What Makes This Cheesy Garlic Chicken So Addictive?
There are some recipes that are just “good,” and then there are the ones you think about hours later—and this Ooey-Gooey Cheesy Garlic Chicken definitely falls into the second category. It’s one of those meals where everything just works: creamy filling, melty cheese, crispy tortilla, and that bold garlic flavor that pulls it all together.
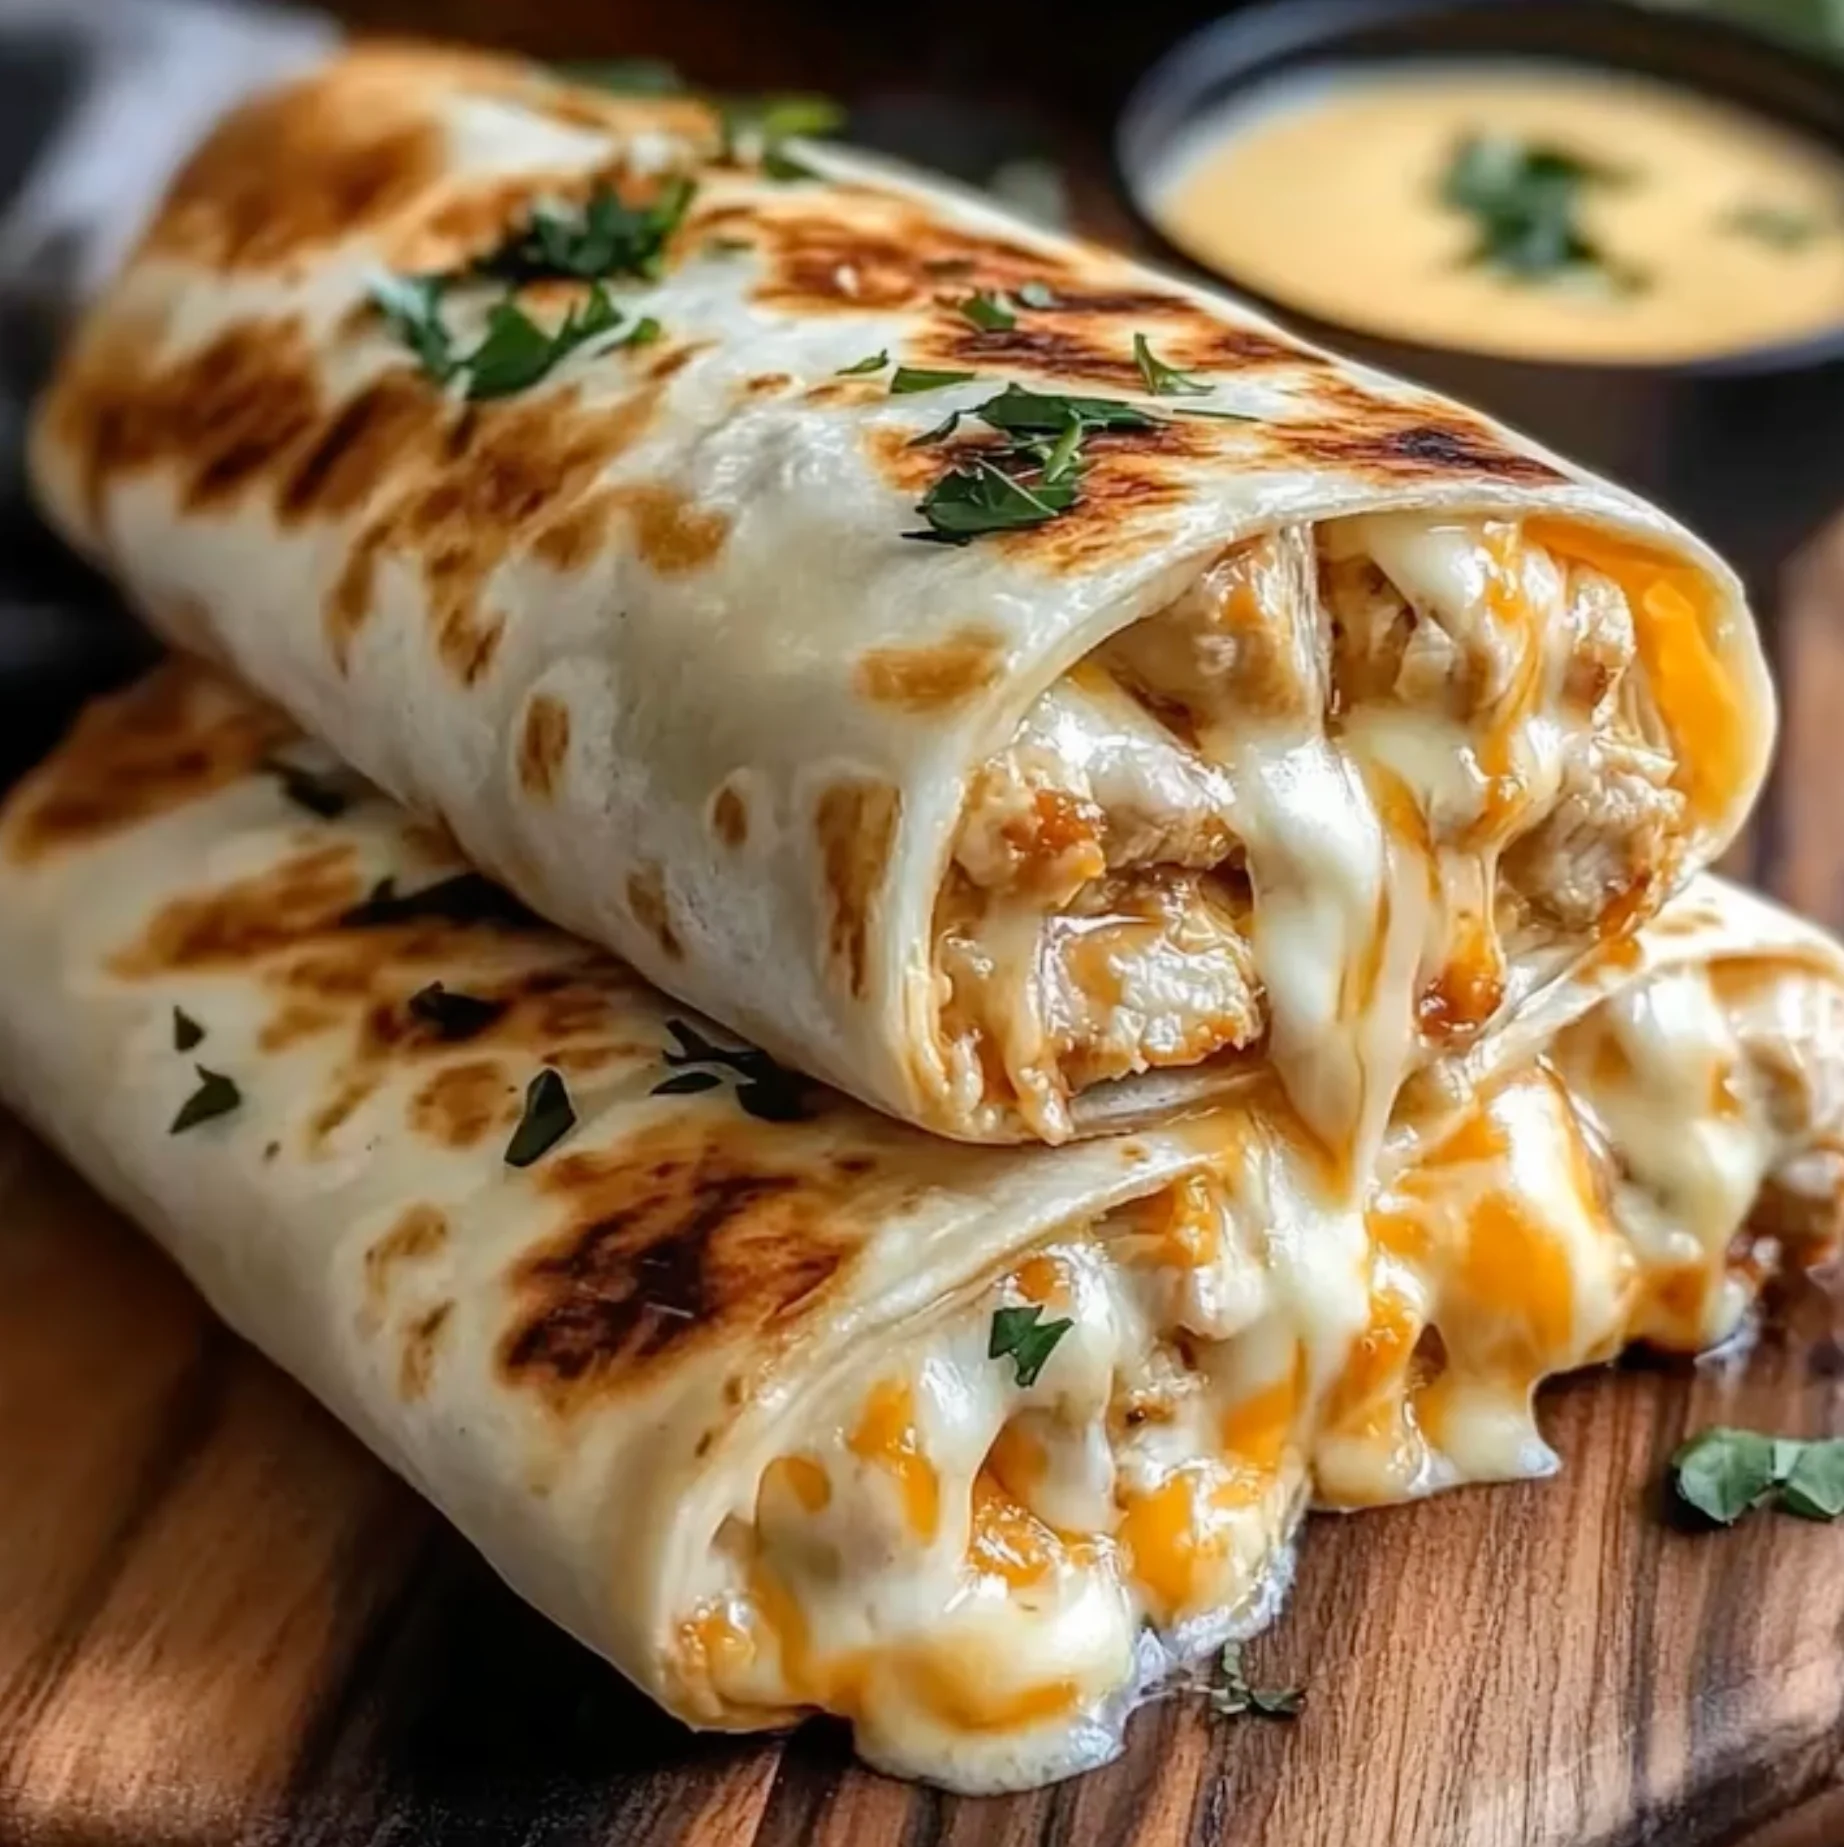
What really makes this dish stand out is the contrast in textures. On the outside, you’ve got a golden, slightly crispy tortilla brushed with butter and topped with Parmesan. It gives you that satisfying crunch when you bite in. But inside? It’s soft, creamy, and packed with cheesy, garlicky goodness. That contrast is what keeps every bite interesting.
The flavor profile is just as strong. Garlic is the star here—not overpowering, but definitely present. It blends with the richness of cream cheese, the stretchiness of mozzarella, and the slight tang from sour cream to create something that feels indulgent but balanced.
And here’s the best part—it looks and tastes like something you’d order at a restaurant, but it’s actually pretty simple to make at home. No complicated techniques, no fancy tools—just good ingredients and a few easy steps.
This is the kind of dinner you make when you want something comforting but still exciting. Something quick—but not boring.
The Perfect Balance of Creamy and Crispy
A lot of recipes try to balance textures, but this one nails it effortlessly. The inside filling is rich and smooth, almost like a thick dip, while the outside adds structure and crunch.
Think of it like this: the tortilla acts as the shell that holds everything together, while the filling does all the heavy lifting in terms of flavor. When baked, the butter and Parmesan create a slightly crisp layer that makes the whole thing feel more elevated.
Without that crisp exterior, the dish would feel too soft. Without the creamy interior, it would feel too dry. Together? Perfect balance.
Why Garlic and Cheese Are a Power Combo
Garlic and cheese are one of those classic pairings that never fail. Garlic brings depth and aroma, while cheese adds richness and texture.
In this recipe, you’re using both fresh garlic and garlic powder. That’s not a mistake—it’s intentional. Fresh garlic gives you that sharp, real flavor, while garlic powder spreads evenly throughout the mixture, ensuring every bite has that garlicky kick.
Then comes the cheese. Mozzarella melts beautifully, creating that stretchy, gooey texture. Parmesan adds a sharper, slightly salty finish on top.
Ingredients for Ooey-Gooey Cheesy Garlic Chicken
Creating this delightful dish is a breeze thanks to a short list of ingredients. Below, you’ll find everything you need to make this cheesy chicken wrap come to life. To make it simple, the exact measurements are available for printing at the bottom of the article.
- Cooked shredded chicken: This is the star of the dish! You can use rotisserie chicken for a quick option or your homemade chicken for a personal touch.
- Shredded mozzarella cheese: Adds that gooey, stretchy quality that makes every bite oh-so-satisfying. Feel free to mix in other cheeses like cheddar for a twist.
- Cream cheese: This creamy addition melds beautifully with the chicken and helps create a luscious filling.
- Sour cream: Provides a bit of tanginess that balances the richness of the cheeses. Greek yogurt can also be a great substitute.
- Mayonnaise: It adds a smooth texture that enhances the overall creaminess. If you’re not a mayo fan, feel free to leave it out.
- Minced garlic: Freshly minced garlic will give a bold flavor that’s hard to resist. You could use garlic paste if that’s what you have on hand.
- Garlic powder: This enhances the garlic flavor; think of it as a flavor booster!
- Italian seasoning: This blend of herbs enhances the flavor profile. You can make your own mix by combining basil, oregano, and thyme.
- Salt and pepper: Essential for tying all the flavors together—don’t skip these!
- Flour tortillas: These wrap everything up into a delicious package. You can opt for whole wheat or corn tortillas based on your preference.
- Butter: Brushing the tortillas with melted butter gives them a beautiful golden crust and enhances flavor.
- Grated Parmesan cheese: Sprinkled on top for an extra crunch and a hint of salty goodness.
- Fresh parsley: Not just for garnish! It adds a pop of color and freshness to the dish.
How to Make Ooey-Gooey Cheesy Garlic Chicken
Step 1: Preheat and Prepare
Begin by preheating your oven to 375°F (190°C). While that’s warming up, line a baking sheet with parchment paper. This little trick keeps your wraps from sticking and ensures they bake evenly. Trust me, this first step sets you up for success and makes cleanup a breeze later on!
Step 2: Mix the Filling
In a spacious mixing bowl, combine the cooked shredded chicken, mozzarella cheese, cream cheese, sour cream, and mayonnaise. Add the minced garlic, garlic powder, Italian seasoning, salt, and pepper. Get in there and mix until everything is smooth and creamy! This filling is the heart of the dish, so feel free to adjust the spices to your liking. It should feel like a warm hug in a bowl!
Step 3: Assemble the Tortillas
Now it’s time to bring it all together! Lay the large flour tortillas flat on your kitchen counter. Spoon a generous amount of that cheesy filling right in the center of each tortilla. Don’t overstuff—just enough to roll them tightly! Tuck in the edges to seal your little parcels of goodness. Place them seam-side down on the baking sheet to keep everything snug during baking.
Step 4: Brush and Sprinkle
Time for some extra love! Take your melted butter and brush it generously over the tops of the wrapped tortillas. This will give them that beautiful golden-brown color. Now, sprinkle the grated Parmesan cheese over the wraps for that delightful crunchy finish. Your kitchen will love the aroma that’s about to fill the air!
Step 5: Bake Until Perfect
Pop those wraps into the preheated oven and let them bake for about 15 to 20 minutes. You’re looking for a crispy, golden exterior and, most importantly, melted, gooey cheese on the inside. Resist the urge to peek too often! Just wait until the kitchen fills with tantalizing scents.
Step 6: Garnish and Serve
Once baked to perfection, remove the wraps from the oven and let them cool slightly. Garnish with chopped fresh parsley to add a touch of color and freshness. Slice them in half if you like, then serve warm to enjoy the cheesy goodness at its prime. Trust me; you’ll want to dive in right away!
Tips for Success
- Shred your chicken while it’s warm for easier handling.
- Use room temperature cream cheese for smoother mixing.
- If tortillas are stiff, warm them slightly in the microwave to make them more pliable.
- Experiment with different cheeses based on your mood or what you have on hand.
- Don’t skip the resting time after baking; it allows everything to set!
Equipment Needed
- Baking sheet: A sturdy sheet for baking those wraps. You can also use a casserole dish!
- Parchment paper: This helps prevent sticking. If you don’t have any, grease the sheet well with butter.
- Mixing bowl: A large bowl for blending the filling. Any bowl you have will do!
- Spatula: Great for mixing. A wooden or silicone spatula works best.
- Oven mitts: Keep your hands safe when pulling those hot wraps out of the oven!
Variations on Ooey-Gooey Cheesy Garlic Chicken
- Spicy Kick: Add a pinch of red pepper flakes or diced jalapeños to the filling to spice things up!
- Veggie Lover: Incorporate sautéed spinach, mushrooms, or bell peppers for a hearty veggie boost. It adds nutrition and flavor.
- Low-Carb Option: Swap out the flour tortillas for lettuce wraps or low-carb tortillas to make it keto-friendly.
- Herbed Delight: Include fresh herbs like basil or cilantro in the filling for an aromatic twist.
- Buffalo Style: Mix in buffalo sauce with the chicken for a tangy buffalo cheesy chicken wrap. Perfect for game day!
- Cheese Explosion: Experiment with different cheeses like pepper jack, gouda, or feta for unique flavor profiles.
Serving Suggestions for Ooey-Gooey Cheesy Garlic Chicken
- Fresh Salad: Pair with a crisp garden salad tossed in a light vinaigrette for a refreshing contrast.
- Chunky Salsa: Serve with a side of chunky salsa or guacamole for an added kick.
- Cold Beverages: An ice-cold lemonade or a glass of sweet tea complements the richness perfectly.
- Garnish: Serve on a colorful platter, artfully garnished with lime wedges and fresh herbs for a beautiful presentation!
FAQs about Ooey-Gooey Cheesy Garlic Chicken
Got some questions about my Ooey-Gooey Cheesy Garlic Chicken? I’ve got you covered! Here are some common inquiries that might pop up while you’re planning your culinary adventure.
Can I use frozen chicken for this recipe?
Absolutely! Just make sure to cook and shred it beforehand. Rotisserie chicken is a fantastic shortcut, giving you tender meat in no time.
What is the best way to store leftovers?
Store any leftovers in an airtight container in the fridge for up to three days. Reheat in the oven for that crispy texture or in the microwave for a quick meal.
Can I make this dish ahead of time?
Yes! You can prepare the filling and assemble the wraps in advance. Just cover them tightly and store in the refrigerator until you’re ready to bake.
How can I customize the spices in the filling?
Feel free to tweak it! Add your favorite spices, such as cumin or paprika, to create a flavor profile that suits your palate.
Is there a way to make this dish gluten-free?
Definitely! Simply swap out the flour tortillas for gluten-free ones. You can still enjoy the delicious cheesy goodness without worry!
Final Thoughts
My Ooey-Gooey Cheesy Garlic Chicken is more than just a recipe; it’s a little piece of comfort that brings joy to the dinner table. Each bite is like a warm hug, filled with creamy goodness and a touch of nostalgia. Whether you’re feeding a hungry family, impressing friends, or just treating yourself, this dish delivers. It’s easy, flavorful, and satisfying—a true winner in any busy household. So roll up some tortillas, let the aroma fill your kitchen, and enjoy a moment of cheesy bliss that you and your loved ones will cherish. You deserve it!
Print
Ooey-Gooey Cheesy Garlic Chicken
- Prep Time: 15 minutes
- Cook Time: 20 minutes
- Total Time: 35 minutes
- Yield: 4 servings 1x
- Category: Main Course
- Method: Baking
- Cuisine: American
- Diet: Gluten Free
Description
A delicious and indulgent dish featuring shredded chicken combined with creamy cheeses and garlic, wrapped in crispy tortillas.
Ingredients
- 2 cups cooked shredded chicken
- 1 cup shredded mozzarella cheese
- 1/2 cup cream cheese, softened
- 1/4 cup sour cream
- 2 tbsp mayonnaise
- 2 cloves garlic, minced
- 1 tsp garlic powder
- 1/2 tsp Italian seasoning
- Salt & pepper, to taste
- 4 large flour tortillas
- 2 tbsp butter, melted
- 2 tbsp grated Parmesan cheese
- Fresh parsley, chopped (for garnish)
Instructions
- Preheat your oven to 375°F (190°C) and line a baking sheet with parchment paper to prevent sticking and ensure even baking.
- In a large mixing bowl, combine shredded chicken, mozzarella cheese, cream cheese, sour cream, mayonnaise, minced garlic, garlic powder, Italian seasoning, salt, and pepper. Stir until the mixture is creamy and well blended.
- Lay out the flour tortillas on a clean surface. Divide the filling evenly in the center of each tortilla. Roll each tortilla tightly, tucking in edges to prevent spills, and place seam-side down on a baking sheet.
- Brush the wraps with melted butter and sprinkle with grated Parmesan cheese to create a golden-brown, crispy crust.
- Bake for 15–20 minutes in the preheated oven, or until the wraps are crispy and the cheese inside is melted and gooey.
- Garnish the baked wraps with chopped parsley and slice in half if desired. Serve warm for the best taste and texture.
Notes
- For added flavor, consider using different types of cheese.
- This dish can be customized with your favorite spices.
- Ensure to store any leftovers in an airtight container in the refrigerator.
Nutrition
- Serving Size: 1 wrap
- Calories: 350
- Sugar: 2g
- Sodium: 600mg
- Fat: 22g
- Saturated Fat: 10g
- Unsaturated Fat: 7g
- Trans Fat: 0g
- Carbohydrates: 30g
- Fiber: 2g
- Protein: 20g
- Cholesterol: 80mg