There’s something magical about the holiday season. The twinkling lights, the cozy movies, the smell of cinnamon and pine in the air. But let’s be real — the best part of the holidays? The cookies. And not just any cookies — we’re talking fun, festive, head-turning treats that look like you spent hours in the kitchen (but really didn’t).
Enter: Oreo Christmas Ornament Cookies.
These adorable little cookies are the definition of holiday joy. They look just like shiny ornaments you’d hang on your Christmas tree — complete with sprinkles, candy “decor,” and a mini peanut butter cup topper that mimics an ornament hook. The best part? They only take 4 to 5 ingredients, require zero baking, and can be made in under 45 minutes.
Whether you’re putting together a cookie tray for a party, creating DIY gifts for teachers and neighbors, or just looking for a fun activity with the kids, these cookies are your holiday MVP. They’re sweet, simple, and — let’s face it — pretty Instagram-worthy too.
Why This Recipe Is a Holiday Favorite
These ornament cookies aren’t just cute — they check every holiday baking box:
- ✅ Easy to make – No oven, no mixer, no fancy tools needed.
- ✅ Budget-friendly – Minimal ingredients and widely available supplies.
- ✅ Kid-friendly – Perfect for hands-on decorating fun.
- ✅ Customizable – Use different colors, toppings, or even cookie flavors.
- ✅ Delicious – Creamy chocolate, crunchy cookie, peanut butter topping… it’s irresistible.
They look like you picked them up from a boutique bakery, but they come together with less effort than a batch of classic sugar cookies. Plus, they’re the kind of treat that brings smiles instantly — exactly what holiday baking is all about.
And let’s not ignore the practicality here: they store well, travel well, and are easy to batch-make. If you’re prepping for a school party, cookie exchange, or need something quick for the office potluck, Oreo ornament cookies are a lifesaver.
Ingredients Overview
Let’s break down the simple but powerful lineup of ingredients you’ll need:
Oreos (12 cookies)
These are your base — the foundation of your ornament. You can use classic Oreos, Golden Oreos, or even peppermint bark Oreos for extra holiday flair.
White Candy Melts (10–12 oz)
They melt easily, coat beautifully, and harden with a glossy finish. White makes a perfect neutral base for decorations.
Oil-Based Food Coloring (Pink or Red)
Water-based dyes can ruin melted chocolate by seizing it. Stick with candy coloring or oil-based gel food dyes. A little goes a long way.
Mini Peanut Butter Cups (12 unwrapped)
These act as the “cap” of the ornament — the little piece you’d hook onto a tree. Pressed onto the edge of each Oreo, they complete the look and add flavor.
Holiday Sprinkles & Optional Candies
Use red, green, and white nonpareils, mini M&M’s, candy pearls, edible stars, or anything colorful and festive. This is your chance to get creative.
Optional but fun:
- Green M&M’s (for garland-like decoration)
- Yellow star sprinkles (for the top of “tree” styled cookies)
- Edible glitter (for sparkle lovers)
The Essential Tools You’ll Need
Before diving into this festive project, take a quick moment to gather your tools. You don’t need anything fancy, but having the right items ready makes this process go smoother — especially when you’re working with melted chocolate that can start to firm up quickly.
Here’s what you’ll want on hand:
- Microwave-safe bowls – One for melting the white chocolate, and another for tinting the pink/red batch. Use ceramic or glass bowls that can handle repeated microwave heating without getting too hot.
- A fork or dipping tool – To dip the Oreos cleanly into the melted chocolate and lift them out without making a mess. A regular dinner fork works perfectly.
- Parchment paper or silicone baking mat – Essential for letting the dipped cookies set without sticking. Line a baking sheet or tray with this before you start.
- Baking sheet or tray – This will hold your dipped Oreos as they cool and harden.
- Small spoons or tweezers – Great for placing delicate decorations like candy pearls, stars, or tiny sprinkles without getting sticky fingers.
- Cooling rack (optional) – You can use this if you need to set multiple batches at once or are working on a small counter.
Optional but helpful:
- Squeeze bottles or piping bags if you want to drizzle extra melted chocolate on top or do precision decoration.
- An apron – Because melted chocolate and kids usually equal mess.
With everything set up in advance, you won’t have to scramble once your chocolate is ready. This is especially important if you’re working with little helpers who need guidance — or if you just want your decorating station to feel calm, not chaotic.
Choosing the Right Oreos for This Recipe
You’d be surprised how much the type of Oreo you choose can affect not just the taste, but the overall presentation of your ornament cookies. Let’s break it down.
Classic Chocolate Oreos
The go-to. The dark cookie contrasts beautifully with the white and pink chocolate coating. It’s rich, chocolatey, and what most people expect when they bite into an Oreo.
Golden Oreos
Want a lighter look or flavor? Golden Oreos are vanilla-flavored and blend subtly with the white chocolate. These are great if you’re using brighter decorations or aiming for a more neutral “ornament.”
Holiday Oreos
Around Christmas, you can usually find Peppermint Bark Oreos or Red Creme Oreos. These add a fun seasonal twist — the red creme pops out a little if your chocolate coating is thin, which can actually look quite festive.
Double Stuf vs. Regular
We recommend sticking with regular Oreos for this recipe. Double Stuf can be too thick and cause problems when dipping — especially if the creme starts separating. Regular-sized cookies give a more even, neat finish.
Flavored Variants
Feel free to experiment — just be mindful of colors and flavors. For instance, caramel or peanut butter Oreos would pair well with the mini peanut butter cup “hook,” while mint-flavored Oreos might pair nicely with crushed candy canes on top.
If you’re baking with kids or gifting, classic Oreos are usually the safest and most universally loved.
How to Melt Candy Melts Perfectly
One of the most important parts of this recipe is getting your candy melts to the perfect consistency. You want it smooth and creamy — not thick, clumpy, or overheated. Candy melts are designed for coating and decorating, and they’re easier to use than regular chocolate if you follow a few simple tips.
Microwave Method (Recommended)
- Start with a clean, dry bowl. Even a small amount of water can ruin melted chocolate.
- Add your white candy melts to the bowl.
- Microwave in 30-second intervals at 50% power.
- Stir thoroughly between each round. Even if the melts don’t look melted yet, the heat distributes and softens them quickly.
- Once the candy melts are about 80–90% melted, remove the bowl and stir until smooth.
🔥 Pro Tip: If your melted chocolate seems too thick, stir in 1–2 teaspoons of coconut oil or vegetable shortening. This thins it out and gives a better dipping consistency.
Double Boiler Method (Alternative)
If you prefer stovetop melting:
- Fill a pot with a couple of inches of water and bring to a simmer.
- Set a heat-safe bowl over the pot (make sure it doesn’t touch the water).
- Stir constantly until the candy melts are smooth.
Both methods work well, but the microwave is faster and easier, especially if you’re making multiple colors.
How to Color White Chocolate the Right Way
Now it’s time to make your cookies pop with color — and for that, you’ll need to tint a portion of your white melted chocolate into a festive pink or red.
Why Oil-Based Coloring Only?
This is important: do not use regular food coloring (like the kind you use for icing or cake batter). Most of those are water-based, and adding water to melted chocolate will cause it to seize. That means it turns gritty, clumpy, and unusable.
Instead, use oil-based food coloring made specifically for chocolate or candy. These mix in easily and give you vibrant results without messing up the texture.
How to Tint the Chocolate
- Once your white candy melts are fully melted, pour about one-third into a separate bowl.
- Add a few drops of your oil-based pink or red coloring.
- Stir thoroughly. Add more drops until you reach your desired shade.
🎨 Want pastel pink? Use just a tiny bit.
❤️ Want bold red? Add several drops or use a super-pigmented gel dye.
Try not to go overboard, though. Too much color can thicken the chocolate and make it harder to work with.
Step-by-Step Recipe Instructions
This is where the magic happens. Follow these steps closely and you’ll have the most adorable ornament cookies on the block.
Step 1: Melt and Divide the Chocolate
As described above, melt your white candy melts until smooth. Pour ⅓ into a second bowl and tint with your chosen food coloring (pink or red).
Keep both bowls warm — chocolate that cools too much will harden and make dipping difficult. You can reheat in 15-second bursts if needed.
Step 2: Dip the Oreos
Using a fork or dipping tool, lower each Oreo into the melted chocolate (either white or pink). Submerge fully, then lift and let the excess drip off.
Tap the fork gently on the side of the bowl to smooth out the coating.
Place the dipped cookie on a parchment-lined baking sheet. Work quickly so the chocolate doesn’t set before you decorate!
Step 3: Decorate with Sprinkles and M&Ms
While the coating is still soft:
- Sprinkle on red, green, and white nonpareils to mimic a snowy, festive design.
- Press in green M&M’s in a straight line or pattern — this gives a “garland” or “ornament bulb” effect.
- Add candy pearls or edible star decorations for variety.
- Get creative! You can mix sprinkles, create patterns, or go full rainbow.
Tip: Set out all your toppings before you start dipping to streamline this step.
Step 4: Add the Mini Peanut Butter Cup Ornament Tops
The final touch — and it’s what makes these cookies look like ornaments.
Take an unwrapped mini peanut butter cup and press it onto the top edge of the Oreo (like a hook on a real ornament). The flat side goes against the Oreo; the ridged side faces out.
If the chocolate coating is already setting, dab a bit of melted chocolate on the bottom of the peanut butter cup to help it stick.
Step 5: Let the Cookies Set
Let the cookies sit at room temperature for about 30–45 minutes, or place them in the refrigerator for 15–20 minutes to speed things up.
Once they’re completely firm, they’re ready to be packaged, plated, or devoured.
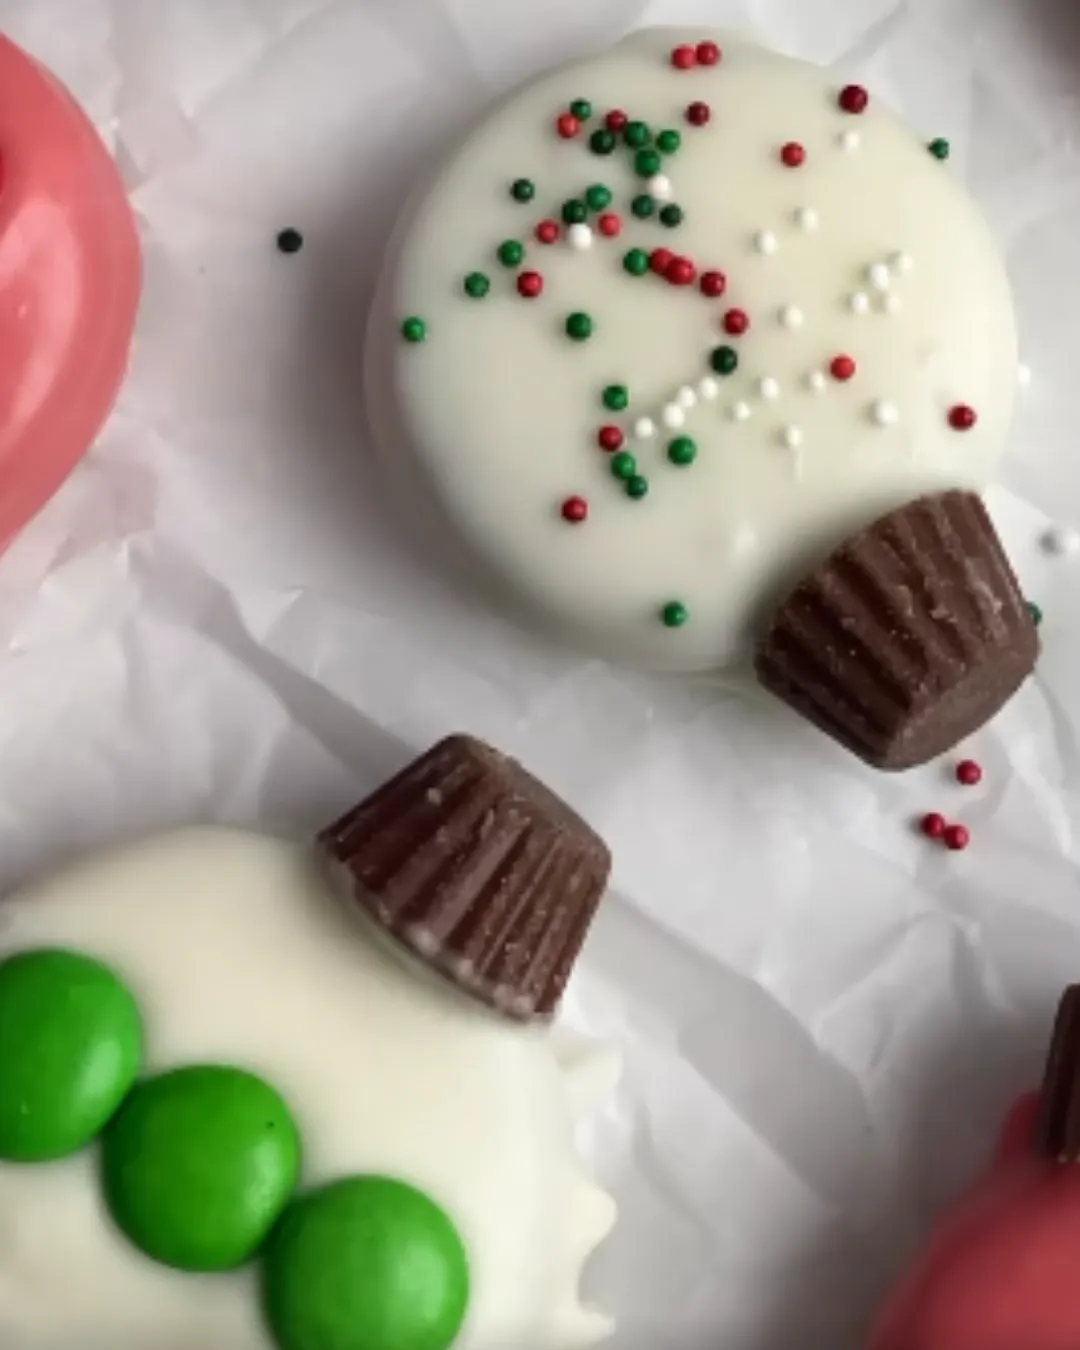
Recreating the Designs in the Photo (Detailed Decoration Tips)
If you’ve seen the photo (the one with the dreamy parchment-lined tray of Oreo ornament cookies), then you already know how gorgeous these little treats can look with just a few simple touches. Let’s break down how to recreate the exact cookie styles from the image so yours can look bakery-quality too.
1. The “Sprinkle Explosion” Ornament
This one is dipped in white chocolate, then covered with a generous dusting of red, green, and white nonpareils. It’s a classic holiday look — like snow falling on an ornament. The texture is fun and the colors pop beautifully. Just be sure to sprinkle while the chocolate is still wet so they adhere perfectly.
Tip: Pour the sprinkles from a spoon for better control, or use your fingers to sprinkle gently from a few inches above for a natural, scattered look.
2. The “Green M&M Garland” Ornament
This version mimics a string of ornament bulbs or garland across the cookie. Dip the Oreo in white chocolate, then carefully press three green M&M’s across the center. Make sure they are evenly spaced for that clean, intentional design.
Variation: You can use mini M&M’s for a more delicate look or mix colors to create a rainbow bulb effect.
3. The “Pink Star Ornament”
This is one of the most eye-catching designs. Dip the cookie in pink-tinted chocolate, then top with a small yellow star candy near the top center. Add a few sprinkles for sparkle.
This one feels whimsical and candy-cute, perfect for gifting or for kids’ parties. Use edible glitter if you want to add a bit of shimmer.
4. The “Simple Red Sprinkle Ornament”
This design uses the pink/red chocolate dip with just a light scattering of nonpareils — minimalist but elegant. It gives that subtle snowy effect without going overboard.
Design Tips Summary:
- Match your sprinkle placement to your theme — more random for a snowy look, more structured for modern designs.
- Use a small spoon or tweezers to place decorations neatly.
- Work fast: once the coating sets, nothing sticks.
Mix and match these designs for a stunning cookie tray that looks like you spent hours decorating — even though it only took minutes.
Making It a Fun Family Activity
Want to turn this recipe into a memory-making moment? This project is perfect for families. It’s messier (in a good way), super interactive, and great for all ages.
Here’s how to make it a holiday activity the whole crew will enjoy:
1. Set Up a Decorating Station
Turn your kitchen counter or table into a mini decorating “workshop.” Lay out:
- Bowls of melted chocolate (white and pink/red)
- Toppings like sprinkles, M&M’s, edible glitter, candy stars
- A plate or tray for each person to decorate on
- Paper towels or wipes (for cleanup!)
Pro Tip: Cover your workspace with parchment paper or a plastic tablecloth to protect from spills and make cleanup easy.
2. Assign Roles for Little Helpers
Even small kids can help with:
- Dipping Oreos (with assistance)
- Sprinkling toppings
- Pressing on M&M’s or candy
- Placing the peanut butter cups
Older kids can take charge of entire cookies or even mix their own chocolate tints.
3. Turn It Into a Cookie Decorating Contest
Everyone loves a little friendly competition. Let each person decorate a few cookies, then vote for:
- Most creative
- Most festive
- Best use of candy
- Most likely to end up on Pinterest
Offer small prizes like candy canes, hot cocoa packets, or cookie-themed stickers.
4. Make It a Tradition
Do this every December. Take photos of each person’s creations. Over time, you’ll have a whole album of ornament cookie masterpieces!
This isn’t just a recipe — it’s an experience. And those moments, filled with laughter and sugar, are what holidays are all about.
How to Store the Cookies and Keep Them Fresh
Now that your cookies are dipped, decorated, and looking too cute to eat (but let’s be honest, you’ll eat them anyway), you’ll want to know how to store them properly.
Room Temperature Storage
The best way to store these cookies is in an airtight container at room temperature, away from direct sunlight or heat. A cookie tin or a plastic food container with a tight lid works great.
Shelf life:
They’ll stay fresh and crisp for up to 7 days.
Tip: If you’re stacking the cookies in a container, place a sheet of parchment or wax paper between layers to prevent the decorations from smudging or the chocolate from sticking.
Refrigerator Storage (Optional)
If your kitchen is especially warm or humid, you can refrigerate them. However, keep in mind that:
- Chocolate can “bloom” in the fridge, leaving white streaks or spots (still safe to eat, just not as pretty).
- Let cookies sit at room temp for 15 minutes before serving to restore texture and flavor.
Freezing? Not Recommended
You can freeze them if absolutely necessary, but it’s not ideal:
- The chocolate coating may crack.
- The peanut butter cup tops may fall off.
- Condensation when thawing can ruin the finish.
If you must freeze them, wrap each cookie in plastic wrap, then store in a freezer-safe container. Thaw in the fridge overnight and let sit at room temperature before unwrapping.
Print
Oreo Christmas Ornament Cookies
- Prep Time: 15 minutes
- Total Time: 35 minutes
- Category: No-Bake Holiday Dessert / Christmas Cookies
Description
🎄 Turn simple Oreos into the cutest holiday ornaments ever! ✨ These festive no-bake cookies are dipped in creamy chocolate, decorated with colorful sprinkles, and topped with a mini peanut butter cup for a magical Christmas look. Perfect for kids, gifting, and holiday trays! 🎅🍪
Ingredients
12 Oreo cookies
10–12 oz white candy melts, divided
Pink or red oil-based food coloring (for tinting chocolate)
12 mini peanut butter cups, unwrapped
Holiday sprinkles (red, green, white nonpareils)
Optional: M&M’s, candy pearls, or star sprinkles
Instructions
Melt the white candy melts in a microwave-safe bowl in 30-second intervals, stirring until smooth. 🥣✨ ⏱️ 3 minutes
Transfer about ⅓ of the melted chocolate to a separate bowl and tint with pink or red food coloring. 🎨 ⏱️ 2 minutes
Using a fork, dip each Oreo fully into the melted chocolate (white or pink), tap gently to remove excess, and place on a parchment-lined baking sheet. 🍪🍫 ⏱️ 5 minutes
While the chocolate is still wet, decorate with holiday sprinkles and press in M&M’s or candy pearls if desired. 🎄✨ ⏱️ 3 minutes
Press one mini peanut butter cup into the top edge of each Oreo to create the ornament “hanger.” 🧁 ⏱️ 2 minutes
Let cookies set at room temperature or refrigerate until fully hardened. ❄️ ⏱️ 15–20 minutes
Notes
Perfect for Christmas parties, cookie exchanges, and festive gift boxes 🎄🎁
Kid-friendly and fun to decorate — great for family baking time 👩🍳👨🍳
No oven required, making it quick and stress-free during the holidays ❄️
Can be customized with different chocolate colors and toppings for variety ✨
Stores well in an airtight container, making it ideal for make-ahead treats 🍪
Nutrition
- Serving Size: 12 cookies
- Calories: ~160 kcal per cookie
Gifting Ideas – Turn These Into Adorable Presents
Want to spread some holiday cheer? These cookies are made to be shared. Their cute ornament shape and festive colors make them a perfect edible gift, whether you’re giving to:
- Teachers
- Neighbors
- Friends
- Co-workers
- Mail carriers or delivery drivers
- Classmates
Here’s how to package them up for maximum joy:
1. Use Clear Treat Bags
Place 2–3 cookies in a clear cellophane bag, then tie with ribbon or twine. Add a cute holiday tag that says:
“Sweet Holidays from Our Family to Yours”
“Thanks for Being So Sweet!”
“Baked with Love (and Sprinkles)”
2. Fill a Holiday Tin or Box
Use festive tins, bakery boxes, or recycled Christmas gift boxes. Line with parchment, stack the cookies (separated by wax paper), and seal with a sticker.
3. Gift with Cocoa or Coffee
Pair the cookies with a packet of hot chocolate, a coffee gift card, or a small mug. It’s a ready-to-go holiday comfort kit.
4. Include Kids’ Names or Notes
If your children helped make the cookies, let them write or draw on the gift tags. People love homemade treats, but they really love treats made by tiny hands.
You may also like :
🎄Oreo Balls for Christmas: The Ultimate No-Bake Holiday Treat You’ll Love🎅
🎄 Christmas Candy Cane Oreo Fluff Recipe: A Festive No-Bake Treat That Steals the Show
Recipe Variations to Try
While the original version of these Oreo Christmas Ornament Cookies is already perfect in its simplicity, one of the best parts about this recipe is how easy it is to customize. With just a few swaps or additions, you can make entirely new variations that fit different flavor profiles, dietary needs, or party themes.
Let’s explore some fun and creative ways to level up this already fantastic treat.
1. Peppermint Bark Oreo Ornaments
Looking for a more minty, winter wonderland twist? Try using Peppermint Bark Oreos (or regular Oreos with peppermint extract in the chocolate coating). Here’s how:
- Add a drop or two of peppermint extract to your melted white chocolate (optional).
- Top the dipped cookies with crushed candy canes instead of sprinkles.
- Stick to white chocolate only, or tint a batch in icy blue for a “frozen” look.
These have a cool, refreshing taste and look amazing on a snowy-themed dessert table.
2. Chocolate Lovers’ Dream Ornaments
For the chocolate-obsessed, swap out white candy melts for:
- Milk chocolate melts
- Dark chocolate melts
- Or even a layered look by double-dipping — once in white, let it set, then halfway in dark chocolate.
Top with mini chocolate chips, shaved chocolate, or cocoa powder-dusted decorations. Rich, indulgent, and a total crowd-pleaser.
3. Nut-Free Ornament Cookies
Need to skip the peanut butter cups for allergy-friendly gifting?
- Use mini marshmallows, gumdrops, or round chocolate buttons for the ornament top instead.
- Or mold your own mini “caps” using fondant or modeling chocolate.
This keeps the aesthetic of the ornament while ensuring it’s safe for nut-free environments like schools.
4. Vegan or Dairy-Free Options
It’s surprisingly easy to make this treat suitable for vegan or dairy-free diets:
- Use dairy-free white chocolate or vegan candy melts (look for brands like Enjoy Life or Sweet William).
- Swap the Oreos for certified vegan sandwich cookies (some Oreo varieties are already dairy-free, but check the label).
- Use a dairy-free alternative for the ornament topper — like a vegan marshmallow or a dairy-free chocolate disk.
Decorate as usual with vegan sprinkles and candies. Everyone should get a chance to enjoy these cookies, no matter their dietary needs!
Common Mistakes & How to Avoid Them
Even though this recipe is beginner-friendly, a few things can still go sideways. Let’s troubleshoot some of the most common issues so your cookies turn out picture-perfect every time.
1. The Chocolate Won’t Melt Smoothly
Problem: The candy melts look chunky, dry, or lumpy instead of smooth and glossy.
Why it happens: Overheating, water contamination, or using the wrong type of chocolate.
Fixes:
- Melt in short bursts (30 seconds) and stir often.
- If it’s too thick, stir in 1 teaspoon of shortening or coconut oil.
- Always use dry bowls and utensils — water will make the chocolate seize.
- Use candy melts or wafers, not just chocolate chips.
2. Decorations Not Sticking
Problem: Sprinkles and M&Ms slide off or don’t stay in place.
Why it happens: The coating has already set before you add the toppings.
Fixes:
- Decorate immediately after dipping, while the coating is still wet.
- Work one cookie at a time instead of batching all the dipping first.
- For heavier candies like M&Ms, press them gently to embed them in the coating.
3. Peanut Butter Cups Keep Falling Off
Problem: The mini peanut butter cup topper doesn’t stay on the Oreo.
Why it happens: The chocolate has hardened, or the cup is too cold to bond.
Fixes:
- Press the peanut butter cup on right after dipping.
- If needed, use a dab of melted chocolate as glue.
- Let the cookies set flat, not upright, while they dry to prevent shifting.
4. Chocolate Cracks After Setting
Problem: The chocolate coating breaks or cracks.
Why it happens: Dipping cold cookies or moving them before they’ve fully set.
Fixes:
- Let your cookies come to room temp before dipping.
- Don’t handle or stack them until the coating is completely hardened.
Creative Ways to Serve Oreo Ornament Cookies
Once your cookies are done, you’ll want to show them off — and trust me, they’re a showstopper.
Here are a few ideas for how to present, serve, or share these adorable little ornaments:
1. Holiday Cookie Trays
Mix them in with other holiday cookies (like sugar cookies, gingerbread men, and chocolate crinkle cookies) for a festive, varied display. These stand out beautifully and add color and texture.
2. Dessert Charcuterie Board
Yes, dessert boards are a thing! Create a sweet platter with:
- Oreo ornament cookies
- Peppermint bark
- Mini cupcakes
- Chocolate-dipped pretzels
- Holiday candies
- Fresh berries or dried fruit
Add a few rosemary sprigs or edible flowers to decorate. It’s a feast for the eyes and taste buds.
3. Classroom Treats or School Parties
Wrap them individually or in pairs in treat bags. They’re safer to distribute this way and make cleanup easier. Just remember to skip peanut butter cups if allergies are a concern.
4. Christmas Eve or Morning Table Decor
Set a cookie at each place setting as a sweet surprise for breakfast or brunch. You could even add a name tag and turn it into an edible place card.
Final Thoughts – A Cookie That Brings Joy
In the world of holiday baking, it’s easy to get overwhelmed. You see intricate cookie houses, royal icing masterpieces, and 20-step baking challenges — and suddenly baking feels like work.
But these Oreo Christmas Ornament Cookies? They’re a reminder that holiday treats can be fun, easy, and just as magical. With only a few ingredients and a whole lot of color, you create something that brings smiles, joy, and maybe even a few “how did you make these?!” reactions.
So whether you’re prepping for a party, looking for a new family tradition, or just want to impress without the stress — give these a try. You’ll end up with a tray full of holiday cheer, and maybe a few new memories too.
Similar recipes:
No-Bake Peppermint Bark Snowballs: A Chilly Holiday Delight
🎄 Little Debbie Christmas Cake Balls: The Ultimate No-Bake Holiday Treat
FAQs
Q1: Can I make these Oreo ornament cookies ahead of time?
Absolutely! These cookies stay fresh for up to 7 days in an airtight container. You can make them several days in advance for parties or gifting.
Q2: Can I use regular chocolate chips instead of candy melts?
You can, but candy melts are easier to work with for dipping. If using chocolate chips, add 1 tsp coconut oil while melting to thin it out.
Q3: Are Oreos vegan?
Many Oreo varieties are technically dairy-free, but they are processed in facilities with milk. Always check the label and use certified vegan options if needed.
Q4: Can I freeze these cookies?
Freezing is not recommended because the chocolate coating may crack or discolor. For best results, store at room temp or refrigerate for short periods.
Q5: What can I use instead of peanut butter cups for the ornament top?
Try mini marshmallows, gumdrops, Rolos, or chocolate buttons. Anything small, round, and cute will work!