Introduction to Oreo Roll Chocolate Creamy
I understand how important it is to find a dessert that brings joy without stealing your whole afternoon. This is where the Oreo Roll Chocolate Creamy comes in! It’s indulgent enough to satisfy that sweet tooth and quick enough to whip up, even on a hectic day. Imagine a luscious chocolate roll, swirled with a creamy filling and speckled with Oreo crumbs. Trust me, this delightful treat will have your family begging for seconds, and it’s so easy to make that you’ll wonder why you didn’t try it sooner.
Why You’ll Love This Oreo Roll Chocolate Creamy
This decadent dessert is not just about taste; it’s about convenience and joy. In just over an hour, you can create something spectacular that feels like it belongs in a bakery. The combination of a rich, chocolatey cake with a creamy Oreo filling will have you dreaming of sweet bliss. Plus, it’s perfect for sharing! Whether it’s a family gathering or a cozy night in, this Oreo Roll Chocolate Creamy is sure to impress.
Ingredients for Oreo Roll Chocolate Creamy
Creating your Oreo Roll Chocolate Creamy starts with gathering some delightful ingredients. Here’s what you’ll need:
- Chocolate cake mix: A box of chocolate cake mix sets a perfect base. Feel free to use your favorite homemade mix for that extra touch!
- Eggs: These bind the ingredients, giving structure to your roll. Three large eggs do the trick.
- Vegetable oil: This adds moisture, ensuring a tender cake. Substitute with melted coconut oil for a flavor twist.
- Water: Along with the oil, water contributes to the perfect batter consistency.
- Vanilla extract: A splash of vanilla brings depth and aroma. This is one ingredient I never skip!
- Powdered sugar: We’ll use this to dust and sweeten the filling. It’s also perfect for a light finish on the roll.
- Cream cheese: Softened cream cheese forms the rich filling that makes this dessert irresistible. Don’t skip this for a creamy texture!
- Unsalted butter: Adds a buttery flavor and richness to the filling, but don’t worry; you can use a dairy-free substitute if needed.
- Extra Oreos: Crushed Oreos add a fabulous crunch. They’re the star that takes this dessert to another level!
- White chocolate: Melted white chocolate makes a lovely drizzle over the top. Dark chocolate would also work for a different flavor!
- Whole Oreos: For decoration, these cookies not only add visual appeal but are fun to eat!
This list covers all the major elements you’ll need for your dessert. For exact measurements, scroll down to the bottom where you can find everything needed for printing!
How to Make Oreo Roll Chocolate Creamy
Step 1: Prepare Your Oven and Pan
First, let’s get that oven hot! Preheat your oven to 350°F (175°C). While it warms up, grab a 10×15-inch jelly roll pan and line it with parchment paper. This step is crucial because it keeps the cake from sticking. You want it to glide out easily later. Plus, remember to spray a little non-stick spray on the pan or the parchment. This ensures that your Oreo Roll Chocolate Creamy will come out perfectly smooth and delicious.
Step 2: Mix the Cake Ingredients
Next, it’s time to combine your ingredients. In a large mixing bowl, blend the chocolate cake mix, eggs, vegetable oil, water, and vanilla extract. Follow the instructions on the cake mix box, but don’t over-mix! Just stir until everything is well combined. The batter should be smooth, like a rich chocolate river. Remember, the less you mix, the lighter and fluffier your dessert will be. Now, it’s almost time for some baking magic!
Step 3: Bake the Cake
Pour that beautiful batter into your prepared pan. Spread it out evenly, giving it a little shake to settle. Pop it into the oven and bake for 12-15 minutes. Keep an eye on it! When a toothpick inserted into the center comes out clean, it’s ready to roll. The smell of chocolate wafting through your kitchen will be downright irresistible. Once done, take it out and let it cool for a bit before flipping—trust me, you’ll want to keep that fluffiness intact.
Step 4: Roll the Cake
Now comes the thrilling part. While the cake is still warm, sprinkle powdered sugar evenly over a clean kitchen towel. This prevents sticking and adds a hint of sweetness. Carefully flip the cake out onto the towel and peel off the parchment paper. Time to roll! Start from one end of the towel and gently roll the cake up, keeping it tight but not too tight—like a cozy chocolate burrito. Let it cool completely while rolled up; this helps maintain its shape.
Step 5: Prepare the Creamy Filling
While your cake is cooling, let’s whip up that irresistible filling. In a medium bowl, beat together the softened cream cheese and butter until creamy. You’ll want it to look like a fluffy cloud! Gradually add in the powdered sugar and the extra splash of vanilla extract. Then, fold in those crushed Oreos gently; we want that scrumptious crunch. Taste a little—just for quality control! This filling is the heart of your Oreo Roll Chocolate Creamy, so make it luscious.
Step 6: Fill and Roll the Cake
Now, let’s bring it all together. Carefully unroll your cooled cake from the towel. Spread the creamy filling all over, getting right to the edges. It’s okay to get a little messy; it adds to the charm! Then, start rolling it back up, keeping that delectable filling tucked snugly inside. Wrap it in plastic wrap, making sure to secure it tightly. This will help the flavors meld together while it chills in the fridge.
Step 7: Chill and Decorate
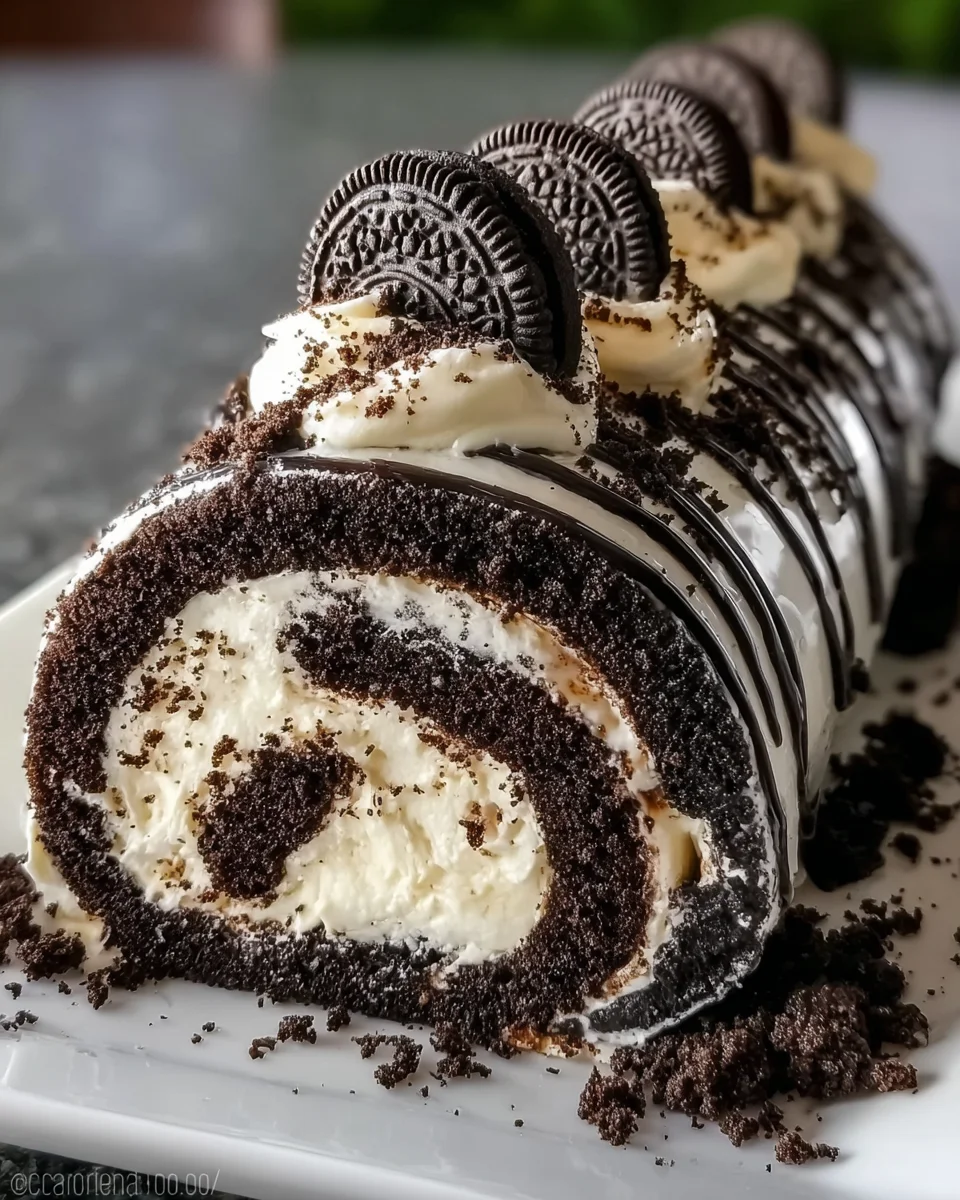
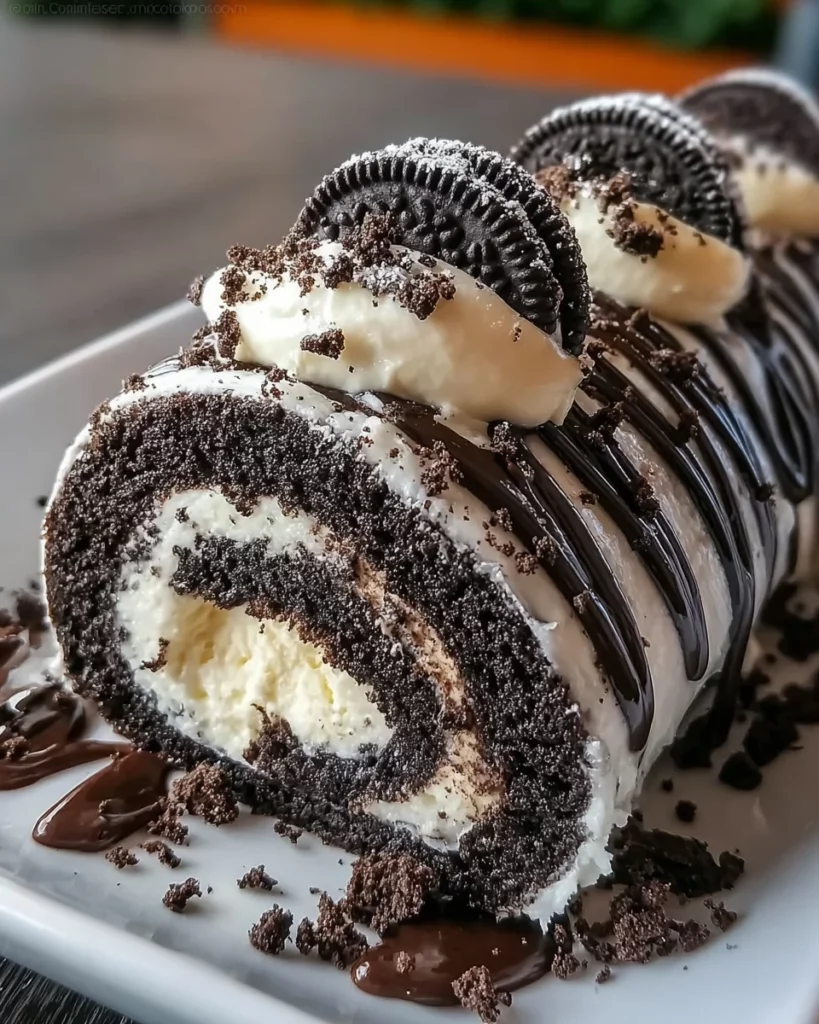
Let your rolled masterpiece chill in the fridge for at least an hour. This helps it firm up, making it easier to slice. Once chilled, it’s time for the fun—decorating! Drizzle that luscious melted white chocolate over the top. Place whole Oreos as decoration and sprinkle some crushed ones around for a fabulous finish. Each slice will be a beautiful work of art, perfect for impressing your family or guests!
Tips for Success
- Let the cake cool completely before spreading the filling; this prevents melting.
- Use a ruler to trim the cake edges for a neat appearance before rolling.
- Chilling the roll helps it hold its shape, making it easier to slice.
- Experiment with different flavored cream cheeses for unique twists.
- Store leftovers covered in the fridge to keep them fresh for longer.
Equipment Needed
- 10×15-inch jelly roll pan: A must-have for baking; a cookie sheet with sides can work in a pinch.
- Parchment paper: This helps prevent sticking; silicone baking mats are a great alternative.
- Mixing bowls: Get a set of various sizes; even a large measuring cup can do the trick.
- Electric mixer: While a whisk works, an electric mixer saves you time and effort!
- Kitchen towel: You’ll need this for rolling; a clean dishcloth can do the job as well.
Variations of Oreo Roll Chocolate Creamy
- Red Velvet Cake Mix: Swap out the chocolate cake mix for red velvet for a festive twist!
- Peanut Butter Filling: Mix in some creamy peanut butter with your cream cheese for a nutty flavor.
- Mint Oreos: Use mint-flavored Oreos for a refreshing, cool take on this dessert.
- Gluten-Free Option: Substitute the cake mix with a gluten-free alternative to accommodate dietary needs.
- Vegan Version: Use plant-based cream cheese and butter, along with a vegan cake mix for a delicious dairy-free treat.
Serving Suggestions for Oreo Roll Chocolate Creamy
- Pair with Coffee: A cup of rich coffee balances the sweetness beautifully.
- Fresh Berries: Serve with a side of strawberries or raspberries for a pop of freshness.
- Ice Cream: Vanilla or mint chocolate chip ice cream makes an indulgent side.
- Presentation: Slice and arrange on a platter, drizzling extra white chocolate for a show-stopping look.
- Whipped Cream: Add a dollop of whipped cream on top for extra creaminess.
FAQs about Oreo Roll Chocolate Creamy
Can I make the Oreo Roll Chocolate Creamy ahead of time? Absolutely! This dessert can be made a day in advance. Just keep it wrapped in plastic wrap in the fridge to maintain its freshness.
Can I use different cookies for the filling? Yes! While Oreos are the star here, feel free to experiment with other cookies like chocolate wafers or even graham crackers for a unique twist.
Is this dessert suitable for a gluten-free diet? Definitely! Simply use a gluten-free chocolate cake mix, and you’re all set to enjoy this tasty treat.
How should I store leftovers of Oreo Roll Chocolate Creamy? Wrap any leftover slices in plastic or store them in an airtight container in the fridge. They should stay fresh for up to three days.
Can I freeze the Oreo Roll Chocolate Creamy? Yes, you can freeze it! Wrap it tightly in plastic wrap, then in aluminum foil. Just remember to thaw in the fridge before serving.
Final Thoughts on Oreo Roll Chocolate Creamy
The experience of making the Oreo Roll Chocolate Creamy is pure joy. It brings together family, food, and fun in one indulgent dessert. Each slice reveals a swirl of creaminess and chocolate perfection that delights both kids and adults. Plus, it’s easy to whip up, making it a wonderful choice for busy days or special occasions. When I see my loved ones enjoying this treat, it warms my heart. I hope you create some delicious memories with this recipe—it’s more than just dessert; it’s a sweet moment you can share together!
Print
Oreo Roll Chocolate Creamy
- Prep Time: 20 minutes
- Cook Time: 15 minutes
- Total Time: 1 hour 35 minutes
- Yield: Serves 8–10 1x
- Category: Dessert
- Method: Baking
- Cuisine: American
- Diet: Vegetarian
Description
A decadent dessert roll filled with a rich cream cheese filling and Oreo cookie crumbs, topped with melted white chocolate and extra Oreos.
Ingredients
- 1 box chocolate cake mix (or your favorite homemade mix)
- 3 large eggs
- 1/2 cup vegetable oil
- 1 cup water
- 1 tsp vanilla extract
- Powdered sugar for dusting
- 8 oz cream cheese, softened to room temperature
- 1/4 cup unsalted butter, softened
- 1/2 cup powdered sugar
- 1 tsp vanilla extract (for filling)
- 1/2 cup Oreo cookie crumbs (use 6–8 cookies)
- 1/4 cup white chocolate, melted (for decoration)
- Extra crushed Oreos for sprinkling on top
- 4–6 whole Oreo cookies for decoration
Instructions
- Set your oven to 350°F (175°C). Use parchment paper to line a 10×15-inch jelly roll pan.
- Combine the cake mix, eggs, oil, water, and vanilla as directed on the mix’s packaging.
- Pour the batter evenly into the lined pan. Bake for 12-15 minutes until a toothpick comes out clean.
- While the cake’s baking, sprinkle powdered sugar evenly over a clean towel.
- When done, flip the cake out onto the sugar-covered towel, peel off the parchment, and tightly roll the cake in the towel while still warm. Wait until it cools.
- Mix softened cream cheese and butter in a bowl until creamy. Gradually add powdered sugar and vanilla, then fold in the crushed Oreos gently until well spread.
- Carefully unroll the cooled cake and spread the cream cheese mixture all over its surface.
- Re-roll the cake, keeping the filling tucked inside, and wrap it snugly in plastic wrap. Chill it for at least an hour to set.
- Drizzle melted white chocolate over the top, place the whole Oreo cookies as decoration, and sprinkle crushed cookies over the roll.
Notes
- Ensure the cake is completely cool before spreading the filling to prevent it from melting.
- Store any leftovers in the refrigerator for up to 3 days.
- This recipe can be adapted with different flavored cream cheese or cake mixes.
Nutrition
- Serving Size: 1 slice
- Calories: 250
- Sugar: 20g
- Sodium: 150mg
- Fat: 12g
- Saturated Fat: 6g
- Unsaturated Fat: 5g
- Trans Fat: 0g
- Carbohydrates: 30g
- Fiber: 1g
- Protein: 4g
- Cholesterol: 40mg


