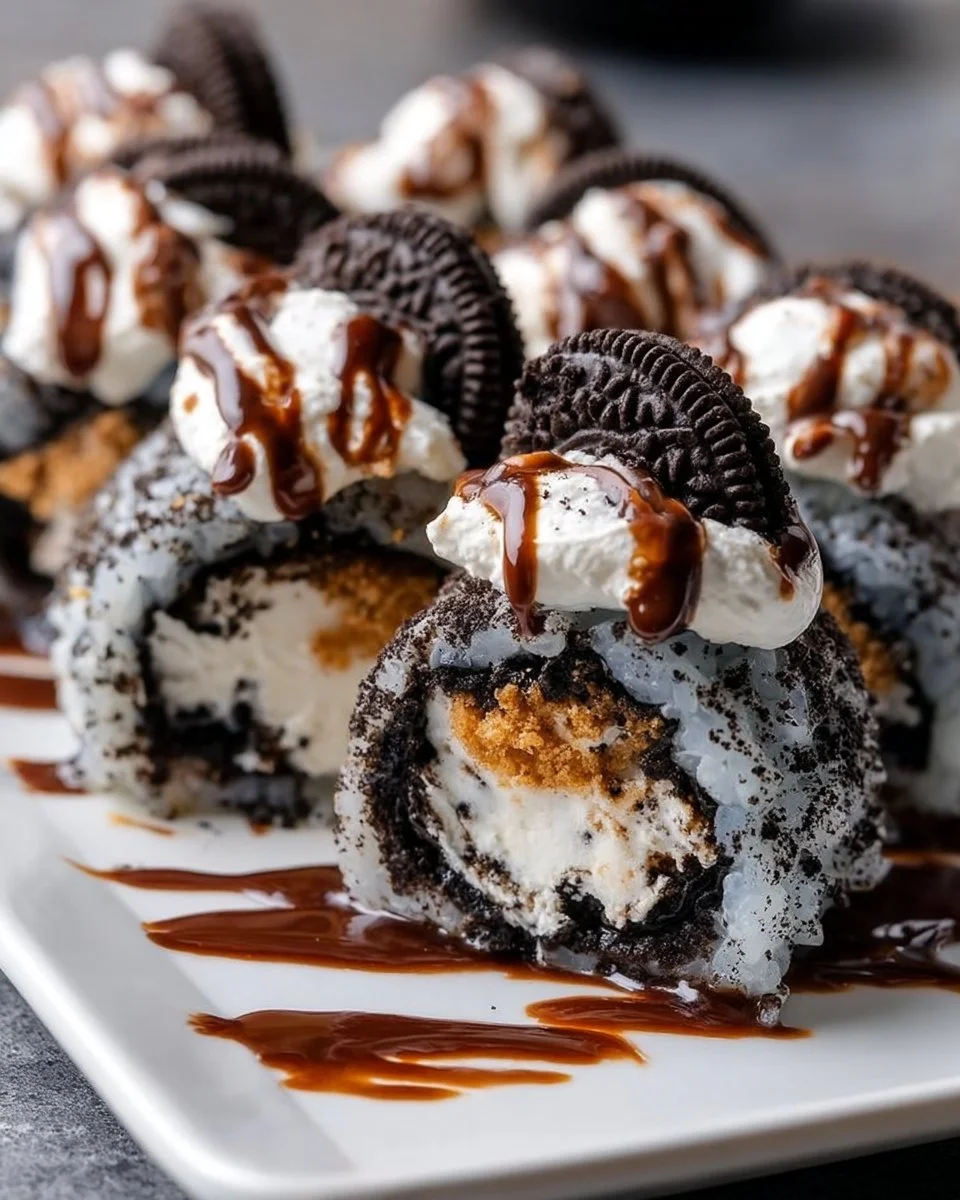
The first bite surprises you: a familiar chocolate crunch gives way to a creamy, tangy cheesecake center, and the whole thing melts into a little cloud of sweetness on your tongue. Oreo Sushi Rolls look whimsical on the plate — tiny, perfect rounds that mimic sushi with a playful twist — but they taste like the grown-up lovechild of cookies and classic cheesecake. The contrast between the crisp Oreo crumbs and the silky cream cheese filling makes every piece feel indulgent yet light, like dessert and petit four rolled into one.
Making these feels like a mini celebration. You press, roll, chill, and then slice to reveal speckled cross-sections that invite you to sample one after another. They come together quickly, so you get that instant-satisfaction joy of a no-bake treat with a presentation that feels special. If you want to see another creative spin on this concept while you bake (no — you don’t actually bake), check this handy no-bake Oreo cheesecake sushi rolls guide for extra inspiration and plating ideas.
Why You’ll Love These Oreo Sushi Rolls
These Oreo Sushi Rolls deliver immediate crowd-pleasing flavor and texture contrasts. The Oreo crumbs supply an irresistible cocoa crunch; the cream cheese filling brings bright, smooth richness; a drizzle of chocolate rounds everything out. They work for last-minute entertaining because they assemble fast and look gorgeous on a dessert board.
This recipe stands out because it transforms everyday ingredients into something unexpectedly elegant. You don’t need pastry skills to impress guests. Make them for a kids’ party, a themed sushi night with friends, a bridal shower, or when you want a playful dessert that doubles as conversation starter. They feel upscale but remain comfortingly familiar — like dessert with a wink.
Preparation Phase & Tools to Use
The right tools make this simple recipe feel polished and run smoothly.
- Food processor: Crushes Oreos to an even, fine crumb. It gives you a clean “seaweed” look and a pleasant texture in every bite. If you don’t have one, use a sturdy plastic bag and rolling pin; pound until fine.
- Mixing bowl and electric mixer (or whisk): An electric mixer makes the cream cheese filling silky fast. A hand whisk will work, but expect extra elbow grease for perfectly smooth results.
- Plastic wrap (cling film): You’ll spread the filling on plastic wrap and roll it tightly. This creates the log shape and simplifies chilling and slicing.
- Offset spatula or small spatula: Helps spread an even layer of filling for clean, uniform rolls.
- Sharp knife and a damp towel: A sharp, wet knife slices cleaner and prevents the filling from sticking or squishing.
- Chill space (refrigerator): You need a chilled surface to set the roll; make sure you have an hour or so free.
Preparation tips:
- Soften cream cheese to room temperature for the smoothest texture and easiest mixing.
- Line a cutting board with parchment or keep a clean damp kitchen towel nearby to steady slicing.
- Chill the food-processor bowl briefly for ultra-fine crumbs if your kitchen is warm.
Ingredients for Oreo Sushi Rolls
1 package Oreo cookies, 8 oz cream cheese, softened, 1/2 cup powdered sugar, 1 tsp vanilla extract, 1/2 cup whipped cream, Chocolate sauce for drizzling
Key ingredient notes and substitutions:
- Oreo cookies (1 package): Standard Oreos provide classic cocoa flavor and texture. Use Double Stuf for extra creaminess in the crumb, or try chocolate wafer cookies for a slightly different cocoa profile.
- Cream cheese (8 oz, softened): The star of the filling. Full-fat cream cheese yields the richest texture; reduced-fat works but tastes less luxurious.
- Powdered sugar (1/2 cup): Smooth sweetness that blends without grit. If you like extra tang, use a bit less and add 1–2 tablespoons of sour cream.
- Vanilla extract (1 tsp): Rounds out the flavor. For a twist, try almond extract (use half the amount) or a splash of coffee liqueur for an adult version.
- Whipped cream (1/2 cup): Lightens the cream cheese for a mousse-like filling. Use stabilized whipped cream if you need a longer hold for display.
- Chocolate sauce for drizzling: Use a good-quality chocolate sauce, ganache, or melted chocolate chips. Flavored sauces (salted caramel) also pair beautifully.
How to Make Oreo Sushi Rolls
Follow these clear steps for flawless rolls. Read through once, then work methodically.
Crush the Oreo cookies until fine crumbs form.
- Pulse Oreos in a food processor until you see a uniform, sandy texture. If a few tiny chunks remain, that adds pleasant crunch — don’t over-process into powder.
- Tip: Reserve a tablespoon of larger crumbs for sprinkling on top before serving, if you like textural contrast.
Beat the softened cream cheese, powdered sugar, and vanilla until smooth.
- In a mixing bowl, use an electric mixer on medium speed to beat the cream cheese until silky. Add powdered sugar and vanilla; continue beating until fully incorporated and lump-free.
- Tip: Scrape the bowl once or twice to ensure no hidden lumps remain.
Fold in the whipped cream until fully combined.
- Gently fold the whipped cream into the cream cheese mixture with a spatula. Use broad, gentle strokes to keep the mixture light and airy.
- Tip: If you overmix, the filling will become dense. Stop folding as soon as the mixture looks homogenous.
Spread a layer of the cheesecake filling over a sheet of plastic wrap; sprinkle the crushed Oreos evenly on top.
- Lay a double layer of plastic wrap on your work surface. Spread the filling into a rectangle roughly 8–10 inches long and 6–7 inches wide, about 1/2 inch thick.
- Sprinkle the crushed Oreos evenly over the top, pressing gently so the crumbs adhere to the filling.
- Tip: Leave a little space at one long edge to help seal the roll neatly.
Roll the mixture tightly using the plastic wrap, forming a log shape.
- Lift the long edge of the plastic and roll away from you, pressing lightly as you roll to make a tight log. Twist the ends of the plastic wrap to seal.
- Tip: If you want very tight, compact rolls, use a towel to press and shape the log while it chills.
Chill in the refrigerator for about 1 hour.
- Place the wrapped log on a flat tray and chill. This firms the filling so you can slice clean pieces.
- Tip: For even neater slices, chill 2 hours. For quicker service, pop the log in the freezer for 20–30 minutes but watch closely to avoid freezing.
Remove from the refrigerator, unwrap, and slice into sushi-like pieces.
- Unwrap the log and use a sharp knife dipped in hot water and wiped dry between cuts. Aim for 1/2- to 3/4-inch slices to mimic sushi rounds.
- Tip: Clean the knife after every two or three cuts for pristine edges.
Drizzle with chocolate sauce before serving.
- Arrange slices on a platter and drizzle chocolate in a thin, artful stream. Add a dusting of extra Oreo crumbs, sea salt, or tiny mint leaves if you like.
- Tip: Serve chilled; these taste best cold and hold their shape beautifully.
Chef’s Notes & Helpful Tips
Make-ahead tips:
- Prepare the roll up to 48 hours in advance. Keep wrapped tightly in plastic and store in an airtight container to prevent odors from the fridge seeping in.
- For longer storage, freeze the wrapped log up to 1 month. Thaw in the refrigerator for 6–8 hours before slicing.
Cooking alternatives:
- Oven/air fryer: This recipe stays no-bake. If you want a warm twist, roll the slices in a thin layer of melted butter and quickly pan-sear 10–15 seconds per side for a warm, crisp exterior — but be gentle to avoid melting the filling.
- If you prefer a firmer, more sliceable texture, add 1 tablespoon of melted, cooled butter to the crushed Oreos before sprinkling on the filling. The crumbs will bind slightly and create a firmer “seaweed.”
Customization ideas:
- Add finely chopped strawberries or raspberries into the filling for bright fruit pockets.
- Fold in mini chocolate chips or crushed candy for extra texture.
- Swap vanilla for orange zest and Grand Marnier for a citrus-profiled adult version.
- Make mini rolls using half the filling spread into smaller rectangles for bite-size party pieces.
Common Mistakes to Avoid
- Using cold cream cheese: Cold cream cheese creates lumps and a grainy filling. Always let it soften to room temperature for silky results.
- Over-processing Oreos: Grinding Oreos into powder removes all delightful texture. Pulse only until sandy; small crumbs give the best mouthfeel.
- Rolling too loosely: A loose roll will fall apart when sliced. Press gently but firmly as you roll and twist the ends of the wrap to compact the log.
- Slicing with a dull or cold knife: A dull knife drags and squashes slices. Wipe a hot, damp knife between cuts for clean edges.
- Skipping the chill time: Under-chilled logs smear when sliced. Give the filling time to firm up — patience pays off with photogenic slices.
What to Serve With Oreo Sushi Rolls
These little rounds pair beautifully with diverse flavors and textures. Try:
- Fresh berries (strawberries, raspberries, blueberries) — offer bright acidity to cut the richness.
- Espresso or strong coffee — the bitter notes balance sweetness and revive the palate.
- Whipped cream or crème fraîche — extra creaminess and a light tang make a lush partner.
- Salted caramel sauce — adds depth and a pleasurable savory-sweet contrast.
- Vanilla ice cream — turns the sushi rolls into an easy plated dessert with temperature contrast.
- Mint sprigs — add a fresh herbal lift and attractive color.
- Sparkling wine or dessert wine — bubbles and sweetness elevate the playful presentation.
- Chopped toasted nuts (hazelnuts, pistachios) — provide crunch and nutty warmth against the soft filling.
Storage & Reheating Instructions
Fridge:
- Store sliced pieces in an airtight container for up to 3–4 days. Keep layers separated with parchment to prevent sticking.
- For the unsliced log, wrap tightly in plastic and store up to 48 hours for peak texture.
Freezer:
- Wrap the log tightly in plastic and then foil. Freeze up to 1 month. Thaw in the fridge 6–8 hours before slicing.
- Avoid freezing sliced pieces; the edges can become icy and the texture changes.
Reheating:
- These sushi rolls taste best chilled. If you want a warm twist, briefly pan-sear slices for 10–15 seconds per side in a hot, butter-coated skillet — just enough to warm the exterior without melting the filling.
- Do not microwave — the filling will soften and lose structure.
Estimated Nutrition Information
Approximate per serving (assuming 12 slices per recipe):
- Calories: 160–200 kcal
- Total fat: 10–12 g
- Saturated fat: 6–8 g
- Carbohydrates: 16–20 g
- Sugars: 12–15 g
- Protein: 2–3 g
Disclaimer: These values are approximate and can vary based on specific brands and portion sizes. Use a nutrition calculator for precise dietary tracking.
FAQs
Q: Can I make these gluten-free?
A: Yes. Use gluten-free chocolate sandwich cookies that mimic Oreos. Texture will depend on the cookie brand; for best results, choose a sturdy gluten-free cookie with a similar cocoa profile and crush it to fine crumbs.
Q: How do I prevent the filling from becoming runny?
A: The filling can become loose if you over-fold the whipped cream or use under-chilled cream cheese. Make sure cream cheese is well-beaten until smooth, then fold whipped cream gently until just combined. Chill the log fully to set the mixture.
Q: Can I replace the whipped cream with heavy cream I whip myself?
A: Absolutely. Whip heavy cream to soft peaks and fold it in gently. For longer stability (for events that last), whip in a stabilizer like a small amount of instant vanilla pudding mix or use stabilized whipped cream.
Q: Will the Oreo crumbs make the roll gritty?
A: No — when you pulse Oreos to a fine sand-like texture, they blend beautifully with the filling. Avoid processing into an ultra-fine powder; that can make the structure too dense. A mix of fine crumbs with a few tiny pieces creates an appealing mouthfeel.
Q: How can I present these rolls creatively for a party?
A: Arrange slices on a long slate and alternate drizzles of chocolate and caramel; sprinkle edible gold dust or crushed nuts for glamour. For a sushi-plate effect, serve with small bowls of flavored sauces (strawberry coulis, salted caramel) and garnish with mint leaves and tiny edible flowers.
Q: Can I make flavored variations (matcha, caramel, peanut butter)?
A: Yes. For matcha, fold 1–2 teaspoons of culinary-grade matcha into the cream cheese base. For peanut butter, mix 2–3 tablespoons of smooth peanut butter into the cream cheese before folding in whipped cream. Caramel works as a swirl — thin it slightly to ripple into the filling.
Conclusion
Oreo Sushi Rolls transform pantry staples into a playful, elegant dessert that delights both the eyes and the palate. Each slice offers crunchy cocoa, lush creaminess, and a perfectly balanced sweetness that makes them addictive. They feel fancy without fuss, perfect for last-minute celebrations or simply treating yourself to something whimsical. For a fresh perspective and extra plating inspiration, check out this creative take on Oreo Sushi – i am a food blog and then roll your own batch to share.
Print
Oreo Sushi Rolls
- Prep Time: 15 minutes
- Cook Time: 0 minutes
- Total Time: 75 minutes
- Yield: 12 pieces 1x
- Category: Dessert
- Method: No-Bake
- Cuisine: American
- Diet: Vegetarian
Description
These playful Oreo Sushi Rolls combine crunchy cocoa and a lush cheesecake filling for a whimsical dessert that delights the palate.
Ingredients
- 1 package Oreo cookies
- 8 oz cream cheese, softened
- 1/2 cup powdered sugar
- 1 tsp vanilla extract
- 1/2 cup whipped cream
- Chocolate sauce for drizzling
Instructions
- Crush the Oreo cookies until fine crumbs form.
- Beat the softened cream cheese, powdered sugar, and vanilla until smooth.
- Fold in the whipped cream until fully combined.
- Spread a layer of the cheesecake filling over a sheet of plastic wrap; sprinkle the crushed Oreos evenly on top.
- Roll the mixture tightly using the plastic wrap, forming a log shape.
- Chill in the refrigerator for about 1 hour.
- Remove from the refrigerator, unwrap, and slice into sushi-like pieces.
- Drizzle with chocolate sauce before serving.
Notes
Make up to 48 hours in advance and store tightly wrapped. Can freeze for up to 1 month.
Nutrition
- Serving Size: 1 piece
- Calories: 200
- Sugar: 14g
- Sodium: 150mg
- Fat: 12g
- Saturated Fat: 8g
- Unsaturated Fat: 2g
- Trans Fat: 0g
- Carbohydrates: 20g
- Fiber: 1g
- Protein: 2g
- Cholesterol: 30mg