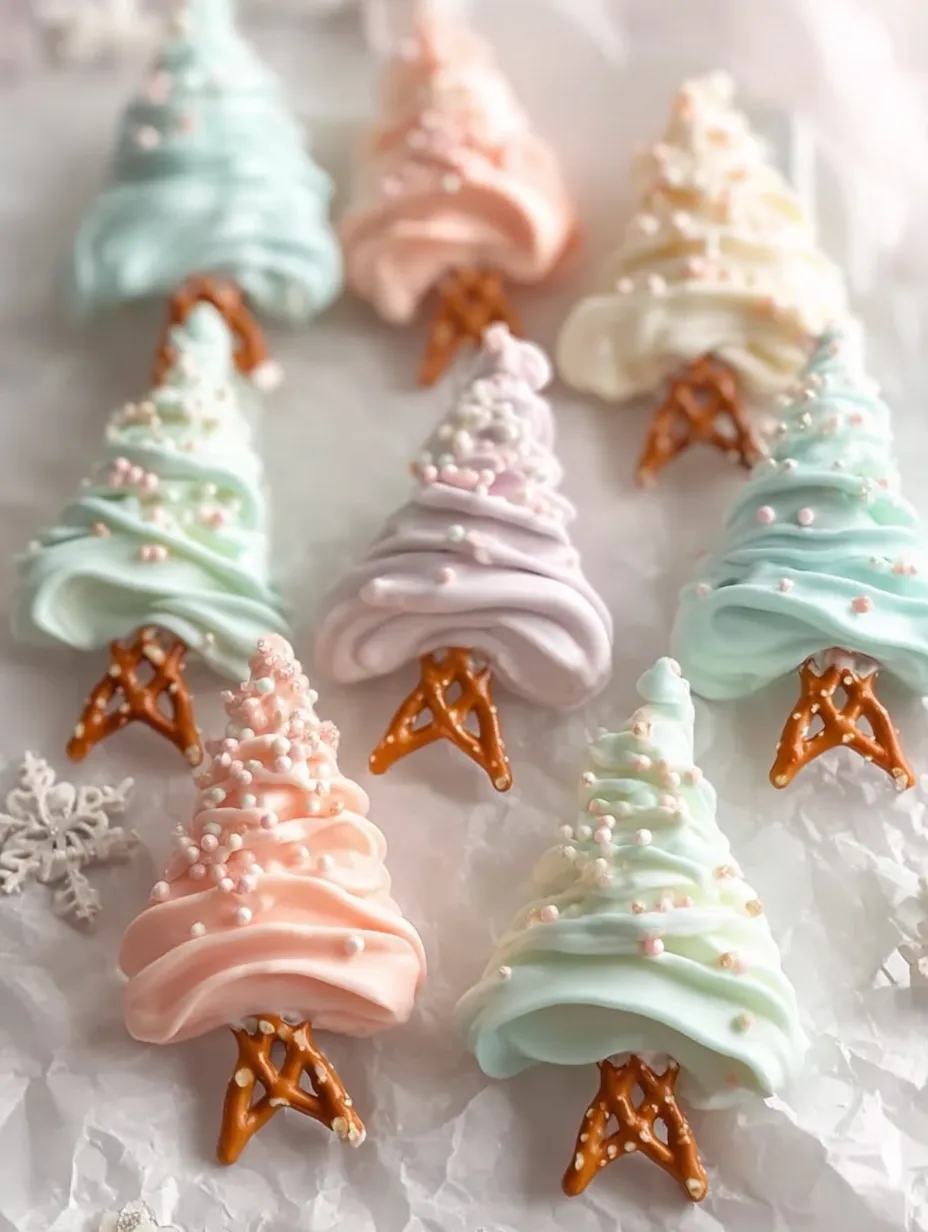
Let’s be honest — the holidays are about more than just the gifts under the tree. It’s about the magic, the memories, and of course, the snacks. And when it comes to festive treats that look just as enchanting as they taste, Pastel Chocolate Pretzel Christmas Trees take the crown. They’re delicate, elegant, and so delightfully whimsical, they might just steal the spotlight on your dessert table.
Imagine soft swirls of pastel chocolate—think dreamy pinks, minty greens, icy blues, and snowy whites—drizzled over crunchy little pretzel “trunks” and dotted with edible pearls. These beauties look like they came straight out of a sugar plum fairy’s dream, but the best part? They’re surprisingly easy to make and only take about 15–20 minutes from start to finish.
Why You’ll Fall in Love with These Chocolate Pretzel Trees
Festive, Fun, and Foolproof
You don’t need to be a baking expert to create these little edible masterpieces. They’re easy enough for beginners, but still give off that professional, Pinterest-worthy vibe. Whether you’re hosting a holiday party, building gift boxes, or decorating cookies with your kids, these trees are the perfect treat.
Perfect for All Ages
Kids love them because they’re colorful and fun. Adults love them because they’re not too sweet, and the salty pretzel base balances everything beautifully. And everyone loves them because they just look so darn cute.
Gather Your Magical Ingredients
Ready to whip up some pastel Christmas trees of your own? Let’s get into what you’ll need.
Ingredients (Makes 12–16 Trees):
- 2 cups white chocolate melts or almond bark
- ½ cup pastel candy melts, divided by color:
- Soft pink
- Mint green
- Light blue
- White
- 36–48 mini pretzel sticks (2–3 per tree)
- Pearl sugar sprinkles or white nonpareils
- Optional: Edible glitter (because ✨ extra sparkle)
Ingredient Notes:
- White chocolate: Use almond bark or melting wafers for smoother results.
- Candy melts: If you don’t have pre-colored melts, you can tint melted white chocolate using oil-based gel food coloring.
- Pretzels: The mini stick variety works best to mimic a “tree trunk”.
- Sprinkles: Go with pearl sugar for that classy, frosted-tree effect.
Essential Tools to Have On Hand
- Parchment paper
- Baking sheet
- Microwave-safe bowls
- Piping bags or zip-top bags
- Scissors (for snipping bags)
- Small spoon or spatula
Step-by-Step Recipe: Creating Your Chocolate Pretzel Trees
Step 1: Prepare Your Pretzel “Trunks”
Start by laying out a piece of parchment paper on a baking sheet. Arrange 2–3 mini pretzel sticks in a narrow triangle at the base. These will serve as the “trunk” of each tree. Slight overlap is fine—it helps hold the shape together once the chocolate sets.
Time: 1 minute
Step 2: Melt the Chocolate to Pastel Perfection
In separate microwave-safe bowls, melt each of your candy melt colors in 20–30 second intervals. Stir after each round until smooth. Be careful not to overheat—chocolate burns fast!
If you’re starting with plain white chocolate, divide it into separate bowls and add a drop or two of oil-based gel coloring to each to create your pastel pink, mint green, light blue, and soft white shades.
Time: 2 minutes
Step 3: Pipe the Swirly Christmas Tree Tops
Spoon each melted chocolate color into a piping bag or zip-top bag and snip off the tip.
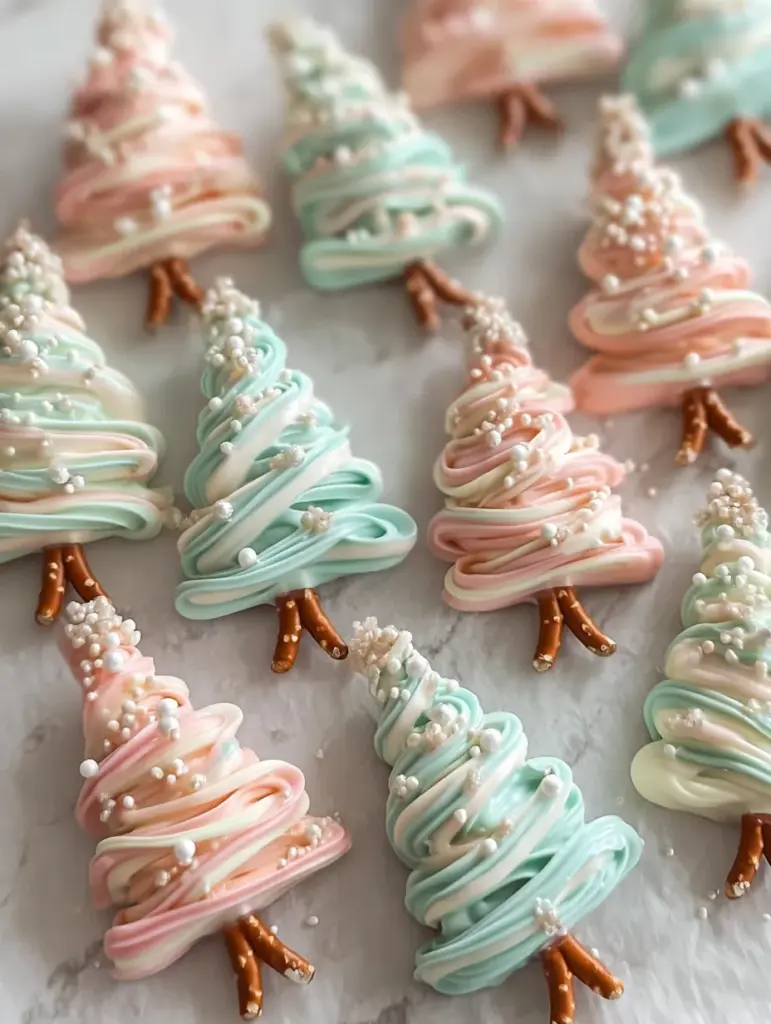
Now the fun begins: pipe zig-zag patterns over the pretzel “trunks,” starting small at the top and working wider as you go down. The result? A fluffy, whimsical tree shape that almost looks like it was piped from frosting.
Pro Tip: Hold the bag slightly above the pretzels and let the chocolate fall naturally into a swirl—this gives it that soft, cloud-like appearance like the photo.
Time: 5 minutes
Step 4: Decorate Like Holiday Royalty
Before the chocolate sets (work quickly!), add your decorations:
- Sprinkle on pearl sugar beads or nonpareils
- Add a dash of edible glitter if you’re feeling extra ✨
This is what gives each tree its unique charm. The pearlescent shimmer makes them look straight out of a winter wonderland.
Time: 2 minutes
Step 5: Let Them Set
Let your chocolate trees harden at room temperature. If you’re in a rush, pop the tray into the fridge for 10 minutes to speed things up.
Once hardened, gently peel them off the parchment, and voilà! Your pastel Christmas forest is ready to dazzle.
Total Time: 15–20 minutes
Tips for Picture-Perfect Trees Every Time
- Use consistent pressure when piping the chocolate to avoid breaks.
- Keep the pretzel sticks tightly grouped so the chocolate has a sturdy base.
- Don’t overdecorate—let the soft colors and swirls shine.
- If your chocolate gets too thick, microwave for a few more seconds and stir.
How to Get That Soft Swirl Look (Like in the Photo!)
The key to that beautiful, piped-icing look is slow, back-and-forth motion with a light touch. Don’t push the chocolate too fast through the piping bag. Let gravity do some of the work, and keep your zig-zags consistent in size as you work from top to bottom.
Want a fuller tree? Just make more swirls and pipe a slightly wider base.
Color Combinations That Shine
Want to keep things elegant but fun? Stick with soft, pastel tones that match your holiday décor.
Soft Pink Dreams
Delicate and charming, these trees are perfect for a feminine, romantic touch.
Icy Blue Wonderland
Cool and calming, blue trees pair beautifully with silver sprinkles or snowflake toppers.
Minty Fresh Forest
A nod to classic Christmas green but with a lighter, fresher twist.
Classic Winter White
Simple, snowy, and timeless. White-on-white trees look like frosted sugar sculptures.
Add Extra Magic: Toppings and Glitter
Pearl Sprinkles vs. Nonpareils
Both give you that holiday sparkle, but pearl sprinkles have a more elegant, upscale look.
Edible Glitter
Use a light dusting to catch the light and give your trees a magical shimmer. Just a pinch on the tip and base can elevate the whole design.
Storage and Make-Ahead Tips
Store your finished trees in an airtight container at room temperature for up to 2 weeks. If your kitchen runs warm, store them in the fridge with parchment between layers.
Want to prep ahead for a party? Make them a few days in advance, and keep them covered to avoid moisture.
Gifting Ideas: Sweet Little Bundles of Joy
- Wrap 3–4 trees in a clear treat bag with a pastel ribbon.
- Place on top of holiday cookie tins for extra flair.
- Add a handwritten tag for a personal touch.
These are the perfect homemade gift for neighbors, teachers, or coworkers.
Fun for Kids: Make It a Family Tradition
Kids love helping with the decorating part, and the process is simple enough that they can pipe their own trees too! Set up a decorating station with sprinkles, mini candies, and edible glitter. Just be ready for a little chocolate mess (and a lot of laughter).
Holiday Platter Styling Ideas
Lay your pastel trees on a white serving tray, sprinkle with fake snow or shredded coconut, and add a few mini ornaments for a holiday centerpiece that’s as edible as it is adorable.
Or place them in rows like a forest — alternating colors for that perfect, Instagram-worthy look.
Variations to Try
Dark Chocolate Trees
Use dark chocolate melts for a rich, decadent version with a modern look.
Peppermint Twists
Add crushed candy cane on top for a festive minty crunch.
Nutty Delight Version
Sprinkle finely chopped pistachios or almonds over the trees before they set.
You may also read :
Chocolate Pretzel Christmas Trees – A Magical Holiday Treat
🎄 Christmas Rolo Pretzel Bites: Your New Favorite Holiday Treat
Final Thoughts: Bringing Holiday Magic to Life
These Pastel Chocolate Pretzel Christmas Trees aren’t just a recipe—they’re a whole vibe. They’re the kind of treat that brings joy, makes memories, and adds instant cheer to any holiday moment. They’re also incredibly easy to personalize, perfect for gifting, and guaranteed to make your dessert table sparkle with soft, pastel magic.
So go ahead—grab those pretzels, melt that chocolate, and swirl your way into some serious holiday happiness.
FAQs
1. Can I make these without candy melts?
Yes! You can use white chocolate chips or almond bark and tint them with oil-based gel coloring for the pastel effect.
2. How do I store the trees without ruining the decorations?
Place parchment between layers in an airtight container to protect the decorations and avoid sticking.
3. Can I freeze these for longer storage?
Freezing isn’t ideal, as condensation can affect the chocolate’s texture and appearance. Stick with fridge or room temperature storage.
4. What if I don’t have piping bags?
No worries! Use zip-top plastic bags and snip a tiny hole in the corner—they work just as well.
5. Can I use other toppings besides pearl sprinkles?
Absolutely! Mini M&Ms, crushed peppermints, or star-shaped sprinkles all make great festive toppings.
How to Make These a Showstopper on Any Holiday Table
Let’s be real—there’s no shortage of desserts at Christmas, but very few will wow your guests the way these pastel chocolate pretzel trees do. Why? Because they’re not just treats. They’re edible art. They double as table décor and conversation starters. Here’s how to really make them shine on your dessert spread:
- Place on a tiered platter: Arrange trees by color for a stunning ombré effect.
- Add to charcuterie-style dessert boards: Nestle a few between cookies, chocolates, and mini cupcakes.
- Use as cupcake toppers: Gently insert one tree into frosted cupcakes for a festive centerpiece.
- Create edible place cards: Write guest names on mini tags and tie them to a tree trunk using ribbon or twine.
They’re versatile, beautiful, and uniquely yours—especially once you customize with your favorite colors and toppings.
Print
Pastel Chocolate Pretzel Christmas Trees
- Prep Time: 5 minutes
- Total Time: 15–20 minutes
- Category: Christmas Treats / No-Bake Holiday Desserts
Description
💗💚✨ Sweet, swirly, pastel holiday magic! These adorable chocolate pretzel trees are crispy, creamy, and absolutely stunning on any Christmas dessert table. Perfect for gifting, parties, or a fun decorating activity with kids! 🎄🤍✨
Ingredients
2 cups white chocolate melts or almond bark
½ cup pastel candy melts (pink, mint green, light blue, white)
36–48 pretzel sticks (2–3 per tree)
Pearl sugar sprinkles or white nonpareils
Optional: edible glitter ✨
Instructions
Line a baking sheet with parchment paper, then arrange 2–3 pretzel sticks close together to form each “tree trunk.”
⏱️ 1 minuteMelt the white chocolate and each pastel color separately in 20–30 second intervals until smooth and silky.
⏱️ 2 minutesTransfer each melted chocolate to piping bags or zip bags. Pipe zig-zag swirls over the pretzel bases, starting small at the top and widening toward the bottom to create a tree shape. 🌲💗
⏱️ 5 minutesWhile the chocolate is still wet, add pearl sprinkles, sugar beads, or edible glitter for a magical snowy effect. ✨❄️
⏱️ 2 minutesLet the trees set at room temperature or chill for faster hardening.
⏱️ 10 minutes
Notes
Perfect for gifting, parties, or kids’ holiday activities.
No baking required — quick, festive, and super eye-catching.
Customize colors using any pastel or holiday-themed candy melts.
Make sure the chocolate is fully melted for smooth piping and clean tree shapes.
Chill to speed up setting if making large batches.
Nutrition
- Serving Size: 12–16 trees
- Calories: ~85 kcal per tree
Troubleshooting: Common Issues and How to Fix Them
Even though this recipe is simple, here are a few common bumps in the road—and how to smooth them out.
My chocolate is too thick to pipe smoothly!
- Add 1 teaspoon of vegetable shortening or coconut oil to the melted chocolate and stir until smooth. This thins it out and makes piping easier.
My tree shapes are messy or too flat.
- Hold your piping bag a bit higher above the pretzels and move in a slow, steady zig-zag motion.
- Make sure the pretzels are tightly grouped so the chocolate stays “on top” rather than falling through.
The decorations fall off!
- Be quick to add sprinkles and glitter before the chocolate sets. Timing is everything here.
My trees broke when I peeled them off the parchment.
- Chill the tray for 10–15 minutes to ensure they are fully set before lifting.
- Use an offset spatula to lift gently from the base to avoid cracks.
Budget-Friendly Tips for Bigger Batches
Want to make a batch for gifting or holiday parties without breaking the bank? Here’s how to save while still making them magical:
- Use almond bark instead of pricier white chocolate melts.
- Buy bulk mini pretzels—they’re cheaper and last forever.
- DIY your pastel colors by tinting plain white chocolate with a single pack of oil-based food coloring (a little goes a long way).
- Skip the edible glitter if needed—it’s gorgeous, but optional!
By buying smart and using what you have, you can make dozens of these festive treats affordably.
Making It Your Own: Flavor & Style Variations
Don’t be afraid to step outside the pastel palette. These little trees are incredibly customizable:
Flavor Boost Ideas
- Add a few drops of peppermint extract to the white chocolate for a cool, minty version.
- Mix in crushed Oreos to the melted chocolate before piping for a cookies-and-cream twist.
- Sprinkle with cinnamon sugar for a snickerdoodle vibe.
Styling Variations
- Pipe the trees taller and narrower for a sleeker, modern look.
- Pipe mini versions (1 pretzel base) for bite-sized treats.
- Make a “frosted tree farm” using all white trees with silver pearl accents.
No matter how you tweak it, these trees will be gorgeous and delicious.
Holiday Memories Are Made Here
There’s something extra special about gathering around the kitchen table, piping swirls of sweet chocolate, and decorating tiny trees with glittering sprinkles. These Pastel Chocolate Pretzel Christmas Trees aren’t just a fun recipe—they’re a holiday experience.
They bring joy to the people who make them, and even more joy to the people who receive or eat them. Whether you’re making a tray for your child’s class party, adding them to a cookie exchange, or just indulging in a little holiday creativity, this recipe delivers the magic.
Simple enough for a casual afternoon. Elegant enough for a holiday party. Sweet enough to become a new Christmas tradition.
So go ahead. Grab the chocolate. Pick your colors. Turn on some holiday music, and swirl your way into the season with the most charming edible trees you’ve ever seen.
More Fun Ideas for the Season
If you loved making these, here are a few related ideas to try next:
- Pastel Peppermint Bark
- White Chocolate-Dipped Snowflake Pretzels
- Meringue Christmas Tree Pops
- Hot Cocoa Bombs in Pastel Molds
- DIY Marshmallow Snowmen with Candy Canes
And of course, you can use the same piping technique to create pastel Easter eggs, Valentine’s hearts, or even birthday balloons—just change the shape and colors.
Similar recipes :
Salted White Chocolate Pretzel Caramel Clusters
Church Lady Butter Toffee Pretzels: A Sweet & Salty Addiction in Every Bite
FAQs (Bonus Set)
1. Can I double the batch for a party?
Absolutely! Just double all ingredients, and prep two baking sheets if needed.
2. What’s the best way to melt chocolate without burning it?
Use 20–30 second intervals in the microwave, stirring each time. Or use a double boiler for more control.
3. Can I use sprinkles with color instead of pearls?
Sure! Rainbow sprinkles give a fun, playful twist. Just know it will look less pastel and more colorful.
4. Do I need to temper the chocolate?
Nope! Since this recipe uses candy melts or almond bark, there’s no need for tempering.
5. Can I use cookie sticks or candy canes instead of pretzels?
Yes, cookie sticks can work—but pretzels give that perfect sweet-salty crunch that people love.


