The Sweetest Bite-Sized Joy
Let’s be real—everyone needs that one dessert recipe they can whip up in under 30 minutes, no baking required, and guaranteed to disappear from the plate before you’ve even put the spoon down. That’s exactly what these Peanut Butter Rice Krispie Balls are.
They’re chewy. They’re crunchy. They’re peanut-buttery. And if you’re anything like us, you’re going to fall in love at first bite.
These little beauties are ridiculously easy to make, packed with nostalgic flavors, and perfect for everything from school lunches to holiday cookie trays. And with their sweet-and-salty combo, they hit every craving at once.
No mixers. No ovens. Just one pot, one bowl, and a whole lot of deliciousness.
Why Peanut Butter Rice Krispie Balls Are a Must-Try
You know how some recipes are just better than others? This one checks all the boxes:
- No-Bake Convenience: No need to preheat the oven or clean baking pans.
- Crowd Pleaser: Perfect for potlucks, kids’ parties, or late-night cravings.
- Fast & Easy: Just 15 minutes of hands-on time.
- Customizable: Add-ins, toppings, chocolate dips—the sky’s the limit.
- Freezer-Friendly: Make a batch, freeze some for later, and enjoy anytime.
You don’t have to be a kitchen pro to pull this off. It’s ideal for first-time dessert makers, busy parents, or anyone craving something sweet without a lot of effort.
Ingredients Overview: What You’ll Need
Let’s break down the short and sweet list of ingredients. You probably already have most of these in your pantry!
Creamy Peanut Butter (1 cup)
This is the base of your mixture. It adds richness, that deep nutty flavor, and holds everything together. Go for smooth, shelf-stable peanut butter (like Jif or Skippy). Natural peanut butters may separate and affect consistency.
Light Corn Syrup (1 cup)
This sticky syrup acts as both sweetener and binder. It keeps the balls soft and chewy, and helps everything set up perfectly.
Powdered Sugar (1 cup)
This blends beautifully with the peanut butter and corn syrup to make a smooth, creamy base with just the right amount of sweetness.
Vanilla Extract (1 tsp)
Just a splash enhances all the other flavors, adding depth and warmth.
Rice Krispies Cereal (6 cups)
This is where the crunch comes from! You want the light, airy texture of puffed rice to balance out the richness of the peanut butter mixture.
Mini Chocolate Chips (½ cup)
These add sweet little bursts of chocolate that make each bite feel extra indulgent. Mini chips are best—they distribute more evenly and melt just enough to give a soft texture inside.
Kitchen Tools Needed
Nothing fancy needed here. Just a few basics:
- Large mixing bowl
- Medium saucepan
- Measuring cups and spoons
- Silicone spatula or wooden spoon
- Baking sheet
- Parchment paper
- Optional: Cookie scoop for uniform size
Step-by-Step Instructions for Perfect Balls
Alright, time to roll up those sleeves (literally). Let’s make these delicious balls of happiness.
1. Prepare the Cereal Base
In your large mixing bowl, combine the 6 cups of Rice Krispies cereal with the ½ cup of mini chocolate chips. Stir gently to distribute the chips evenly. Set this bowl aside while you prep the gooey stuff.
2. Make the Peanut Butter Mixture
In a medium saucepan, add 1 cup of creamy peanut butter, 1 cup of light corn syrup, 1 cup of powdered sugar, and 1 teaspoon of vanilla extract. Heat over low heat, stirring constantly. You want it to be smooth and well-blended, but not boiling. This should take 5–6 minutes.
Once the mixture is completely melted and combined, remove it from the heat.
3. Combine the Mixtures
Immediately pour the hot peanut butter mixture over the cereal mixture. Stir quickly and thoroughly until every bit of cereal is coated and gooey. It’ll be sticky and thick, so use some muscle!
Let the mixture cool for about 5–7 minutes before shaping. It should be warm and pliable—not hot.
4. Roll into Balls
Lightly grease your hands with a little oil or butter to prevent sticking. Scoop out a heaping tablespoon of the mixture and roll it between your palms to form a ball.
Place each ball on a parchment-lined baking sheet.
5. Let Them Cool & Set
Leave them at room temperature for 15–20 minutes to firm up. Once they’re set, they’re ready to devour!
Storage and Shelf Life
Room Temperature
Store the balls in an airtight container for up to 3 days at room temp. Keep them in a cool, dry place.
Refrigerator
Want them to last a little longer? Refrigerate them for up to 7 days. Just let them come to room temp before serving so they’re not too hard.
Freezer
You can freeze them for up to 2 months! Flash freeze on a tray, then transfer to a ziplock or container. Thaw at room temp before eating.
Tips for Perfect Results
- Work Fast: Once you pour the hot mixture over the cereal, stir quickly before it cools.
- Grease Hands: Lightly oil your hands to make rolling easier and cleaner.
- Size Matters: Use a cookie scoop for uniform, bakery-style balls.
- Let Cool Slightly: Don’t burn your hands trying to shape too early—wait 5–7 minutes.
Ways to Customize Your Krispie Balls
Drizzles & Dips
- Dip half of each ball in melted chocolate.
- Drizzle white chocolate or caramel on top.
Add-ins
- Chopped nuts (peanuts, pecans, almonds)
- Mini marshmallows
- Shredded coconut
- Crushed pretzels for salty crunch
Swaps
- Almond butter or sunflower seed butter for allergies
- Maple syrup or honey instead of corn syrup (note: softer texture)
Turn Them into Holiday Treats
These little guys are super easy to theme for any occasion!
For Christmas
- Red and green sprinkles
- White chocolate drizzle with crushed peppermint
For Halloween
- Candy eyeballs
- Orange and black chocolate drizzle
For Valentine’s Day
- Pink heart sprinkles
- Strawberry-flavored chocolate dip
For Birthdays
- Rainbow sprinkles
- Add a birthday candle to the top
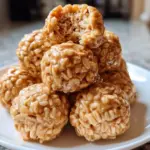
Peanut Butter Rice Krispie Balls
- Prep Time: 15 minutes
- Cook Time: 10 minutes
- Total Time: 25 minutes
- Category: No-Bake Desserts / Sweet Snacks
Description
✨ Crunchy, chewy, and irresistibly nutty — these Peanut Butter Rice Krispie Balls are the ultimate no-bake treat for peanut butter lovers! Perfect for snacking, gifting, or a quick dessert fix. 😋
Ingredients
6 cups Rice Krispies cereal
1 cup creamy peanut butter
1 cup light corn syrup
1 cup powdered sugar
1 tsp vanilla extract
1/2 cup mini chocolate chips
Instructions
Prepare the Cereal Base (2 minutes) 🥣
Add Rice Krispies cereal and mini chocolate chips to a large mixing bowl. Set aside.Make the Peanut Butter Mixture (5 minutes) 🍯
In a saucepan over low heat, combine creamy peanut butter, corn syrup, powdered sugar, and vanilla extract. Stir continuously until the mixture is smooth and well blended.Combine & Mix (3 minutes) 🥄
Pour the warm peanut butter mixture over the cereal and chocolate chips. Stir gently but thoroughly until all the cereal is evenly coated.Shape into Balls (10 minutes) ⚡
Allow the mixture to cool slightly so it’s easy to handle. Scoop about 1 tablespoon at a time and roll into firm balls using your hands.Cool & Set (10 minutes) ❄️
Place the balls on a parchment-lined tray and let them cool at room temperature until firm.Optional Step (2 minutes) 🍫
For a decadent twist, drizzle melted chocolate over the top of each ball or roll them halfway in chocolate.
Notes
These Peanut Butter Rice Krispie Balls are a nostalgic, crunchy-sweet delight that takes minutes to make and requires no baking! Perfect for holidays, lunchboxes, or movie-night treats. 🥜 The combination of creamy peanut butter, crispy cereal, and mini chocolate chips creates a texture that’s both chewy and crunchy. For an extra indulgent touch, drizzle or dip them in melted chocolate before serving — they’ll taste like bite-sized candy bars! 🍫
Nutrition
- Serving Size: 24 balls
- Calories: 130 kcal
Make It Healthier (If You Must)
Let’s be honest—these are treats. But if you want to lighten them up, here are some swaps:
- Use honey or agave instead of corn syrup
- Cut the powdered sugar in half
- Use natural peanut butter (just expect a softer texture)
- Add chia seeds or ground flax for nutrition
- Mix in a scoop of protein powder for post-workout snacking
You may like also : Peanut Butter Rice Krispie Treats with M&M’s and Chocolate Chips: A No-Bake Dessert Everyone Will Crave
Peanut Butter Substitutes: Almond, Cashew & More
Can’t or don’t want to use peanut butter? Try these:
- Almond Butter: Earthier, with a lighter flavor
- Cashew Butter: Creamy and buttery—super smooth
- Sunflower Butter: Nut-free, great for schools and allergies
- Nutella: For a chocolate-hazelnut spin (yum!)
Just note: consistency might vary, so you may need to adjust cereal or syrup slightly.
Perfect for Parties, Gifts, and More
These aren’t just a snack—they’re a moment. Serve them at:
- Birthday parties
- Holiday cookie swaps
- Baby showers
- Picnics or BBQs
- Classroom or office treats
Or package them up in cute bags or boxes and hand them out as edible gifts!
A Kid-Friendly Recipe They’ll Love to Make
Kids love anything messy and hands-on. Let them:
- Mix the cereal and chocolate chips
- Roll the balls (with clean, greased hands!)
- Decorate with sprinkles or drizzle
It’s a fun afternoon activity that ends with dessert. Total win.
The Texture Factor: What Makes These So Addictive
Every bite is a perfect mix of chewy, crunchy, creamy, and melty. The peanut butter sticks everything together, the powdered sugar keeps it soft, the cereal gives that satisfying snap, and the chocolate chips… well, they melt into your mouth just enough to make you want another.

Conclusion: Try It, Share It, Love It
These Peanut Butter Rice Krispie Balls aren’t just a snack—they’re an experience. From the moment you stir the mixture to the first bite, it’s joy in dessert form.
Whether you’re making a treat for yourself, prepping for a party, or getting your kids involved in the kitchen, these no-bake bites are a guaranteed hit. No oven. No stress. Just sweet, peanut-buttery perfection.
So go ahead—make a batch, hide a few for yourself, and share the rest. Just don’t be surprised when everyone asks for the recipe!
Similar recipes :
No-Bake Peanut Butter Oatmeal Sandwich Cookies
Slow Cooker Apple Crisp
FAQs
1. Can I use natural peanut butter?
You can, but it might be too oily or thin. If using natural, stir well and consider reducing the syrup slightly.
2. Can I use a different cereal?
Sure! Try Cheerios, puffed quinoa, or corn flakes for a twist.
3. Can I skip the chocolate chips?
Yep! The balls will still taste great without them—or swap in white chocolate, caramel chips, or dried fruit.
4. How long do they stay fresh?
Up to 7 days in the fridge or 2 months in the freezer. Store in airtight containers.
5. Can I make them in bar form instead?
Absolutely. Just press the mixture into a greased or parchment-lined pan, let it cool, and cut into squares.