If there’s one dessert that never fails to disappear faster than you expect, it’s a no-bake chocolate peanut butter bar. And when you combine that classic flavor duo with a chewy Rice Krispie base and a thick, glossy chocolate topping swirled with creamy peanut butter? Well, that’s not just a snack — that’s an event.
These No-Bake Chocolate Peanut Butter Rice Krispie Squares are rich, thick, and unapologetically indulgent. They’re the kind of treat you slice into generous squares, stack on a plate, and watch people hover around pretending they’re “just looking.” No oven. No fancy equipment. Just simple ingredients, a little stirring, and a whole lot of satisfaction.
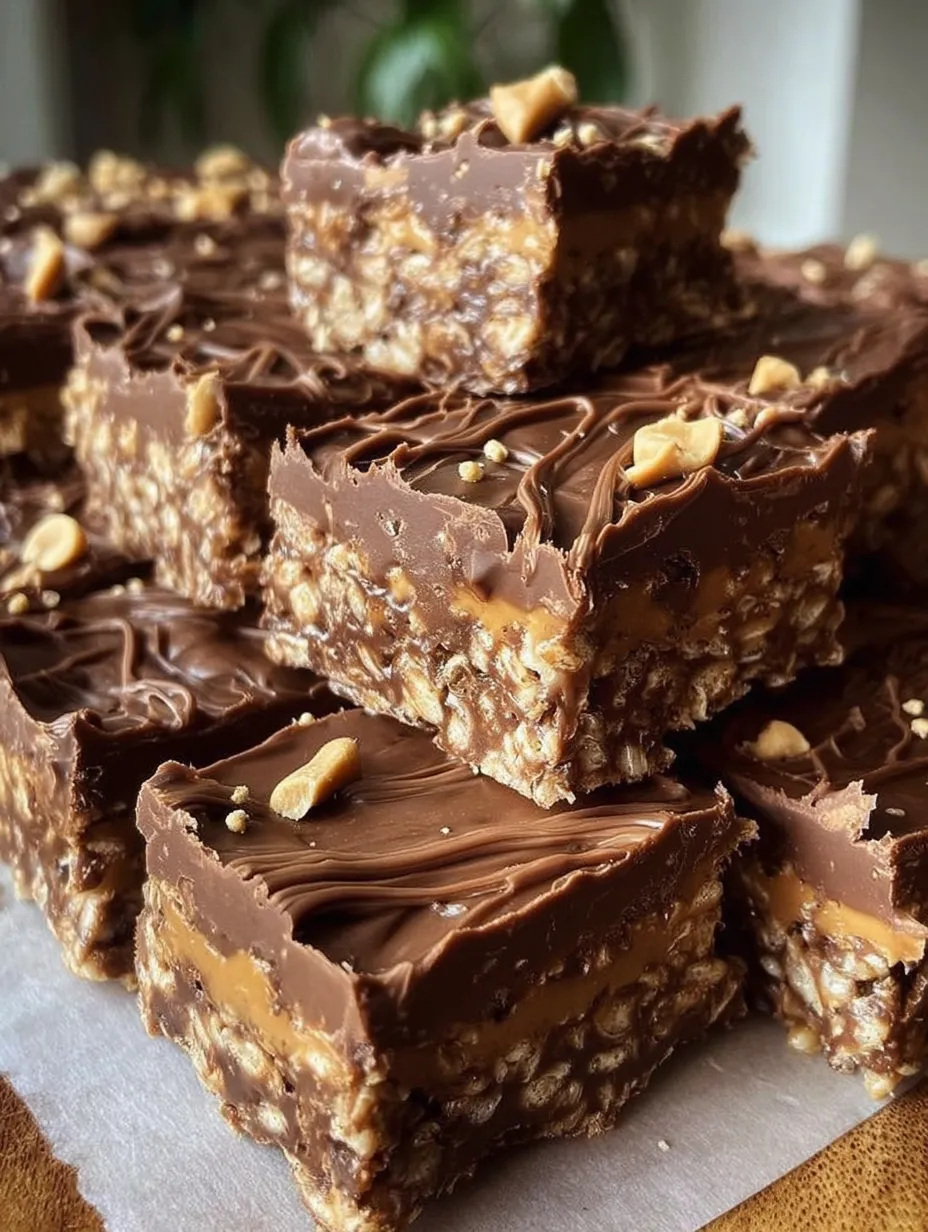
What makes this recipe extra special is the texture contrast. The bottom layer is chewy with just the right amount of crunch from the Rice Krispies, held together by warm peanut butter and honey. On top sits a smooth, glossy chocolate layer, thick enough to feel luxurious, swirled with ribbons of peanut butter that set beautifully once chilled. The final look — exactly like the image you shared — is rustic, rich, and bakery-worthy.
Let’s walk through everything you need to know, from ingredients to tips, variations, and storage, so your bars turn out thick, sliceable, and irresistible every single time.
Why These No-Bake Squares Are Always a Winner
No-bake desserts have a special kind of magic. They feel effortless, but they deliver big flavor. These Rice Krispie squares are especially popular because they check so many boxes at once.
First, they’re quick. From start to fridge, you’re looking at about 20 minutes of hands-on time. Second, they’re reliable. There’s no baking guesswork, no worrying about overcooking or underbaking. And third, they’re crowd-pleasers. Chocolate and peanut butter are universally loved, and the Rice Krispie base adds a nostalgic crunch that makes people smile.
Another reason these bars shine is their thickness. Unlike thin cereal treats, these are pressed firmly into the pan and topped with a generous layer of chocolate. When you cut them, you get clean, bakery-style squares that feel substantial — just like the ones in your photo.
They’re perfect for:
- Bake sales and potlucks
- After-school snacks
- Holiday dessert trays
- Make-ahead treats for busy weeks
- Late-night chocolate cravings
And because they don’t require baking, they’re ideal for warm days when you don’t want to turn on the oven.
Ingredients Breakdown (And Why Each One Matters)
This recipe uses simple, familiar ingredients, but each one plays an important role in the final texture and flavor.
Rice Krispie Base
- 4 cups Rice Krispies cereal
This provides the light crunch and structure. The cereal stays crisp while still being held together by the peanut butter mixture. - ¾ cup creamy peanut butter
Peanut butter acts as both flavor and glue here. Creamy works best for a smooth, cohesive base. - ½ cup honey or maple syrup
This sweetens the base and helps it set without baking. Honey gives a slightly firmer, classic chew, while maple syrup adds a warmer, deeper sweetness. - 1 teaspoon vanilla extract
Vanilla rounds out the flavors and enhances both the peanut butter and chocolate. - ¼ teaspoon salt
Just enough to balance the sweetness and deepen the overall flavor.
Chocolate Topping
- 1½ cups semi-sweet chocolate chips
Semi-sweet chocolate keeps the bars rich without being overly sweet. It also sets nicely in thick layers. - ¾ cup creamy peanut butter
This is for swirling into the chocolate. It adds visual appeal and extra peanut butter flavor in every bite. - 2 tablespoons coconut oil or butter
This helps the chocolate melt smoothly and gives the topping that glossy, professional finish you see in the image.
Optional Garnish
- Crushed peanuts for extra crunch
- Flaky sea salt for contrast and a gourmet touch
Both options complement the bars without overpowering them.
Step-by-Step: How to Make No-Bake Chocolate Peanut Butter Rice Krispie Squares
1️⃣ Prepare the Pan
Start by lining an 8×8-inch or 9×9-inch pan with parchment paper. Leave a bit of overhang on the sides so you can easily lift the bars out later.
This step might seem small, but it makes slicing and serving much easier — especially when the bars are thick and firm.
2️⃣ Make the Rice Krispie Base
In a saucepan over low heat, add the peanut butter and honey (or maple syrup). Stir gently until the mixture is smooth, warm, and pourable. You don’t want it boiling — just warm enough to blend.
Remove the saucepan from heat and stir in:
- Vanilla extract
- Salt
Now add the Rice Krispies cereal. Use a spatula to gently fold everything together until the cereal is evenly coated. Take your time here to avoid crushing the cereal.
Transfer the mixture to the prepared pan. Using the back of a spoon or a piece of parchment paper, press it firmly into an even layer. This step is key for a sturdy base that holds together when sliced.
3️⃣ Prepare the Chocolate Layer
Place the chocolate chips and coconut oil (or butter) in a microwave-safe bowl. Heat in 20-second intervals, stirring between each round, until fully melted and smooth.
In a separate bowl, warm the peanut butter just until it’s pourable. You can microwave it for 10–15 seconds.
Both components should be smooth and fluid — this ensures a clean swirl and glossy finish.
4️⃣ Assemble and Swirl
Pour the melted chocolate evenly over the Rice Krispie base. Use a spatula to gently spread it into a thick, even layer.
Drizzle the warm peanut butter over the chocolate in lines or small pools. Then take a knife or skewer and gently swirl the two together. The goal is a visible marbled pattern, not a fully mixed layer.
This swirling technique is exactly what creates the beautiful, rustic finish shown in the image.
If using garnishes, sprinkle crushed peanuts or flaky sea salt over the top while the chocolate is still soft.
5️⃣ Chill and Set
Place the pan in the refrigerator for 1 to 2 hours, or until the chocolate is completely firm.
Chilling allows the layers to set cleanly, making it easier to cut thick, neat squares.
6️⃣ Slice and Serve
Once set, lift the bars out of the pan using the parchment overhang. Use a sharp knife to cut into thick squares.
For extra clean cuts, wipe the knife between slices.
What Makes These Bars Look So Good (Like the Image)
The final appearance of these bars is all about thickness, texture, and swirl.
- The base is pressed firmly, creating clean edges
- The chocolate layer is thick, not skimpy
- The peanut butter swirl stays visible and glossy
- The top has a slightly rustic finish, not overly smooth
These small details give the bars that homemade-but-polished look that makes people assume they took much more effort than they actually did.
Tips for Perfect No-Bake Rice Krispie Squares Every Time
- Use low heat when warming peanut butter to avoid separation
- Press the base firmly so it doesn’t crumble
- Let the chocolate cool slightly before swirling for better definition
- Chill fully before slicing for clean edges
- Store chilled if your kitchen is warm
You may also like :
🍌 Banana Pudding Rice Krispie Treats Recipe: Sweet, Creamy, Crunchy Bliss!
Rice Krispie Cheddar Crackers (Ultra-Crispy & Addictive)
Fun Variations to Try
Once you’ve mastered the base recipe, it’s easy to customize.
- Dark Chocolate Version: Use dark chocolate chips for a deeper flavor
- Crunchy Peanut Butter: Swap creamy for added texture
- Nut-Free Option: Use sunflower seed butter
- Extra Crunch: Add chopped peanuts into the base
- Holiday Twist: Sprinkle festive toppings on the chocolate
No-Bake Chocolate Peanut Butter Rice Krispie Squares
- Prep Time: 20 minutes
- Total Time: 1 hour 20 minutes
- Category: No-Bake Desserts / Dessert Bars / Sweet Treats
Description
Thick, rich, and irresistibly layered! ✨ These no-bake squares feature a chewy peanut butter Rice Krispie base topped with a smooth, glossy chocolate layer swirled with creamy peanut butter. No oven required — just pure indulgence in every bite 😍🍫
Ingredients
Rice Krispie Base
4 cups Rice Krispies cereal
¾ cup creamy peanut butter
½ cup honey or maple syrup
1 teaspoon vanilla extract
¼ teaspoon salt
Chocolate Topping
1½ cups semi-sweet chocolate chips
¾ cup creamy peanut butter
2 tablespoons coconut oil or butter
Optional Garnish
Crushed peanuts or flaky sea salt
Instructions
Line an 8×8 or 9×9-inch pan with parchment paper, leaving extra overhang for easy lifting later. (5 minutes 🧻)
In a saucepan over low heat, gently warm the peanut butter and honey until smooth and pourable. Remove from heat, then stir in vanilla extract and salt. (5 minutes 🔥🥄)
Add Rice Krispies to the warm mixture and fold gently until fully coated. Press the mixture firmly and evenly into the prepared pan to form a compact base. (5 minutes 🍚✨)
In a microwave-safe bowl, melt the chocolate chips with coconut oil in 20-second intervals, stirring between each, until smooth and glossy. (2–3 minutes 🍫)
Warm the peanut butter separately just until pourable. (1 minute 🥜)
Pour the melted chocolate evenly over the Rice Krispie base. Drizzle the warm peanut butter on top and gently swirl using a knife or skewer. Do not overmix. Sprinkle with crushed peanuts or flaky sea salt if desired. (5 minutes 🎨✨)
Refrigerate until fully set and firm. (1–2 hours ❄️)
Lift from the pan using the parchment paper and slice into thick, satisfying squares. (5 minutes 🔪😊)
Notes
Perfect for hot days since there’s no oven required ❄️
Use parchment paper for clean edges and easy removal.
For sharper slices, chill well and cut with a warm knife 🔪
Can be stored in the refrigerator for up to 5 days in an airtight container.
Freezer-friendly: freeze up to 1 month and thaw slightly before serving.
You can swap honey with maple syrup for a slightly deeper flavor 🍯🍁
Nutrition
- Serving Size: 12 squares
- Calories: ~280 kcal per serving
Storage and Make-Ahead Tips
These bars store beautifully, making them perfect for prepping ahead.
- Refrigerator: Store in an airtight container for up to 7 days
- Freezer: Freeze for up to 2 months; thaw slightly before serving
- Room Temperature: Best for short periods in cooler climates
Nutrition & Yield
- Prep Time: 20 minutes
- Chill Time: 1–2 hours
- Servings: 12 thick squares
- Calories: ~280 kcal per square
Conclusion
These No-Bake Chocolate Peanut Butter Rice Krispie Squares are everything a great dessert should be: easy, indulgent, and completely satisfying. With their chewy base, rich chocolate topping, and beautiful peanut butter swirl, they look just as good as they taste — and just like the image you shared.
Whether you’re making them for a gathering or keeping them all to yourself, one thing is guaranteed: they won’t last long.
Similar recipes :
Peanut Butter Rice Krispie Treats with M&M’s and Chocolate Chips
Peanut Butter Rice Krispie Balls – Your New Favorite No-Bake Treat
FAQs
1. Can I use maple syrup instead of honey?
Yes, both work beautifully. Honey gives a firmer set, while maple syrup adds a softer chew.
2. Do these need to stay refrigerated?
They’re best stored chilled, especially in warmer kitchens.
3. Can I make these gluten-free?
Yes, just use gluten-free Rice Krispies.
4. Why is my chocolate layer dull?
Adding coconut oil or butter helps create a glossy finish.
5. Can I double the recipe?
Absolutely — use a 9×13-inch pan and increase chilling time slightly.


