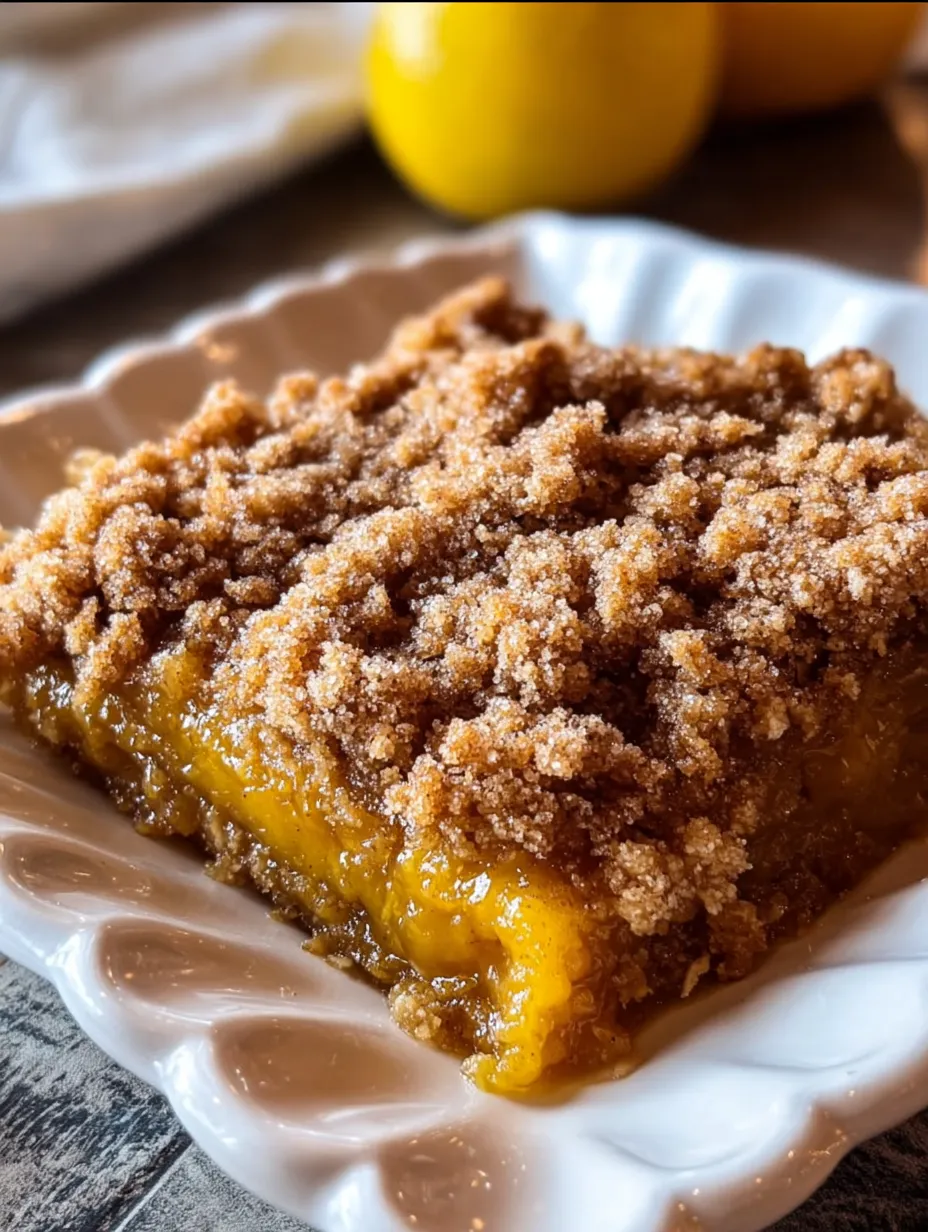
There’s something magical about fall—the crisp air, the warm sweaters, and, of course, the comforting flavors that fill the kitchen. If you’re a fan of pumpkin pie but crave something with more texture and crunch, Pumpkin Crisp is about to become your new seasonal obsession.
This dessert combines everything you love about pumpkin pie—the smooth, spiced filling—with a buttery, crumbly topping that adds the perfect crunch. Imagine the sweet scent of cinnamon and nutmeg wafting through your home as the golden topping bakes to perfection. It’s cozy, it’s comforting, and it tastes just like autumn.
A Dessert That Tastes Like Autumn in Every Bite
Pumpkin Crisp is the ultimate fall dessert for people who want that traditional pumpkin flavor without the fuss of pie crusts. It’s rich, creamy, sweet, and crunchy all at once. And the best part? You only need a few pantry staples and less than an hour from start to finish.
The Perfect Fusion of Pumpkin Pie and Crisp Crumble
Think of Pumpkin Crisp as the love child of pumpkin pie and apple crisp. The base is silky pumpkin custard infused with warm spices, and the top is a buttery, crumbly layer made from yellow cake mix and melted butter. The two layers bake together to create a golden, caramelized crust over a creamy filling.
The result? A dessert that’s both elegant and comforting—perfect for Thanksgiving, Christmas, or any cozy night at home.
Why Pumpkin Crisp Deserves a Spot on Your Dessert Table
Because it’s simple, stunning, and soul-warming. Unlike pumpkin pie, there’s no need to fuss with dough or blind-baking. Everything mixes in one bowl, goes straight into the oven, and comes out bubbling with that irresistible buttery aroma.
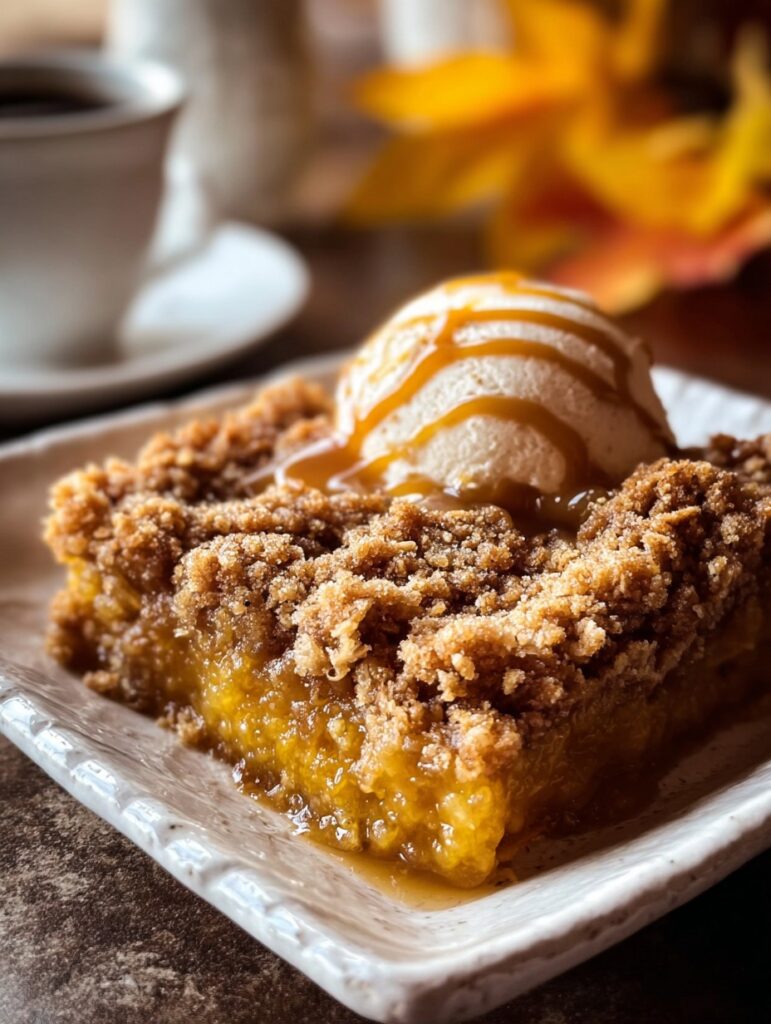
It’s a guaranteed crowd-pleaser that can be dressed up with whipped cream, served warm with vanilla ice cream, or enjoyed plain with a cup of coffee. However you serve it, Pumpkin Crisp is a taste of pure fall bliss.
Ingredients You’ll Need for the Best Pumpkin Crisp
Let’s break down the ingredients that make this dessert so special. Each one plays a deliciously important role.
Pumpkin Purée – The Star Ingredient
You’ll need one 15-ounce can of pumpkin purée. Make sure to use pure pumpkin, not pumpkin pie filling. The puree gives that smooth, rich base while letting you control the sweetness and spice levels.
Evaporated Milk – The Secret to Creaminess
This is what gives your pumpkin layer that silky, custard-like texture. The 12-ounce can of evaporated milk blends beautifully with the eggs and sugar to create a creamy filling that melts in your mouth.
Eggs and Sugar – Sweetness and Structure
You’ll use 3 large eggs and 1 cup of granulated sugar to bring structure and sweetness to your filling. The eggs help the pumpkin mixture set perfectly while the sugar enhances the warm, earthy pumpkin flavor.
Pumpkin Pie Spice – The Flavor of Fall
Use 1 tablespoon of pumpkin pie spice or make your own with 2 teaspoons cinnamon, ½ teaspoon nutmeg, and ½ teaspoon ginger. These spices give your dessert that unmistakable fall aroma that instantly makes your kitchen feel like home.
Yellow Cake Mix – The Shortcut That Works Like Magic
Here’s the genius part—1 box of dry yellow cake mix becomes the crispy topping. You simply sprinkle it over the pumpkin layer and drizzle butter on top. It bakes into a crunchy, caramelized crumble that’s absolutely addictive.
Melted Butter – The Golden Crunch Maker
Butter is what transforms the cake mix into a golden, crisp topping. Use ¾ cup of melted unsalted butter, and make sure to drizzle it evenly for the best results.
Optional Add-Ins – Nuts, Caramel, and More
If you want to get fancy, sprinkle chopped pecans or walnuts over the cake mix before baking. They toast beautifully in the oven and add an irresistible crunch. Or, for extra indulgence, drizzle caramel sauce on top right before serving.
Step-by-Step Instructions for Making Pumpkin Crisp
Now that we’ve covered the ingredients, it’s time to bring everything together. Follow these simple steps for a dessert that’s as beautiful as it is delicious.
Step 1: Preheat and Prepare
Preheat your oven to 350°F (175°C). Grease a 9×13-inch baking dish with butter or nonstick spray. This ensures your crisp comes out easily and doesn’t stick to the bottom.
Step 2: Mix the Pumpkin Filling
In a large mixing bowl, combine the pumpkin purée, evaporated milk, eggs, sugar, vanilla extract, and pumpkin pie spice. Whisk until the mixture is completely smooth and creamy.
It should have a rich, custard-like consistency with a beautiful orange hue. Pour this mixture into your prepared baking dish and spread it evenly with a spatula.
Step 3: Assemble the Layers
Once your pumpkin filling is poured into the baking dish, it’s time to add the magic—the buttery crumble topping. Take your dry yellow cake mix (do not mix it with eggs or milk—keep it dry) and sprinkle it evenly over the pumpkin filling. Try to cover the entire surface so there are no gaps; this ensures every bite gets that perfect crunchy layer.
Next, slowly drizzle the ¾ cup of melted butter over the cake mix. The key here is to drizzle evenly across the surface rather than pouring it all in one spot. The butter will soak into the cake mix, creating that golden-brown, crumbly texture we love.
If you’re adding nuts, now’s the time! Scatter chopped pecans or walnuts over the top before baking. As they toast, they’ll add depth and crunch that complements the creamy pumpkin base beautifully.
The pan will now look layered—with the vibrant orange pumpkin filling underneath and the buttery, sandy topping on top. It’s already a sight to behold!
Step 4: Bake to Perfection
Place your baking dish into the preheated oven and bake for 40–45 minutes, or until the top is golden brown and the pumpkin filling is set.
You’ll know it’s done when the topping has a deep golden color and the edges bubble slightly with caramelized butter. You can test doneness by inserting a toothpick into the center; it should come out mostly clean with just a few moist crumbs.
The aroma that fills your kitchen during this step? Pure heaven—warm cinnamon, buttery crumble, and sweet pumpkin mingling together. It’s the scent of autumn itself.
Pro Tip: If you prefer a crunchier top, bake for an extra 5 minutes. If you like a softer texture, remove it at the 40-minute mark.
Step 5: Cool, Serve, and Enjoy
When the crisp is done baking, remove it from the oven and let it cool for at least 10–15 minutes. This allows the pumpkin layer to set completely and makes it easier to slice and serve.
Serve it warm for the ultimate comfort dessert experience. The best part? You can dress it up however you like:
- A scoop of vanilla ice cream – melts beautifully into the crisp, creating a caramel-like sauce.
- A dollop of whipped cream – adds a light, airy contrast to the rich filling.
- A drizzle of caramel or maple syrup – enhances the flavor and gives it that irresistible glossy finish.
Each bite delivers a heavenly blend of smooth pumpkin custard and crisp, buttery topping with just the right amount of spice. It’s cozy, nostalgic, and utterly satisfying.
Tips and Tricks for the Perfect Pumpkin Crisp
Want to take your Pumpkin Crisp from great to unforgettable? Here are a few simple tricks to guarantee success every time.
Texture Tips for a Creamy and Crunchy Balance
- Use cold evaporated milk—it helps thicken the pumpkin layer while baking.
- Don’t stir the cake mix into the pumpkin filling. The layering is what creates the crisp contrast between soft and crunchy.
- Allow the crisp to cool slightly before serving. This helps the layers firm up while keeping that luscious, creamy interior.
Choosing the Right Cake Mix and Butter
Stick with a classic yellow cake mix for the best flavor—it adds a buttery, slightly vanilla-like note that pairs beautifully with pumpkin. However, you can experiment with spice cake mix for an extra punch of fall flavor.
When it comes to butter, always go for unsalted. Salted butter can make the topping too salty since the cake mix already contains sodium. Melt it just before drizzling to ensure smooth, even coverage.
Flavor Boosters for the Ultimate Fall Experience
Want to elevate your Pumpkin Crisp even more? Try these:
- Add a teaspoon of maple syrup or brown sugar to the pumpkin mixture for deeper sweetness.
- Sprinkle a pinch of sea salt on top before baking to balance the flavors.
- Stir in mini butterscotch chips or white chocolate chips with the cake mix layer for an indulgent twist.
Pumpkin Crisp
- Prep Time: 10 minutes
- Cook Time: 40 minutes
- Total Time: 50 minutes
- Category: Dessert
Description
🍁 Cozy, sweet, and full of fall flavor — this Pumpkin Crisp is a warm and comforting dessert that tastes like autumn in every bite! 🧡 With creamy spiced pumpkin filling, buttery cake topping, and a golden crisp crust, it’s perfect for Thanksgiving or any chilly evening treat. ✨🍰
Ingredients
1 can (15 oz) pumpkin purée
1 can (12 oz) evaporated milk
3 large eggs
1 cup granulated sugar
1 teaspoon vanilla extract
1 tablespoon pumpkin pie spice (or 2 tsp cinnamon + ½ tsp nutmeg + ½ tsp ginger)
1 box yellow cake mix (dry)
¾ cup unsalted butter, melted
Instructions
Preheat oven to 350°F (175°C). Grease a 9×13-inch baking dish. (5 minutes)
Mix together pumpkin purée, evaporated milk, eggs, sugar, vanilla, and pumpkin pie spice in a large bowl until smooth and creamy. (5 minutes)
Pour the pumpkin mixture into the prepared baking dish, spreading evenly. (2 minutes)
Sprinkle the dry yellow cake mix evenly over the pumpkin filling — do not stir. (2 minutes)
Drizzle the melted butter evenly across the top, covering as much as possible. (2 minutes)
Bake for 40–45 minutes, or until the top is golden brown and the center is set. A toothpick should come out clean. (45 minutes)
Cool slightly before serving. Enjoy warm, topped with whipped cream or vanilla ice cream if desired! 🍨✨ (10 minutes)
Notes
🧈 Butter coverage matters! Make sure the melted butter is spread evenly across the cake mix to ensure a crisp, golden topping.
🌰 Add crunch: Sprinkle chopped pecans or walnuts on top before baking for extra texture and a nutty twist.
🍦 Serving tip: This dessert tastes amazing served warm with a scoop of vanilla ice cream or a dollop of whipped cream.
🎃 Flavor boost: Use homemade pumpkin pie spice for deeper, fresher flavor.
❄️ Storage: Store leftovers covered in the fridge for up to 4 days. Reheat in the oven or microwave before serving.
Nutrition
- Serving Size: 8 servings
- Calories: 350 kcal
Delicious Variations to Try
Once you fall in love with the original (and trust me, you will), try experimenting with a few fun variations!
Pumpkin Pecan Crisp
Add a full ½ cup of chopped pecans to the topping before baking. The pecans toast beautifully in the oven, adding a nutty aroma and satisfying crunch that pairs perfectly with the silky pumpkin base.
Pumpkin Apple Crisp
For a fruity twist, spread a thin layer of sliced apples or apple pie filling between the pumpkin layer and the cake mix. The apples add a tart-sweet flavor that balances the creamy pumpkin beautifully.
Pumpkin Caramel Delight
Drizzle caramel sauce both before and after baking for an ultra-rich version. You’ll end up with a gooey, sticky caramel layer that clings to the crisp topping—it’s absolutely irresistible with vanilla ice cream.
How to Serve Pumpkin Crisp Like a Pro
Pumpkin Crisp is the kind of dessert that can look rustic or refined, depending on how you serve it.
Perfect Pairings – Ice Cream, Whipped Cream, and More
Here are some classic (and creative) serving ideas:
- Vanilla Bean Ice Cream: The ultimate contrast—cold and creamy meets warm and spicy.
- Whipped Cream with Cinnamon Dusting: Simple, elegant, and light enough to balance the richness.
- Salted Caramel Drizzle: Takes the dessert from homestyle to restaurant-level fancy.
- Espresso or Coffee: A slightly bitter cup of coffee pairs perfectly with the sweet, buttery flavors.
Presentation Tips for Holidays and Gatherings
For holidays like Thanksgiving, serve Pumpkin Crisp in individual ramekins or mason jars for a charming touch. You can even top each serving with a mini cinnamon stick or a sprinkle of crushed graham crackers for texture.
Want to impress your guests? Garnish with a small mint leaf or edible gold flakes for a showstopping finish.
You may like also :
Flourless Pumpkin Muffins – A Cozy Fall Favorite
Storage and Make-Ahead Tips
Pumpkin Crisp is not only delicious fresh out of the oven—it also stores and reheats beautifully.
How to Store Leftovers Properly
Once cooled, cover the dish tightly with foil or plastic wrap and store in the refrigerator for up to 5 days. The topping may soften slightly, but the flavors deepen as it sits, making it even better the next day.
How to Reheat Without Losing Crunch
To bring back that fresh-baked crispiness, reheat individual portions in the oven at 350°F (175°C) for about 10–15 minutes. Avoid microwaving if possible—it can make the topping soggy.
If you must use the microwave, reheat in short intervals and finish under a toaster oven or broiler for a minute to restore crunch.
Nutritional Breakdown (Per Serving)
Let’s be honest—Pumpkin Crisp is pure comfort food, not a “diet” dessert. But it’s nice to know what you’re indulging in. Each serving (based on 8 portions) has approximately 350 calories, which is quite reasonable for something this rich and satisfying.
Here’s an approximate nutritional snapshot per serving:
| Nutrient | Amount |
|---|---|
| Calories | 350 kcal |
| Carbohydrates | 48 g |
| Sugars | 33 g |
| Fat | 15 g |
| Protein | 5 g |
| Fiber | 2 g |
Keep in mind, this will vary depending on your specific ingredients (and if you add nuts, caramel, or whipped cream). But even so, each bite feels worth every single calorie—it’s a dessert that feeds both the stomach and the soul.
The Indulgence You Can Feel Good About
Pumpkin is naturally rich in vitamin A, fiber, and antioxidants, so at least part of this dessert is actually good for you! It supports healthy skin and eyesight, while the comforting spices—like cinnamon and ginger—have natural warming and anti-inflammatory properties.
So yes, Pumpkin Crisp is indulgent, but it’s also packed with cozy, feel-good ingredients that make it a guilt-free pleasure (in moderation, of course).
Common Mistakes to Avoid
Even a foolproof recipe like Pumpkin Crisp can go wrong if you rush through it. Here’s how to ensure your dessert turns out perfect every time.
Overmixing or Undercooking
One of the biggest mistakes people make is mixing the layers together. Remember—this is not a cake. You’re supposed to layer the dry cake mix over the pumpkin filling, not stir it in. Mixing will ruin the crisp topping and turn it into a dense, mushy texture.
Another issue is undercooking. The filling needs time to set, so always bake for at least 40–45 minutes. If the center jiggles too much when shaken, give it a few more minutes. It should be firm yet custard-like, similar to pumpkin pie.
Uneven Butter Drizzle – The Trick to Perfect Crumble
If you pour all the butter in one spot, you’ll end up with patches of dry cake mix that don’t bake properly. The secret? Drizzle the melted butter slowly and evenly over the entire surface.
You can even use a pastry brush or spoon to help spread it more uniformly. This ensures every inch of your dessert develops that irresistible golden-brown crust.
Bonus Tip: If your topping still looks a little powdery after baking, you can lightly spritz it with melted butter and pop it back in the oven for 5 more minutes. That’ll do the trick!
Similar recipes :
Flourless Pumpkin Spice Greek Yogurt Cake – Cozy, Light & Guilt-Free Fall Bliss
Pumpkin Spice Gooey Cake: A Cozy Autumn Dessert
No-Bake Pumpkin Pie – Creamy, Cozy, and Oven-Free Comfort!
Conclusion – The Fall Dessert Everyone Will Love
Warm, buttery, and full of cozy spice, Pumpkin Crisp is everything you love about fall in one baking dish. It’s simple enough for weeknights but elegant enough for Thanksgiving dinner. Every spoonful gives you the best of both worlds—the creamy smoothness of pumpkin pie and the crumbly sweetness of a crisp topping.
What makes this dessert truly special is its effortless elegance. You don’t need fancy ingredients or baking skills to make something that looks (and tastes) like it came straight out of a high-end bakery. It’s the perfect combination of rustic charm and indulgent flavor.
So next time you crave a fall dessert that’s comforting, easy, and absolutely delicious, skip the pie crust and go for this Pumpkin Crisp. Serve it warm, top it with ice cream, and let that buttery crumble melt into the creamy pumpkin base. It’s fall on a plate—and once you try it, it might just become your new seasonal tradition.
FAQs About Pumpkin Crisp
1. Can I make Pumpkin Crisp ahead of time?
Absolutely! You can prepare the pumpkin layer a day in advance, refrigerate it, and then add the cake mix and butter just before baking. This makes it a perfect make-ahead dessert for busy holidays.
2. Can I use fresh pumpkin instead of canned?
Yes, you can! Just roast and purée your fresh pumpkin until smooth. Use about 1¾ cups of homemade purée to replace the 15-ounce can. Make sure it’s not too watery—strain it if needed.
3. How do I keep my topping crispy after refrigeration?
If your topping softens after chilling, reheat your serving in the oven at 350°F for about 10 minutes. This will re-crisp the buttery crumble layer perfectly.
4. Can I make this gluten-free?
Definitely! Substitute the yellow cake mix with your favorite gluten-free cake mix. The texture and taste will remain almost identical, and no one will even notice the difference.
5. What can I serve with Pumpkin Crisp?
It’s amazing on its own, but for extra decadence, serve it with vanilla ice cream, whipped cream, or a drizzle of caramel sauce. If you want to get creative, add a sprinkle of toasted coconut or a dash of sea salt for a gourmet touch.


