Introduction to Raspberry Pistachio Mousse Cakes
Let’s be honest—sometimes life gets hectic, and I find myself needing a quick yet delightful dessert to cap off a busy day. That’s where these Raspberry Pistachio Mousse Cakes come into play! They’re the kind of treat that not only looks impressive but tastes divine. Picture this: layers of creamy mousse infused with rich pistachios, brightened by tangy raspberry compote. It’s a sweet escape that anyone will love. Whether you want to treat your family or impress friends at a gathering, this recipe feels like a warm hug on a plate!
Why You’ll Love This Raspberry Pistachio Mousse Cakes
These Raspberry Pistachio Mousse Cakes truly shine when it comes to balancing flavors and textures. The ease of preparation means you won’t spend hours in the kitchen. Perfect for any busy mom or professional, they deliver a stunning dessert with a wow factor. Whether you’re celebrating a special occasion or simply treating yourself, each bite bursts with delightful raspberry and nutty pistachio flavors. Sounds tempting, right?
Ingredients for Raspberry Pistachio Mousse Cakes
Before diving into the delightful world of Raspberry Pistachio Mousse Cakes, let’s chat about the ingredients you’ll need. Not only are they delicious but also accessible, making this dessert perfect for anyone, even on a busy day. Here’s your shopping list:
- Pistachios: Roasted and unsalted, they bring a lovely nutty flavor that enhances the entire dessert.
- Almond Flour: This adds moisture and a slight sweetness, balancing the nutty flavor of the pistachios.
- Sugar: Essential for boosting sweetness in the mousse and compote, but feel free to adjust based on your taste!
- Melted Butter: It binds the cake base, providing richness that enhances all the flavors.
- Egg: The binding agent that gives our cake structure, making it light yet firm.
- Vanilla Extract: A touch of warmth that complements the pistachios and raspberries beautifully.
- Heavy Cream: For that luscious mousse texture, whipped to perfection. Make sure it’s chilled for best results!
- Gelatin Powder: This helps set your mousse, ensuring it holds its shape beautifully.
- Raspberries: Fresh or frozen, they provide that tangy punch we all crave. Adjust the sweetness as needed!
- Lemon Juice: Brightens the flavors of your raspberry compote, adding a zing that awakens the taste buds.
- Cornstarch: Helps thicken the raspberry compote, creating a perfect spread over your mousse.
For exact measurements, don’t worry—they’re all detailed at the end of the article and available for printing. Now, let’s get to the fun part—making these extraordinary mousse cakes!
How to Make Raspberry Pistachio Mousse Cakes
Let’s roll up our sleeves and dive into the delightful layers of these Raspberry Pistachio Mousse Cakes. Each step is straightforward, so you can enjoy the process. This isn’t just about baking; it’s about creating something truly special!
Step 1: Preheat the Oven
First things first, preheat your oven to 350°F (175°C). Preheating ensures that your cake base rises beautifully, creating that perfect texture. If the oven isn’t hot enough, the cake may turn out dense and heavy. Trust me; you want a light and airy base for these layered desserts!
Step 2: Prepare the Pistachio Base
In a mixing bowl, combine finely ground pistachios, almond flour, sugar, melted butter, egg, and vanilla extract. Mix until everything is well blended. This combination should feel somewhat like a thick, damp sand—perfect for pressing into your molds. You’ll develop a lovely nutty flavor, setting a strong foundation for your mousse cakes.
Step 3: Bake the Base
Now, press that mixture into your molds and pop them in the oven. Bake for about 12 to 15 minutes, keeping a close eye on them. You’ll know the bases are done when they begin to turn a light golden color and feel firm to the touch. Let them cool completely afterward; this will ensure a sturdy base for the mousse layers!
Step 4: Prepare the Gelatin
While your bases are cooling, let’s prepare the gelatin. In a small bowl, sprinkle the gelatin powder over cold water and let it sit for about 5 minutes. This process is called blooming and it’s vital. Blooming allows the gelatin to dissolve properly, ensuring a smooth consistency in your mousse.
Step 5: Make the Pistachio Mousse
In another bowl, blend together the remaining finely ground pistachios, heavy cream, sugar, and vanilla extract until smooth. The next part is the most fun! Heat the bloomed gelatin until it dissolves completely, then mix it into the pistachio blend. Make sure it’s well combined! Now, whip some heavy cream in a separate bowl. It should create soft peaks. Gently fold this whipped cream into the pistachio mixture to keep it airy and fluffy!
Step 6: Layer the Mousse
Take your cooled pistachio base and layer the mousse generously over it. Give it a gentle shake to smoothen the top and settle the mousse. Now, pop it in the fridge for 30 minutes. This initial chill helps create distinct layers, which look so beautiful when you cut into the cakes.
Step 7: Cook the Raspberry Compote
While the mousse chills, let’s make that luscious raspberry compote. In a saucepan, combine the raspberries, sugar, and lemon juice. Cook on medium heat for about 5 minutes until the berries soften. Be sure to mash slightly with a spoon for even consistency. Adjust the sweetness based on your taste; you want a balance between sweet and tart that resonates with the raspberry’s natural flavor.
Step 8: Incorporate Raspberry Layer
After the compote cools, use cornstarch mixed with water to thicken the mixture. Cook it for a bit until it thickens to your desired consistency. Next, let’s work on the raspberry mousse layer! Bloom your gelatin again in cold water and mix it into the warm raspberry puree. Set it aside to cool slightly, then fold in whipped cream—just like you did with the pistachio mousse!
Step 9: Chill and Set
Once all layers are added, it’s time to chill once more. Cover the molds and let them sit in the fridge for at least 4 hours, or if you can wait, overnight. This rest period allows the flavors to meld beautifully while also ensuring that your Raspberry Pistachio Mousse Cakes set perfectly, revealing those stunning layers when you serve them.
Tips for Success
- Use unsalted roasted pistachios for a fresher flavor.
- Ensure your heavy cream is well chilled for maximum volume when whipping.
- Adjust sugar levels in the raspberry compote based on berry tartness.
- Patience is key—allow ample chilling time for the best texture.
- Experiment with garnishes like fresh mint or edible flowers for extra flair!
Equipment Needed
- Muffin or tart pans: If you don’t have these, silicone molds work great too!
- Mixing bowls: A set of different sizes is handy for all your mixing needs.
- Whisk: An electric hand mixer can save time, but a simple whisk works, too.
- Saucepan: Needed for cooking the raspberry compote—any small pot will do!
- Spatula: Essential for folding in ingredients without losing that light texture.
Variations
- Nut-Free Option: Substitute the pistachios with sunflower seed flour or oat flour for a nut-free version that still has great texture.
- Vegan Adaptation: Use aquafaba (chickpea water) whipped to form peaks instead of heavy cream, and replace gelatin with agar-agar for a plant-based option.
- Chocolate Twist: Incorporate cocoa powder into your pistachio mousse for a delightful chocolate-pistachio combination.
- Seasonal Fruit Swap: Experiment with different fruits like strawberries or blueberries in place of raspberries; just adjust the sweetness accordingly!
- Gluten-Free Version: Ensure almond flour is certified gluten-free, and replace any flour in the base if needed with additional almond flour or gluten-free flour blend.
Serving Suggestions
- Pair these Raspberry Pistachio Mousse Cakes with a dollop of whipped cream for added indulgence.
- Serve alongside a light herbal tea for a refreshing balance of flavors.
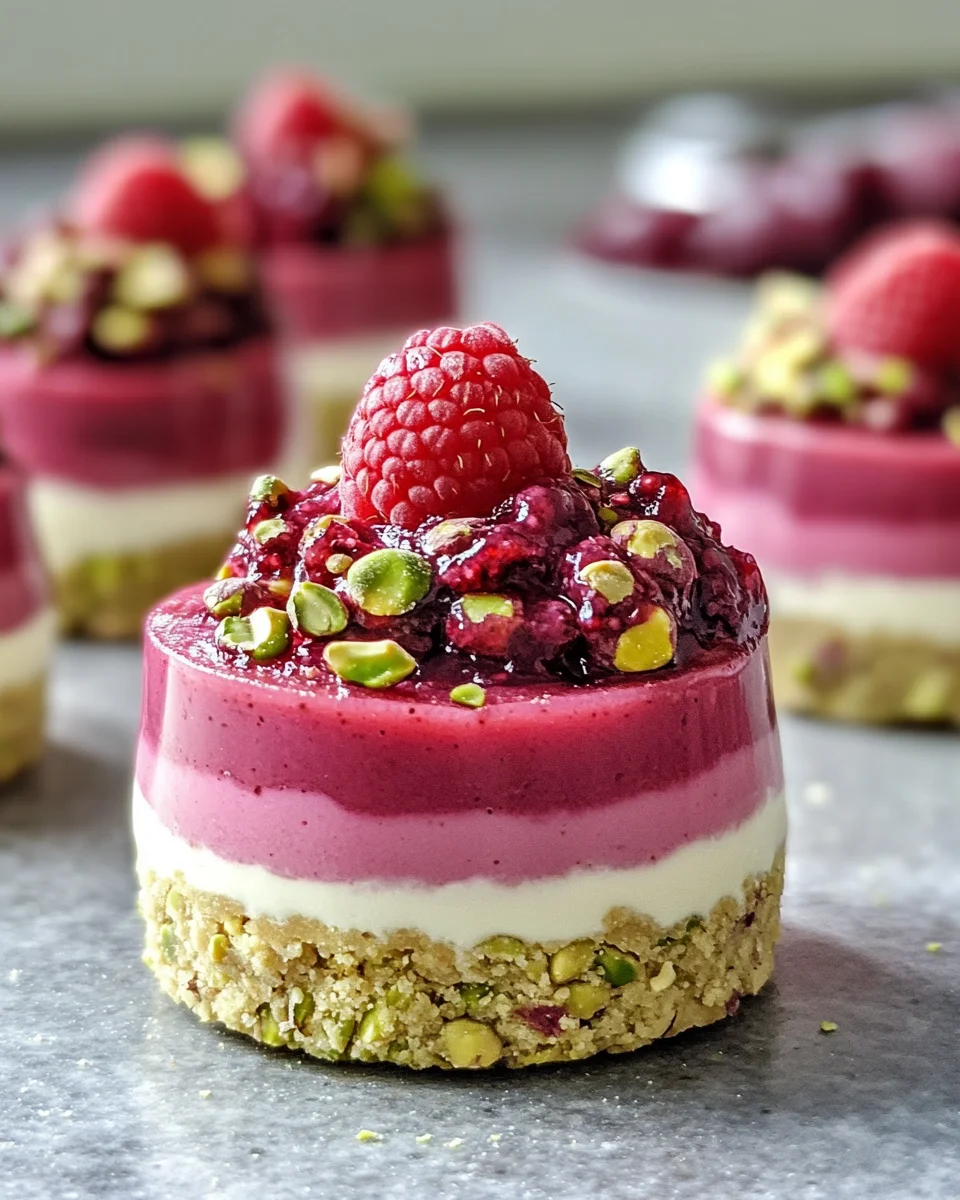
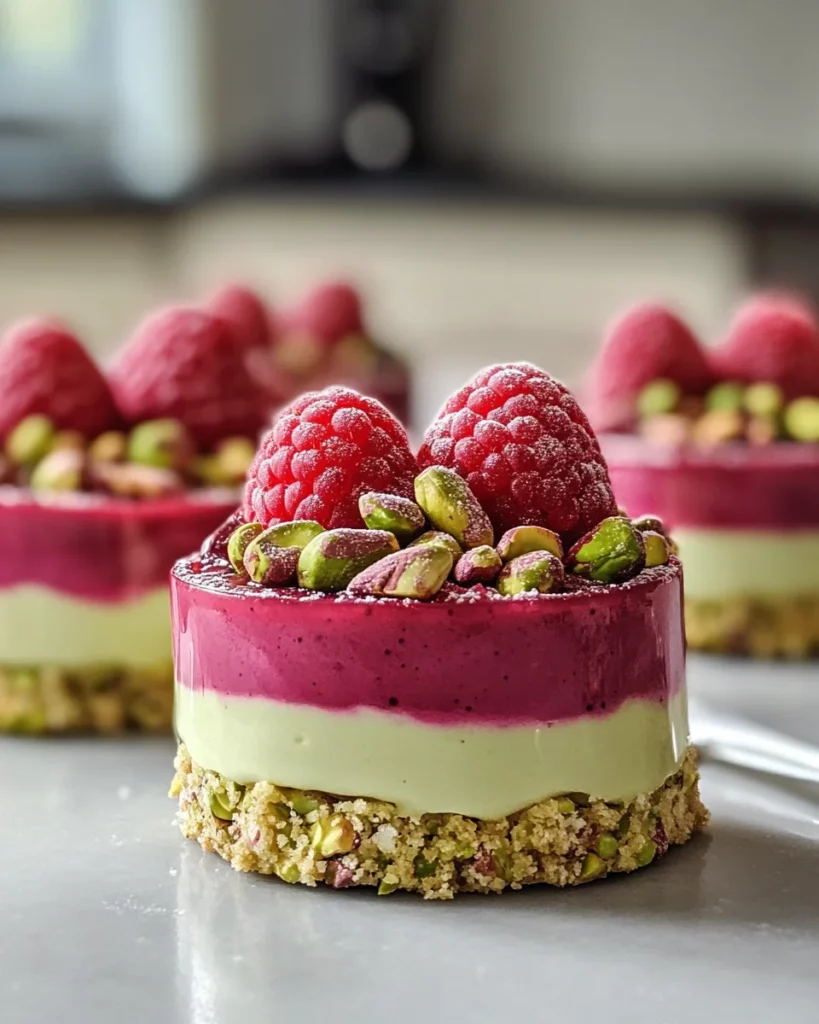
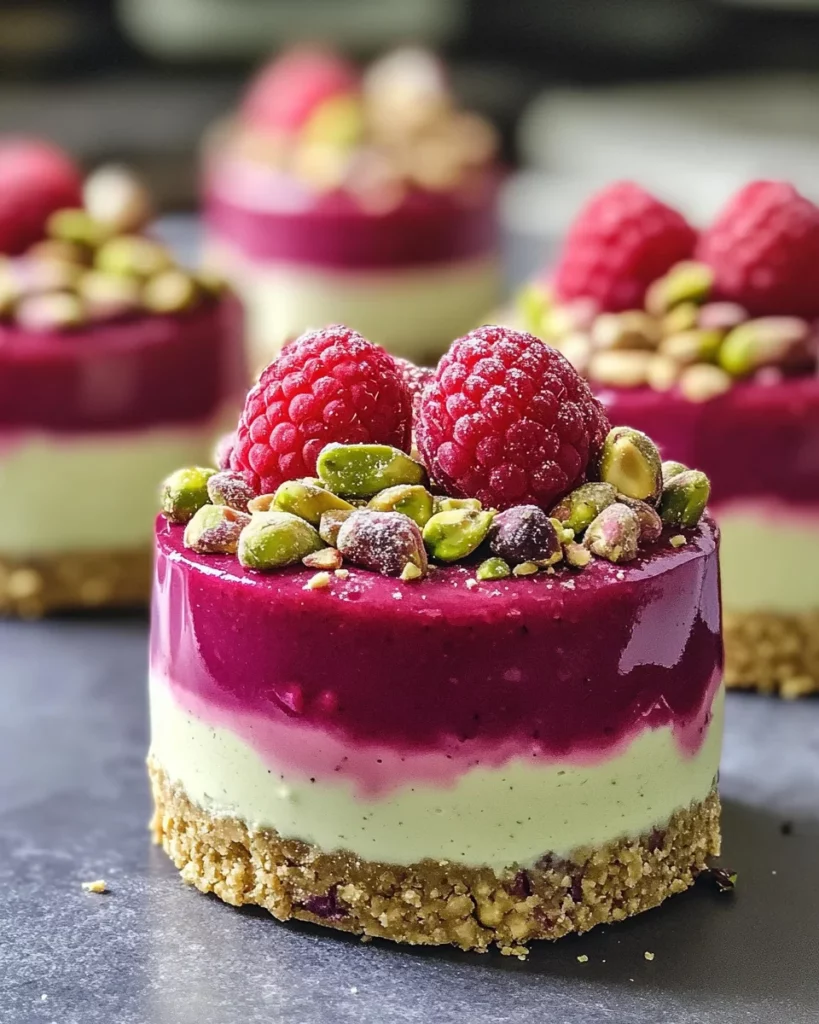
- Garnish with fresh raspberries and crushed pistachios for an eye-catching presentation.
- A sprinkle of edible flowers can elevate the visual appeal for special occasions.
- Include a scoop of vanilla ice cream for a classic treat that can’t be beaten!
FAQs about Raspberry Pistachio Mousse Cakes
Curiosity is natural when it comes to making these Raspberry Pistachio Mousse Cakes. I’ve gathered some common questions you might have and I’m excited to share the answers with you!
Can I make these Raspberry Pistachio Mousse Cakes in advance?
Absolutely! These cakes are perfect for prepping ahead of time. In fact, making them a day before serving enhances the flavors even more. Just keep them covered in the fridge until you’re ready to serve!
What can I substitute for gelatin in this recipe?
If you’re looking for a vegetarian or vegan-friendly option, you can use agar-agar instead of gelatin. Simply follow the package instructions for blooming and dissolving it to achieve a similar texture in your mousse.
How long do these mousse cakes last in the fridge?
Stored properly in an airtight container, your Raspberry Pistachio Mousse Cakes should last about 3 days in the fridge. They’re great for a quick dessert or snack during that time!
Can I use frozen raspberries instead of fresh?
Sure thing! Frozen raspberries work just as well; just make sure to thaw and drain them before cooking down for compote. The flavor and texture will still be delightful!
What do I do if my mousse doesn’t set properly?
No worries! If your mousse isn’t setting, check if the gelatin bloomed correctly or was fully dissolved. Additionally, a longer chilling time might be all that’s needed to firm it up. Every fridge can temper differently!
Final Thoughts
Making Raspberry Pistachio Mousse Cakes is more than just a cooking project; it’s a delightful journey that fills your kitchen with sweet aromas and cheerful anticipation. As you serve these layered delights, you’re not just sharing dessert but creating beautiful memories with your loved ones. The combination of nutty, creamy, and tangy flavors comes together to create a symphony of tastes that sings happiness. Whether it’s a quiet family dinner or a grand celebration, these cakes are sure to bring smiles. So, roll up your sleeves, enjoy the process, and indulge in the joy that this recipe brings!
Print
Raspberry Pistachio Mousse Cakes
- Prep Time: 30 minutes
- Cook Time: 15 minutes
- Total Time: 4 hours 45 minutes
- Yield: 6 servings 1x
- Category: Dessert
- Method: Baking and Chilling
- Cuisine: International
- Diet: Vegetarian
Description
Raspberry Pistachio Mousse Cakes are delightful layered desserts featuring a pistachio cake base, creamy pistachio mousse, tangy raspberry compote, and light raspberry mousse, making them a perfect treat for any occasion.
Ingredients
- ½ cup pistachios (roasted, unsalted, finely ground)
- ¼ cup almond flour
- 2 tablespoons sugar
- 2 tablespoons melted butter
- 1 egg
- ½ teaspoon vanilla extract
- ½ cup pistachios (finely blended)
- 1 cup heavy cream
- 2 tablespoons sugar
- 1 teaspoon gelatin powder
- 2 tablespoons cold water
- ½ teaspoon vanilla extract
- 1 cup fresh or frozen raspberries
- 2 tablespoons sugar
- 1 teaspoon lemon juice
- 1 teaspoon cornstarch + 1 tablespoon water (slurry)
- 1 cup raspberries (blended and strained)
- 2 tablespoons sugar
- 1 cup heavy cream
- 1 teaspoon gelatin powder
- 2 tablespoons cold water
- ½ teaspoon vanilla extract
Instructions
- Preheat oven to 350°F (175°C).
- Mix ground pistachios, almond flour, sugar, melted butter, egg, and vanilla.
- Press into molds and bake for 12–15 minutes. Cool completely.
- Bloom gelatin in cold water for 5 minutes.
- Blend pistachios, cream, sugar, and vanilla until smooth.
- Heat gelatin until dissolved and mix in.
- Whip heavy cream separately and fold into the pistachio mixture.
- Layer over crust and chill for 30 minutes.
- Cook raspberries, sugar, and lemon juice until soft, about 5 minutes.
- Stir in cornstarch slurry and cook until thickened. Let cool.
- Spread a thin layer over pistachio mousse.
- Bloom gelatin in cold water for 5 minutes.
- Warm raspberry puree and mix in gelatin. Let cool slightly.
- Whip cream, sugar, and vanilla until soft peaks form.
- Fold in raspberry mixture and pipe over compote.
- Chill for at least 4 hours or overnight.
- Garnish with fresh raspberries and crushed pistachios before serving.
Notes
- Use unsalted roasted pistachios for the best flavor.
- Ensure the heavy cream is chilled before whipping for better volume.
- Adjust sweetness of raspberry compote based on the tartness of the raspberries used.
Nutrition
- Serving Size: 1 cake
- Calories: 320
- Sugar: 20g
- Sodium: 40mg
- Fat: 22g
- Saturated Fat: 10g
- Unsaturated Fat: 8g
- Trans Fat: 0g
- Carbohydrates: 25g
- Fiber: 3g
- Protein: 6g
- Cholesterol: 60mg


