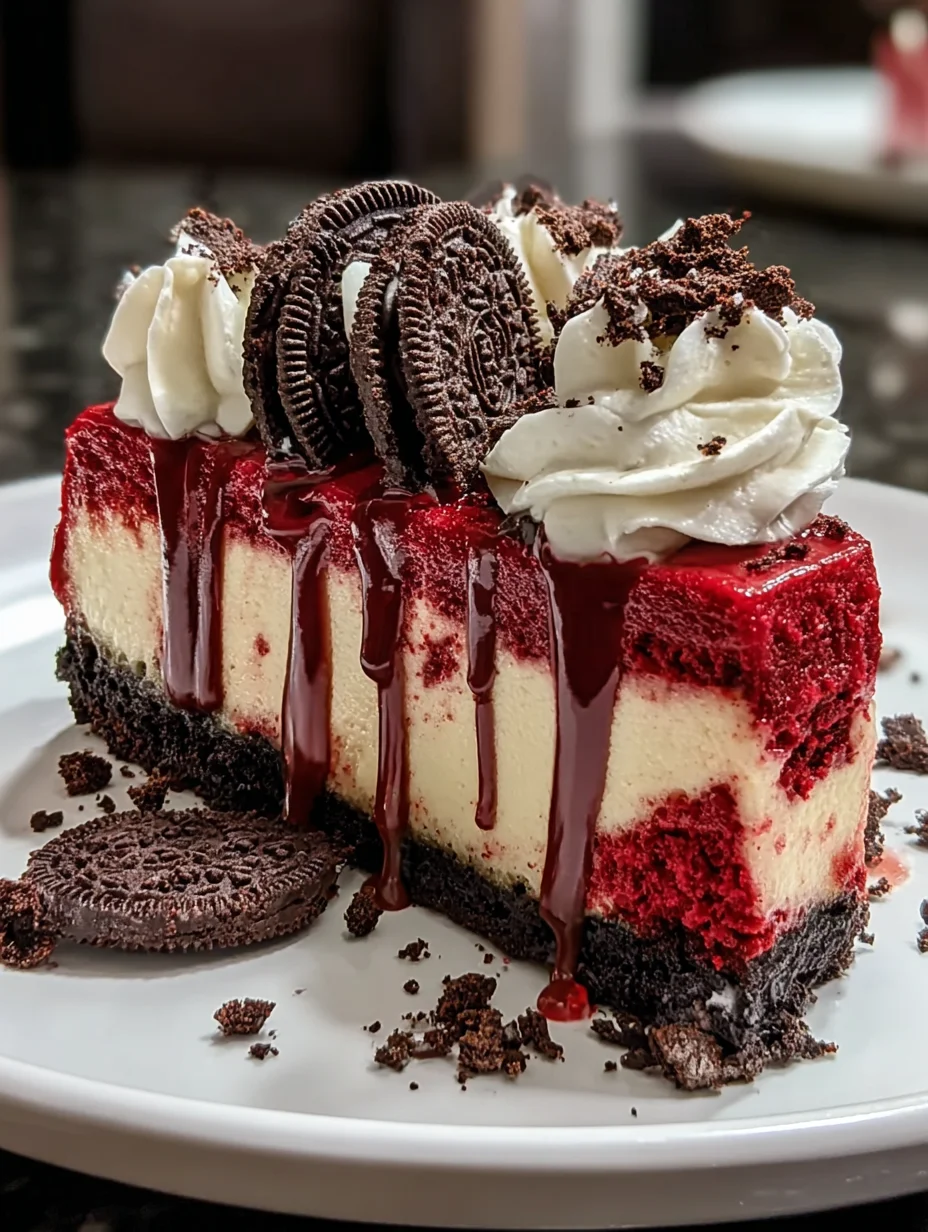
Introduction to Red Velvet Oreo Cheesecake
Welcome to the delightful world of Red Velvet Oreo Cheesecake! If you’re like me, a busy mom juggling work and family, then finding simple, yet impressive desserts can be a game changer. This creamy, dreamy cheesecake is a showstopper that’s perfect for everything from parties to family gatherings. It combines the classic flavors of velvety red cake with the irresistible crunch of Oreo cookies. Plus, it’s a fabulous way to satisfy that sweet tooth in a pinch, transforming any ordinary day into something special.
Why You’ll Love This Red Velvet Oreo Cheesecake
This Red Velvet Oreo Cheesecake is the ultimate treat for anyone who loves rich, indulgent desserts without the hassle. It comes together quickly, perfect for those hectic weeks when time is short. The deliciously smooth cream cheese blend, combined with the familiar crunch of Oreos, is a flavor match made in heaven. Plus, it’s visually stunning, making it ideal for impressing guests or just enjoying a luxurious slice at home.
Ingredients for Red Velvet Oreo Cheesecake
Gathering the right ingredients is half the fun of baking, and this Red Velvet Oreo Cheesecake uses some of my favorites!
- Oreo cookies: These are the star of the crust! Their rich chocolaty flavor pairs perfectly with the creamy filling.
- Unsalted butter: Melted butter binds the cookie crumbs together, creating a deliciously crunchy base.
- Cream cheese: The heart of the cheesecake, this ingredient brings that rich, velvety texture we all love.
- Granulated sugar: A touch of sweetness, it balances out the tangy cream cheese for a harmonious flavor.
- Eggs: They add structure and help the cheesecake set to perfection.
- Vanilla extract: A splash of this adds warmth and enhances the overall flavor.
- Sour cream: This gives the filling a creamy texture and a slight tang, making each bite delightful.
- Cocoa powder: Just a bit of cocoa enriches the flavor while keeping it fabulously red velvet.
- Red food coloring: This gives the cheesecake its striking red hue; don’t be shy to add a splash!
- Whipped cream: For topping, it adds a light and fluffy finish to your dessert.
- Oreo crumbs: Sprinkle some on top for that extra crunch and visual appeal.
- Chocolate shavings (optional): These are the cherry on top for chocolate lovers, offering a decadent touch.
For exact quantities of each ingredient, check the bottom of the article where they’re listed and available for printing. Now, let’s get ready to bake that show-stopping cheesecake!
How to Make Red Velvet Oreo Cheesecake
Now comes the exciting part—making the Red Velvet Oreo Cheesecake! This process involves a few simple steps, but each one is an important building block for that delicious end result. Let’s dive right into it!
Step 1: Preheat the Oven
First things first: preheat your oven to 325°F (160°C). Preheating is crucial for baking cheesecake, as it helps create that beautiful, creamy texture we all love. If the oven isn’t hot when you pop in the cheesecake, it might bake unevenly. So set it while you prepare everything else!
Step 2: Prepare the Oreo Crust
Now, let’s get that crust ready. In a bowl, mix crushed Oreo cookies with melted butter until everything is well combined. I love using my hands to really get in there. It’s a bit messy, but it’s also fun! Then, press this mixture firmly into the bottom of a 9-inch springform pan. You want a solid base, so don’t be shy about pressing down. Bake your crust for 10 minutes and let it cool. This par-baking step gives your crust that delicious crunch.
Step 3: Make the Cream Cheese Filling
Next, it’s time for the star of the show—the filling! In a large mixing bowl, beat the softened cream cheese and sugar together until smooth. I often use a hand mixer for this, which makes it quicker and easier. Next, add the eggs one at a time. Mix well after each addition. This is important for ensuring the filling doesn’t have lumps. Finally, stir in the vanilla extract, sour cream, cocoa powder, and red food coloring. The red and chocolate flavors are simply heavenly together!
Step 4: Pour and Bake
With your filling ready, pour it over the cooled Oreo crust. Smooth the top with a spatula for an even look. Bake the cheesecake in the oven for 60 minutes. The edges should be set, but watch for a gentle jiggle in the center. This slight wobble indicates the cheesecake will set perfectly as it cools.
Step 5: Cooling and Refrigeration
Once the cheesecake has baked, turn off the oven and let it cool with the door ajar for about 30 minutes. This gradual cooling helps prevent cracks on the surface. After that, cover it and refrigerate for at least 4 hours or overnight. Trust me, chilling is key for achieving the ideal texture.
Step 6: Topping the Cheesecake
Finally, it’s time for the grand finale! Before serving, top the cheesecake with whipped cream, a sprinkle of Oreo crumbs, and if you’re feeling fancy, some chocolate shavings. This not only enhances the flavor but makes your dessert presentation pop—perfect for impressing any guest or just treating yourself!
Tips for Success
- Use room temperature cream cheese for a smooth filling—no lumps allowed!
- Don’t skip the cooling step; it helps with texture and prevents cracks.
- For extra flavor, experiment with different toppings like fresh berries.
- Make your cheesecake a day in advance for even better flavor.
- Keep an eye on baking time; every oven is a bit different!
Equipment Needed
- 9-inch springform pan: Essential for easy removal of the cheesecake; a regular cake pan works too.
- Mixing bowls: Use medium to large ones for preparing the crust and filling.
- Electric mixer: Helpful for quickly beating the cream cheese; a whisk will do if you’re up for a workout!
- Spatula: Perfect for smoothing and scraping down the sides.
- Oven mitts: A must-have for safely handling hot pans.
Variations on Red Velvet Oreo Cheesecake
- Gluten-Free Option: Swap out regular Oreo cookies for gluten-free Oreos. Just as delicious, and perfect for those avoiding gluten!
- Vegan Alternative: For a vegan twist, use dairy-free cream cheese and a flaxseed egg substitute instead of eggs. You can also use non-dairy sour cream for a creamy texture.
- Chocolate Red Velvet: Add more cocoa powder to the filling for a deeper chocolate flavor. This pairing creates a rich chocolate experience in every bite!
- Minty Fresh: Incorporate mint extract into the filling for a refreshing twist. Top with crushed mint Oreos for extra flair!
- Decadent Cream Cheese Swirl: Before baking, swirl additional cream cheese made with sugar and vanilla through the cheesecake filling for a marbled effect.
Serving Suggestions
- Serve slices of Red Velvet Oreo Cheesecake with a dollop of fresh whipped cream on top for added elegance.
- Pair with a scoop of vanilla ice cream to create a delightful contrast of flavors and textures.
- A drizzle of chocolate or raspberry sauce elevates the dessert visually and adds a flavor burst.
- For drinks, consider a chilled glass of sweet tea or a rich cappuccino to complement the cheesecake.
- Garnish your plate with fresh berries or mint leaves for a pop of color and freshness.
FAQs about Red Velvet Oreo Cheesecake
Can I make Red Velvet Oreo Cheesecake ahead of time?
Absolutely! In fact, making it a day in advance allows the flavors to meld beautifully. Just be sure to keep it covered in the refrigerator until you’re ready to serve.
How do I store leftover cheesecake?
Store any leftovers in an airtight container in the refrigerator. It should stay fresh for up to five days—though it’s unlikely to last that long!
Can I freeze this cheesecake?
Yes, you can! Wrap the cheesecake tightly in plastic wrap and then in aluminum foil. It can be frozen for up to three months. Just thaw it in the fridge before serving for the best texture.
What can I use instead of cream cheese?
If you’re looking for a dairy-free option, you can use vegan cream cheese. For those avoiding dairy but still wish to achieve a similar texture, try blended silken tofu with a bit of sugar and vanilla.
How can I fix a cracked cheesecake?
If your cheesecake cracks, don’t worry! It’s usually just a cosmetic issue. You can cover it with whipped cream or a layer of ganache to hide those imperfections while adding more flavor.
Final Thoughts
Creating this Red Velvet Oreo Cheesecake is more than just baking; it’s about crafting a sweet memory for your family and friends. The vibrant red hue and creamy texture beckon everyone to take a slice and savor the delightful crunch of Oreo crust. I cherish how it transforms an ordinary day into a celebration, making every gathering feel special. Plus, it’s a treat that balances indulgence and joy, leaving smiles around the table. Whether you’re sharing it or keeping it all to yourself, this cheesecake is bound to bring happiness to any occasion!
Print
Red Velvet Oreo Cheesecake
- Prep Time: 20 minutes
- Cook Time: 70 minutes
- Total Time: 4 hours 90 minutes
- Yield: 8 servings 1x
- Category: Dessert
- Method: Baking
- Cuisine: American
- Diet: Vegetarian
Description
A rich and creamy Red Velvet Oreo Cheesecake with a crunchy Oreo crust and delightful toppings.
Ingredients
- 24 Oreo cookies, crushed
- 4 tablespoons unsalted butter, melted
- 16 oz cream cheese, softened
- 1 cup granulated sugar
- 3 large eggs
- 1 teaspoon vanilla extract
- 1 cup sour cream
- 2 tablespoons cocoa powder
- 1 tablespoon red food coloring
- Whipped cream (for topping)
- Oreo crumbs (for topping)
- Chocolate shavings (optional, for topping)
Instructions
- Preheat your oven to 325°F (160°C).
- Mix crushed Oreo cookies and melted butter until combined.
- Press firmly into the bottom of a 9-inch springform pan.
- Bake for 10 minutes and let cool.
- Beat cream cheese and sugar until smooth.
- Add eggs one at a time, mixing well after each.
- Stir in vanilla extract, sour cream, cocoa powder, and red food coloring.
- Pour the filling over the cooled crust.
- Bake for 60 minutes until the edges are set but the center is jiggly.
- Cool in the oven with the door ajar for 30 minutes.
- Refrigerate for at least 4 hours or overnight.
- Top with whipped cream, Oreo crumbs, and chocolate shavings before serving.
Notes
- For best results, use room temperature cream cheese.
- The cheesecake can be made a day in advance.
- Store leftovers in the refrigerator for up to 5 days.
Nutrition
- Serving Size: 1 slice
- Calories: 450
- Sugar: 30g
- Sodium: 350mg
- Fat: 30g
- Saturated Fat: 15g
- Unsaturated Fat: 10g
- Trans Fat: 0g
- Carbohydrates: 40g
- Fiber: 2g
- Protein: 6g
- Cholesterol: 100mg


