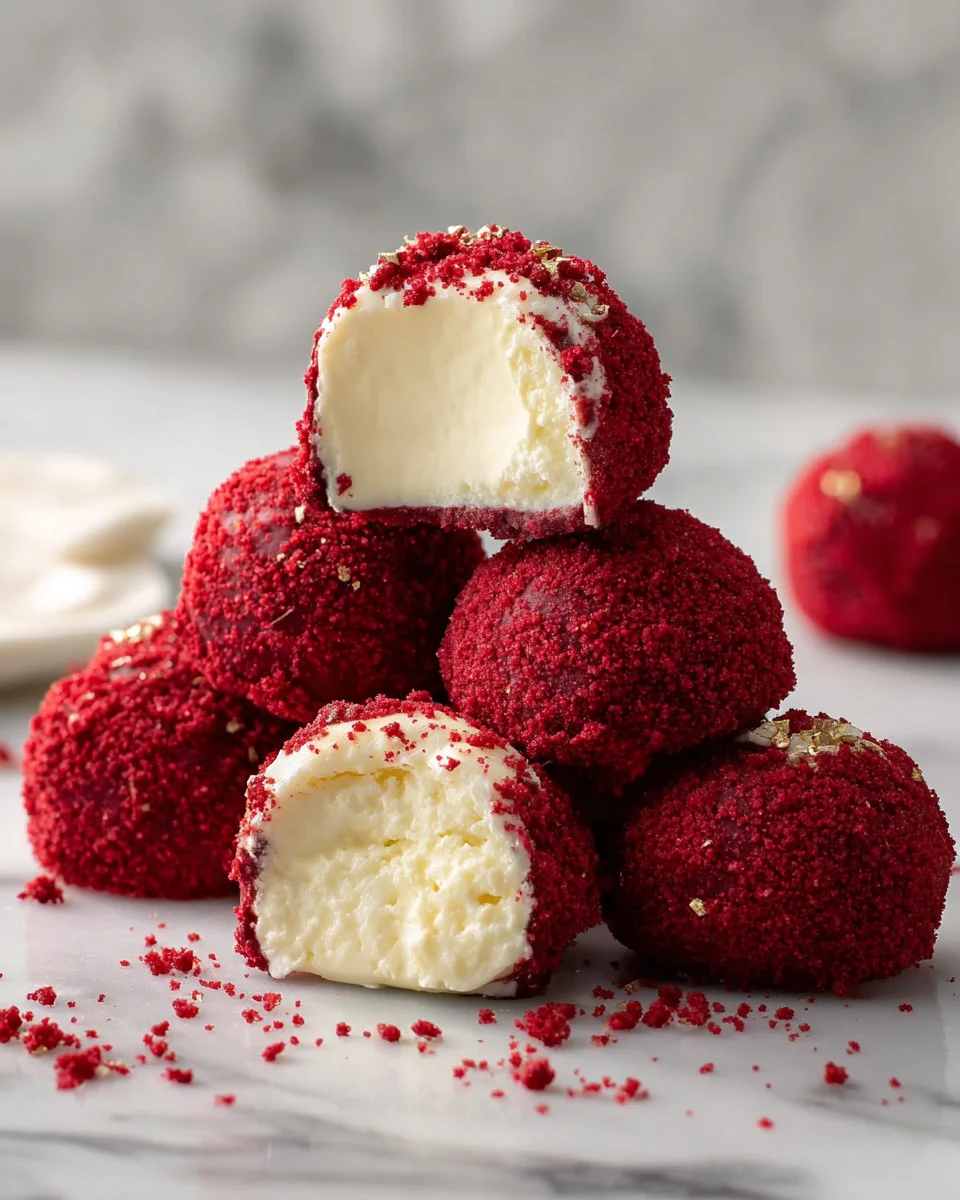
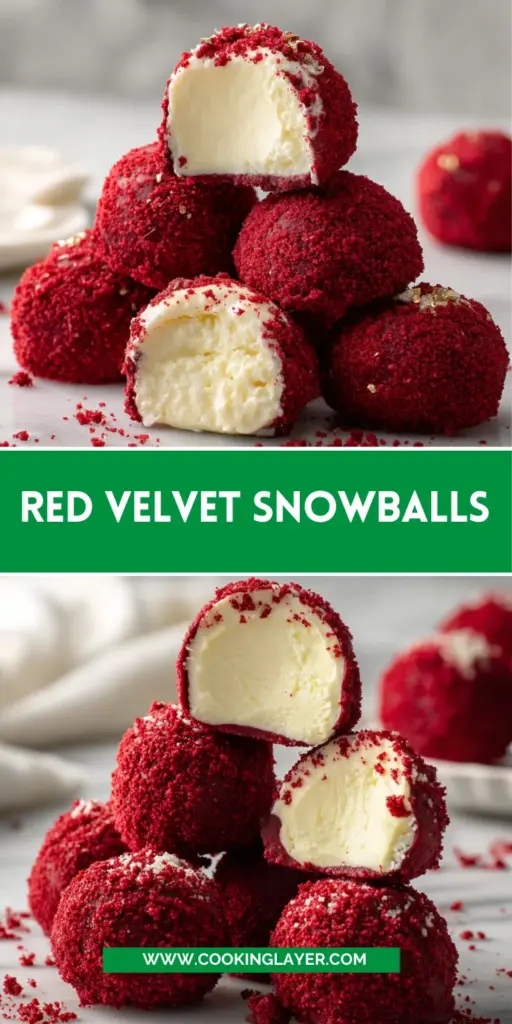
Introduction to Red Velvet Snowballs
As the holiday season approaches, there’s nothing quite like the magic of baking that fills your home with warmth and cheer. These delightful Red Velvet Snowballs are the perfect addition to your festive cookie platter. Imagine the rich flavor of red velvet cake paired with a snowy coat of powdered sugar, bringing smiles to your loved ones’ faces.
They’re quick to whip up, making them a lifesaver for busy moms and professionals like me. In just under 30 minutes, you can create a mouthwatering treat that everyone will adore. Trust me, they’re simply irresistible!
Why You’ll Love This Red Velvet Snowballs
These Red Velvet Snowballs are fantastically easy to make, perfect for busy days when time is tight. The process is simple enough for your kids to join in and create memories together. Plus, they bake up soft and chewy, delighting your taste buds with each bite. The vibrant color brightens any holiday gathering, making them a showstopper on your dessert table. I guarantee they’ll capture hearts and taste buds alike!
Ingredients for Red Velvet Snowballs
To whip up these delightful Red Velvet Snowballs, you’ll need a few key ingredients that come together beautifully. Here’s what you’ll gather:
- Butter: Softened butter forms the creamy base for these cookies, adding richness and keeping them tender.
- Sugar: Granulated sugar sweetens the dough and contributes to that perfect melt-in-your-mouth texture.
- All-purpose flour: This is the foundation of our cookies, giving them structure and stability.
- Unsweetened cocoa powder: It infuses that decadent chocolate flavor, beautifully complementing the red velvet essence.
- Vanilla extract: A splash of vanilla enhances the overall flavor, rounding things out deliciously.
- Baking powder: This leavening agent helps our cookies rise to that perfect softness.
- Salt: Just a pinch brings balance to the sweetness, elevating each bite.
- Red food coloring: Gel coloring works best, giving our Snowballs that striking red hue that makes them festive.
- Powdered sugar: This sweet dusting creates that magical snowy finish we adore, making these cookies truly festive.
For those looking to personalize their cookies, consider incorporating chopped nuts or chocolate chips for added texture. You can find the exact measurements at the bottom of the article, ready for printing!
How to Make Red Velvet Snowballs
Now that we’ve gathered all our ingredients, let’s dive into making these glorious Red Velvet Snowballs! Each step is straightforward, ensuring you’ll enjoy the process and create something simply beautiful. Follow along, and remember, this is your time to shine!
Step 1: Cream the Butter and Sugar
Start by placing your softened butter in a large mixing bowl.
Add the sugar and cream them together until the mixture turns light and fluffy.
This may take a minute or two but trust me, it’s worth it!
The fluffiness sets your cookies up for that melt-in-your-mouth delight.
Don’t be shy, get in there with a hand mixer or a sturdy wooden spoon!
Step 2: Mix in the Red Food Coloring
Next, it’s time to bring some color into the mix!
Add in the red food coloring and vanilla extract.
Give everything a good stir until you reach a vibrant, deep red hue.
It’s like painting a masterpiece! You want friends to notice those snowy treats gleaming at your holiday table.
Step 3: Combine Dry Ingredients
In a separate bowl, whisk together the all-purpose flour, cocoa powder, baking powder, and salt.
This blend of dry ingredients adds structure and depth to your cookies.
Slowly mix the dry ingredients into the wet mixture until a dough starts to form.
Don’t over-mix; we want to keep that soft, tender texture!
Step 4: Form the Dough Balls
Once your dough is ready, it’s time to get hands-on!
Roll it into small balls, about one inch in diameter.
Make sure to leave some space between each one on a parchment-lined baking sheet.
This ensures they’re not crowded during baking, allowing them to spread just perfectly!
Step 5: Bake the Cookies
Pop the baking sheet into a preheated oven at 350°F.
Bake for about 10 to 12 minutes, keeping an eye on them as they bake.
The cookies should be set yet soft to the touch.
Let them cool slightly before handling; they’re delicate beauties!
Step 6: Roll in Powdered Sugar
Now comes the magical moment!
Once they’ve cooled a bit, roll the cookies generously in powdered sugar.
For that dreamy snowball effect, roll them twice—once while they’re warm, and again after they cool off.
This snowy coat not only looks beautiful but adds that sweet touch we all crave.
Tips for Success
- Use room temperature butter for easy creaming.
- Measure your flour correctly; fluff it up, spoon it into the cup, and level it off.
- Roll the dough into uniform balls for even baking.
- Keep an eye on your cookies while they bake; they can go from perfect to overdone quickly.
- Experiment with add-ins like chopped nuts or mini chocolate chips for a fun twist!
Equipment Needed
- Mixing bowls: A large bowl for mixing ingredients; you can use a stand mixer or hand mixer as alternatives.
- Baking sheet: A standard cookie sheet lined with parchment paper is perfect, but a non-stick one works too.
- Measuring cups and spoons: Essential for accuracy, but you can use a kitchen scale if preferred.
- Spoon or cookie scoop: Useful for portioning dough evenly; if you don’t have a scoop, a spoon will do!
Variations of Red Velvet Snowballs
- Nutty Delight: Add chopped walnuts or pecans to the dough for a crunchy texture.
- Chocolate Chip Twist: Fold in semi-sweet chocolate chips for an extra layer of sweetness.
- Dairy-Free Option: Substitute butter with coconut oil or vegan butter for a dairy-free version.
- Gluten-Free Version: Use a gluten-free all-purpose flour blend instead of traditional flour.
- Red Velvet Cheesecake Snowballs: Roll the cookies in a mixture of crushed graham crackers and powdered sugar for a cheesecake-inspired twist.
Serving Suggestions for Red Velvet Snowballs
- Pair these cookies with a comforting cup of hot cocoa or a warm chai latte for a cozy treat.
- For a festive touch, serve them on a bright red platter surrounded by fresh cranberries or holly leaves.
- Consider a dollop of whipped cream or a scoop of vanilla ice cream on the side for an indulgent twist.
- These delightful cookies also make great gifts! Arrange them in a decorative tin for a charming holiday present.
FAQs about Red Velvet Snowballs
Here are some common questions I often get about these delightful Red Velvet Snowballs. I hope my answers help make your baking experience even smoother!
Can I freeze Red Velvet Snowballs?
Absolutely! You can freeze these cookies for up to three months. Just make sure they cool completely and then store them in an airtight container. When you’re ready to enjoy them, simply thaw them at room temperature.
What can I use instead of red food coloring?
If you prefer a natural option, beet juice can be a great substitute for red food coloring. While it won’t be as vibrant, it will still give a charming hue to your cookies!
How can I make these cookies more festive?
Consider adding festive sprinkles on top while they’re still warm, or try swirling cream cheese frosting over them for an extra touch of holiday cheer!
What’s the best way to store these cookies?
Store them in an airtight container at room temperature. They stay fresh for about a week—if they last that long!
Can I make these cookies gluten-free?
Yes, you can! Simply swap the all-purpose flour with a gluten-free blend. Ensure that the blend has xanthan gum for better texture.
Final Thoughts
Baking these Red Velvet Snowballs is like wrapping your loved ones in a warm, sugary hug. The vibrant red hue brings joy and cheer to any holiday celebration, instantly making the occasion feel special.
Whether you’re sharing them with family or gifting them to friends, these cookies create unforgettable memories.
I love the simplicity in their preparation, making them accessible for everyone, even on the busiest days.
So gather your ingredients, roll up your sleeves, and let the holiday spirit flow as you whip up these delightful treats. Trust me, they’ll become a cherished tradition in your home!
Print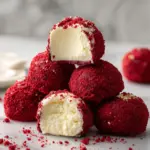
Red Velvet Snowballs
- Prep Time: 15 minutes
- Cook Time: 12 minutes
- Total Time: 27 minutes
- Yield: 24 cookies 1x
- Category: Dessert
- Method: Baking
- Cuisine: American
- Diet: Vegetarian
Description
Red Velvet Snowballs are festive holiday cookies that combine the rich flavors of red velvet cake with the delightful sweetness of powdered sugar.
Ingredients
- 1 cup butter, softened
- ½ cup sugar
- 2 cups all-purpose flour
- 2 tbsp unsweetened cocoa powder
- 1 tsp vanilla extract
- 1 tsp baking powder
- Pinch of salt
- Red food coloring (gel works best for a vibrant shade)
- 1 cup powdered sugar (for rolling)
Instructions
- In a large bowl, cream together the softened butter and sugar until light and fluffy. Add vanilla extract and red food coloring, mixing until you achieve a deep red color.
- In a separate bowl, whisk together flour, cocoa powder, baking powder, and salt. Slowly add the dry ingredients to the wet mixture until a dough forms.
- Roll the dough into small 1-inch balls and place them on a parchment-lined baking sheet, leaving a little space between each cookie.
- Bake at 350°F (175°C) for about 10–12 minutes, or until the cookies are set but still soft.
- Let the cookies cool slightly, then roll them generously in powdered sugar. For the best snowy look, roll them twice—once while warm and again after they cool.
Notes
- Make sure the butter is softened for easy creaming with sugar.
- Using gel food coloring will give a more vibrant red color.
- For a fun twist, consider adding chopped nuts or chocolate chips to the dough.
Nutrition
- Serving Size: 1 cookie
- Calories: 120
- Sugar: 8g
- Sodium: 45mg
- Fat: 7g
- Saturated Fat: 4g
- Unsaturated Fat: 2g
- Trans Fat: 0g
- Carbohydrates: 14g
- Fiber: 0g
- Protein: 1g
- Cholesterol: 30mg