What if I told you that one of the most festive, eye-catching desserts on your holiday table requires no oven, barely any effort, and just a handful of simple ingredients? Sounds like Christmas magic, right? Well, meet Santa’s No-Bake Sugar Cookie Bars – a dreamy blend of crushed vanilla cookies, melted white chocolate, a whisper of almond, and tons of cheerful sprinkles.
These bars are soft, rich, buttery, and bursting with holiday joy. With a creamy top layer that melts in your mouth and a crumbly cookie base, they’re like biting into a nostalgic sugar cookie – only cooler, creamier, and ridiculously easier.
Whether you’re short on time, not in the mood to bake, or just want something new to wow your guests, this treat has your name (and Santa’s) written all over it.
Why You’ll Love These No-Bake Holiday Bars
Let’s be real – the holidays can get crazy. Between gift shopping, decorating, family events, and trying not to burn the dinner rolls, you need a dessert that’s low-stress but still delivers that “wow” factor.
Here’s why these bars are about to be your new favorite:
- No Oven Required: No baking, no problem! Great for those without access to an oven or anyone avoiding the holiday kitchen heat.
- Super Quick: Prep takes less than 10 minutes – then chill and slice!
- Festive AF: Red, green, and white all the way! Perfect for dessert platters or cookie exchanges.
- Customizable: Want peppermint? Add it. Prefer dark chocolate? Swap it in.
- Kid-Friendly: No baking means it’s safe and fun for kids to help.
- Crowd-Pleaser: Soft, sweet, and a little nostalgic – they disappear fast.
If you’re looking to impress with minimal effort, these are the bars to bring.
Ingredients You’ll Need (and Why They Work)
Let’s break down the magic behind these bars. Each ingredient plays a role in flavor, texture, and that irresistible holiday charm.
Vanilla Sandwich Cookies (1 package, ~17–18 oz)
This is your base! When crushed, these cookies mimic sugar cookie dough with a bit more flavor and a buttery finish. Think Golden Oreos, not chocolate ones.
Unsalted Butter (½ cup, melted)
Butter brings moisture and richness. It binds the crushed cookies into a soft, yet sturdy crust. Bonus: that buttery taste is straight-up addictive.
Sweetened Condensed Milk (½ cup)
Thick, sweet, and sticky – this is the key to the creamy top layer. It sweetens and helps everything hold together once chilled.
Vanilla Extract (1 tsp)
The base of that sugar cookie flavor we’re chasing. Don’t skip it!
Almond Extract (¼ tsp, optional but amazing)
Just a touch adds a bakery-quality flavor that makes people go, “What is that?!” It’s the secret weapon of Christmas desserts.
White Chocolate Chips (1 cup, melted)
These make the bars luxuriously creamy. Melted into the condensed milk, they create a soft, sweet top layer that firms up beautifully in the fridge.
Holiday Sprinkles (¾ cup, divided)
Nothing says “Christmas” like red, green, and white sprinkles. They add crunch, color, and pure joy.
Mini Marshmallows (1 cup, optional)
These soften slightly when mixed in and give a pillowy texture that contrasts beautifully with the cookie base.
Tools and Prep Tips Before You Start
Before we dive in, let’s set the stage for success.
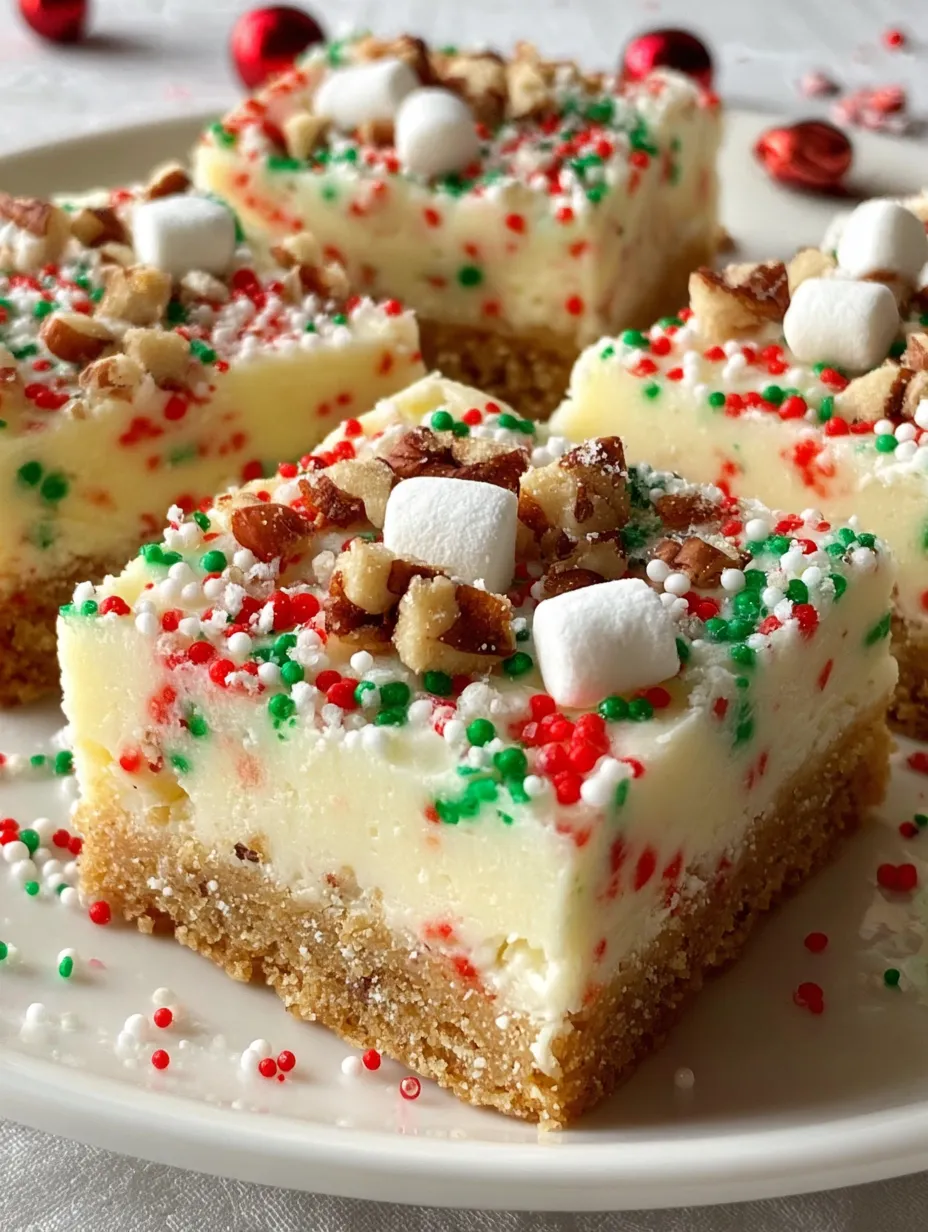
- Use an 8×8-inch square pan for the perfect thickness (like in the image).
- Line the pan with parchment paper, leaving some extra on the sides. This makes it way easier to lift the bars out cleanly.
- Microwave-safe bowls will save you time when melting butter and chocolate.
- Spatula or the bottom of a measuring cup is great for pressing down the crust evenly.
Now you’re ready to rock.
Step-by-Step Instructions
Let’s walk through this together. Here’s how to make these bars like a pro.
1. Crush the Cookies
Dump the vanilla sandwich cookies into a food processor or a zip-top bag. Crush them until they resemble fine crumbs – not chunky, but not powder either. It should look like cookie sand.
Tip: Don’t remove the cream – it adds flavor and helps with binding.
2. Mix with Melted Butter
Pour the crumbs into a bowl, add the melted butter, and stir until fully coated. It should feel like damp sand.
3. Press the Base
Transfer the buttery crumbs to your lined pan. Press down firmly using a spatula or the bottom of a glass. You want a solid base, so don’t be shy!
Pop it in the fridge while you prep the top layer.
4. Make the Creamy Topping
In another bowl, stir together the melted white chocolate, sweetened condensed milk, vanilla, and almond extract until smooth. It should be glossy and thick.
5. Add Sprinkles + Marshmallows
Fold in half of the holiday sprinkles and the mini marshmallows (if using). Mix gently to keep the marshmallows whole.
6. Spread Over Base
Pull the base out of the fridge and spread the creamy mixture evenly on top. Smooth the surface with a spatula.
7. Decorate the Top
Sprinkle the remaining festive sprinkles across the top. Press them in lightly so they stick.
8. Chill
Refrigerate for at least 1–2 hours, or until fully set. You should be able to cut clean squares without gooey edges.
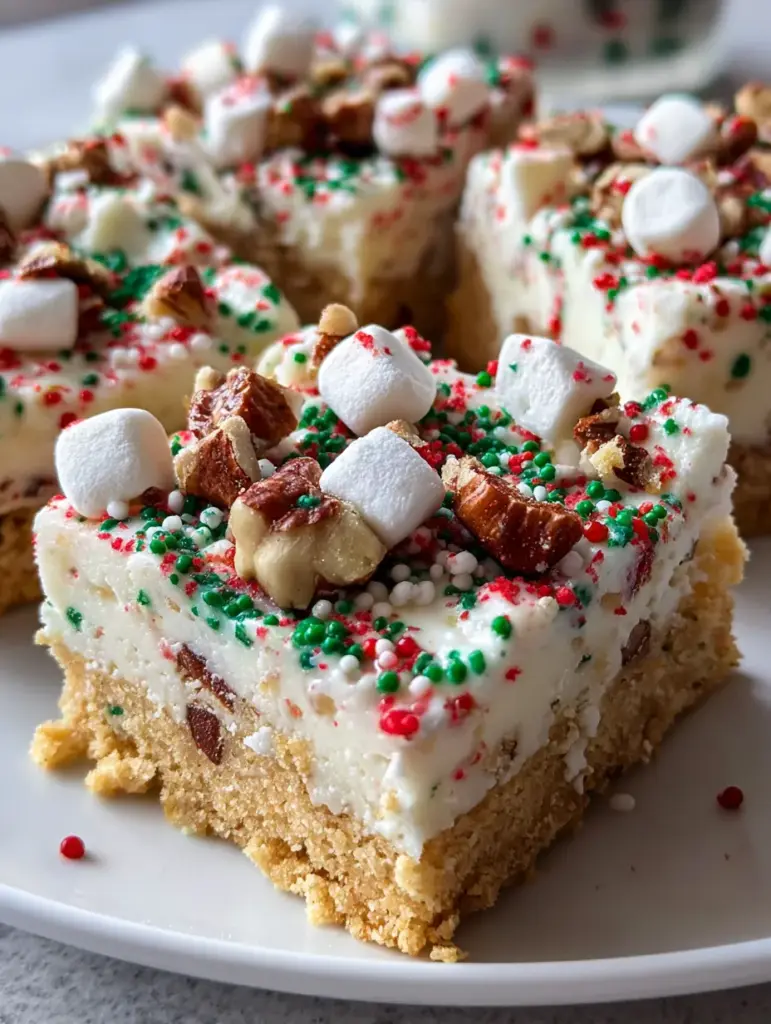
Visual Guide: Matching the Picture-Perfect Finish
You saw the photo. Golden, crumbly base. Creamy white top speckled with red, green, and white sprinkles. A few marshmallows and chopped pecans on top? That’s optional but adds flair.
Want that exact look?
- Use nonpareil holiday sprinkles for that dotted texture.
- Don’t overmix the sprinkles or they’ll bleed into the white chocolate.
- Add a few extra mini marshmallows on top before chilling.
- Sprinkle on chopped nuts (like pecans or walnuts) for a fancy touch.
That final bar? It’s holiday perfection.
Make-Ahead Magic: How Long Do They Last?
One of the best parts about Santa’s No-Bake Sugar Cookie Bars is how well they hold up. That means you can make them ahead of time, cross dessert off your to-do list, and actually enjoy the holidays without the stress.
Here’s how long they’ll keep:
- In the fridge: Store in an airtight container, and they’ll stay fresh for up to 7 days. The texture gets even better after the first day!
- At room temperature: You can leave them out for a few hours at a party or gathering, but keep them cool if you can. Warm rooms may cause the white chocolate to soften too much.
- In the freezer: Want to get really ahead? Freeze them! Just slice, wrap individually in plastic wrap, and place in a freezer-safe bag or container. They’ll last 2–3 months. Thaw overnight in the fridge before serving.
These bars are sturdy enough to travel too, making them perfect for cookie swaps, potlucks, or packing up for Santa himself 🎅.
Tips for the Best Results Every Time
Want to make sure your bars come out perfect – soft, creamy, and photo-worthy every time? Follow these pro tips:
Crushing Cookies Like a Boss
- A food processor will give you even crumbs in seconds.
- No processor? Use a rolling pin and a zip-top bag – smash with love (and a little holiday stress relief).
- Too chunky = crumbly bars. Too fine = mushy. Aim for even, sandy texture.
Melting White Chocolate Without a Mess
- Melt in 20-30 second intervals in the microwave, stirring in between.
- Burnt chocolate is bitter and grainy – don’t rush!
- Add a teaspoon of coconut oil or shortening if it’s too thick to stir smoothly.
Perfect Texture Hacks
- Press the base firmly to avoid it falling apart.
- Make sure the top layer is fully mixed and creamy – any chunks = uneven setting.
- Chill long enough for clean slicing – a minimum of 1 hour, ideally 2.
Fun Variations to Try This Season
Once you’ve made this once, you’ll want to play around. Good news: this recipe is crazy flexible. Here are a few variations to try:
Peppermint Twist
- Add crushed candy canes or peppermint extract to the creamy layer.
- Swap holiday sprinkles for red and white only.
- Top with crushed peppermint for crunch.
Chocolate Drizzle Version
- After chilling, drizzle the top with melted dark or milk chocolate.
- Adds contrast and richness to the sweet white chocolate base.
Gluten-Free Swap
- Use gluten-free vanilla sandwich cookies (like Glutino or Kinnikinnick).
- Double-check that your sprinkles and white chocolate are GF.
Nutty Delight
- Stir in chopped pecans or walnuts for crunch.
- Sprinkle on top for extra flair.
Making It a Family Affair: Get the Kids Involved
This recipe is a dream for family fun in the kitchen.
Here’s how the kids can help:
- Crushing the cookies – let them go to town with a rolling pin.
- Mixing sprinkles – just be ready for a sprinkle explosion.
- Pressing the base – little hands are perfect for flattening.
- Decorating the top – their creativity will make each bar unique!
Since there’s no baking or stove involved, it’s safe and easy for all ages. Make memories while making dessert? That’s a holiday win.
Perfect Pairings: What to Serve With These Bars
These bars are sweet, creamy, and rich, so they pair best with lighter or contrasting treats.
- Hot Cocoa – the classic match, especially with whipped cream on top.
- Milk (obviously!) – Santa’s top choice. Cold milk + soft cookie bars = heaven.
- Coffee or espresso – balances the sweetness with a bold kick.
- Fresh berries – add a tart note and festive color.
Planning a dessert tray? Add:
- Peppermint bark
- Chocolate-covered pretzels
- Mini cupcakes
- Snowball cookies
It’s all about variety!
Print
Santa’s No-Bake Sugar Cookie Bars Recipe
- Prep Time: 8 minutes
- Total Time: ~1 hour 10 minutes
- Category: Dessert · No-Bake · Christmas Treats 🎅🍬
Description
🎅✨ The sweetest, softest Christmas bars—no oven needed! These festive squares taste like sugar cookies, holiday magic, and childhood joy all in one. Perfect for gifting, sharing, or leaving out for Santa! 🎄🍬
Ingredients
1 package (17–18 oz) vanilla sandwich cookies, crushed fine 🍪
1/2 cup unsalted butter, melted 🧈
1/2 cup sweetened condensed milk
1 teaspoon vanilla extract ✨
1/4 teaspoon almond extract (optional) 🌟
1 cup white chocolate chips, melted 🤍🍫
3/4 cup holiday sprinkles (½ for mixing, ½ for topping) 🎉
1 cup mini marshmallows (optional) ☁️
Instructions
Line an 8×8-inch pan with parchment paper, leaving extra over the sides.
⏱ Duration: 1 minuteIn a large bowl, mix crushed vanilla cookies with melted butter until fully combined and sandy.
⏱ Duration: 2 minutesPress the mixture firmly into the bottom of the pan to form the crust. Smooth the surface.
⏱ Duration: 1 minuteIn another bowl, stir together sweetened condensed milk, vanilla extract, almond extract, and melted white chocolate until creamy.
⏱ Duration: 2 minutesFold in half of the sprinkles (and marshmallows if using).
⏱ Duration: 1 minuteSpread this festive mixture evenly over the cookie crust.
⏱ Duration: 1 minuteAdd remaining sprinkles on top, pressing lightly to help them stick.
⏱ Duration: 30 secondsChill in the refrigerator for 1–2 hours, or until firm enough to cut clean squares.
⏱ Duration: 60–120 minutes
Notes
For the smoothest bars, crush the cookies into fine crumbs—the texture holds better.
If the mixture feels too soft before chilling, add 2–3 extra tablespoons of crushed cookies.
Almond extract is optional but adds that nostalgic “sugar cookie” flavor.
Mini marshmallows make the bars extra soft and fluffy, but you can skip them for a firmer texture.
For easier slicing, run your knife under hot water, wipe dry, and cut quickly.
Nutrition
- Serving Size: 12 bars
- Calories: approx. 320 kcal
Decorating Tips to Make Them Shine
Let’s be honest: the sprinkles do most of the work. But if you want to go the extra mile:
- Add edible glitter for a magical sparkle.
- Use Christmas-themed sprinkles like trees, stars, or tiny Santa hats.
- Press candy cane bits or mini M&Ms into the top.
- Add a tiny swirl of colored frosting for a bakery look.
These bars are already beautiful, but a few finishing touches make them look store-bought.
You may like as well :
Salted Caramel Chocolate Crack Bars 🍫 – The Ultimate Sweet and Salty Addiction!
Butter Pecan Toffee Bark Recipe: The Ultimate Sweet & Nutty Delight
Common Mistakes to Avoid
Let’s dodge a few common holiday dessert fails:
Using the wrong cookies
Don’t grab chocolate sandwich cookies! You want vanilla cream-filled ones (like Golden Oreos) for that sugar cookie flavor.
Not pressing the base enough
Loose base = crumbly mess. Use your weight, press it down hard.
Overheating the chocolate
White chocolate is finicky. Go slow, stir often, and never microwave for more than 30 seconds at a time.
Cutting too soon
Patience pays off. If you slice before they’re fully chilled, you’ll get gooey edges and smushed tops.
Storage, Freezing & Gifting Ideas
Planning to give these as gifts? Smart move.
Gifting Tips:
- Slice into even squares and place in mini cupcake liners.
- Stack in a clear treat bag, tie with a festive ribbon.
- Add a handwritten tag: “Santa’s Favorite – Made with Love”
Freezing Instructions:
- Slice first, then freeze individually wrapped.
- Stack in a freezer-safe container with parchment between layers.
These bars are ideal for holiday make-ahead prep, so you’re always ready when guests drop by… or when that late-night sweet tooth hits!
Final Thoughts: Sweet Memories in Every Bite
Santa’s No-Bake Sugar Cookie Bars aren’t just a treat – they’re a holiday experience. They’re cheerful, simple, and full of nostalgic sugar cookie flavor, all dressed up in red and green. Whether you’re leaving them out for Santa, gifting them to neighbors, or just indulging during movie night, these bars deliver joy in every bite.
No bake, no stress, all flavor. That’s the magic of the holidays.
Similar recipes :
Christmas Sugar Cookie Cheesecake Bars (No-Bake)
No-Bake Peppermint Bark Snowballs: A Chilly Holiday Delight
FAQs About Santa’s No-Bake Sugar Cookie Bars
1. Can I use chocolate sandwich cookies instead of vanilla?
It’ll work, but you’ll lose the sugar cookie flavor. Stick to vanilla sandwich cookies for the classic holiday taste.
2. My white chocolate seized up! What happened?
White chocolate can overheat quickly. Microwave in short bursts and stir frequently. Add a teaspoon of coconut oil if needed to loosen.
3. Can I make this in a larger pan?
Yes! Double the recipe and use a 9×13-inch pan for a bigger batch.
4. Can I skip the almond extract?
Absolutely. It adds depth but isn’t essential. You can replace it with more vanilla or try peppermint for a twist.
5. Do they need to stay in the fridge after setting?
They’re best chilled but can sit out for a few hours at a party. For longer storage, refrigerate in a sealed container.


