Welcome to the Magic of Homemade Holiday Candy
The holiday season isn’t just about presents under the tree or snow falling gently outside — it’s also about those nostalgic flavors that bring back memories with every bite. That’s where these Soft Christmas Peppermints come in. Picture a buttery, melt-in-your-mouth texture with a refreshing hint of mint and the festive red-and-white swirls that just scream “Christmas!” ✨
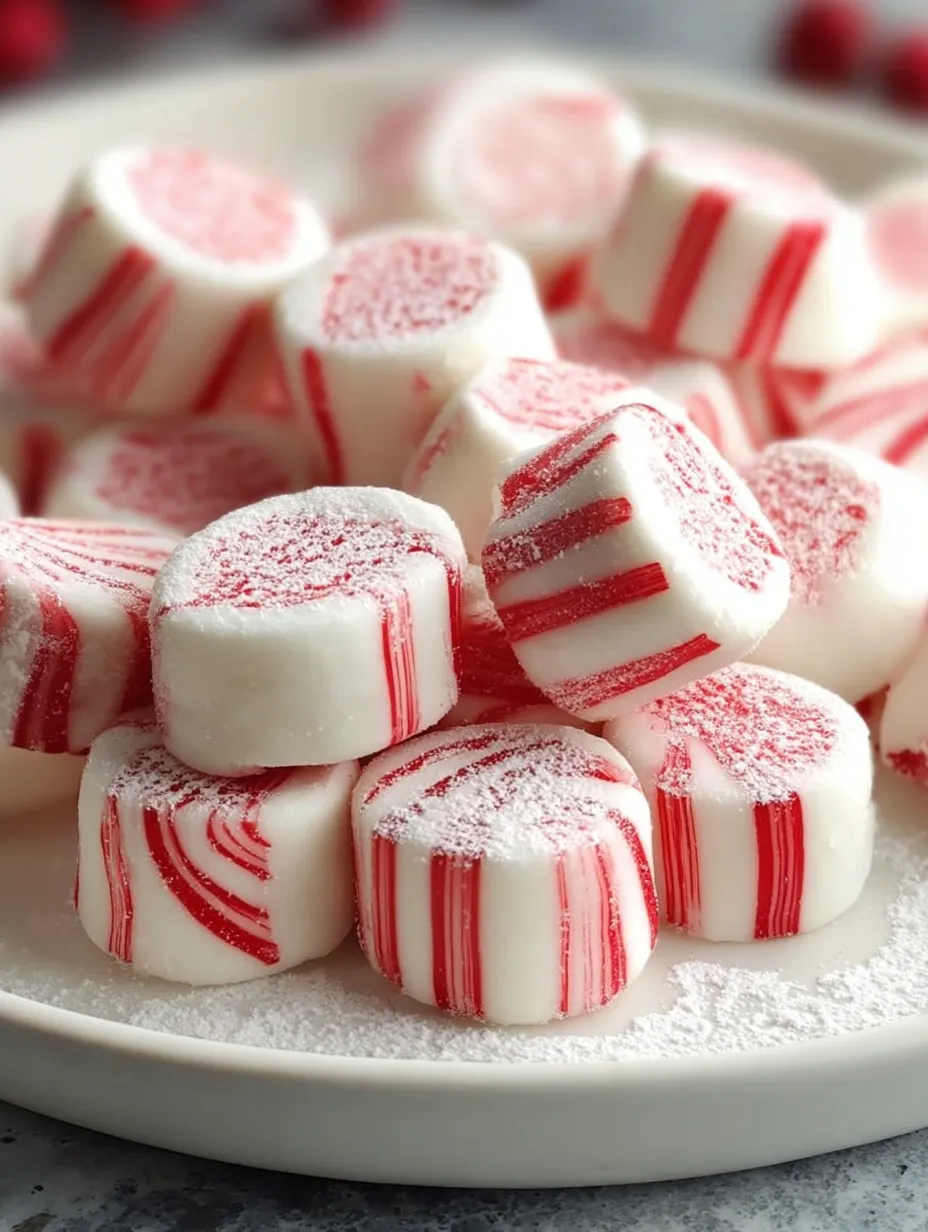
Unlike the rock-hard mints from the store, these are tender, pillowy, and full of buttery sweetness — a perfect blend of creamy and minty. If you’re looking for a fun, festive, and beginner-friendly recipe that looks as good as it tastes (just like in the photo you saw), you’re in the right place.
The Magic Behind Soft Peppermints
What makes these different? It’s the texture. These aren’t crunchy or chalky. They’re soft, fluffy, and almost melt the second they hit your tongue, much like a snowflake landing gently on your skin. The blend of butter and powdered sugar creates a dough that sets into the perfect consistency: soft enough to bite into easily, but firm enough to hold shape.
They’ve got that cool, fresh mintiness, balanced with a gentle buttery sweetness — not overpowering like some mints that feel like a winter storm in your mouth. Instead, these are comforting and cozy with just the right amount of sparkle.
Ingredient Breakdown: Let’s Talk About What’s Inside
To get that dreamy texture and iconic look, here’s what you’ll need:
- ½ cup unsalted butter, softened 🧈
This is what gives the mints their smooth and creamy base. Room temp is key! - 3 cups powdered sugar 🍥
This fine sugar helps with the soft texture and adds that melt-away sweetness. - 2 tablespoons heavy whipping cream 🥛
Adds richness and helps make the dough pliable. - ¼ teaspoon peppermint extract 🍃
A little goes a long way. You can adjust to taste, but don’t overdo it! - Red gel food coloring ❤️
This gives you those gorgeous holiday stripes without ruining the texture.
Why Gel Coloring Is Non-Negotiable
Ever added liquid food coloring and ended up with sticky, soupy dough? That’s exactly what we want to avoid. Gel food coloring is thicker and more concentrated, which means it gives you vivid red hues without messing with your dough’s consistency. In our case, it helps those signature red swirls pop like candy canes without making the mints wet or runny.
Essential Tools You’ll Want Handy
Before diving in, grab these kitchen tools:
- Large mixing bowl
- Electric hand mixer or stand mixer
- Silicone spatula
- Measuring cups and spoons
- Sharp knife or dough scraper
- Parchment paper
- Airtight container for storage
Having everything ready before you start makes the process so much smoother — and way more enjoyable.
Let’s Make Soft Christmas Peppermints! 🎁
1. Beat the Butter (5 Minutes)
Start by beating softened unsalted butter in a large bowl for about 5 minutes using an electric mixer. You want it light, fluffy, and creamy, like the base of a perfect frosting. This step is super important because it sets the tone for the entire texture. If the butter isn’t beaten enough, your mints could turn out too dense or greasy.
Pro tip: Scrape down the sides of the bowl with a spatula a few times to ensure it’s evenly whipped.
2. Add the Sweetness (7 Minutes)
Now, gradually add in your powdered sugar, a bit at a time. Alongside that, pour in the heavy whipping cream and the peppermint extract. Start mixing on low so you don’t end up in a sugar cloud, then slowly increase the speed.
You’re aiming for a thick, pliable dough — soft like Play-Doh but not sticky. If it feels too crumbly, a teaspoon of cream can help. Too wet? Add a spoonful of powdered sugar. The dough should hold its shape but feel light to the touch.
3. Divide and Tint (5 Minutes)
Split your dough into two equal portions. Leave one half as-is (classic white) and color the other half using your red gel coloring. A small dab goes a long way — knead it in gently with your hands until the color is evenly distributed.
You’ll notice your hands might pick up some color. You can use gloves if you’d like, but the gel does wash off fairly easily. Try not to overwork the dough — we want to keep that soft texture intact.
4. Shape the Swirls (10 Minutes)
This is the part where the magic happens and your mints start looking like the ones in the image! 🎨
- Roll out each colored dough into long, skinny ropes about ½-inch thick.
- Take one white rope and one red rope and gently twist them together. You should now have a lovely candy-cane-style swirl!
- Gently press them together to avoid unraveling.
- Using a sharp knife, cut bite-sized pieces, about ¾ to 1 inch each.
The finished pieces should look like little white peppermint pillows with red swirled stripes, just like the image above!
5. Let Them Air Dry (24 Hours)
Place your cut mints on a parchment-lined baking sheet or platter in a single layer. Now comes the hardest part — waiting!
- Let them air dry for 1–2 hours uncovered so they firm up on the outside.
- After that, move them somewhere safe to dry completely for 24 hours.
By the end, they’ll have a slightly firm exterior with that signature soft, melt-in-your-mouth center. Like snowflakes that hold their shape but disappear on your tongue.
6. Store and Enjoy (5 Minutes)
Once dried, pop them into an airtight tin, glass jar, or festive container. They’ll stay fresh for up to 2 weeks at room temperature. No need to refrigerate!
They make fantastic gifts, stocking stuffers, or holiday table treats. Wrap them in little cellophane bags with ribbon, or serve them on a white platter for that picture-perfect Christmas vibe.
Common Mistakes to Avoid ❌
Let’s be real—making candy can feel intimidating, but these peppermint bites are pretty forgiving. Still, here are a few common pitfalls to avoid:
- Overmixing the Dough: Once your dough is combined, don’t keep mixing it. Overworking it will make it stiff and hard to shape, ruining that soft texture we’re aiming for.
- Too Much Peppermint Extract: It might seem like more mint = more festive, but peppermint is potent. Start with ¼ teaspoon and adjust from there. You want a refreshing kiss of mint, not a mouth full of toothpaste.
- Using Liquid Food Coloring: As we covered earlier, liquid coloring throws off your dough’s consistency. It’ll become sticky and impossible to shape. Always go with gel.
- Skipping the Drying Time: Yes, it takes 24 hours to dry completely. Yes, it’s worth it. Skipping this step will leave you with mushy candies that fall apart when stored.
Fun Flavor Variations to Try 🍬
Want to shake things up? You can use this same base recipe and get creative with flavors and colors:
- Vanilla Bean Peppermints: Replace the peppermint with ½ teaspoon vanilla bean paste. Add a touch of gold luster dust for a chic look.
- Chocolate Peppermint Duo: Add 1 tablespoon cocoa powder to half the dough (instead of food coloring) to make chocolate swirls.
- Lemon Mint Swirl: Swap half the peppermint extract with lemon extract. It’s surprisingly refreshing and light — kind of like a cool breeze with sunshine!
- Spearmint or Wintergreen: If you prefer a slightly sweeter, milder flavor than classic peppermint, try these extracts instead.
Remember: Always taste test before shaping the entire batch. A tiny pinch goes a long way with flavors.
Print
Soft Christmas Peppermints Recipe
- Prep Time: 15 minutes
- Total Time: 24 hours 15 minutes
- Category: Candy | Holiday Treats | No-Bake Desserts
Description
🎄 Sweet, buttery, and perfectly minty — these Soft Christmas Peppermints melt in your mouth like a snowflake! ❄️ A nostalgic holiday treat that’s as fun to make as it is to eat. 🍬✨
Ingredients
½ cup unsalted butter, softened 🧈
3 cups powdered sugar 🍥
2 tbsp heavy whipping cream 🥛
¼ tsp peppermint extract (adjust to taste) 🍃
Red gel food coloring ❤️
Instructions
Beat the Butter (5 minutes):
In a large mixing bowl, beat the softened butter until smooth and creamy. This forms the silky base for your mints. 💫Add Sweetness (7 minutes):
Gradually mix in the powdered sugar, heavy whipping cream, and peppermint extract. Stir until a thick, dough-like texture forms — soft but not sticky. 🍬Divide and Tint (5 minutes):
Split the dough into two portions. Leave one part white and color the other with red gel food coloring. Knead gently until the color is evenly distributed. 🎨Shape the Swirls (10 minutes):
Roll each color into long, thin ropes. Twist one red and one white rope together, then pinch off bite-sized pieces to form beautiful red-and-white swirls. ❤️🤍Air Dry (1–2 hours active, 24 hours rest):
Place the mints on parchment paper and let them air dry for 1–2 hours to firm up. Allow to dry completely for 24 hours for that perfect soft yet stable texture. 🌬️Enjoy & Store (5 minutes):
Once set, store your Soft Christmas Peppermints in an airtight tin or jar. They’ll stay fresh for up to 2 weeks at room temperature. 🎁
Notes
Nutrition
- Serving Size: 90 kcal per serving
- Calories: 40 pieces
Making It With Kids – Holiday Fun in the Kitchen! 👨👩👧👦
Looking for an easy and joyful family activity during the holidays? This is it!
These Soft Christmas Peppermints are the perfect hands-on kitchen project for kids. No stove, no hot sugar syrups, no complicated techniques — just mixing, rolling, twisting, and shaping. It’s like edible Play-Doh!
Let the little ones:
- Help roll out ropes
- Twist colors together (they’ll love this part)
- Cut pieces with kid-safe butter knives
- Taste test along the way (of course!)
Tip: Set up a little “mint station” with parchment paper, festive sprinkles, and cookie cutters. You can press the dough into shapes too, like hearts, stars, or trees!
Holiday Presentation Ideas 🎁
Your gorgeous swirl mints are not just tasty — they’re show-stoppers on any dessert table or gift bag. Here are some festive ideas:
- Plate Like a Pro: Use a white plate or wooden board, pile them up like in the image, and sprinkle with edible glitter or crushed candy canes.
- Gift-Worthy Jars: Pack the mints into mason jars with a red ribbon and tag — instant, thoughtful, homemade gift.
- Add to Dessert Trays: Combine with sugar cookies, fudge, and bark for a beautiful holiday sweet platter.
- Place Setting Delights: Put a few mints in mini organza bags or on top of a napkin for a sweet touch at your holiday table.
They’re more than candy — they’re a conversation starter, a nostalgic throwback, and a little bit of edible joy.
You may like also :
Traditional Christmas Cake Recipe: A Rich & Fruity Holiday Classic
Nutrition Breakdown (per piece) 📊
While these aren’t exactly diet food, they’re a delightful indulgence — and it’s the holidays, after all! Here’s an estimate per peppermint piece:
| Nutrient | Amount (Approx.) |
|---|---|
| Calories | 90 kcal |
| Total Fat | 5g |
| Saturated Fat | 3g |
| Sugar | 12g |
| Protein | <1g |
| Carbohydrates | 14g |
Allergy Notes: Contains dairy (butter and cream). You can experiment with plant-based butter and coconut cream for a dairy-free version, though texture may vary.
Frequently Asked Questions (FAQs)
1. Can I freeze Soft Christmas Peppermints?
Nope — freezing will change their texture and make them soggy once thawed. These are best stored at room temperature in an airtight container.
2. How do I fix sticky dough?
Add more powdered sugar, one tablespoon at a time, until it firms up. Make sure you’re not using liquid food coloring!
3. Can I use other colors besides red?
Absolutely! Green for a holly vibe, gold for elegance, or go full rainbow for fun! Just make sure the colors are gel-based.
4. How long do they last?
Stored properly in a sealed jar, they’ll stay fresh for up to 2 weeks. They might even last longer, but chances are they’ll be gone before then.
5. Can I make these in advance for gifting?
Yes! They’re perfect for make-ahead holiday prep. Just be sure they’re fully dried before packaging to avoid any stickiness.
Conclusion: A New Holiday Tradition Starts Here 🎄
There’s something truly magical about making your own holiday candies. These Soft Christmas Peppermints are more than just a sweet treat — they’re a memory in the making. Whether you’re gifting them, sharing them at a party, or just enjoying them curled up by the fire with a cup of cocoa, these mints bring joy with every bite.
They look festive, taste divine, and feel like a holiday hug. So put on your favorite Christmas playlist, grab your butter and sugar, and start rolling — because these mints deserve a place in your holiday traditions for years to come.
Similar recipes :
Never Fail Fruit Cake – The Classic Old-Fashioned Holiday Treat


