If Christmas had a taste, it would probably be these soft, buttery sugar cookies. There’s something incredibly nostalgic and heartwarming about a plate full of iced snowflakes, sparkling trees, and glittery stars. These are not just cookies—they’re edible Christmas memories.
Whether you’re baking with kids, preparing cookie boxes for neighbors, or need a centerpiece for your dessert table, this recipe delivers. These cookies don’t spread too much, they keep their shape, they’re soft (not crunchy!), and the royal icing dries beautifully for stacking and gifting.
Let’s dive into this cozy, magical cookie adventure together! 🎄💫
✨ Why You’ll Love This Recipe
- Perfectly soft, not crumbly: Thanks to the perfect ratio of butter, flour, and sugar.
- Holds shape well: Your trees won’t turn into blobs!
- Simple, pantry-friendly ingredients
- Fun to decorate: Get creative with royal icing and sprinkles.
- Freezer-friendly: Bake now, enjoy later.
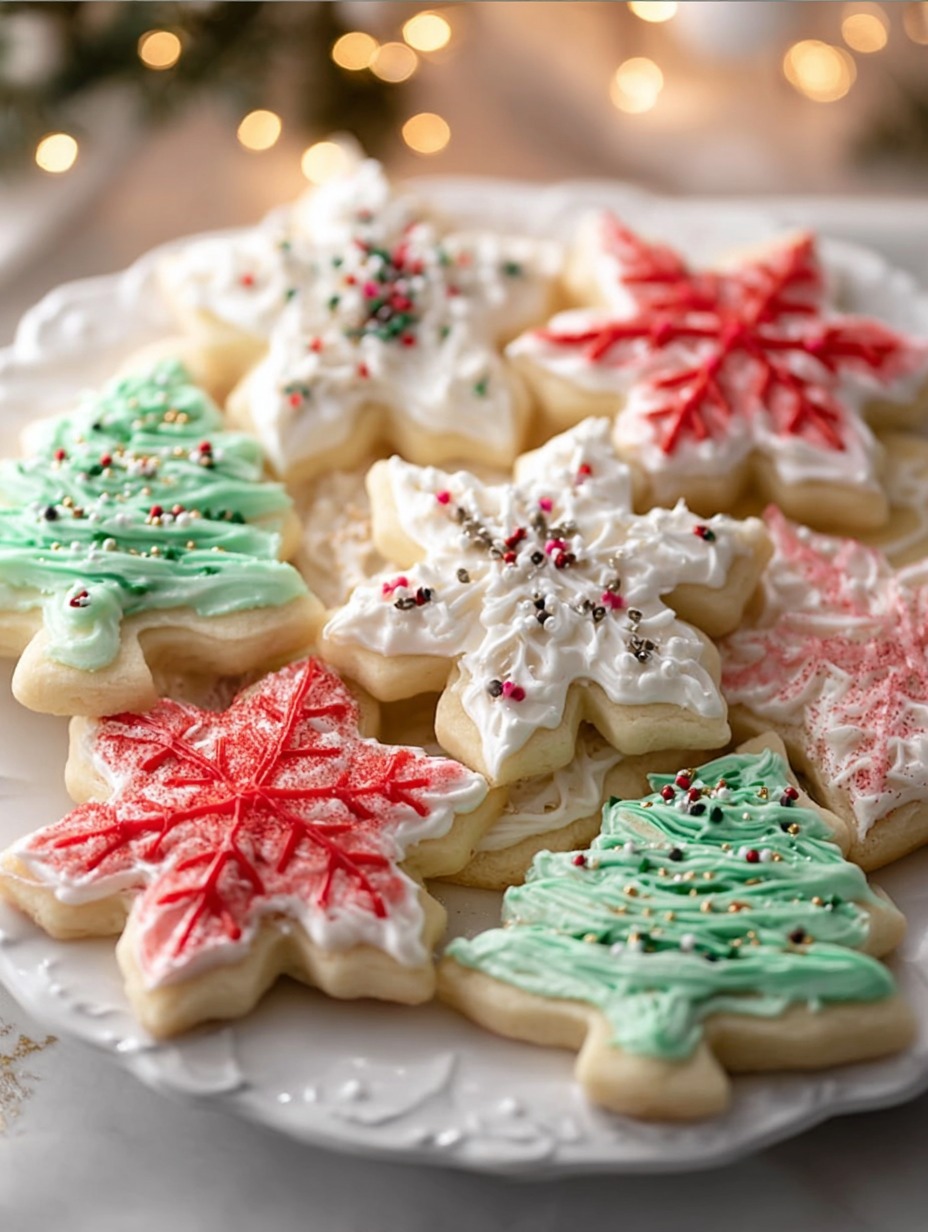
Bonus? This exact recipe gives you cookies that look just like the ones in the photo—snowflakes with intricate icing, Christmas trees with piped green branches, and lots of sparkly sprinkles.
🧈 Ingredients You’ll Need
For the Sugar Cookies:
- 1 cup unsalted butter, softened
- 1 cup granulated sugar
- 1 large egg
- 2 teaspoons vanilla extract
- ½ teaspoon almond extract
- 3 cups all-purpose flour
- ½ teaspoon baking powder
- ½ teaspoon salt
These ingredients make a buttery, rich dough that’s easy to roll out and cut. The almond extract gives it that subtle bakery-style flavor.
For the Royal Icing:
- 3 cups powdered sugar
- 2 tablespoons meringue powder
- 4–5 tablespoons warm water
- ½ teaspoon vanilla or almond extract
- Gel food coloring (red, green, white)
- Christmas sprinkles or edible glitter
This icing hardens beautifully, making the cookies stackable and perfect for gifting.
🔪 Kitchen Tools You’ll Need
- Electric mixer or stand mixer
- Mixing bowls
- Whisk
- Rolling pin
- Cookie cutters (snowflake, tree, star, etc.)
- Baking sheets
- Parchment paper or silicone mats
- Piping bags + small round tips (or zip-top bags with snipped corners)
- Cooling racks
💡 Before You Begin: Key Tips for Perfect Cookies
- Chill the dough: This step ensures clean edges and prevents spreading.
- Use gel food coloring: Liquid colors can thin the icing too much.
- Don’t overbake: Pale edges = soft cookies. Golden brown = crispy.
- Let icing dry fully: 6–8 hours is best if stacking or packaging.
👩🍳 How to Make Soft Christmas Sugar Cookies – Step-by-Step
Step 1: Creaming the Butter and Sugar
Start by beating the softened butter and sugar until light and fluffy—about 2 to 3 minutes on medium speed. This step is crucial because it adds air into the dough, making the final cookies soft and tender.
You’ll know it’s ready when the mixture is pale in color and creamy in texture.
Step 2: Adding the Egg and Extracts
Crack in the egg, then add the vanilla and almond extract. Mix until fully combined—this should take about a minute.
That almond extract? It gives these cookies a sweet, almost candy-like flavor that pairs perfectly with royal icing. Don’t skip it!
Step 3: Combining the Dry Ingredients
In a separate bowl, whisk together the flour, baking powder, and salt. Make sure there are no lumps.
Adding this gradually into the butter mixture will help form a soft, slightly sticky dough.
Step 4: Mixing Dough to the Perfect Consistency
Add the dry ingredients to the wet in batches, mixing just until combined. The dough should come together but not feel too dry or crumbly.
If needed, press the dough together with your hands to form a soft ball. Divide into two discs, wrap in plastic, and refrigerate for at least 1 hour.
Step 5: Chill for Perfectly Shaped Cookies
Chilling prevents your cookies from losing their sharp, festive shapes. Trust us—this step is worth the wait. Cold dough is easier to roll and cut cleanly.
Step 6: Roll, Cut & Shape Your Cookies
Roll the dough out to ¼-inch thick on a floured surface. Use snowflake, tree, and star cookie cutters to match the holiday spirit.
Place shapes on parchment-lined baking sheets about 1 inch apart.
Pro Tip: Dip your cookie cutters in flour between cuts to avoid sticking.
Step 7: Bake Until Just Set
Preheat oven to 350°F (175°C). Bake cookies for 8–10 minutes—they should look pale with slightly set edges.
Avoid browning! You want soft centers and clean edges for decorating.
Let cool on baking sheets for 5 minutes, then transfer to wire racks to cool completely.
Step 8: Cool Completely Before Icing
This is a must! If the cookies are even slightly warm, the icing will melt and run. Wait until they are room temperature—cool and dry.
🍭 How to Make Royal Icing That Actually Works
Mixing the Icing Ingredients
In a large bowl, whisk together:
- 3 cups powdered sugar
- 2 tbsp meringue powder
- ½ tsp extract
- Add warm water slowly (start with 4 tbsp, add more if needed)
Beat with an electric mixer on medium-high for 4–5 minutes, until the icing forms soft peaks.
Getting the Right Consistency
- Outline consistency: Should be thick but pipeable (think toothpaste).
- Flooding consistency: Add a touch more water so it settles into a smooth, glossy layer (like honey).
Divide icing into small bowls and tint using gel food coloring (red, green, white).
Coloring & Prepping for Decorating
Use piping bags or squeeze bottles for clean lines. If using sandwich bags, snip a tiny corner for control.
You can match the cookies in the image by:
- Using white royal icing for snowflakes, adding glitter and silver sprinkles.
- Using green icing for trees with piped branches and pink sprinkles.
- Using red and pink icing for candy-cane-inspired flakes.

🎨 Decorating Tips: Turning Cookies into Christmas Art
This is where the real holiday magic begins! Decorating sugar cookies is more than just adding color—it’s an art form, a moment to slow down, sip cocoa, and create edible Christmas joy. Whether you’re a pro or a total beginner, here’s how to make your cookies look as dazzling as the ones in the photo.
Outlining & Flooding Technique
Start with outlining each cookie shape using a slightly thicker icing. This creates a dam so your flood icing won’t run over the edges.
Once the outline sets (usually a minute or two), use thinner icing to flood the center. A toothpick or scribe tool helps spread the icing evenly and pop any air bubbles.
Match the cookie photo:
- For snowflakes, outline and flood in white, then add delicate red or silver icing details.
- For Christmas trees, outline and flood in green, then drag a toothpick through white icing for a tree “branch” texture.
- Sprinkle edible glitter or white nonpareils for a snowy sparkle.
Using Sprinkles & Edible Glitter
Apply sprinkles while the icing is still wet, so they stick. The cookies in the image show a mix of fine sanding sugar, silver dragees, and colored nonpareils. You can find these at most grocery stores during the holidays.
Get creative:
- Add silver beads to the center of snowflakes.
- Use red sprinkles to highlight tree ornaments.
- Create ombre effects by combining different sprinkle shades.
Drying Time & Storing Tips
Once decorated, let your cookies dry completely at room temperature. This can take 6–8 hours, or even overnight.
Once dry:
- Stack with parchment between layers.
- Store in an airtight container for up to 1 week.
- For longer storage, freeze undecorated cookies and decorate later.
🎁 Fun Shape Ideas That Match the Season
While snowflakes and trees are classics, you can really mix it up with other festive shapes:
- ⭐ Stars: Use yellow icing and gold sugar
- 🎅 Santa hats: Red triangles with white borders
- ⛄ Snowmen: Stack two circles and use black icing for details
- 🎁 Presents: Squares decorated with bows
Pro Tip: Stick with 3–4 designs for a coordinated look in gift boxes.
⚠️ Common Mistakes to Avoid
Even with the best recipe, sugar cookies can go wrong if you’re not careful. Here are some pitfalls to dodge:
- Skipping the chill time: Warm dough = cookies that spread and lose their shape.
- Overworking the dough: Makes cookies tough and dry.
- Rolling uneven dough: Leads to inconsistent baking—some burn, some underbake.
- Overbaking: These are soft cookies, so pale is perfect. Take them out at 9 minutes max if they look set.
- Using too much food coloring: Gel goes a long way. Too much = bitter taste.
- Stacking cookies before icing dries: Leads to ruined decorations.
Keep these tips in mind and you’ll be golden (not your cookies though—they should stay pale)!
🍪 How to Store Your Cookies
Freshly baked and decorated cookies should be cooled and dried fully before storing.
- Room temperature: Store in an airtight tin for up to 1 week.
- Fridge: Not recommended—moisture can ruin the icing.
- Freezer (undecorated): Freeze raw dough discs or baked cookies for up to 3 months. Thaw and decorate later.
Tip: Layer parchment between stacked cookies to prevent sticking or breaking.
Print
🎅 Soft Christmas Sugar Cookies
- Prep Time: 15 minutes
- Total Time: 7 hours+
- Category: Holiday Cookies / Christmas Baking
Description
🎄✨ Soft, buttery, and perfectly shaped — these Christmas sugar cookies are a festive delight! Ideal for decorating parties, gift boxes, and joyful holiday moments. Let the magic begin! ❄️🍪💚
Ingredients
1 cup unsalted butter, softened
1 cup granulated sugar
1 large egg
2 tsp vanilla extract
½ tsp almond extract
3 cups all-purpose flour
½ tsp baking powder
½ tsp salt
Royal Icing:
3 cups powdered sugar
2 tbsp meringue powder
4–5 tbsp warm water
½ tsp vanilla or almond extract
Gel food coloring (red, green, white)
Christmas sprinkles
Instructions
Beat softened butter and granulated sugar until light and fluffy. (⏱️ 2–3 minutes)
Add the egg, vanilla, and almond extract; mix until creamy. (⏱️ 1 minute)
In another bowl, whisk together flour, baking powder, and salt. (⏱️ 1 minute)
Add dry ingredients into the wet mixture and mix until a soft dough forms. (⏱️ 1–2 minutes)
Divide dough into 2 discs, wrap, and chill to help cookies stay thick and clean-edged. (⏱️ 1 hour)
Preheat oven to 350°F (175°C) and line baking sheets with parchment paper. (⏱️ 2 minutes)
Roll dough to ¼-inch thickness and cut into festive shapes 🎄❄️⭐. (⏱️ 5 minutes)
Transfer shapes to baking sheets and bake for 8–10 minutes, keeping them soft and pale. (⏱️ 10 minutes)
Let cookies cool completely before decorating. (⏱️ 20 minutes)
Make the icing: whisk powdered sugar and meringue powder, then add water slowly until smooth and pipeable. (⏱️ 3 minutes)
Add extract, divide icing, and tint using red, green, and white gel colors. (⏱️ 2 minutes)
Decorate with outlines, icing floods, sprinkles, and let dry completely for stackable cookies. 🎨✨ (⏱️ 6–8 hours)
Notes
Nutrition
- Serving Size: 24–30 cookies
- Calories: 150 kcal
❄️ Can You Freeze Sugar Cookies? Yes! Here’s How
Absolutely, and it’s a lifesaver during the busy holiday season.
To freeze cookie dough:
- Wrap the dough discs tightly in plastic wrap.
- Place in a freezer bag.
- Freeze up to 3 months.
- Thaw overnight in the fridge before rolling and cutting.
To freeze baked cookies:
- Let cookies cool completely.
- Stack in containers with parchment between layers.
- Freeze for up to 2 months.
- Thaw at room temperature and decorate after thawing.
To freeze decorated cookies:
- Only freeze if completely dry.
- Place in single layers with parchment.
- Use airtight containers (not zip bags) to avoid crushing designs.
You may also like :
Holiday Spritz Cookies – A Buttery Bite of Christmas Magic
The Ultimate Guide to Cream Cheese Cookies (With Soft Frosting)
🎉 Make It a Holiday Tradition
There’s something incredibly special about decorating cookies together during the holidays. It’s messy, fun, and filled with laughter.
Turn it into a full-on family event:
- Set up a decorating station.
- Make hot cocoa with marshmallows.
- Play Christmas tunes in the background.
- Let kids go wild with sprinkles (even if it ends up on the floor).
Create memories, not just cookies.
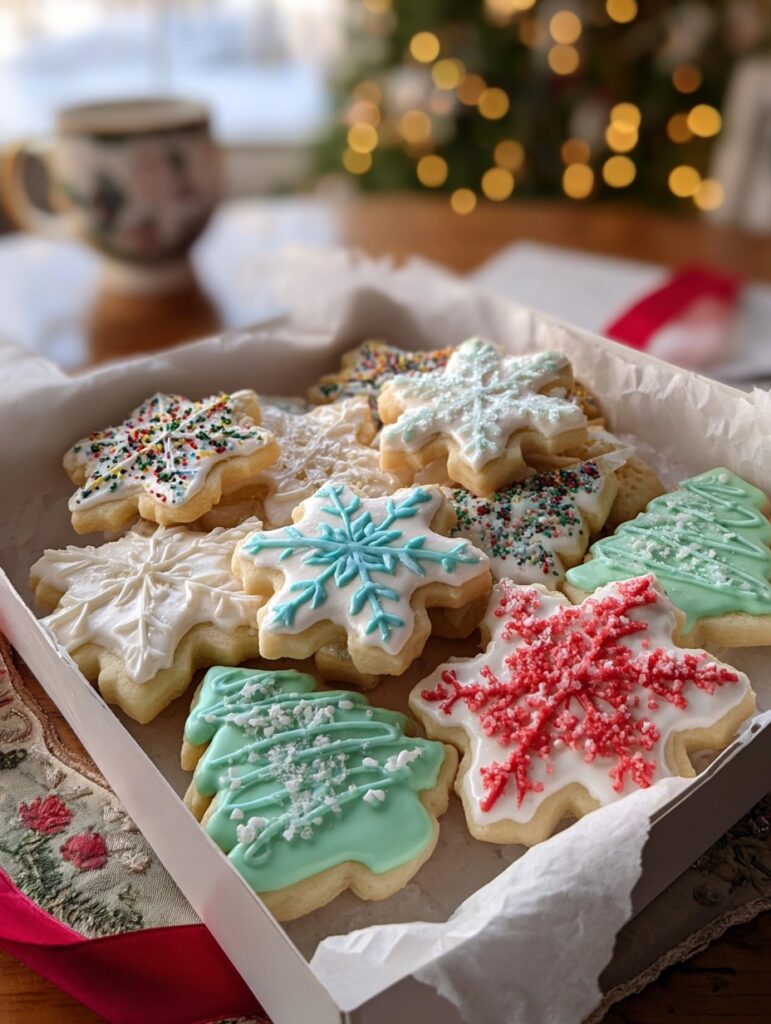
🎀 Perfect for Gifting: Packaging Ideas
Homemade cookies make heartfelt, affordable gifts. Here’s how to package them beautifully:
- Clear cellophane bags tied with ribbon
- Holiday tins from the dollar store
- Mason jars layered with tissue or cupcake liners
- Cardboard bakery boxes with twine and handwritten tags
Add a personal touch with a tag that says, “Baked with love” or “Merry & sweet!”
🎯 Conclusion: Bake Joy Into Every Cookie
Soft Christmas sugar cookies are more than just a holiday treat—they’re tiny bites of nostalgia, creativity, and connection. Whether you’re baking solo with holiday music or decorating with your kids and friends, these cookies will bring festive cheer to every kitchen they visit.
With a buttery soft base, crisp edges, and a canvas ready for all your decorative dreams, this recipe is a must-have for your holiday baking lineup. So preheat that oven, roll up your sleeves, and let the flour fly. Christmas magic is just a cookie away. 🎄✨
Similar recipes :
Rosemary Shortbread Christmas Tree Cookies Recipe – A Buttery, Festive Treat for the Holidays
Soft Christmas Cookies Recipe: A Melt-in-Your-Mouth Holiday Delight
❓ FAQs
1. Can I make the dough ahead of time?
Absolutely! The dough can be made up to 3 days ahead and kept in the fridge, or frozen for 3 months.
2. What if I don’t have meringue powder?
You can make a simple glaze with powdered sugar and milk, but it won’t harden the same way. Meringue powder is key for stackable royal icing.
3. How do I fix icing that’s too runny or too thick?
If it’s too runny, add more powdered sugar. If too thick, add warm water a teaspoon at a time.
4. Do these cookies spread in the oven?
Not if you chill the dough! Cold dough and a hot oven ensure they hold their shape perfectly.
5. What’s the best way to color the icing?
Use gel food coloring—it’s concentrated, doesn’t thin the icing, and produces vibrant colors.