
When the holidays roll around, there’s nothing quite like the joy of baking—and let’s be honest, eating—a tray full of soft, beautifully decorated sugar cookies. These Soft Christmas Tree Sugar Cookies are the kind that look like they came out of a holiday bakery window, but they’re made right at home, with simple ingredients, a whole lot of love, and just a bit of sparkle.
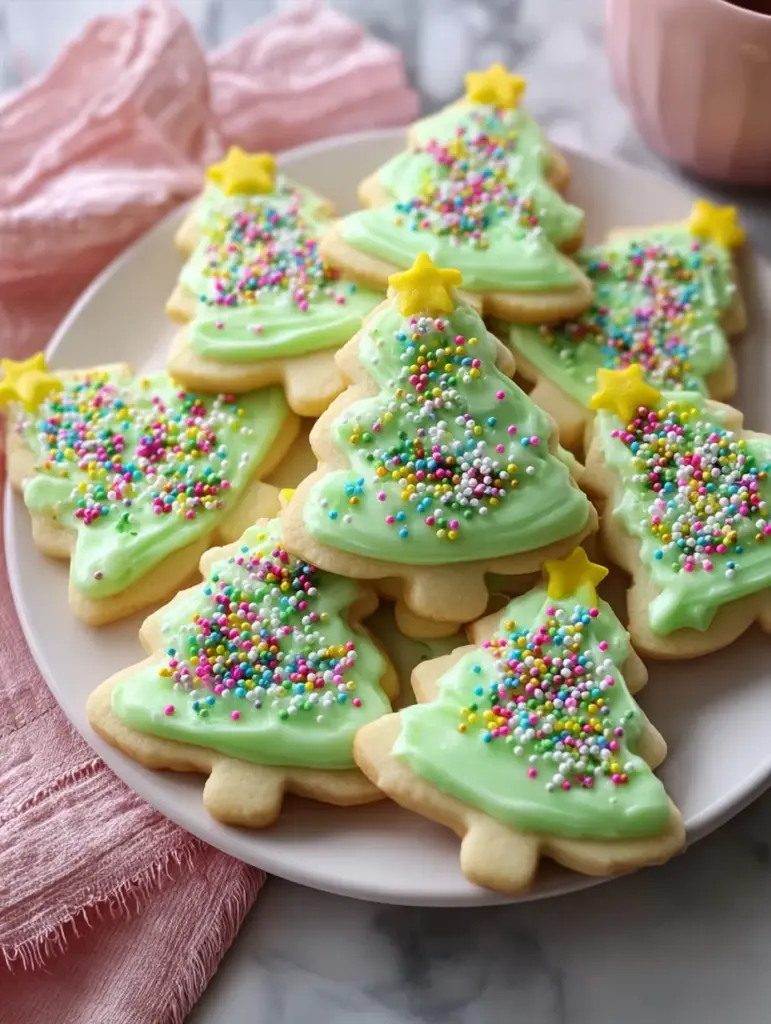
This recipe is everything a holiday cookie should be: soft, buttery, not too sweet, and topped with a creamy green frosting that holds a generous dusting of colorful nonpareils. And let’s not forget the piped yellow star that finishes each cookie like the perfect Christmas tree topper. These cookies look exactly like the festive treats in the photo you see—and we’re going to walk through every single step to help you make them just as picture-perfect.
So, grab your apron, preheat that oven, and let’s get into the most cheerful (and delicious) recipe you’ll make this season.
Table of Contents
Why You’ll Love These Cookies
These cookies aren’t just pretty—they’re a total crowd-pleaser for all ages. Here’s why:
- Soft and pillowy texture – Thanks to the butter-based dough and the no-browning bake, these cookies are incredibly tender.
- Perfectly sweet but not overwhelming – The cookies themselves are mild, which balances beautifully with the frosting and sprinkles.
- Customizable and fun – Want to swap colors? Add chocolate chips? Make a glittery version? You totally can.
- No fancy ingredients required – Everything you need is probably already in your pantry.
- Instagram-worthy looks – Just like the ones in our photo: pastel green frosting, rainbow sprinkles, and adorable yellow stars.
Tools You’ll Need
Before diving in, make sure you’ve got the right tools on hand. This ensures smooth sailing from start to finish.
- Electric hand or stand mixer
- Mixing bowls (at least two)
- Measuring cups & spoons
- Rubber spatula
- Rolling pin
- Christmas tree cookie cutter
- Baking sheets
- Parchment paper
- Wire rack for cooling
- Icing spatula or butter knife
- Small piping bag or zip-top bag (for the yellow star)
Ingredients Breakdown
Let’s take a closer look at what you’ll need to bring these cookies to life.
For the Cookies
- 1 cup (2 sticks) unsalted butter, softened – The base of our tender dough
- 1 cup granulated sugar – Just the right amount of sweetness
- 1 large egg – For structure and moisture
- 1½ teaspoons vanilla extract – For warm, classic flavor
- 2¾ cups all-purpose flour – Holds everything together
- 1 teaspoon baking powder – A touch of lift without puffing too much
- ¼ teaspoon salt – Balances the sweetness
For the Green Frosting
- 2 cups powdered sugar – The sweet, smooth base
- 3 tablespoons milk (more as needed) – For thinning
- 2 tablespoons unsalted butter, softened – For richness
- ½ teaspoon vanilla extract – For flavor
- Green gel food coloring – Gives that soft tree green without watering down the frosting
For Decorating
- Rainbow nonpareil sprinkles – Adds crunch and color
- Yellow frosting for stars – Store-bought or a bit of extra homemade frosting dyed yellow
Let’s Talk About Butter: Why It Matters
Butter is the heart of these cookies, and its quality really shows. Room-temperature, unsalted butter not only gives these cookies their flavor but also their soft, almost melt-in-your-mouth texture. When creamed properly with sugar, it creates air pockets that expand just enough during baking to give you cookies that don’t spread out too much—but don’t stay stiff either.
Prepping the Perfect Sugar Cookie Dough
This step is crucial. Don’t rush it!
- Cream butter and sugar – Beat them together for a full 2–3 minutes. You want light and fluffy!
- Add in the egg and vanilla – Mix until it’s all one creamy mixture.
- Combine dry ingredients in another bowl – Whisk the flour, baking powder, and salt to distribute evenly.
- Mix dry into wet – Slowly mix in the flour mixture until a dough forms. It should be soft but not sticky.
- Chill that dough! – Wrap it up, flatten it into a disk, and refrigerate for at least 1 hour. This is key to getting cookies that hold their shape and don’t puff up too much.
Rolling and Cutting: Getting That Classic Tree Shape
Once chilled, roll out your dough on a floured surface to ¼-inch thickness. No thinner! This gives us soft cookies that still have enough surface area for frosting and decoration.
Use a Christmas tree cookie cutter, pressing straight down without wiggling. Place each cut-out on a parchment-lined baking sheet, spacing them about 1 inch apart.
Baking the Cookies to Soft, Fluffy Perfection
Preheat your oven to 350°F (175°C). Bake for 8–10 minutes. Keep a close eye on them! These cookies should not brown. You’re looking for set edges and a matte top.
They might look underbaked, but trust the process. That pale, soft look is exactly what you want for that melt-in-your-mouth texture like in the photo.
Let them cool on the baking sheet for 5 minutes, then transfer to a wire rack.
Frosting 101: Making That Smooth, Pastel Green Icing
In a bowl, mix:
- 2 cups powdered sugar
- 2 tablespoons softened butter
- 3 tablespoons milk
- ½ teaspoon vanilla extract
Whisk until smooth. Adjust consistency:
- Too thick? Add a splash of milk.
- Too thin? More powdered sugar.
Add green gel food coloring (a few drops at a time) until you reach that soft pastel green. Liquid coloring will water it down, so stick with gel for the rich, creamy consistency like you see in the image.
Decorating Like a Pro
Now comes the fun part—decorating your Christmas tree cookies! This is where they truly come to life, just like the photo you see.
1. Frosting Application
Start by spreading a generous layer of the soft green frosting onto each cooled cookie using a butter knife or offset spatula. Don’t worry about perfection—tree branches are never perfectly straight! A gentle zigzag pattern across the cookie gives it that “garland” effect, just like in the picture.
Make sure you frost one cookie at a time before moving on. The frosting sets quickly, and you want the decorations to stick while it’s still wet.
2. Sprinkle Time
Immediately after frosting each cookie, shake on your rainbow nonpareil sprinkles. Don’t hold back! These add the festive, colorful touch that mimics lights or ornaments on the tree. In the image, you can see how the sprinkles are spread generously and evenly for that full, glittery look.
Tip: Place a baking tray underneath to catch excess sprinkles—it makes cleanup much easier.
3. Adding the Yellow Star
To mimic the adorable yellow star on top of the tree, pipe a small dollop of yellow frosting at the top of each cookie. If you don’t have a piping bag, snip the corner of a zip-top bag and use it instead. Use a star tip if you have one for extra flair, or just make a cute little swirl.
These tiny stars are the cherry on top and really pull together the whole holiday tree look.
Cookie Storage Tips
You just spent time and love creating these beautiful cookies—let’s make sure they last!
- Room Temperature: Store in an airtight container with parchment between layers. They’ll stay soft for up to 5 days.
- Refrigerate: If your house is warm or humid, refrigerate to keep the frosting firm. Let them come to room temp before serving.
- Freeze: You can freeze undecorated cookies for up to 2 months. For decorated cookies, flash-freeze them on a tray, then store in layers with parchment.
Pro Tip: To keep them super fresh, add a slice of bread in the container—the cookies absorb the moisture and stay tender longer.
Making These with Kids
These cookies are perfect for a family baking day. Kids love:
- Cutting out shapes
- Spreading the frosting (messy but fun!)
- Sprinkling with wild abandon
- Piping on stars like tiny pastry chefs
Set up a decorating station with a few bowls of sprinkles, spoons, and small bags of frosting. Keep the cookies on parchment-lined trays and let their creativity shine!
Just a heads-up: nonpareils can bounce everywhere. Lay down a tablecloth or baking sheet to contain the sprinkle chaos.
Troubleshooting Common Issues
Dough too sticky?
Add a spoonful of flour and chill longer. Make sure the butter isn’t too soft.
Cookies spreading too much?
That’s often because the dough wasn’t chilled enough. Let them chill for a full hour, or even overnight.
Frosting too runny?
Add more powdered sugar. Remember: gel food coloring keeps the frosting thick—avoid liquid colors.
Sprinkles falling off?
Frost one cookie at a time and add sprinkles immediately while the icing is still wet.
Cookies too hard?
Likely overbaked. Pull them from the oven as soon as they look set and matte, even if they seem soft. They firm up as they cool.

Soft Christmas Tree Sugar Cookies
- Prep Time: 15 minutes
- Total Time: 1 hour 25 minutes
- Category: Holiday Cookies / Christmas Desserts
Description
🎄✨ Soft, sweet, melt-in-your-mouth Christmas tree cookies that hold their shape beautifully and look magical on any holiday table! Festive, fun, and perfect for decorating with the family. 💚⭐🍬
Ingredients
1 cup (2 sticks) unsalted butter, softened
1 cup granulated sugar
1 large egg
1 ½ tsp vanilla extract
2 ¾ cups all-purpose flour
1 tsp baking powder
¼ tsp salt
Frosting:
2 cups powdered sugar
3 tbsp milk (more as needed)
2 tbsp unsalted butter, softened
½ tsp vanilla extract
Green gel food coloring
Decorations:
Rainbow nonpareil sprinkles
Yellow frosting (for stars)
Instructions
Prepare the Dough 🎅🥣
Beat softened butter and sugar until light and fluffy. 🕒 3 minutes
Add egg and vanilla; mix until smooth. 🕒 1 minute
Whisk flour, baking powder, and salt in a separate bowl. 🕒 1 minute
Add dry ingredients to the wet mixture and mix until a soft dough forms. 🕒 1 minute
Shape into a disk, wrap, and refrigerate. 🕒 1 hour
Roll & Cut the Cookies 🎄✨
Preheat oven to 350°F (175°C). 🕒 5 minutes
Lightly flour surface and roll dough to ¼-inch thickness. 🕒 3 minutes
Cut out Christmas tree shapes using a cookie cutter. 🕒 3 minutes
Transfer to a parchment-lined baking sheet. 🕒 1 minute
Bake the Cookies 🍪❄️
Bake for 8–10 minutes until set but still pale. 🕒 10 minutes
Cool completely before decorating. 🕒 10 minutes
Make the Frosting & Decorate 💚⭐
Mix powdered sugar, butter, milk, and vanilla until smooth. 🕒 2 minutes
Add green gel food coloring to reach a soft pastel tone. 🕒 1 minute
Spread frosting over each cookie and add rainbow sprinkles. 🕒 5 minutes
Pipe a tiny yellow star on top of each tree. 🕒 2 minutes
Notes
These cookies stay soft and buttery thanks to the chilled dough.
Keeping the cookies pale prevents them from drying out or losing their shape.
Gel food coloring is essential for getting that perfect pastel green without thinning the frosting.
Perfect for decorating with kids, gifting, or adding to a festive cookie platter.
Nutrition
- Serving Size: 20–24 cookies
- Calories: 160–180 kcal
Other Variations to Try
Want to switch it up? These cookies are super flexible!
- Chocolate-Dipped Tips: Dip the bottom of the tree in melted white or dark chocolate for a fun contrast.
- Different Colors: Try blue frosting with white snowflake sprinkles for a winter wonderland theme.
- Sanding Sugar Instead of Nonpareils: Adds a bit of shimmer without the crunch.
- Add Flavor: Almond extract or lemon zest in the dough gives a delicious twist.
- Mini Trees: Use a smaller cutter to make bite-sized versions—great for gifting.
You may like also :
Cherry Snowball Shortbread Cookies: A Bite of Holiday Magic
Lemon Crinkle Cookies 🍋 – Bright, Buttery, and Bursting with Sunshine!
Nutritional Info
Let’s be real—these aren’t diet cookies. But they’re worth every buttery bite.
- Approx. Calories per cookie: 160–180 kcal (depending on frosting and sprinkle thickness)
- Carbs: 25g
- Sugar: 15g
- Fat: 7–8g
Want to lighten them up?
- Use less frosting (or a thin glaze)
- Swap out half the butter for Greek yogurt
- Try a sugar alternative like erythritol in the dough (test in small batches first)
Final Thoughts: A Treat That Becomes a Tradition
These Soft Christmas Tree Sugar Cookies aren’t just cookies—they’re memories in the making. Whether you’re whipping them up with kids, surprising your neighbors with a holiday treat box, or simply indulging in some cozy, feel-good baking, these cookies bring all the Christmas cheer in one sweet, frosted bite.
They’re soft, colorful, fun to make, and even more fun to eat. Plus, they look just like the festive photo—with a creamy green coat, a confetti of rainbow sprinkles, and a perfect little yellow star at the top. It’s like biting into Christmas itself.
So go ahead—bake a batch (or two), crank up those holiday tunes, and let the smell of sugar cookies fill your kitchen with the spirit of the season.
Similar recipes :
Soft Christmas Cookies Recipe: A Melt-in-Your-Mouth Holiday Delight
Pineapple Upside Sugar Cookies – A Tropical Twist on a Classic Treat!
FAQs
1. Can I make these ahead of time?
Yes! Make and freeze the cookie dough up to a month in advance. Or bake and store cookies (undecorated) in an airtight container for up to a week.
2. What if I don’t have a tree-shaped cutter?
You can use any shape you like! Stars, bells, or circles (decorated as ornaments) work great. The dough holds shapes very well.
3. Can I make this dough gluten-free?
Absolutely. Substitute a high-quality 1:1 gluten-free flour blend. Check consistency and chill well for best results.
4. Can I double the batch?
Totally! This dough doubles beautifully. You may want to chill it in two separate disks for easier handling.
5. Do these ship well for holiday gifts?
They do—just let the frosting harden completely before packaging. Use parchment between each cookie and wrap them in a snug box to avoid shifting.


