
Some cookies just look like Christmas — snowy, soft, a little magical. Enter: Ultra-Soft Raspberry Christmas Snow Clouds. These dreamy cookies are impossibly tender, crinkled with powdered sugar like fresh snow, and studded with ruby-red raspberry gems. Each bite tastes like a cozy December evening, wrapped up in blankets with twinkling lights all around.
You know those treats that become tradition the moment you bake them once? This is that cookie. It’s not just about taste (although, spoiler alert: they’re insanely delicious) — it’s about the look, the feel, and the vibe. Let’s get into it.
Why These Raspberry Crinkle Cookies Are the Ultimate Christmas Treat
Let’s be real — Christmas cookies are kind of a competitive category. But these? They stand out for all the right reasons:
- Ultra-soft, almost melt-in-your-mouth texture
- Real fresh raspberries for juicy, sweet-tart bursts
- A snowy powdered sugar coating that screams holiday magic
- Easy to make — you don’t need a mixer or fancy skills
- Picture-perfect presentation with crinkles and sugar
They’re the kind of cookies that make people say, “Wait, you made these?” And all you did was follow a few simple steps. 😉
The Magic Behind the “Snow Cloud” Texture
The name says it all — these cookies are like biting into a snow cloud. Soft, pillowy, fluffy — no crunch, no dryness, no toughness. That dreamy texture comes from:
- The perfect butter-to-flour ratio
- Not overmixing
- Using fresh (not frozen!) raspberries
- Baking just until set, not browned
And that crackled, snowy top? It’s all about the powdered sugar and a good chill before baking. More on that soon.
What You’ll Need: Simple Ingredients, Magical Results
This isn’t one of those recipes that makes you run to five stores. Most of the ingredients are pantry staples — and the fresh raspberries are the only must-have specialty item.
Dry Ingredients Breakdown
- 1 ½ cups all-purpose flour – Your basic foundation. No need for cake flour or anything fancy.
- 1 teaspoon baking powder – Lifts the dough gently without making it puffy.
- ¼ teaspoon salt – Just enough to balance the sweet and boost flavor.
Wet Ingredients That Keep It Soft
- ½ cup unsalted butter, softened – Room temp is key for creaming.
- ½ cup granulated sugar – Sweet, but not overly so. Powdered sugar comes later!
- 1 large egg – Binds and adds richness.
- 1 teaspoon vanilla extract – Adds warmth and classic cookie flavor.
The Secret Star: Fresh Raspberries
- ¾ cup fresh raspberries – Pat them completely dry with paper towels. You don’t want extra juice turning your dough into soup. Gently crush them so they streak, not dissolve.
Optional but Worth It: White Chocolate Chips
- ⅓ cup white chocolate chips – Adds creamy sweetness that plays beautifully with tart raspberries. Totally optional, but chef’s kiss if you include them.
The Golden Rules of Perfect Raspberry Snow Crinkle Cookies
- DRY. THE. RASPBERRIES.
Seriously, this step makes or breaks your cookies. Wet berries = mushy, flat, pink-dough disasters. - Chill the dough for at least 15 minutes.
It helps firm things up so the cookies stay puffed and beautiful. - Don’t overbake.
If they look golden, they’ve gone too far. Pale means perfect. - Roll TWICE in powdered sugar.
One coat before baking, and one after they’ve cooled slightly. That’s how you get the snowy look in the photo.
Step-by-Step Instructions for Raspberry Snow Cloud Cookies
Let’s bake magic!
Step 1: Creaming the Butter and Sugar
Start by beating ½ cup softened butter with ½ cup granulated sugar. Use a hand mixer or stand mixer if you have one, but you can also do it with a sturdy whisk and elbow grease. Beat for about 2 minutes, until it looks pale and fluffy — this aerates the dough and sets up the soft texture.
Step 2: Mixing in the Egg and Vanilla
Add 1 large egg and 1 teaspoon vanilla extract to the creamed butter. Mix for 1 more minute, until everything is smooth and silky. This is your wet base — it should smell amazing already.
Step 3: Combining the Dry Ingredients
In a separate bowl, whisk together:
- 1 ½ cups all-purpose flour
- 1 teaspoon baking powder
- ¼ teaspoon salt
Gradually mix the dry ingredients into the wet base. Don’t overdo it — mix just until no streaks of flour remain. You want a soft, scoopable dough, not a tough one.
Step 4: Folding in Those Raspberries Just Right
Here’s where things get exciting! Take your ¾ cup fresh raspberries, pat them really dry (paper towels are your best friend), and give them a gentle crush with a fork.
Now fold them gently into the dough using a spatula. Don’t stir — fold. You want pretty streaks of pink and red, not totally pink dough. Add white chocolate chips now if you’re using them.
Step 5: Chilling the Dough – Don’t Skip This
Cover the dough and pop it into the fridge for at least 15 minutes. Chilling firms it up and makes it easier to shape. It also helps prevent overspreading in the oven.
Step 6: Rolling in Powdered Sugar (Twice!)
Scoop dough into 2-tablespoon-sized balls (about the size of a ping pong ball). Roll each one heavily in powdered sugar — like, don’t be shy.
Pro tip: For the ultimate “snow cloud” look, roll once, let them sit for a minute, and roll them again in a second coat of powdered sugar before baking.
Step 7: Baking to Pale-Perfection
Preheat your oven to 350°F (175°C). Line a baking sheet with parchment paper.
Place the cookie balls on the tray, leaving 2 inches between each. Bake for 12–14 minutes — they should look soft, puffed, and slightly cracked, but not golden brown.
Let them cool on the tray for 5 minutes, then dust with more powdered sugar if you want extra snow. (You do.)
Why They Stay Pale – And Why That’s the Point
Let’s talk color. You might be tempted to keep baking these cookies until they look golden brown, like traditional cookies. But that would be a mistake. These raspberry snow clouds are meant to stay pale — that’s part of their charm.
The pale color keeps the whole “snowy cloud” theme alive. Plus, baking just until set (not browned) is the secret to keeping the texture ultra-soft. Overbaking dries them out, flattens them, and loses that magical, almost cakey center.
So when the timer hits 12–14 minutes, don’t second-guess yourself. If they’ve puffed up, cracked slightly on top, and look matte but not glossy — they’re done. Trust the process.
Troubleshooting: Common Mistakes and How to Avoid Them
Every baker has a “why didn’t mine look like the photo?” moment. Let’s save you from that.
Problem: Flat Cookies
- Cause: Raspberries were too wet.
- Fix: Press them between layers of paper towels until they’re basically dry.
Problem: Pink Dough
- Cause: Overmixed after adding berries.
- Fix: Fold gently, just 2–3 turns max.
Problem: No Crinkle or Snowy Look
- Cause: Not enough powdered sugar or skipped second roll.
- Fix: Roll once, let sit a minute, then roll again for extra coverage.
Problem: Cookies Spread Too Much
- Cause: Dough too warm or butter too soft.
- Fix: Chill longer (up to 30 minutes), and don’t skip it!
Decorating Tips: Amp Up the Snowy Magic
Want cookies that sparkle like they belong in a holiday bakery window? Try these tricks:
- Dust with edible glitter after baking for an icy shimmer.
- Drizzle with melted white chocolate and top with crushed freeze-dried raspberries.
- Use a stencil and extra powdered sugar to create snowflake designs.
These little upgrades don’t change the flavor — just take the presentation from “cute” to Christmas-showstopper.
Print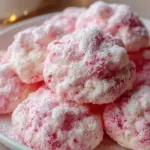
Ultra-Soft Raspberry Christmas Snow Clouds
- Prep Time: 15 minutes
- Total Time: 42 minutes
- Category: Christmas Cookies • Holiday Baking • Fruit Desserts • Festive Treats
Description
❄️✨ Soft, cloud-like, and dusted in snowy powdered sugar! These raspberry snow crinkle cookies are pale, fluffy, and bursting with sweet berry pockets — true little bites of Christmas magic. ❤️🎄
Ingredients
1 ½ cups all-purpose flour
½ cup granulated sugar
½ cup unsalted butter, softened
1 large egg
1 teaspoon vanilla extract
1 teaspoon baking powder
¼ teaspoon salt
¾ cup fresh raspberries, patted very dry and lightly crushed
½ cup powdered sugar (for rolling)
Optional: ⅓ cup white chocolate chips
Instructions
Beat the softened butter and granulated sugar together until light and fluffy. ⏱️ 2 minutes ✨
Add the egg and vanilla extract, mixing until smooth and creamy. ⏱️ 1 minute 🥣
In a separate bowl, whisk together flour, baking powder, and salt. Add to the wet mixture and mix just until a soft dough forms. ⏱️ 1 minute
Gently fold in the well-dried raspberries (and white chocolate chips if using), allowing light streaks without fully blending. ⏱️ 20 seconds ❤️
Chill the dough to firm it slightly for shaping. ⏱️ 15 minutes ❄️
Scoop dough into balls (about 2 tablespoons each) and roll heavily in powdered sugar to create the snowy coating. ⏱️ 3 minutes ☁️
Bake at 350°F (175°C) until cookies are pale, soft, and crackly — not golden. ⏱️ 12–14 minutes 🔥
Cool on the baking tray briefly, then dust with extra powdered sugar if desired. ⏱️ 5 minutes ✨
Notes
Nutrition
- Serving Size: 12 large cookies
- Calories: ~165 kcal
Variations to Try If You’re Feeling Creative
Want to make this your signature cookie with a twist? Here are some fun riffs:
Lemon-Zest & Raspberry Snow Clouds
Add 1 teaspoon of lemon zest to the dough for a bright citrusy edge that pairs beautifully with raspberries.
White Chocolate Raspberry Bliss
Mix in white chocolate chips (⅓ cup) for added creaminess and sweetness.
Almond Raspberry Clouds
Swap vanilla for almond extract for a nutty flavor that gives the cookies a European bakery vibe.
Raspberry Coconut Snow Cookies
Roll the cookie dough balls in a mix of powdered sugar and shredded coconut for a tropical, snowy feel.
Serving Ideas: Turn Cookies Into a Holiday Dessert Showstopper
Sure, you can pile these cookies on a plate — and they’ll vanish fast. But if you want to level up your Christmas dessert game, try these ideas:
- Hot Cocoa Dunkers – Serve alongside rich hot chocolate. The soft texture soaks up cocoa like a dream.
- Holiday Cookie Box Star – These cookies hold up well and look stunning. Nestle them into festive tins with parchment paper.
- Christmas Brunch Treats – Serve with coffee, mulled wine, or eggnog for a sweet morning surprise.
- Mini Ice Cream Sandwiches – Pair with vanilla bean or raspberry sorbet. Yes, really.
You may like also :
Raspberry White Chocolate Cheesecake Truffles Recipe: A Creamy, Dreamy Dessert You’ll Crave All Year Long
White Chocolate Raspberry Coconut Truffle Bites
Storing & Freezing: Keep the Magic Going
To Store:
- Place cooled cookies in an airtight container.
- Layer with parchment paper to prevent sticking.
- Keep at room temp for up to 4 days.
They’ll stay soft and snowy — no need to refrigerate.
To Freeze:
- Freeze baked cookies: Lay flat on a tray, freeze until solid, then transfer to freezer bags. Good for up to 2 months.
- Freeze the dough: Scoop and freeze dough balls (uncoated). When ready to bake, let thaw 10 minutes, roll in powdered sugar, and bake.
Perfect for make-ahead baking or surprise guests!
How to Make These Cookies With Kids (They’ll Love It!)
This recipe is made for little helpers. Here’s how to involve the kiddos:
- Let them roll the cookie dough balls in powdered sugar.
- Crush the raspberries with a fork together — messy but fun.
- Use cookie scoops to teach portioning.
- Let them dust the tops after baking (more powdered sugar = more fun).
The result? Adorable bonding moments, lots of sugar-dusted noses, and a new holiday tradition.

FAQs: Everything You’ve Ever Wondered About Snow Crinkles
Q1: Can I use frozen raspberries?
A: Not recommended — they release too much moisture and turn the dough into a pink mess.
Q2: What if I don’t have white chocolate chips?
A: Skip them or substitute with chopped white chocolate chunks or even ruby chocolate for extra flair.
Q3: Can I make the dough ahead of time?
A: Absolutely! Wrap tightly and store in the fridge for up to 24 hours, or freeze for up to 2 months.
Q4: Are these cookies gluten-free?
A: Not as written, but you can use a good 1:1 gluten-free flour blend. Results may vary slightly in texture.
Q5: Why do my cookies look brown underneath?
A: Your oven may be too hot or the tray too dark. Try using a lighter baking sheet and baking in the center rack.
Final Thoughts: Your New Favorite Holiday Cookie Recipe
If you’ve been looking for that Christmas cookie — the one that’s soft, magical, and totally unique — Ultra-Soft Raspberry Christmas Snow Clouds are it. They look like something from a holiday bakery window, but come together with pantry staples and a few fresh raspberries.
They’re fun to make, gorgeous to serve, and completely unforgettable. Whether you’re making them for a cookie swap, gifting them in a tin, or enjoying them with your morning coffee by the tree, these cookies bring joy in every bite.
So go ahead — preheat that oven, dust off your powdered sugar, and make some edible Christmas magic. ❄️🍪
Similar recipes :
Crispy Cotton Candy Cheesecake Bombs: A Whimsical Dessert Dream Come True
Deep Fried Marshmallows Recipe: The Ultimate Gooey, Golden Treat


