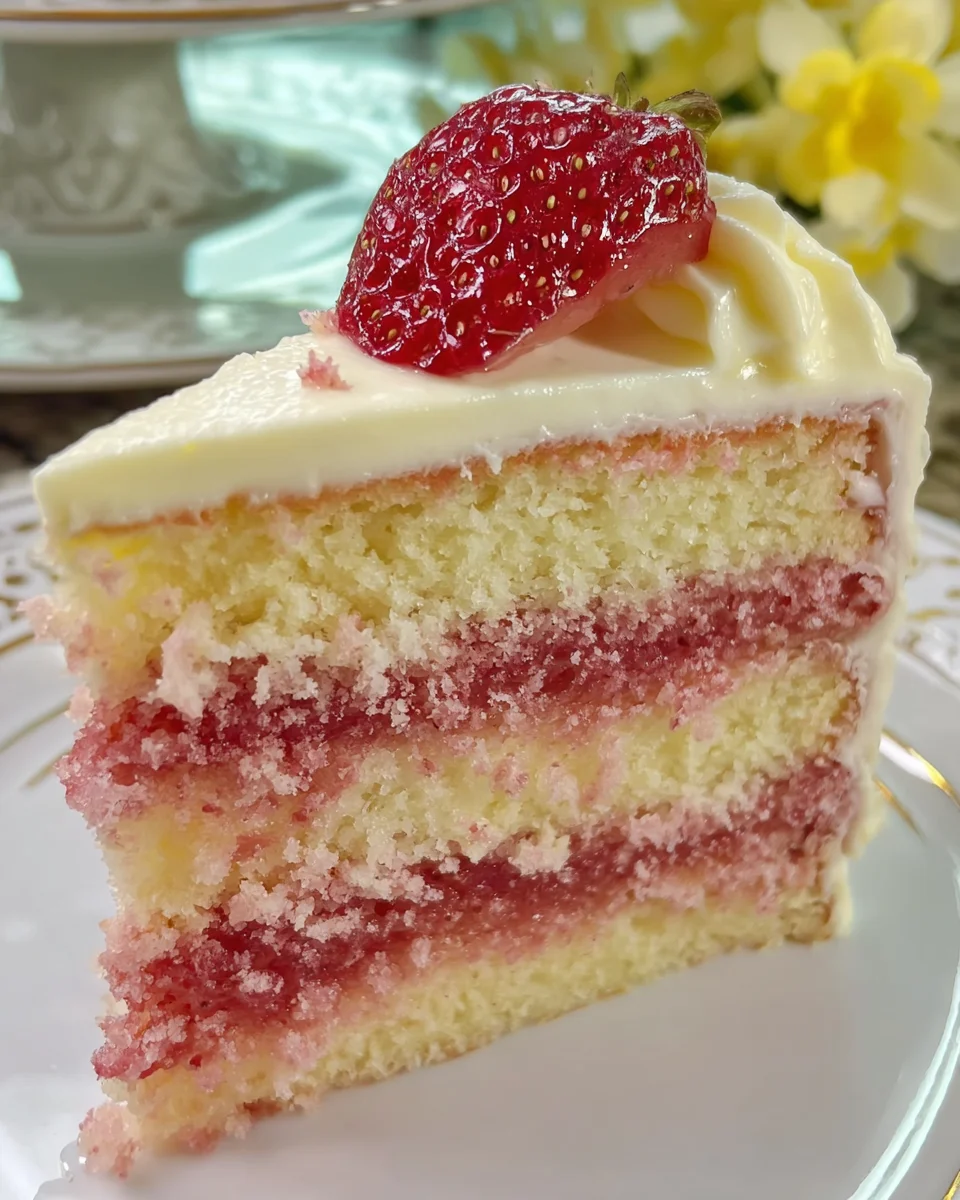
Introduction to Strawberry Lemonade Cake Layers
Ah, the joy of baking at times. The creation of refreshing, colorful desserts with so vibrant flavors sings true magic. Whether company is coming over, and you have to impress them with a special dessert, or simply get something refreshing for your loved ones, fear not – my answer is the Strawberry Lemonade Cake Layers. It is full of summery fresh flavors of lemons and sweet, juicy strawberries – perfect for just about any occasion. And that’s why it makes my heart race. This is also a busy mom friendly recipe so be prepared. Simple recipes are dangerous, my friends. Ahh…the things we come home to after finally marshaling our troops back to the dinner table.
Why You’ll Love This Strawberry Lemonade Cake Layers
This Layer Cake is all that is good in baking the ultimate confection. A real crowd pleaser at any party because of the mild flavor with a pop of spring. Not gonna lie, it is pretty fast to throw together and still tastes … Yeah and gorgeous too, the color and scent will make people return for more this weekend! It’s an easy way to create happy moments with family- because each piece is filled with love and light!
Ingredients for Strawberry Lemonade Cake Layers
As we dive into the yummy world of Strawberry Lemonade Cake Layers, let’s gather our ingredients like excited friends at a picnic. Each component plays its part, adding flavor and texture to this beautiful cake.
- Cream cheese: This adds creaminess to the frosting, making it silky and rich. Choose full-fat for the best flavor.
- Unsalted butter: Softened butter helps create that perfect airy texture. Unsalted allows you to control the saltiness in your cake.
- Sugar: Provides sweetness and helps the cake rise; a vital ingredient that really brings it all together.
- Large eggs: They bind the ingredients and create structure. Room temperature eggs whisk in better for a fluffier cake.
- Cake flour: A lighter flour ideal for cakes, ensuring our layers are soft and delicate.
- Baking powder and baking soda: These leavening agents help the cake rise and create softness, giving it that melt-in-your-mouth quality.
- Salt: Just a pinch enhances the flavor of the cake by balancing sweetness.
- Strawberry puree: This lends a burst of juicy strawberry flavor to the cake. You can make your own by blending fresh strawberries!
- Strawberry extract: A concentrated version of strawberry flavor. If you can’t find it, vanilla extract works too.
- Vegetable oil: Keeps the cake moist and adds a lovely texture, making it easy to cut and serve.
- Pink coloring gel: This is optional but fun! It gives an extra pop of color. A little goes a long way.
- Sugar and water (for lemon simple syrup): They create a sweet, citrusy glaze that soaks into the cake layers for added zing.
- Lemon juice and zest: Freshness and tartness are exactly what we need, bringing the lemonade vibe to our cake.
- Confectioners’ sugar: Essential for the frosting, creating a smooth, sweet topping that’s easy to spread.
- Fresh strawberries and lemon wedges: These are the show-stoppers, perfect for garnishing and elevating the visual appeal.
You’ll find exact quantities at the bottom of the article, easily printable for your next baking adventure!
How to Make Strawberry Lemonade Cake Layers
Now that we have gathered our ingredients, it’s time to transform them into the beautiful Strawberry Lemonade Cake Layers. Each step is essential, so let’s dive right into this culinary adventure!
Step 1: Prepare Your Baking Pans
Preheat your oven to 325°F (165°C) while you prepare the pans. Greasing and flouring three 8-inch cake pans is crucial to prevent sticking. An easy way is to use a pastry brush to spread softened butter all over the inside. Then, dust with flour, shaking out the excess. Having parchment paper at the bottom adds an extra layer of assurance!
Step 2: Mix the Dry Ingredients
In a medium bowl, mix cake flour, baking powder, baking soda, and salt. Sifting these ingredients for about 30 seconds ensures they blend well, creating a lighter cake texture. This step helps incorporate air, leading to soft layers that rise beautifully in the oven.
Step 3: Combine Wet Ingredients
In another bowl, whisk together the oil, strawberry puree, and strawberry extract. This step adds moisture and flavor to our strawberry cake. Mix until everything is combined, and make sure the puree is free of lumps for a smooth batter. Don’t rush this part; it sets the stage for a lovely cake!
Step 4: Cream Butter and Cream Cheese
In your mixer, combine softened butter and cream cheese. Mix these on medium speed until smooth. Gradually add sugar and beat for about 2-3 minutes until the mixture becomes fluffy. This is an important step because it creates the cake’s structure. The more air, the better the rise!
Step 5: Add Eggs Gradually
Now, it’s time to add the eggs one at a time, mixing well after each addition. This ensures each egg is fully incorporated, leading to the best texture. If you’d like, mix in a tiny amount of pink coloring gel at this stage for that extra pop of fun!
Step 6: Blend Ingredients Together
With your mixer on low speed, alternate adding the dry ingredients and the wet strawberry mix, starting and ending with the dry. This method will keep the batter consistent and smooth. Just mix until combined; over-mixing could lead to a dense cake.
Step 7: Bake
Divide the batter evenly among prepared pans. Bake for 28-30 minutes, or until a toothpick comes out clean when inserted in the center. While baking, the aroma of strawberries and lemons will fill your kitchen, making it feel like a warm hug!
Step 8: Make the Lemon Simple Syrup
In a small saucepan, boil water and sugar together until the sugar dissolves. Remove from heat and mix in lemon juice and zest. Allow it to cool. This syrup adds a zesty layer of flavor to soak into your cake, taking it to the next level!
Step 9: Prepare the Frosting
For the frosting, blend softened butter with cream cheese until smooth. Gradually add confectioners’ sugar and mix in lemon juice, extract, and zest until you get a buttery, creamy frosting. If it feels too soft, pop it in the fridge for a few minutes.
Step 10: Assemble the Cake
Place the first cake layer on a serving plate; brush it lightly with lemon syrup. Spread an even layer of lemon frosting on top and layer thinly sliced strawberries. Repeat this process with the second and final layers, allowing the flavors to meld beautifully.
Step 11: Final Frosting and Decoration
Cake construction isn’t complete without a crumb coat! Frost the entire cake lightly and chill for 10-15 minutes. This will lock in any crumbs. After chilling, finish frosting with a thicker layer and use a cake comb or piping tips for decoration. Top it off with fresh strawberries and lemon wedges for that picture-perfect finish!
Tips for Success
- Always use room temperature ingredients for better incorporation and texture.
- Measure flour accurately by spooning it into your measuring cup to avoid a dense cake.
- Don’t skip the sifting step; it’s crucial for a light and airy cake.
- Keep your oven door closed while baking to ensure even rising.
- Customize your frosting with additional lemon juice for a zippier flavor.
Equipment Needed
- Mixing bowls: A set of various sizes for dry and wet ingredients.
- Electric mixer: A stand or hand mixer makes creaming butter and sugar easier.
- Cake pans: Three 8-inch pans; you can use two and bake the layers in batches.
- Parchment paper: To line your pans for easy cake removal.
- Measuring cups and spoons: Essential for accurate ingredient measurements.
- Cooling rack: Helps cakes cool evenly.
- Spatula: For spreading frosting smoothly.
Variations of Strawberry Lemonade Cake Layers
- Gluten-Free Option: Substitute cake flour with a gluten-free 1-to-1 baking blend for a delicious gluten-free cake.
- Buttercream Alternative: Swap the cream cheese frosting for lemon buttercream for a lighter option. Just beat softened butter with confectioners’ sugar and lemon juice.
- Berry Medley: Mix in other berries like raspberries or blueberries along with strawberries for a colorful twist in flavor.
- Mini Cakes: Create adorable mini cakes or cupcakes using the same recipe, perfect for parties or gifting.
- Vegan Version: Use plant-based butter and a flax egg mixture in place of eggs to make the cake vegan-friendly.
- Layered Parfaits: For a quick dessert, make layered parfaits with cake crumbs, frosting, and fresh strawberries in a glass.
Serving Suggestions for Strawberry Lemonade Cake Layers
- Pair each slice with a dollop of whipped cream for extra indulgence.
- A refreshing glass of iced tea or lemonade complements the cake perfectly.
- Serve on a beautiful cake stand to enhance its presentation.
- Garnish plates with additional strawberry slices and lemon zest.
- For a more formal touch, add edible flowers for a stunning display.
FAQs about Strawberry Lemonade Cake Layers
Can I make Strawberry Lemonade Cake Layers ahead of time?
Yes! You can bake the cake layers a day in advance. Just wrap them tightly in plastic wrap and store them in the refrigerator. Frost the cake on the day you plan to serve it for the best flavor and texture.
How do I store leftover Strawberry Lemonade Cake Layers?
Store any leftover cake in an airtight container in the refrigerator. It should stay fresh for up to 3 days. Just remember to let it come to room temperature before serving for the best taste!
Can I use frozen strawberries for the puree?
Absolutely! Frozen strawberries work perfectly for the puree. Just thaw them and blend until smooth. This can be a great time-saver, especially when fresh strawberries are out of season.
How can I make the frosting more lemony?
If you’re looking for a zippier frosting, simply add more lemon juice and zest. Taste as you go, since a little extra can elevate the flavor without overpowering the sweetness.
What’s the best way to slice the cake without crumbling?
Use a sharp serrated knife for clean cuts. It’s helpful to wipe the knife with a damp cloth between cuts, keeping those slices neat and showcasing the beautiful layers of your Strawberry Lemonade Cake Layers.
Final Thoughts
Baking this Strawberry Lemonade Cake Layers is more than just creating a dessert; it’s about crafting joyful moments and precious memories with loved ones. Each layer captures the essence of summer, sunshine, and laughter, making every bite a delightful experience. As I watch my family revel in the flavors and colors, it warms my heart and fills my home with love. I hope this cake brings you as much joy as it does for me. So when life gives you lemons, embrace them and turn them into a stunning cake that brightens everyone’s day!
Print
Strawberry Lemonade Cake Layers: A Must-Try Delight!
- Prep Time: 30 minutes
- Cook Time: 30 minutes
- Total Time: 1 hour
- Yield: 12 servings 1x
- Category: Dessert
- Method: Baking
- Cuisine: American
- Diet: Vegetarian
Description
A delightful and refreshing strawberry lemonade cake with layers of cream cheese frosting, perfect for any occasion.
Ingredients
- 8 oz (226g) cream cheese, softened
- 1 ½ sticks (168g) unsalted butter, softened
- 2 cups (400g) sugar
- 4 large eggs, room temperature
- 3 cups (342g) cake flour
- 2 teaspoons (8g) baking powder
- ½ teaspoon (3g) baking soda
- ½ teaspoon (3g) salt
- 1 cup (243g) strawberry puree
- 2 teaspoons (8g) strawberry extract
- ¼ cup (54g) vegetable oil
- A touch of pink coloring gel (optional)
- ½ cup sugar (for lemon simple syrup)
- ⅓ cup water (for lemon simple syrup)
- Juice (3 tablespoons) and zest of 1 lemon (for lemon simple syrup)
- 3 sticks (339g) unsalted butter, softened (for frosting)
- 8 oz (226g) cream cheese, softened (for frosting)
- ¼ cup (57g) lemon juice (for frosting)
- 1 ½ teaspoons (6g) lemon extract (for frosting)
- Zest of 1 lemon (for frosting)
- 7 ½ cups (863g) confectioners’ sugar, sifted (for frosting)
- Approximately 10 fresh strawberries (for garnish)
- Thinly sliced wedges of lemon (for decoration)
Instructions
- Preheat oven to 325°F (165°C). Grease and flour three 8-inch pans and line with parchment paper.
- In a medium bowl, whisk together cake flour, baking powder, baking soda, and salt for 30 seconds. Set aside.
- In another bowl, mix oil, strawberry puree, and strawberry extract. Set aside.
- In a mixer bowl, combine butter and cream cheese. Mix at medium speed until smooth. Gradually add sugar and beat for 2-3 minutes.
- Add eggs one at a time, mixing until yolks disappear. Optionally, mix in pink coloring gel.
- With mixer on low, alternately add flour mixture and strawberry mixture (beginning and ending with flour, in 3 dry and 2 wet additions). Mix until combined and smooth.
- Divide batter among prepared pans. Bake at 325°F (165°C) for 28-30 minutes, or until a toothpick inserted in the center comes out clean.
- Let cool for 5-10 minutes in pans before transferring to a wire rack.
- In a saucepan over medium heat, bring water and sugar to a boil. Lower heat, stirring until sugar dissolves. Remove from heat, add lemon juice and zest, and let cool.
- In a mixer, blend butter until smooth. Gradually add cream cheese and confectioners’ sugar. Mix in lemon juice, extract, and zest. Refrigerate if frosting softens.
- Place the first cake layer on a plate. Optionally brush with lemon syrup. Spread lemon frosting on top and layer with thinly sliced strawberries. Repeat with the second and final layers.
- Frost the entire cake with a crumb coat and chill for 10-15 minutes before final frosting.
- Decorate the cake with frosting using a cake comb or piping tips. Add fresh strawberries and lemon wedges for garnish.
- Refrigerate and bring to room temperature before serving.
Notes
- For a stronger lemon flavor, increase the amount of lemon juice and zest in the frosting.
- Ensure all ingredients are at room temperature for best results.
- This cake can be made a day in advance and stored in the refrigerator.
Nutrition
- Serving Size: 1 slice
- Calories: 450
- Sugar: 40g
- Sodium: 300mg
- Fat: 22g
- Saturated Fat: 10g
- Unsaturated Fat: 8g
- Trans Fat: 0g
- Carbohydrates: 58g
- Fiber: 1g
- Protein: 4g
- Cholesterol: 80mg