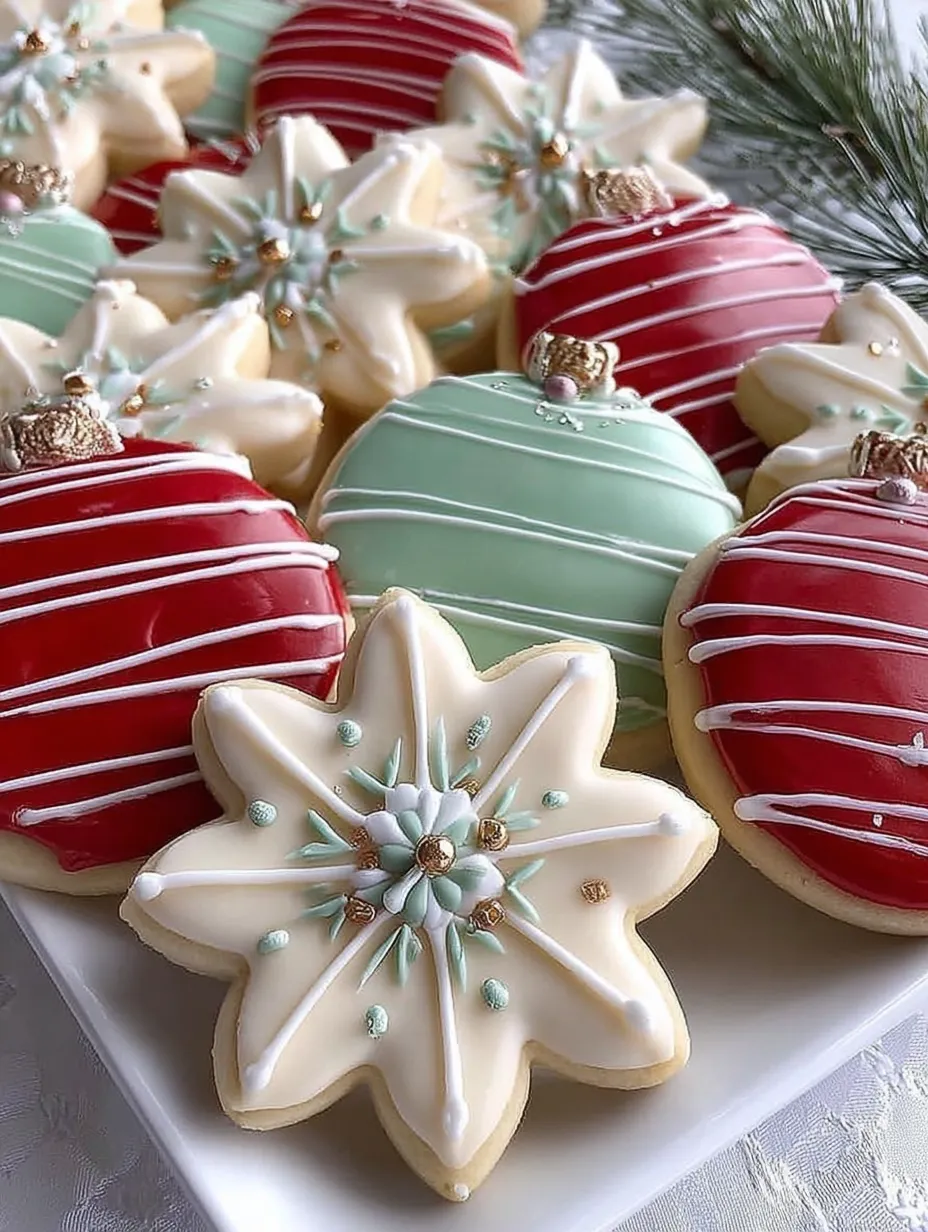
When December rolls in and the twinkling lights go up, there’s one tradition that warms the heart like no other—baking Christmas cookies. But we’re not just talking about any cookies. We’re talking about Striped Christmas Ornament & Snowflake Sugar Cookies—beautiful, buttery, and perfectly festive treats that look as magical as they taste.
These cookies are inspired by classic holiday ornaments and delicate snowflakes, decorated with bold red and green stripes, soft vanilla icing, and glimmering clusters of sugar pearls. Whether you’re setting them out for Santa, gifting them in a pretty tin, or enjoying them with hot cocoa by the fire, these cookies will become a cherished part of your holiday memories.
Why These Cookies Are the Star of Your Dessert Table
Let’s be real. Holiday desserts are everywhere in December—cakes, pies, bars, you name it. But these cookies? They steal the show every single time. Why?
- They’re stunning – Like edible ornaments straight off the tree.
- They’re buttery and soft – With just the right amount of chew and crisp edge.
- They’re fully customizable – Want more green? Add it. Prefer just snowflakes? You can do that too.
- They store beautifully – So you can bake ahead and gift without worry.
Best of all, they taste as incredible as they look. It’s the perfect blend of classic sugar cookie flavor and that nostalgic holiday magic.
The Secret to Perfectly Shaped Sugar Cookies
Nothing ruins a festive cookie moment like your snowflake looking more like a snow blob after baking. The trick? It’s all in the dough prep and chilling time. A well-structured dough combined with the right rolling and cutting techniques ensures those crisp, sharp edges survive the oven.
You’ll also want to make sure your dough isn’t overworked, and that your butter is softened—not melted—before mixing. Chilling is non-negotiable. You’ll see why in just a sec.
Gather Your Ingredients: What You’ll Need
Dry Ingredients
- 2 ½ cups all-purpose flour
- ½ teaspoon baking powder
- ¼ teaspoon salt
These provide the structure and lift. Make sure to spoon and level your flour—don’t scoop, or your dough could end up too dry.
Wet Ingredients
- 1 cup unsalted butter, softened (not melted!)
- 1 cup granulated sugar
- 1 large egg
Butter gives that melt-in-your-mouth texture, while the egg binds everything together.
Flavor Boosters
- 2 teaspoons vanilla extract
- ½ teaspoon almond extract (optional, but highly recommended for a nostalgic bakery-style flavor)
Tips for Using Almond Extract (Without Overpowering the Cookie)
Almond extract can go from “yum” to “soap” if you use too much. But when used right, it gives your sugar cookies that iconic bakery aroma and flavor. Half a teaspoon is just enough to elevate the vanilla without dominating the dough.
If you’re baking for folks with nut allergies or just not a fan of almond extract, you can omit it. Or swap in something fun like orange or lemon zest for a fresh citrus twist.
Essential Tools for Holiday Cookie Success
Want bakery-level cookies? Make sure you have these on hand:
- Rolling pin (preferably with thickness rings)
- Cookie cutters (snowflake + round ornament shapes)
- Piping bags or squeeze bottles
- Toothpicks or scribe tools
- Gel food coloring (not liquid!)
- Cooling racks
- Offset spatula
- Sprinkles (pearls, nonpareils, glitter sugars)
Step-by-Step Sugar Cookie Dough Instructions
- Cream butter + sugar on medium speed for 2 minutes. You want it creamy and smooth—not airy.
- Add the egg, vanilla, and almond extract. Mix until combined.
- In a separate bowl, whisk the flour, baking powder, and salt.
- Add dry to wet ingredients and mix on low until the dough forms.
- Shape dough into a flat disk, wrap it in plastic wrap, and refrigerate for at least 1 hour.
This dough is dreamy. It’s easy to roll, holds its shape, and doesn’t spread in the oven. Just don’t skip the chill time!
Chilling the Dough: Why It’s Crucial for Shape and Texture
Here’s the deal: Warm dough spreads. Cold dough doesn’t. That’s it. If you skip chilling, your cute little snowflakes could end up looking like melted blobs.
Chilling also helps the gluten relax, giving you that tender bite instead of a tough cookie. For best results, chill for at least 1 hour—2 if you can wait.
Rolling and Cutting the Dough: Pro Tips for Clean Shapes
Roll your chilled dough on a lightly floured surface to about ¼-inch thick. Not too thin, not too thick. Use cookie cutters dipped in flour for clean edges.
Tip: Cut cookies close together to avoid re-rolling too much. Each re-roll can toughen the dough just a bit.
Place cookies on parchment-lined baking sheets, about 1 inch apart.
The Bake: How to Know When Sugar Cookies Are Just Right
Bake at 350°F (175°C) for 9–11 minutes. Don’t wait for them to brown—the edges should look just set, still pale in color.
Overbaking will rob you of that soft center. Once out of the oven, let them cool on the tray for 5 minutes, then transfer to a wire rack.
Mixing the Royal Icing: Getting the Consistency Right
Time to decorate! For the icing, combine:
- 3 cups powdered sugar
- 3–4 tablespoons milk
- 1 tablespoon light corn syrup
- 1 teaspoon vanilla extract
Mix until you get a smooth, flowy texture that settles back in 10–12 seconds when stirred. That’s your flooding consistency. Thicken it slightly for drizzling detail lines.
Coloring the Icing: Getting that Bright Red and Festive Green
Use gel food coloring for vivid color without watering down your icing. Divide the base white icing into 3 bowls and tint one red, one green, and leave the third white (or tint with white gel for brightness).
Let colors sit 10 minutes after mixing—colors deepen over time.
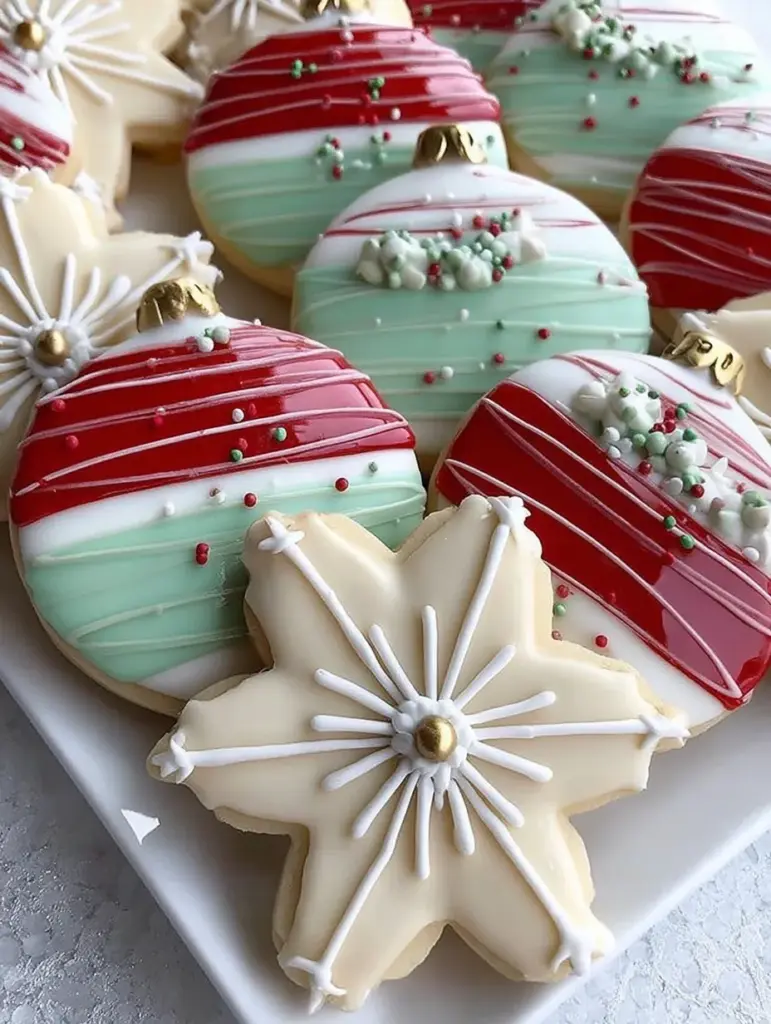
Decorating Like a Pro: How to Make Those Beautiful Stripes
Creating the Red & White Stripes
- Flood the cookie with white icing.
- Quickly pipe red stripes across before it sets.
- Use a toothpick to gently drag lines vertically for a marbled stripe effect.
- Let it dry 10–15 minutes before adding details.
Making the Tricolor Green/White/Red Ribbons
- Flood with alternating lines of red, green, and white.
- Gently swirl together or leave as is for bold ribbons.
- Use a thicker icing to pipe thin drizzle lines in white or red on top once it sets.
Snowflake Cookie Design: Classy and Elegant
Flood snowflake cookies in white icing. Once semi-set, pipe thin white lines from the center outward to mimic snowflake arms.
Add sugar pearls and white nonpareils along the lines for a frosty sparkle. Use a large red pearl in the center, then surround with smaller green, white, and gold pearls to match the design in the image.
The Sprinkle Clusters: Tiny Ornaments on a Cookie
This is the part that really brings the “wow” factor. Each cookie looks like it’s been kissed by holiday magic thanks to those little sprinkle clusters.
How to Build the Sprinkle Clusters:
- Start with one large red pearl right in the center of the cookie.
- Surround it with smaller green, white, and gold sugar pearls.
- Add a sprinkle of white nonpareils around the cluster to mimic falling snow.
- Dust the entire cookie with fine sugar glitter to give it that frosty shimmer.
This is your chance to really personalize the cookies. Want a little more sparkle? Go wild with glitter. Want to tone it down for a more minimalist look? Stick to white and gold. The clusters act like edible jewelry—and they’re what give these cookies that true ornament-like finish.
How Long Should Cookies Dry? And Why It Matters
After decorating, patience becomes your best friend. The icing needs time to fully set and dry. If you move or stack them too soon, you’ll ruin the smooth surface and all your beautiful details.
Drying Time Guidelines:
- Surface dry: 4–6 hours
- Fully dry for packaging or stacking: 8–12 hours
Leave the cookies uncovered at room temperature on a tray or parchment paper. Avoid using the fridge—it can cause colors to bleed or the icing to develop a weird texture.
Pro Tip: If you’re in a hurry, place a fan on low speed near the cookies to help speed up the drying process. Just don’t point it directly at them—gentle airflow is key.
Packaging and Gifting Tips: Turning Cookies into Presents
Let’s talk presentation. You’ve baked and decorated these show-stopping cookies—now it’s time to share them!
Packaging Ideas:
- Place each cookie in a clear cellophane bag tied with ribbon.
- Use a holiday-themed tin lined with parchment paper.
- Create cookie gift boxes with festive crinkle paper and a hand-written tag.
These cookies are durable enough for shipping too—just be sure to cushion them well with bubble wrap or soft padding between layers.
They’re perfect for:
- Hostess gifts 🎁
- Teacher thank-yous 🍎
- Cookie swaps 🍪
- Coworker treats 🎄
Give them with a mug and a packet of hot cocoa for an instant cozy gift bundle.
Storing Your Cookies to Keep Them Fresh
Freshness matters. You worked hard on these cookies, and they deserve to stay delicious for as long as possible.
Storage Tips:
- Room temperature: Store in an airtight container for up to 7 days.
- Freezing undecorated cookies: Up to 2 months, well-wrapped.
- Freezing decorated cookies: Freeze between parchment layers and thaw at room temp in the container (don’t open while thawing—moisture can ruin the icing).
Avoid humid or warm spots in your kitchen to prevent icing from softening or colors from bleeding.
Print
Striped Christmas Ornament & Snowflake Sugar Cookies
- Prep Time: 1 hour 20 minutes
- Total Time: 2 hours 15 minutes (plus drying time)
- Category: Holiday Cookies / Festive Baking
Description
🎄 Cozy, festive, and beautifully detailed — these delicate cookies shine like tiny ornaments on a holiday tree. Smooth glaze, crisp edges, and sweet sprinkle clusters make every bite feel like Christmas magic. ✨❄️
Ingredients
1 cup unsalted butter, softened
1 cup granulated sugar
1 large egg
2 teaspoons vanilla extract
½ teaspoon almond extract
2 ½ cups all-purpose flour
½ teaspoon baking powder
¼ teaspoon salt
Icing:
3 cups powdered sugar
3–4 tablespoons milk
1 tablespoon light corn syrup
1 teaspoon vanilla extract
Red gel food coloring
Green gel food coloring
White gel food coloring (optional)
Decorations:
Red, green, white, and gold sugar pearls
White nonpareils
Fine white sugar glitter
Instructions
Cream butter and sugar on medium speed until smooth, not fluffy.
👉 Duration: 2 minutes 😊Add egg, vanilla, and almond extract; mix until combined.
👉 Duration: 1 minuteWhisk together flour, baking powder, and salt in a separate bowl. Add to wet mixture and mix on low until dough forms.
👉 Duration: 2 minutesShape dough into a disk, wrap, and chill for at least 1 hour for clean-cut edges.
👉 Duration: 1 hour ❄️Roll dough to ¼-inch thickness and cut out snowflakes and ornament shapes.
👉 Duration: 10 minutesBake at 350°F (175°C) for 9–11 minutes until edges are pale. Cool fully.
👉 Duration: 10 minutes baking + 20 minutes coolingPrepare icing by mixing powdered sugar, milk, corn syrup, and vanilla until smooth (10–12 second consistency).
👉 Duration: 5 minutesDivide and tint icing red, green, and white. Flood cookies in desired patterns and let set.
👉 Duration: 15 minutesDrizzle slightly thicker icing in thin lines for bakery-polished finish.
👉 Duration: 5 minutesAdd sprinkle clusters: place one large red pearl in the center, surround with other colored pearls, dust with nonpareils and glitter.
👉 Duration: 10 minutes ✨Let cookies dry completely for a fully firm surface.
👉 Duration: 4–12 hours
Notes
These cookies are perfect for Christmas parties, cookie exchanges, or decorating with kids.
The dough should be well-chilled before cutting to ensure clean edges and prevent spreading during baking.
Royal icing or glaze can be used to create intricate designs like stripes, snowflakes, and ornaments.
Decorations such as sugar pearls, nonpareils, and edible glitter make the cookies visually festive and photo-ready.
Cookies need sufficient drying time (4–12 hours) for icing to fully set if you want them stackable or gift-ready.
Can be stored in an airtight container for up to 1 week.
Nutrition
- Serving Size: 24 cookies
- Calories: 160 kcal
Common Mistakes to Avoid with Holiday Sugar Cookies
Even seasoned bakers can run into hiccups, especially when decorating cookies. Here’s what to watch out for:
❌ Mistake 1: Skipping the Chill Time
This leads to cookies spreading in the oven and losing their shape. Always chill the dough!
❌ Mistake 2: Overbaking
If the edges are golden brown, they’re probably overdone. Take them out when they still look pale.
❌ Mistake 3: Using Liquid Food Coloring
This can water down your icing and make it runny. Stick to gel food coloring.
❌ Mistake 4: Rushing the Drying Process
If you stack or package too early, your icing may smudge or dent. Let them dry overnight.
❌ Mistake 5: Skipping Consistency Checks on Icing
Different decorating techniques need different icing consistencies. Always test before decorating.
Avoid these mistakes, and your cookies will be both beautiful and delicious!
Final Thoughts: Bake with Love and Holiday Spirit
Striped Christmas Ornament & Snowflake Sugar Cookies are more than just a festive treat—they’re edible memories in the making. From the aroma of buttery vanilla dough in the oven to the joy of creating sparkling decorations with your kids, friends, or just for yourself, these cookies bring warmth to the season.
The best part? You can make them your own. Change the colors, play with designs, or go classic—no matter what, you’ll end up with cookies that feel (and taste) like Christmas.
So pull out those sprinkles, queue up your favorite holiday playlist, and let your kitchen become a winter wonderland of sweetness.
Similar recipes :
Melt-in-Your-Mouth Christmas Sprinkle Cookies – A Festive, Buttery Delight!
Ginger Molasses Christmas Cookies
FAQs About Striped Christmas Ornament & Snowflake Sugar Cookies
1. Can I make the dough in advance?
Yes! You can refrigerate the dough for up to 3 days or freeze it for up to 2 months. Just let it thaw in the fridge overnight before using.
2. What if I don’t have corn syrup for the icing?
You can skip it, but corn syrup adds shine and helps the icing set with a smooth finish. Honey can be used as a substitute in small amounts.
3. How do I keep the icing colors from bleeding into each other?
Let the first layer of icing set slightly before adding new colors or details. Also, avoid storing them in a humid area.
4. Can I use different shapes for the cookies?
Absolutely! The base recipe works for any cut-out cookie shapes. Stars, trees, mittens—go wild with it.
5. What’s the best way to get those thin drizzle lines on top?
Use a piping bag with a #1 or #2 tip (or snip a very tiny corner off a plastic sandwich bag). Let your base icing dry slightly first for the cleanest look.


