
Introduction to Banana Split Dump Cake
Do you ever find yourself in a dessert dilemma, battling between time constraints and the desire to whip up something special? I know I have! That’s why I’m so excited to share my Banana Split Dump Cake with you. It’s a delightful blend of classic banana split flavors in a breeze-worthy cake. Whether you’re serving up an after-school treat for the kids or a sweet ending to a family dinner, this dessert promises smiles and satisfied sweet tooths. Best of all, it’s as simple as layering ingredients—no complicated steps here. Let’s dive into this joyful culinary adventure!
Why You’ll Love This Banana Split Dump Cake
This Banana Split Dump Cake is a lifesaver for busy moms like me. It’s so easy to make, you can whip it up in under an hour! The harmony of fruity flavors and gooey sweetness will have everyone, from picky eaters to dessert enthusiasts, roaring with delight. Plus, it offers a nostalgic twist on a beloved classic banana split while allowing you to enjoy your time with family instead of fussing in the kitchen.
Save this recipe and cook smarter
Keep your favorite Cooking Layer recipes in one place, plan your weekly meals, and quickly find dinner ideas whenever you need them.
Free to download • Fast and easy to use
Ingredients for Banana Split Dump Cake
Let’s gather our stars for this delicious Banana Split Dump Cake! Here’s what you’ll need:
- Ripe Bananas: I love the natural sweetness and creaminess they bring. Choose medium ripe bananas for that perfect flavor balance.
- Canned Crushed Pineapple: This adds a tropical flair! Make sure to drain it well. Too much moisture can make your cake soggy.
- Fresh Strawberries: Slice them up for a burst of freshness. They pair beautifully with the bananas and pineapple!
- Yellow or White Cake Mix: This is our shortcut! It gives the cake its structure and base flavor. Feel free to pick your favorite brand, or even a gluten-free option.
- Unsalted Butter: Melted butter enhances flavor and adds moisture. Don’t skip this crucial ingredient; it’s key to that perfect golden top!
- Heavy Whipping Cream or Whipped Topping: This is for the luscious cream layer. Whipping cream creates a decadent topping, but store-bought is a wonderful time-saver.
- Extra Bananas and Strawberries: These are for garnishing! They make your dessert beautiful and inviting. It’s all about presentation.
- Chopped Pecans or Walnuts: For that lovely crunch and nutty flavor. These add texture and contrast to the softness of the cake.
- Optional Chocolate Syrup or Melted Chocolate: Drizzling this on top provides indulgent sweetness, elevating the whole banana split experience. You can never go wrong with chocolate!
Remember, exact quantities can be found at the bottom of this article, making it easy for you to print and follow along. Let’s get ready for baking magic!
How to Make Banana Split Dump Cake
Ready to dive into the kitchen and bring this Banana Split Dump Cake to life? Follow these simple steps, and you’ll be savoring the incredible flavors in no time. Each step is straightforward, perfect for even the busiest of us!
Step 1: Preheat the Oven
First things first—let’s get that oven warmed up to 350°F (175°C). While it heats, grab your trusty 9×13-inch baking dish and grease it with non-stick spray or butter. This will make sure your cake slides right out with ease!
Step 2: Layer the Fruits
Now comes the fun part! Layer your sliced bananas evenly across the bottom of your dish. Next, spread the drained crushed pineapple over those bananas. Finally, evenly distribute the sliced strawberries on top. Oh, the colors are already so inviting!
Step 3: Sprinkle the Cake Mix
Take your dry cake mix and sprinkle it generously over the fruity layers. This helps create that delightful texture we love. Just remember, don’t stir—let it sit pretty on top, waiting to work its magic!
Step 4: Add the Butter
Time to melt that butter! Drizzle the melted butter evenly over the cake mix. This step is crucial as the butter will moisten the mix during baking, ensuring every bite is soft and flavor-packed!
Step 5: Bake the Cake
Pop the dish into your preheated oven and bake for 40–45 minutes. Keep an eye on it—the top should magically transform into a golden brown and bubbly delight. Trust me, the aroma will draw everyone into the kitchen!
Step 6: Prepare Whipped Cream
While the cake is cooling (it’s hard to resist, I know!), grab your heavy cream. Whip it until soft peaks form. This dreamy addition will crown your cake perfectly. If time is tight, feel free to use store-bought whipped topping instead!
Step 7: Garnish and Serve
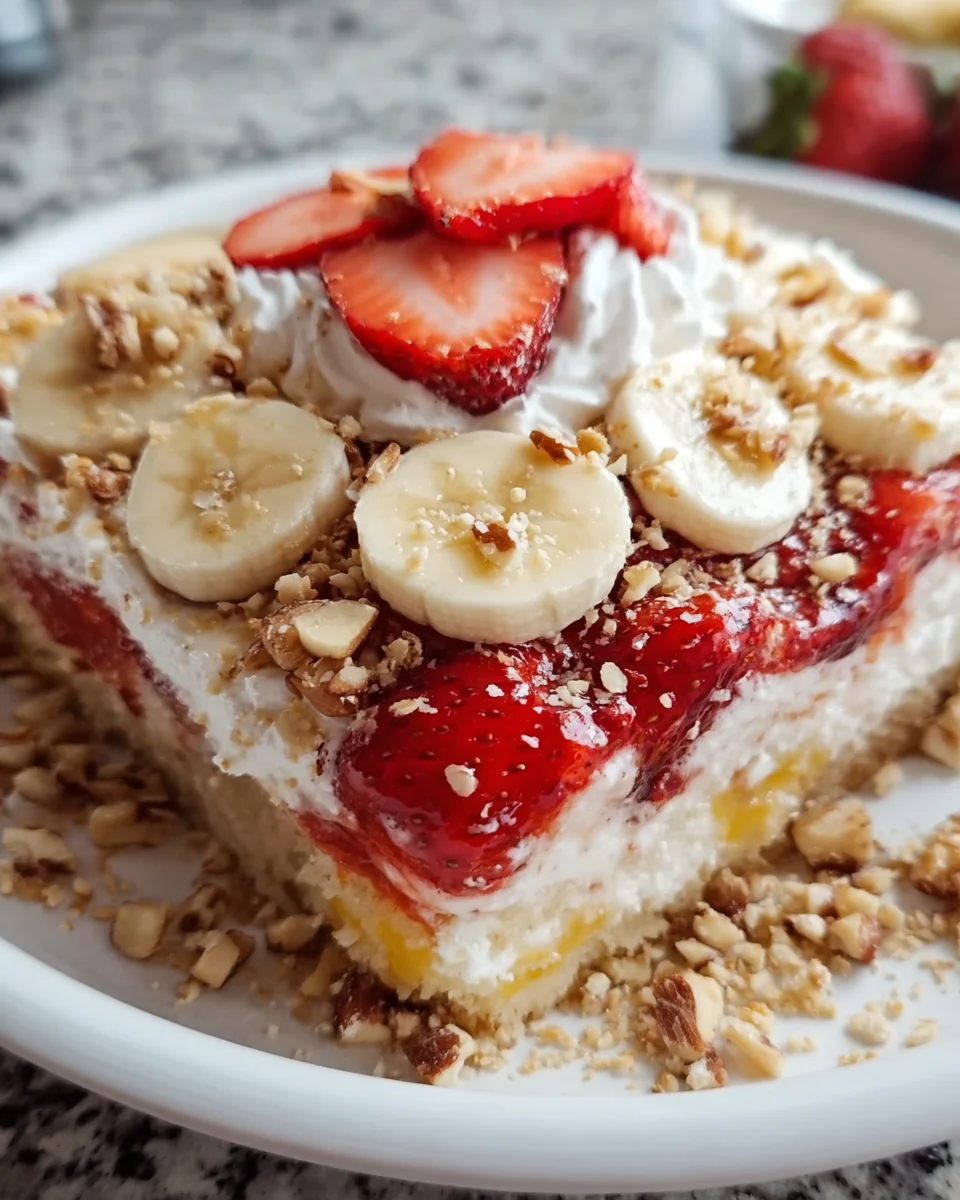
Once the cake has cooled for about 15 minutes, it’s time to decorate! Dollop your whipped cream generously over the cake. Top it with those extra sliced bananas, strawberries, and a sprinkle of chopped nuts. For the ultimate treat, drench it with chocolate syrup or melted chocolate!
Tips for Success
- Choose ripe bananas for the best flavor—look for those with a few brown spots!
- Drain the crushed pineapple thoroughly to prevent sogginess in your cake.
- Don’t skip the whipped cream—it adds that luscious finish!
- Experiment with different nuts to customize the crunch and flavor to your liking.
- Feel free to make this ahead of time; it stores wonderfully in the fridge!
Equipment Needed
- 9×13-inch Baking Dish: Any similar-sized baking dish will work in a pinch!
- Mixing Bowl: A large bowl for mixing or whipping cream is essential.
- Measuring Cups: Handy for ensuring the right amounts, especially for the cake mix!
- Whisk or Electric Mixer: Use either for whipping cream; an electric mixer makes it faster.
- Spatula: A spatula will help you dollop the whipped cream beautifully!
Variations on Banana Split Dump Cake
- Chocolate Lovers: Swap half of the yellow cake mix with a chocolate cake mix for a chocolate banana split experience.
- Nut-Free Option: Omit the nuts if you have allergies, or replace them with crushed graham crackers for a different crunch.
- Additional Fruits: Try adding blueberries or raspberries for a mixed berry twist; they’ll pop with flavor!
- Dairy-Free Version: Use coconut cream instead of heavy cream, and substitute coconut milk for the cake mix. Yum!
- Gluten-Free: Opt for a gluten-free cake mix to ensure everyone can enjoy this delicious dessert!
Serving Suggestions for Banana Split Dump Cake
- Ice Cream: A scoop of vanilla or chocolate ice cream pairs perfectly with the warm cake.
- Fresh Mint: Garnish with fresh mint leaves for a pop of color and refreshing flavor.
- Coffee: Serve alongside a cup of rich coffee or sweet iced tea to balance the sweetness.
- Layered Presentation: For a fun twist, serve in individual parfait glasses for a delightful look.
FAQs about Banana Split Dump Cake
Curious about this delicious treat? Here are some common questions I often hear about the Banana Split Dump Cake:
Can I make this Banana Split Dump Cake ahead of time?
Absolutely! This dish is a make-ahead dream. Prepare it a day in advance and store it in the refrigerator. Just garnish with whipped cream and fruits right before serving for a fresh look.
What if I can’t find heavy whipping cream?
No problem at all! You can use a sturdy whipped topping or even Greek yogurt for a unique twist. While it won’t be as decadent, it’ll still taste fantastic!
Can I use other fruits?
Definitely! Feel free to get creative. Blueberries, blackberries, or even peaches would add delightful flavors. Just remember to balance them with the other ingredients for the best results.
Is this recipe gluten-free?
Yes! Simply swap in a gluten-free cake mix. It’s a tasty way for everyone to join in on dessert without worry.
How do I store leftovers?
If you have leftovers (which is rare in my house!), cover the dish and keep it in the fridge. It will last for 2–3 days, but trust me, it’s best enjoyed fresh!
Final Thoughts on Banana Split Dump Cake
As I reflect on my experiences sharing this Banana Split Dump Cake with my family and friends, I can’t help but smile. It’s more than just dessert; it’s a celebration of togetherness, joy, and nostalgia. With every slice, I’m reminded of sun-soaked summer days and laughter-filled gatherings. This cake is simple yet sensational, making it the perfect treat for any occasion. Whether it’s a birthday bash or a quiet family dinner, this delightful dessert brings warmth and happiness to the table, creating sweet memories that last long after the cake is gone.
Print
Banana Split Dump Cake
- Prep Time: 15 minutes
- Cook Time: 45 minutes
- Total Time: 1 hour
- Yield: 12 servings 1x
- Category: Dessert
- Method: Baking
- Cuisine: American
- Diet: Vegetarian
Description
A delicious and easy-to-make Banana Split Dump Cake featuring layers of fruit and cake mix topped with whipped cream and nuts.
Ingredients
- 4 medium ripe bananas, sliced
- 1 can (20 oz) crushed pineapple, drained
- 1 cup fresh strawberries, sliced (plus more for topping)
- 1 box yellow or white cake mix
- 1 stick (½ cup) unsalted butter, melted
- 1 cup heavy whipping cream (or 1 tub whipped topping)
- 1–2 bananas, sliced (for garnish)
- ½ cup fresh strawberries, halved or sliced
- ½ cup chopped pecans or walnuts
- Optional: Chocolate syrup or melted chocolate for drizzling
Instructions
- Preheat your oven to 350°F (175°C). Grease a 9×13-inch baking dish with non-stick spray or butter.
- Arrange the sliced bananas evenly across the bottom of the dish. Spread the drained crushed pineapple over the bananas, followed by the sliced strawberries.
- Sprinkle the dry cake mix evenly over the fruit layer. Do not stir; let it sit as a dry layer on top of the fruit.
- Drizzle the melted butter evenly over the cake mix, ensuring it covers as much of the dry mix as possible.
- Bake in the preheated oven for 40–45 minutes, or until the top is golden brown and bubbly. Let the cake cool for about 15 minutes to allow the layers to set.
- While the cake cools, whip the heavy cream into soft peaks, or use pre-made whipped topping. Spread or dollop the whipped cream over the cooled cake.
- Garnish with additional sliced bananas, fresh strawberries, and chopped nuts. If desired, drizzle chocolate syrup or melted chocolate on top for that authentic banana split vibe.
Notes
- Make sure to drain the crushed pineapple well to avoid excess moisture.
- You can use any type of cake mix you prefer, including gluten-free options.
- This dessert can be made ahead of time and stored in the refrigerator for a day.
Nutrition
- Serving Size: 1 slice
- Calories: 320
- Sugar: 21g
- Sodium: 160mg
- Fat: 15g
- Saturated Fat: 8g
- Unsaturated Fat: 5g
- Trans Fat: 0g
- Carbohydrates: 48g
- Fiber: 2g
- Protein: 4g
- Cholesterol: 30mg
Enjoyed this recipe?
Discover more delicious recipes, save your favorites, and plan your meals with the Cooking Layer app.
Free to download • Fast and easy to use


