
Why This Blackberry Mousse Cake Is a Stunning Dessert Choice
There’s something undeniably captivating about a cake that looks like it belongs behind the glass of a luxury patisserie. This blackberry vanilla bean mousse cake is exactly that kind of dessert—elegant, bold, and layered with flavor that feels both indulgent and refined. It’s not just about satisfying a sweet tooth; it’s about creating a moment, whether you’re celebrating something special or simply elevating your baking game.
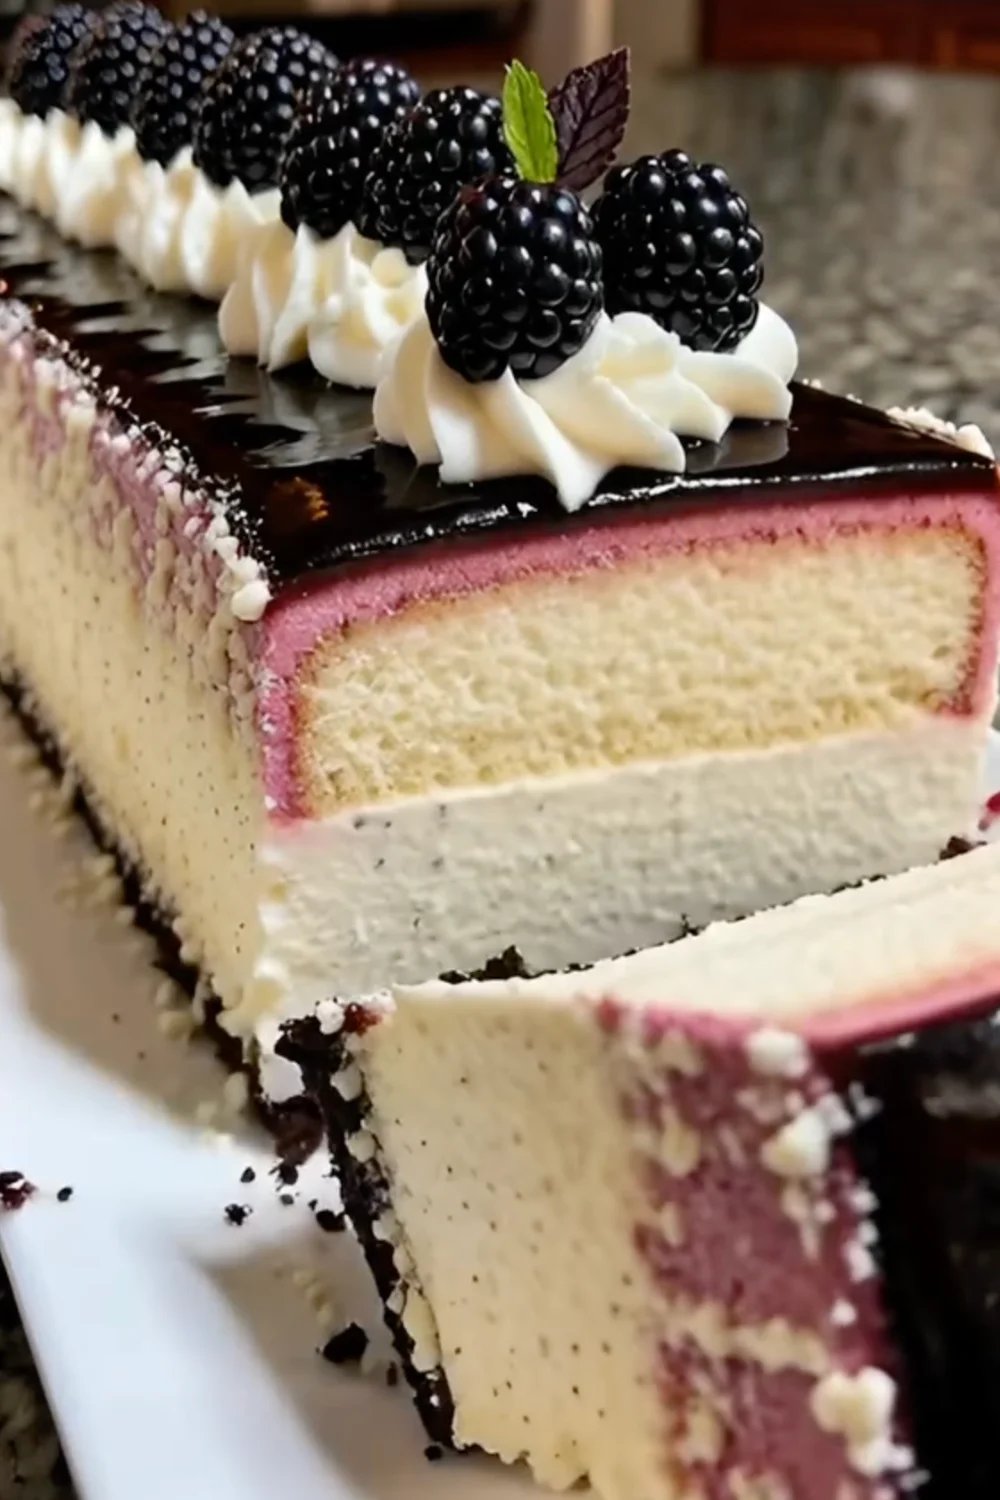
What makes this cake stand out immediately is its deep, dramatic color palette. The rich purple tones from blackberries paired with the glossy dark berry mirror glaze create a visual impact that’s hard to ignore. It’s the kind of dessert that gets people reaching for their phones before their forks. But beyond the looks, the flavor profile is where it truly shines.
Save this recipe and cook smarter
Keep your favorite Cooking Layer recipes in one place, plan your weekly meals, and quickly find dinner ideas whenever you need them.
Free to download • Fast and easy to use
Blackberries bring a natural balance of sweetness and tartness, which prevents the cake from becoming overly rich. When combined with the warm, aromatic depth of vanilla bean paste, the result is a flavor that feels layered and sophisticated. According to culinary experts, desserts that balance acidity and sweetness tend to be more satisfying because they engage more of your taste buds—and this cake does exactly that.
Another reason this cake deserves attention is its texture. You’re not just biting into a single layer—you’re experiencing a sequence. The soft chocolate cake, the airy mousse, and the smooth glaze all interact in a way that keeps each bite interesting. It’s like a well-composed piece of music, where every note has its place.
And here’s the best part: while it looks complex, it’s entirely achievable at home. With the right approach and a bit of patience, you can create a dessert that feels truly professional. It’s the kind of recipe that doesn’t just give you a cake—it gives you confidence.
Understanding the Layers of This Elegant Cake
A cake like this isn’t thrown together—it’s carefully built, layer by layer, each component designed to contribute something unique. Understanding these layers helps you appreciate not just how the cake tastes, but why it works so well.
Rich Chocolate Cake Base
At the foundation sits a moist chocolate cake that anchors the entire dessert. This isn’t a dense, भारी cake—it’s soft, tender, and slightly airy thanks to the balance of baking powder and baking soda. The addition of buttermilk adds a subtle tang while keeping the crumb incredibly moist.
The boiling water might seem unusual, but it plays a key role in blooming the cocoa powder, intensifying the chocolate flavor. The result is a base that’s rich but not overpowering, allowing the blackberry mousse to shine without competition.
This layer also absorbs some of the moisture from the mousse, creating a seamless transition between textures. It’s not just a base—it’s an active part of the experience.
Silky Blackberry Vanilla Bean Mousse
The mousse is where this cake finds its personality. Light, airy, and bursting with berry flavor, it creates a beautiful contrast to the chocolate base. The blackberry puree delivers a vibrant color and a naturally tangy sweetness that keeps things refreshing.
Vanilla bean paste takes this mousse to another level. Unlike regular vanilla extract, it contains tiny specks of real vanilla seeds, adding both visual appeal and a deeper, more complex flavor. It’s one of those small details that makes a big difference.
The whipped cream provides volume and softness, while gelatin ensures the mousse holds its shape when sliced. When done right, it feels almost like a cloud—soft but stable, rich yet light.
Glossy Dark Berry Mirror Glaze
The final layer is what transforms this cake into a showpiece. The mirror glaze is smooth, shiny, and almost reflective, giving the cake that signature high-end look. It’s made from a blend of chocolate, condensed milk, and berry puree, creating a finish that’s both flavorful and visually stunning.
What makes mirror glaze special is its texture—it sets into a soft, glossy coating that contrasts beautifully with the mousse underneath. It’s not just decoration; it adds a subtle richness and ties all the flavors together.
Ingredient Breakdown and Their Importance
Every ingredient in this cake plays a specific role, and understanding them can help you achieve better results. Flour provides structure, cocoa powder adds depth, and sugar balances flavors while keeping the cake moist.
The combination of butter and buttermilk ensures a tender crumb, while eggs add stability. In the mousse, heavy cream is responsible for that airy texture, and gelatin gives it the ability to hold its shape.
Blackberries are the star ingredient here, contributing both flavor and color. Their natural acidity enhances the overall taste, making the dessert feel less heavy.
Choosing Fresh vs Frozen Blackberries
Fresh blackberries are ideal because they offer a brighter, more vibrant flavor. However, frozen berries can work just as well if they’re properly thawed and drained. Studies show that frozen berries retain most of their nutrients, so you’re not sacrificing much in terms of quality.
The Role of Vanilla Bean Paste
Vanilla bean paste isn’t just about flavor—it’s about depth. It provides a richer, more aromatic profile compared to extract. Those tiny specks also add a visual cue that signals quality and craftsmanship.
Essential Tools for a Professional Finish
Having the right tools can make the difference between a stressful experience and an enjoyable one. A 9-inch cake pan ensures even baking, while an electric mixer helps achieve the perfect mousse texture.
A blender or food processor is essential for creating smooth berry puree, and a rubber spatula helps fold ingredients gently without losing air. For the glaze, a microwave-safe bowl or saucepan ensures even melting.
These tools don’t just make things easier—they help you achieve consistent, professional results.
Step-by-Step Preparation Guide
Baking the Chocolate Cake Layer
Start by preparing your oven and pan carefully. Proper greasing and flouring prevent sticking, which can ruin the cake’s structure. Mixing dry ingredients thoroughly ensures even distribution, while adding wet ingredients gradually helps maintain a smooth batter.
The boiling water step is crucial—it enhances the cocoa flavor and creates a thin batter that bakes into a soft, moist cake. Once baked, cooling completely is non-negotiable.
Preparing the Blackberry Vanilla Bean Mousse
Blooming gelatin properly ensures it dissolves smoothly. The blackberry puree should be as smooth as possible for the best texture. Whipping the cream to soft peaks creates the foundation of the mousse.
Folding in the puree and vanilla gently preserves the airiness, while adding gelatin stabilizes the mixture. The result should be light, smooth, and evenly colored.
Assembling and Chilling the Cake
This is where your patience and attention to detail really start to pay off. Assembling a blackberry vanilla bean mousse cake isn’t complicated, but it does require a gentle touch and a bit of planning. Think of it like stacking delicate layers of flavor—each one needs space and time to settle into place.
Start by ensuring your chocolate cake has completely cooled. If there’s even a hint of warmth, the mousse will begin to melt on contact, and you’ll lose that clean, defined structure. Place the cake on a sturdy serving base or inside a cake ring if you have one. Using a cake ring or even a simple parchment collar can help you achieve those sharp, professional edges that make mousse cakes look so impressive.
Next, pour or spread the blackberry vanilla bean mousse evenly over the cake layer. Don’t rush this step. Use a spatula to gently guide the mousse toward the edges, making sure there are no air pockets trapped inside. Air pockets might not seem like a big deal now, but they can show up as holes when you slice the cake later—and that takes away from the smooth, elegant look you’re going for.
Once the mousse is evenly spread, lightly tap the pan on your countertop a couple of times. This helps settle the mixture and removes any hidden bubbles. Then comes the hardest part: waiting. Refrigerate the cake for at least 4 hours, though overnight chilling is even better. This extended chilling time allows the gelatin to fully set, giving the mousse its signature sliceable texture.
When properly set, the cake should feel firm to the touch but still slightly springy. This stage is crucial because it prepares the surface for the mirror glaze. If the mousse isn’t fully set, the glaze can slide off or create uneven patches. So while it might be tempting to move on जल्दी, giving the cake enough time here makes all the difference in the final result.
Creating the Dark Berry Mirror Glaze
Now comes the part that turns your cake into a true showstopper—the dark berry mirror glaze. This glossy, reflective layer is what gives the cake that high-end pastry shop appearance. It might look intimidating, but once you understand the process, it becomes surprisingly manageable.
Start by combining sugar, water, and sweetened condensed milk in a saucepan. As the mixture heats, stir continuously to ensure the sugar dissolves completely. You’re looking for a gentle boil—not an aggressive one. Too much heat can affect the final texture of the glaze.
Once the mixture is ready, remove it from the heat and add the chopped dark chocolate. Let it sit for a minute or two before stirring. This allows the chocolate to melt धीरे, resulting in a smoother finish. Stir gently until the mixture becomes glossy and uniform.
Next, incorporate the bloomed gelatin. It should dissolve completely into the warm mixture, helping the glaze set with that signature soft shine. Then add your berry puree, which gives the glaze its deep color and fruity flavor. This is where the personality of the glaze really comes through.
Temperature is everything at this stage. The glaze should cool to around 90–95°F (32–35°C) before pouring. Too hot, and it will melt the mousse. Too cool, and it won’t spread smoothly. When it reaches the right consistency—fluid but not runny—pour it over the center of your chilled cake.
Let gravity do the work. The glaze will naturally flow outward, covering the surface and dripping down the sides in a smooth, even layer. Avoid overworking it with a spatula, as this can create streaks or bubbles. After pouring, let the cake sit undisturbed for about 30 minutes to allow the glaze to set.
The result? A stunning, mirror-like finish that reflects light and makes your cake look almost too beautiful to cut.
Common Mistakes to Avoid
Even though this cake is achievable, a few common mistakes can affect the final outcome. One of the biggest issues is not cooling the cake completely before adding the mousse. Warm cake and cold mousse don’t mix well, and this can lead to a melted, unstable layer.
Another frequent mistake is improper gelatin handling. If it’s not bloomed correctly or not fully dissolved, you might end up with lumps or a mousse that doesn’t set properly. Precision here is key.
Overwhipping the cream is another trap. It might seem like more whipping equals more stability, but it actually creates a grainy texture that’s hard to fix. Aim for soft peaks that hold their shape without becoming stiff and dry.
Finally, rushing the glaze process—especially pouring it at the wrong temperature—can ruin the finish. Mirror glaze is all about timing and patience.
Expert Tips for Mirror Glaze Perfection
If you want that flawless, professional finish, a few expert tricks can elevate your results. First, always pour glaze over a well-chilled or slightly frozen cake. This helps the glaze set quickly and evenly.
Straining the glaze before pouring removes any bubbles or undissolved bits, giving you a smoother surface. It’s a small step that makes a noticeable difference.
Using a wire rack placed over a tray when glazing allows excess glaze to drip off cleanly, preventing pooling at the base. This creates neat edges and a more polished look.
And remember—confidence matters. Pour the glaze in one steady motion rather than hesitating. A smooth pour leads to a smooth finish.
Storage and Shelf Life
This cake should always be stored in the refrigerator due to its mousse and glaze layers. Keep it covered in an airtight container to preserve freshness and prevent it from absorbing odors.
It’s best enjoyed within 2 to 3 days, when the texture and flavor are at their peak. While it can last slightly longer, the mousse may begin to lose its lightness.
Freezing is possible, but it’s best done before adding the mirror glaze. If freezing, wrap the cake tightly and thaw it slowly in the fridge before glazing and serving.
Flavor Variations and Creative Twists
Once you’ve mastered this recipe, there’s plenty of room to experiment. You can swap blackberries for blueberries, raspberries, or even cherries for a different flavor profile.
Adding a layer of berry compote or crunch base can introduce new textures, making each bite even more interesting. You could also infuse the mousse with a hint of lemon zest or lavender for a more unique twist.
For chocolate lovers, using a dark chocolate sponge or adding chocolate shards as decoration can enhance the richness without overpowering the fruit.
Nutritional Insights
This cake is undeniably indulgent, with each slice averaging around 350–450 calories depending on portion size. The cream, chocolate, and sugar contribute to its richness, while blackberries add a small boost of fiber and antioxidants.
It’s a dessert meant to be enjoyed occasionally, not rushed. Taking the time to savor each bite makes it far more satisfying.
Serving and Presentation Ideas
Presentation is where this cake truly shines. Use a sharp, warm knife for clean slices, wiping it between cuts for that perfect layered look. Serve on a simple plate to let the colors stand out.
Garnish with fresh blackberries and mint leaves for a natural, elegant finish. You can even add a light dusting of powdered sugar or a drizzle of berry sauce for extra flair.
Pairing the cake with tea, coffee, or a light fruit beverage enhances the overall experience without overpowering the flavors.
Conclusion
The blackberry vanilla bean mousse cake with dark berry mirror glaze is more than just a dessert—it’s a creative expression of flavor and technique. From the rich chocolate base to the airy mousse and glossy glaze, every element works in harmony to create something truly memorable.
It’s the kind of cake that challenges you just enough to be rewarding, while still being achievable at home. And once you’ve made it, you’ll realize it’s not just about baking—it’s about crafting an experience worth sharing.
FAQs
1. Can I make this cake ahead of time?
Yes, it’s actually ideal to make it a day in advance to allow the layers to fully set and develop flavor.
2. What if I don’t have vanilla bean paste?
You can substitute with vanilla extract, though the flavor will be slightly less intense.
3. Can I skip the mirror glaze?
Yes, but the glaze adds both flavor and that signature visual appeal.
4. Why is my mousse not firm enough?
This usually happens if the gelatin wasn’t properly bloomed or the cake wasn’t chilled long enough.
5. How do I get a perfect mirror glaze finish?
Ensure the glaze is at the right temperature and pour it over a well-chilled cake in one smooth motion.
Print
Blackberry Vanilla Bean Mousse Cake with Dark Berry Mirror Glaze
Description
There’s something undeniably captivating about a cake that looks like it belongs behind the glass of a luxury patisserie. This blackberry vanilla bean mousse cake is exactly that kind of dessert—elegant, bold, and layered with flavor that feels both indulgent and refined. It’s not just about satisfying a sweet tooth; it’s about creating a moment, whether you’re celebrating something special or simply elevating your baking game.
Ingredients
For the Chocolate Cake
- 1 ½ cups all-purpose flour
- 1 cup granulated sugar
- ½ cup unsweetened cocoa powder
- 1 ½ teaspoons baking powder
- ½ teaspoon baking soda
- ½ teaspoon salt
- ½ cup unsalted butter, softened
- 2 large eggs
- 1 teaspoon vanilla extract
- 1 cup buttermilk
- ½ cup boiling water
For the Blackberry Vanilla Bean Mousse
- 1 cup fresh blackberries
- 1 cup heavy cream
- ½ cup granulated sugar
- 1 teaspoon vanilla bean paste
- 1 teaspoon gelatin
- 2 tablespoons cold water
For the Dark Berry Mirror Glaze
- 1 cup granulated sugar
- ½ cup water
- ½ cup sweetened condensed milk
- 1 cup dark chocolate, chopped
- 1 teaspoon gelatin
- 2 tablespoons cold water
- 1 cup berry puree (blackberries, raspberries, or mixed berries)
For Garnish
- Fresh blackberries
- Mint leaves
Instructions
Step 1: Make the Chocolate Cake
- Preheat your oven to 350°F (175°C). Grease and flour a 9-inch round cake pan.
- In a large mixing bowl, whisk together the flour, sugar, cocoa powder, baking powder, baking soda, and salt.
- Add the softened butter, eggs, vanilla extract, and buttermilk. Beat until smooth and creamy.
- Slowly stir in the boiling water. The batter will be thin.
- Pour the batter into the prepared pan and bake for 30–35 minutes, or until a toothpick inserted in the center comes out clean.
- Let the cake cool completely before adding the mousse layer.
Step 2: Prepare the Blackberry Vanilla Bean Mousse
- In a small bowl, sprinkle gelatin over cold water and let it bloom for 5 minutes.
- Blend the blackberries into a smooth puree. Strain if desired to remove seeds.
- In another bowl, whip the heavy cream and sugar until soft peaks form.
- Fold in the vanilla bean paste and blackberry puree gently.
- Microwave the bloomed gelatin for about 10 seconds until dissolved, then stir it into the mousse mixture.
- Spread the mousse evenly over the cooled cake.
- Refrigerate for at least 4 hours until set.
Step 3: Make the Dark Berry Mirror Glaze
- In a saucepan, combine sugar, water, and sweetened condensed milk. Bring to a gentle boil while stirring.
- Remove from heat and add chopped dark chocolate. Stir until smooth and glossy.
- Bloom the gelatin in cold water for 5 minutes, then stir it into the warm chocolate mixture.
- Add the berry puree and mix until fully combined.
- Let the glaze cool slightly before pouring it over the chilled mousse cake.
- Refrigerate for 30 minutes until the glaze is set.
Enjoyed this recipe?
Discover more delicious recipes, save your favorites, and plan your meals with the Cooking Layer app.
Free to download • Fast and easy to use


