
Introduction to Bread in a Bag
Have you ever craved the warm, comforting aroma of fresh homemade bread but felt too busy to make it? I get it! Life can be a whirlwind, especially for busy moms and professionals. That’s why I’m excited to share my favorite recipe for Bread in a Bag. It’s the perfect way to whip up delicious, homemade bread without the fuss of traditional methods. In just a few simple steps, you can have soft, golden loaves that will impress your family and friends. Let’s dive into this easy journey of baking bliss!
Why You’ll Love This Bread in a Bag
This Bread in a Bag recipe takes the stress out of baking, making it a breeze even on your busiest days. With minimal cleanup and no fancy equipment needed, this is truly accessible for all home cooks. Plus, the taste? Oh, it’s heavenly! Your family will adore the warm, fluffy loaves, and you’ll feel like a kitchen superstar—all in under an hour!
Save this recipe and cook smarter
Keep your favorite Cooking Layer recipes in one place, plan your weekly meals, and quickly find dinner ideas whenever you need them.
Free to download • Fast and easy to use
Ingredients for Bread in a Bag
Gather your ingredients for this delightful Bread in a Bag. Here’s what you’ll need:
- All-purpose flour: This is your main ingredient, providing structure and chewiness. You can also substitute with bread flour for a lighter texture.
- Granulated sugar: Just a touch to help the yeast bloom and add a hint of sweetness.
- Rapid-rise yeast: This little packet is a game-changer! It works faster than regular yeast, making your bread baking quicker and easier.
- Olive oil or vegetable oil: A light touch of oil adds richness and tenderness to your bread. Use olive oil for a flavor boost!
- Salt: Essential for flavor and controlling yeast activity. A pinch goes a long way in elevating your bread.
- Warm water: You want this just right—too hot can kill the yeast, and too cold can stunt its growth. The ideal temperature is around 110°F (43°C).
- Melted butter (optional): Brushing this on after baking gives your bread a lovely, shiny finish and adds extra flavor.
If you’d like a flatter, more rustic bread, feel free to swap some of the all-purpose flour with whole wheat flour or try adding herbs and spices to the mix for a flavor twist!
For exact measurements, be sure to check the bottom of the article where you’ll find a handy print version!
How to Make Bread in a Bag
Now that you have your ingredients ready, let’s get started! Making this Bread in a Bag is as easy as 1-2-3. I promise you’ll love how simple the process is, and you’ll be amazed at the results.
Step 1: Activate the Yeast
First, grab your large gallon-size zip-top bag. Add the warm water, granulated sugar, and the yeast. Seal the bag, leaving some air inside. Now, give it a gentle squish for about 30 seconds to mix everything together. It’s like a mini workout! Set the bag aside for 5–10 minutes. You’ll know when it’s ready because a foamy, bubbly mixture will form, showing that your yeast is active.
Step 2: Mix the Dough
Once your yeast is ready, it’s time to mix in the rest. Open the bag and pour in the olive oil and 1 cup of all-purpose flour. Reseal that bag and squish again! Keep going until everything is smooth, with no dry patches. This is where the magic begins, and trust me, you’ll feel like a pro!
Step 3: Knead Inside the Bag
Now for the fun part! Add the remaining 2 cups of flour and the salt to your bag. Seal it up and knead that dough by squishing, folding, and pressing for about 5–7 minutes. You’ll get a soft dough that feels amazing in your hands. If it’s sticky, just sprinkle flour, one tablespoon at a time, while kneading gently. You’ll find the perfect texture.
Step 4: Shape the Dough
Once your dough is ready, transfer it to a lightly floured surface. Give it a quick hand knead for 1–2 minutes, getting it smooth. Now, it’s shaping time! Divide it into 3 equal portions for mini loaves, or keep it whole for one standard loaf. Shape each piece into a tight loaf, tucking the edges underneath like a cozy package.
Step 5: Let It Rise
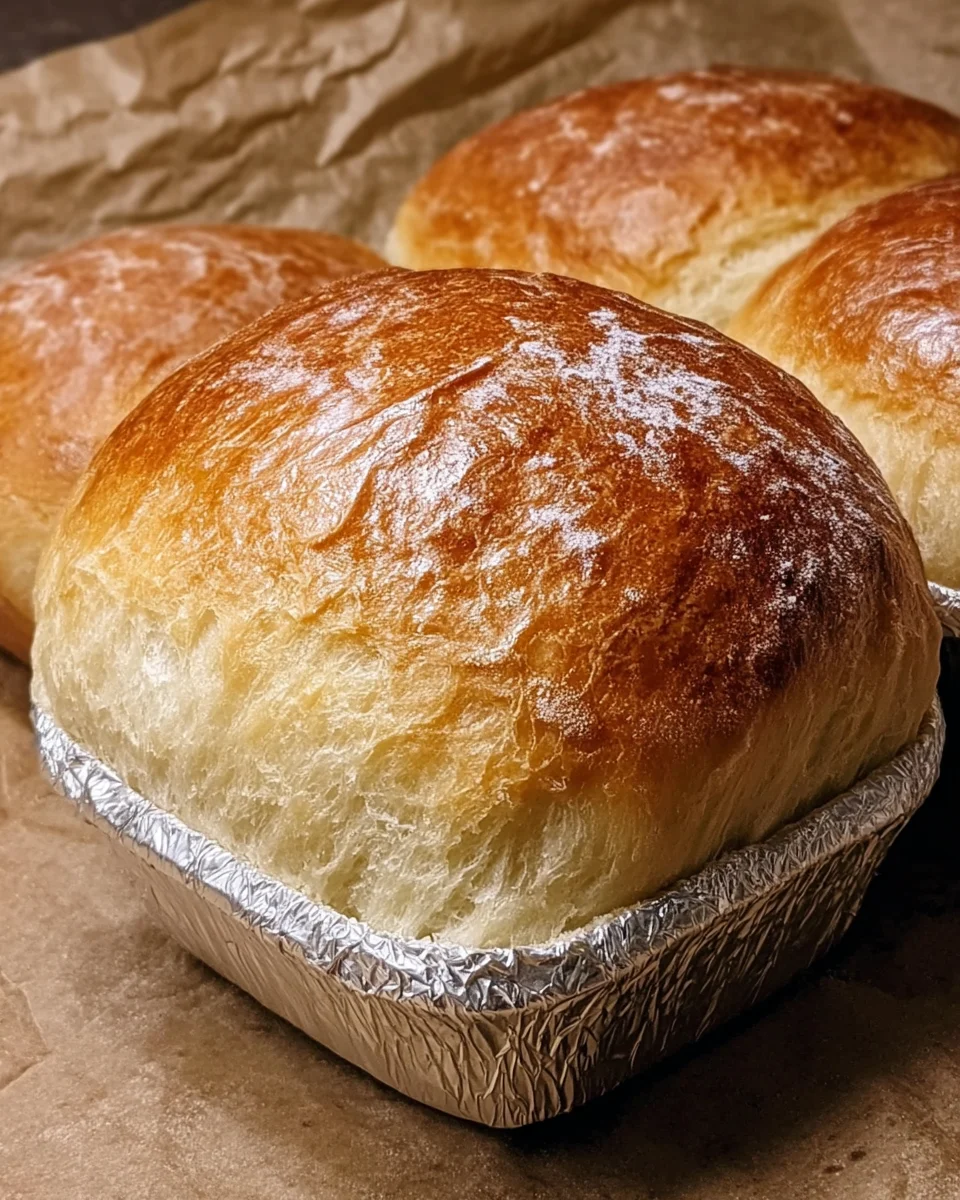
Place your loaves into greased mini loaf pans (I love using foil pans for this!). Loosely cover them with a clean towel and find a warm spot for the dough to rise. Give it 30–45 minutes, or until the dough doubles in size. This is where the bread starts to come to life!
Step 6: Bake the Bread
Preheat your oven to 375°F (190°C). The moment has arrived! For mini loaves, bake them for 18–22 minutes. If you’ve chosen the standard loaf, let it bake for 25–30 minutes. You’ll know it’s done when the tops are a beautiful golden brown. Give the loaf a gentle tap; if it sounds hollow, it’s ready! Plus, check the internal temperature, aiming for about 190°F. Your kitchen will smell like a bakery!
Step 7: Cool and Enjoy
Once baked, let the bread cool in the pans for about 10 minutes. Then, flip them onto a wire rack. For that extra touch, brush the tops with melted butter while they’re still warm. This gives a soft, shiny finish that makes for a delightful first slice. Grab a knife and enjoy this warm slice of heaven!
Tips for Success
- Use a thermometer to check your water temperature for optimal yeast activation.
- Don’t rush the rising time; patience yields the best results.
- If you’re unsure about your yeast’s freshness, do a quick test by adding it to warm water with sugar.
- Feel free to experiment with add-ins like chopped herbs or cheese for extra flavor.
- For easier cleanup, use a bowl to mix if you’re worried about bag strength.
Equipment Needed for Bread in a Bag
- Gallon-size zip-top bag: This is your main tool! If you don’t have one, a large mixing bowl with a cover works too.
- Measuring cups: Essential for accuracy. A kitchen scale can be an excellent alternative if you prefer weight measurements.
- Mixing spoon: Helps in the initial mixing. A spatula or your hands works just as well!
- Loaf pans: Mini loaf pans are great, but you can also use a standard loaf pan or even a baking dish.
- Wire rack: Perfect for cooling, though a plate will work too.
Variations of Bread in a Bag
- Herb-Infused Bread: Add dried herbs like rosemary, oregano, or thyme to the dough for a savory twist.
- Garlic Parmesan Bread: Incorporate minced garlic and grated Parmesan cheese into the dough for a delicious flavor boost.
- Whole Wheat Option: Substitute half or all of the all-purpose flour with whole wheat flour for a hearty, nutritious loaf.
- Sweet Bread: Mix in cinnamon, nutmeg, or even chocolate chips for a sweet treat perfect for breakfast or snacks.
- Gluten-Free Version: Use a gluten-free all-purpose flour blend and add a bit of xanthan gum to help with texture.
Serving Suggestions
- Dynamic Dips: Pair your bread with homemade hummus or a zesty olive oil and balsamic vinegar dip.
- Cheesy Companions: Serve alongside a warm cheese platter featuring brie, cheddar, or goat cheese.
- Soup Sensation: Enjoy the bread with a comforting bowl of tomato or vegetable soup.
- Presentation Tips: Slice the loaves and arrange them on a wooden board for a rustic touch.
FAQs about Bread in a Bag
As you embark on your journey to make this Bread in a Bag, you may have some questions. Here are a few common ones that can help you out:
Can I use regular yeast instead of rapid-rise yeast?
Yes, you can, but your rising time will be longer. Just be patient, and allow the dough to rise until it’s doubled in size.
What if my dough is too sticky?
Don’t worry! Simply sprinkle in extra flour, one tablespoon at a time, until it reaches a softer, less sticky texture. Just knead gently each time.
Can I make this bread in advance?
Absolutely! You can let the shaped loaves rise, then wrap them tightly and freeze. When you’re ready to bake, just thaw, then continue with the baking instructions.
What can I add for flavor?
Feel free to customize! Herbs, spices, cheese, or even dried fruit can elevate your bread. It’s all about creativity in the kitchen!
How should I store leftover bread?
To keep your bread fresh, store it in an airtight container or wrap it in foil. It’s best enjoyed within a few days, but you can also freeze it for later delights.
Final Thoughts
As I reflect on my journey with Bread in a Bag, I can’t help but smile. This delightful recipe brings the warmth of homemade bread into our busy lives with ease. It’s a reminder that simple ingredients and a little love can create something truly special. Whether you’re enjoying it fresh out of the oven or toasting a slice for breakfast, each bite is a celebration of comfort and creativity. So, give it a go and watch as your kitchen transforms into a haven of deliciousness, making happy memories one loaf at a time!
Enjoyed this recipe?
Discover more delicious recipes, save your favorites, and plan your meals with the Cooking Layer app.
Free to download • Fast and easy to use
Bread in a Bag
- Prep Time: 15 minutes
- Cook Time: 20-30 minutes
- Total Time: 45 minutes to 1 hour
- Yield: 3 mini loaves or 1 standard loaf 1x
- Category: Bakery
- Method: Baking
- Cuisine: American
- Diet: Vegetarian
Description
A simple and easy recipe for making homemade bread using a bag instead of traditional methods.
Ingredients
- 3 cups all-purpose flour, plus extra for dusting
- 3 teaspoons granulated sugar
- 1 packet rapid-rise yeast (2¼ teaspoons)
- 3 tablespoons olive oil or vegetable oil
- 1¼ teaspoons salt
- 1 cup warm water (110°F / 43°C)
- 1 tablespoon melted butter, for brushing after baking (optional)
Instructions
- Add the warm water, sugar, and yeast to a large gallon-size zip-top bag. Seal the bag, leaving a little air inside, and gently squish for about 30 seconds to combine. Set the bag aside for 5–10 minutes until the mixture becomes foamy and bubbly, indicating the yeast is active.
- Open the bag and add the olive oil and 1 cup of flour. Reseal the bag and squish until the mixture is smooth and evenly combined, with no dry patches.
- Add the remaining 2 cups of flour and the salt to the bag. Seal again and knead the dough inside the bag by squishing, folding, and pressing for 5–7 minutes, until a soft dough forms. If the dough feels very sticky, add extra flour 1 tablespoon at a time, kneading gently after each addition.
- Remove the dough from the bag and place it on a lightly floured surface. Knead by hand for 1–2 minutes until smooth. Divide the dough into 3 equal portions for mini loaves, or leave whole for one standard loaf. Shape each portion into a tight loaf by tucking the edges underneath.
- Place the shaped dough into greased mini loaf pans (foil pans work perfectly). Cover loosely with a clean towel and let rise in a warm place for 30–45 minutes, or until doubled in size.
- Preheat the oven to 375°F (190°C). Mini loaves: Bake for 18–22 minutes; One standard loaf: Bake for 25–30 minutes. The bread is done when the tops are golden brown, the loaf sounds hollow when tapped, and the internal temperature reaches about 190°F.
- Let the bread cool in the pans for 10 minutes, then transfer to a wire rack. Brush the tops with melted butter while still warm for a soft, shiny finish. Slice and enjoy.
Notes
- For best results, ensure the water is at the correct temperature to activate the yeast.
- Feel free to customize your bread with herbs or spices in the dough.
Nutrition
- Serving Size: 1 slice
- Calories: 150
- Sugar: 1g
- Sodium: 200mg
- Fat: 4g
- Saturated Fat: 0.5g
- Unsaturated Fat: 2.5g
- Trans Fat: 0g
- Carbohydrates: 25g
- Fiber: 1g
- Protein: 4g
- Cholesterol: 0mg


