
Introduction to Cherry Cheesecake Tacos
Hey there, fellow dessert lovers! If you’re searching for a delightful treat that can make any day feel special, then you’ve come to the right place. Cherry Cheesecake Tacos are not just a yummy dessert; they’re a fun twist on two beloved favorites! Perfect for busy moms or professionals like you, these little treasures are quick to whip up and sure to impress your family and friends. Imagine the joy on their faces when you serve this creamy, sweet goodness wrapped in a crispy shell—it’s a dessert that brings smiles and good vibes all around!
Why You’ll Love This Cherry Cheesecake Tacos
You’ll absolutely adore Cherry Cheesecake Tacos for their delightful combination of flavors and textures. They’re quick and easy to prepare, making them a fantastic option for those hectic weeknights or family gatherings. With a heavenly cheesecake filling nestled inside a crunchy, cinnamon-sugar-coated tortilla, each bite is simply blissful. Plus, they’re visually appealing, so they’ll be the star of any dessert spread!
Save this recipe and cook smarter
Keep your favorite Cooking Layer recipes in one place, plan your weekly meals, and quickly find dinner ideas whenever you need them.
Free to download • Fast and easy to use
Ingredients for Cherry Cheesecake Tacos
Gathering your ingredients is the first step toward creating these mouthwatering Cherry Cheesecake Tacos. Here’s what you’ll need:
- Cream cheese: The heart of the cheesecake filling, providing that rich and creamy texture we all crave.
- Powdered sugar: Adds a touch of sweetness without the graininess of granulated sugar, perfect for desserts.
- Vanilla extract: A splash of this brings warmth and depth of flavor to the filling.
- Cool Whip: This fluffy topping lightens the cheesecake filling, making it airy and easy to pipe.
- Cherry pie filling: Tart and sweet, this is the star fruit that brings your tacos to life. You can also use fresh cherries if you prefer a fresher taste.
- Flour tortillas: The canvas for our dessert! Opt for street taco-size tortillas, which are perfect for holding the filling.
- Vegetable oil or shortening: Essential for frying, it gives the tortillas that golden, crispy texture.
- Granulated sugar: This adds sweetness to the cinnamon sugar coating, making it irresistible.
- Ground cinnamon: Together with sugar, it creates a warm, fragrant coating that elevates the taco shells.
Each ingredient plays a vital role in crafting this scrumptious dessert. If you’re interested in exact quantities, feel free to scroll down to find the complete measurements available for printing!
How to Make Cherry Cheesecake Tacos
Now that we’ve gathered our ingredients, it’s time to dive into the fun part—making these delicious Cherry Cheesecake Tacos! Trust me; each step is a piece of cake, and I’ll guide you through it. Let’s get our hands a little messy, shall we?
Step 1: Preheat the Oil
Start by pouring at least four cups of vegetable oil or shortening into a deep stockpot or Dutch oven. Heat the oil over medium heat until it reaches 350°F. It’s crucial to achieve this temperature for perfectly fried tortillas. A kitchen thermometer is your best friend here, as it takes the guesswork out. Once it’s hot enough, you’re ready to fry!
Step 2: Prepare the Cheesecake Filling
Grab a medium mixing bowl and beat together your softened cream cheese, powdered sugar, and vanilla extract until smooth. This is where the magic begins! Properly mixing ensures that your filling is creamy and luscious. Add in the Cool Whip and blend everything until it is light and fluffy. Just like that, you’ll create the dreamiest cheesecake filling!
Step 3: Chill the Filling
Now for a little trick! Pop your cheesecake filling into a piping bag fitted with a star tip or use a gallon-sized Ziploc bag as a makeshift piping bag. Keep it refrigerated while you prepare your taco shells. This will help it stay cool and make piping easier later. Trust me; nobody wants warm cheesecake filling!
Step 4: Fry the Tortillas
Time to make our taco shells! Take a tortilla and pinch together two sides to form a taco shape. Carefully submerge it into the hot oil, frying for about 1-2 minutes. Keep an eye on it! You want it to be lightly browned but not too dark. Use a slotted spoon to fish it out and let any excess oil drain off.
Step 5: Coat the Taco Shells
As soon as your tortilla emerges from the oil, roll it in a mix of granulated sugar and ground cinnamon. Cover both the inside and outside for that sweet, delightful crunch! It’s like a magical fairy dust for your taco, making them utterly irresistible.
Step 6: Fill the Tacos
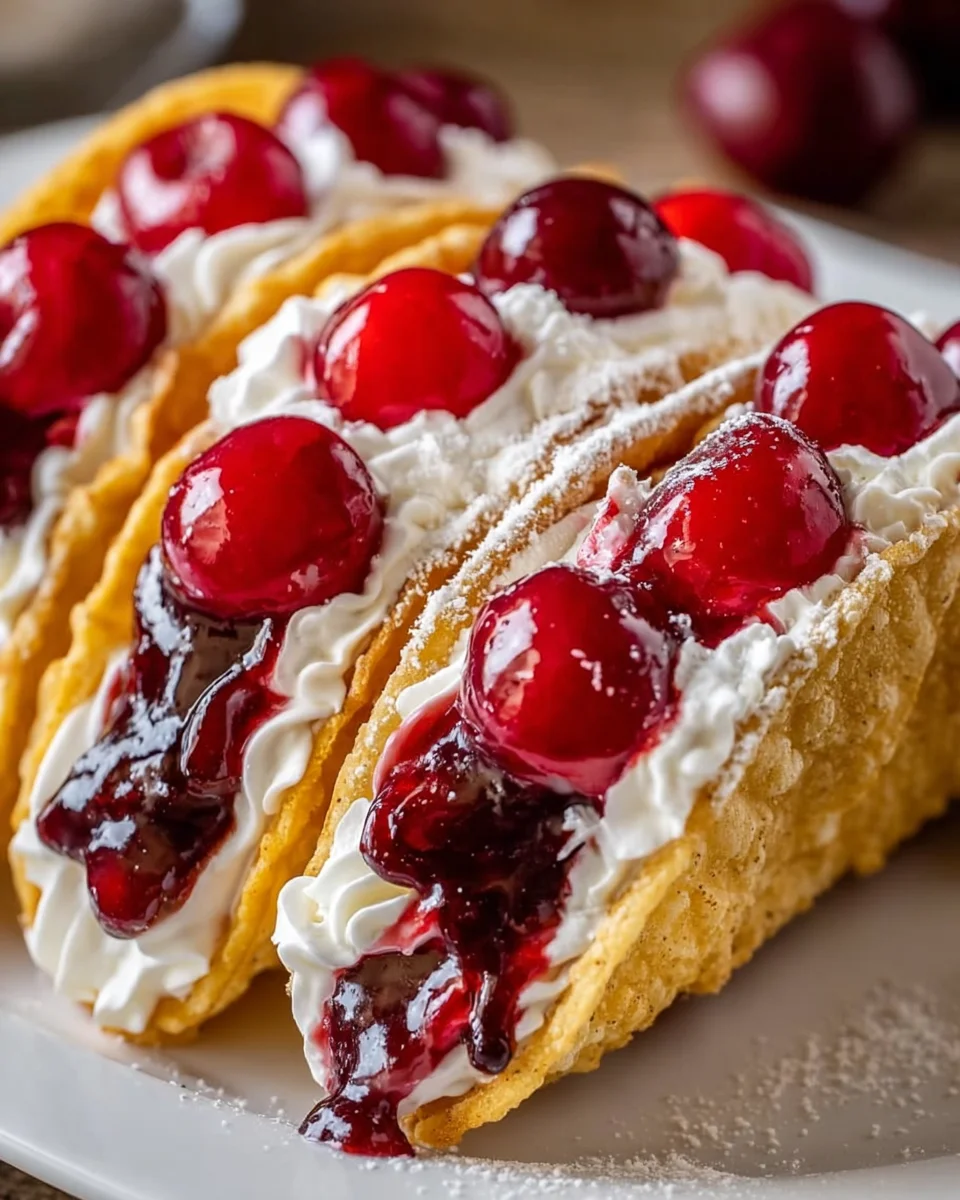
Once the taco shells have cooled and are ready to go, it’s time to fill them! Pipe a line of that fabulous cheesecake filling down the center. Then, top with 3-4 cherries from the pie filling, including some of that scrumptious sauce. What a sight! Each taco will look like a work of art.
Step 7: Serve and Enjoy
Now, the moment you’ve all been waiting for! Serve your Cherry Cheesecake Tacos immediately for the best flavor and texture. These little treats hold up wonderfully and can be a showstopper at any gathering. If you have any leftovers, keep them in the refrigerator, but they’re so good, I doubt there will be any!
Tips for Success
- Always keep your oil at a consistent 350°F for even frying.
- Use softened cream cheese for a smoother filling; no lumps allowed!
- Chill your filling well; it makes piping much easier.
- Fry only a few tortillas at a time to maintain oil temperature.
- Feel free to play with toppings; whipped cream or chocolate drizzle can elevate your tacos!
Equipment Needed
- Deep stockpot or Dutch oven: For frying; you can use a large skillet if you don’t have a deep pot.
- Kitchen thermometer: Essential for checking oil temperature; alternatively, you can use a wooden spoon to test if bubbles form.
- Mixing bowls: For your cheesecake filling; even a large measuring cup works in a pinch.
- Piping bag or Ziploc bag: To pipe filling; simply snip a corner of a bag if you don’t have a piping bag.
Variations
- Chocolate Cherry Cheesecake Tacos: Mix in some cocoa powder with the cheesecake filling for a rich chocolate flavor.
- Berry Bliss Tacos: Swap cherry pie filling for mixed berries or strawberry filling for a refreshing twist.
- Gluten-Free Option: Use gluten-free flour tortillas to make this dessert safe for those avoiding gluten.
- Vegan Version: Substitute cream cheese for a vegan alternative and use coconut whipped cream instead of Cool Whip.
- No Fry Option: Bake the tortillas briefly in the oven until crispy using a little cooking spray for a healthier version.
Serving Suggestions
- Pair with a scoop of vanilla ice cream for a delightful contrast in textures.
- Serve alongside a fresh fruit salad to balance the sweetness.
- Consider pairing with a light, fruity white wine or a sparkling beverage.
- For an elegant touch, dust with powdered sugar before serving.
FAQs about Cherry Cheesecake Tacos
Can I make Cherry Cheesecake Tacos ahead of time?
Absolutely! You can prepare the cheesecake filling and fry the tortillas ahead. Just keep everything separate until you’re ready to serve. This way, the tacos remain crispy and delightful!
Can I use other fruit fillings?
Yes! Cherry pie filling is divine, but you can also experiment with blueberry, strawberry, or mixed berry fillings. The options are endless, depending on your mood!
How do I store leftovers?
If you somehow have any leftovers (they’re pretty irresistible!), store them in an airtight container in the refrigerator for up to two days. Just know that the shells may soften over time!
Are Cherry Cheesecake Tacos suitable for a gluten-free diet?
Yes! Simply swap regular flour tortillas for gluten-free varieties, and you’re good to go. Everyone can enjoy this sweet treat!
What can I do with leftover cheesecake filling?
If you find yourself with extra filling, don’t fret! Use it as a fruit dip, spread it on graham crackers, or give it a place in a parfait with layers of fresh fruit. It’s so versatile!
Final Thoughts
Creating these Cherry Cheesecake Tacos is more than just whipping up a dessert—it’s an experience filled with joy and creativity. Each taco is a little morsel of happiness, marrying the creamy allure of cheesecake with the crunch of a perfectly fried tortilla. These tacos are perfect for celebrating family time or adding a sweet touch to a hectic day. Plus, they’re easy enough for anyone to recreate! So, gather your loved ones, share some laughs in the kitchen, and enjoy every delicious bite. Trust me, these delightful treats are bound to become a cherished favorite in your home!
Enjoyed this recipe?
Discover more delicious recipes, save your favorites, and plan your meals with the Cooking Layer app.
Free to download • Fast and easy to use

Cherry Cheesecake Tacos
- Prep Time: 30 minutes
- Cook Time: 15 minutes
- Total Time: 45 minutes
- Yield: 18 tacos 1x
- Category: Dessert
- Method: Frying
- Cuisine: American
- Diet: Vegetarian
Description
Cherry Cheesecake Tacos are a delightful dessert combining creamy cheesecake filling and cherry pie, all wrapped in a crispy cinnamon-sugar tortilla.
Ingredients
- 1 (8-ounce) package cream cheese, softened
- ⅓ cup powdered sugar
- 2 teaspoons vanilla extract
- 8 ounce tub Cool Whip, thawed
- 1 (21-ounce) can cherry pie filling
- 18 street taco-size flour tortillas
- Vegetable oil or shortening for frying (at least 4 cups)
- 1 cup granulated sugar
- 3 teaspoons ground cinnamon
Instructions
- Preheat the oil to 350°F in a deep stockpot or Dutch oven.
- In a medium mixing bowl, beat together cream cheese, powdered sugar, and vanilla extract until thoroughly combined.
- Add in Cool Whip and continue beating until mixture is smooth and fluffy.
- Transfer mixture to a piping bag fitted with Tip #1M or a gallon-sized Ziploc bag. Set in the refrigerator to stay cold while preparing taco shells.
- When the oil has reached a temperature of precisely 350°F, pinch together two sides of a tortilla to form a folded taco shape and submerge it into the oil, frying for 1-2 minutes.
- Ensure tortilla is lightly browned and remove it from the oil, placing it directly into cinnamon sugar.
- Sprinkle cinnamon sugar over the tortilla (inside and out) and set on a paper-towel-lined inverted muffin tin to hold shape while cooling.
- When taco shells are cooled, pipe a line of cheesecake filling across the center of the taco.
- Top with 3-4 cherries (and sauce) from the can of pie filling.
- Serve immediately.
Notes
- For an alternative, use graham cracker crumbs in place of cinnamon sugar on taco shells.
- Make sure to keep the filling chilled until ready to use for a fresh taste.
Nutrition
- Serving Size: 1 taco
- Calories: 202
- Sugar: 14g
- Sodium: 181mg
- Fat: 8g
- Saturated Fat: 4g
- Unsaturated Fat: 3g
- Trans Fat: 0g
- Carbohydrates: 30g
- Fiber: 1g
- Protein: 2g
- Cholesterol: 25mg


