
Why Chocolate and Orange Are a Perfect Pair
There’s a reason why chocolate and orange have stood the test of time as one of the most beloved flavor combinations in desserts. It’s not just tradition—it’s chemistry. The deep, slightly bitter richness of chocolate contrasts beautifully with the bright, tangy sweetness of orange. When these two come together, they don’t compete—they elevate each other.
Think about biting into a piece of dark chocolate followed by a sip of orange juice. On their own, they’re great. Together? They create a layered flavor experience that feels both indulgent and refreshing. That’s exactly what this chocolate orange mousse cake captures in every slice. The chocolate grounds the dessert with depth, while the orange cuts through the richness, preventing it from feeling too heavy.
Professional pastry chefs often rely on this pairing because it naturally balances sweetness. According to culinary studies, citrus flavors like orange can enhance perceived sweetness by up to 20%, which means you can achieve a satisfying dessert without overloading it with sugar. That’s why this cake feels rich but not overwhelming.
Another reason this pairing works so well is aroma. Orange zest contains essential oils that release a vibrant citrus fragrance, which instantly makes the dessert feel fresher and more complex. When combined with melted chocolate, the aroma alone is enough to make people stop and ask, “What are you baking?”
This cake isn’t just dessert—it’s an experience. It’s the kind of treat that feels fancy enough for celebrations but comforting enough to enjoy on a quiet evening. And once you taste that first bite, you’ll understand why this combination never goes out of style.
Understanding the Layers of Chocolate Orange Mousse Cake
A great mousse cake isn’t just about flavor—it’s about structure and contrast. Each layer plays a specific role, and when combined, they create a dessert that feels balanced, elegant, and satisfying. This chocolate orange mousse cake is a perfect example of how thoughtful layering can turn simple ingredients into something extraordinary.
Moist Chocolate Cake Base
At the foundation of this dessert is a soft, moist chocolate cake that acts as the anchor for everything else. Unlike dense chocolate cakes that can feel भारी, this one is light yet sturdy enough to support the mousse. The use of oil instead of butter gives it a tender crumb that stays moist even after refrigeration.
What makes this cake particularly interesting is the addition of vinegar. It might sound unusual, but it reacts with the baking soda to create a softer, fluffier texture. Don’t worry—you won’t taste it at all. Instead, you’ll notice how the cake feels almost melt-in-your-mouth while still holding its shape.
This base also absorbs a bit of moisture from the mousse layer, enhancing its flavor over time. It’s not just a support layer—it actively contributes to the overall experience.
Light and Zesty Orange Chocolate Mousse
This is where the magic happens. The orange chocolate mousse is airy, creamy, and packed with flavor. It’s the heart of the cake, bringing together richness and freshness in a way that feels effortless.
The whipped cream provides lightness, while the melted chocolate adds body and depth. Then comes the orange zest and juice—these elements brighten the mousse, giving it a refreshing citrus kick that keeps it from feeling too heavy.
The texture is key here. It should be smooth and fluffy, not dense or overly firm. When done right, it feels like a cloud with just enough structure to hold its shape. Every bite melts gently, releasing layers of chocolate and citrus flavor.
Rich Chocolate Ganache Topping
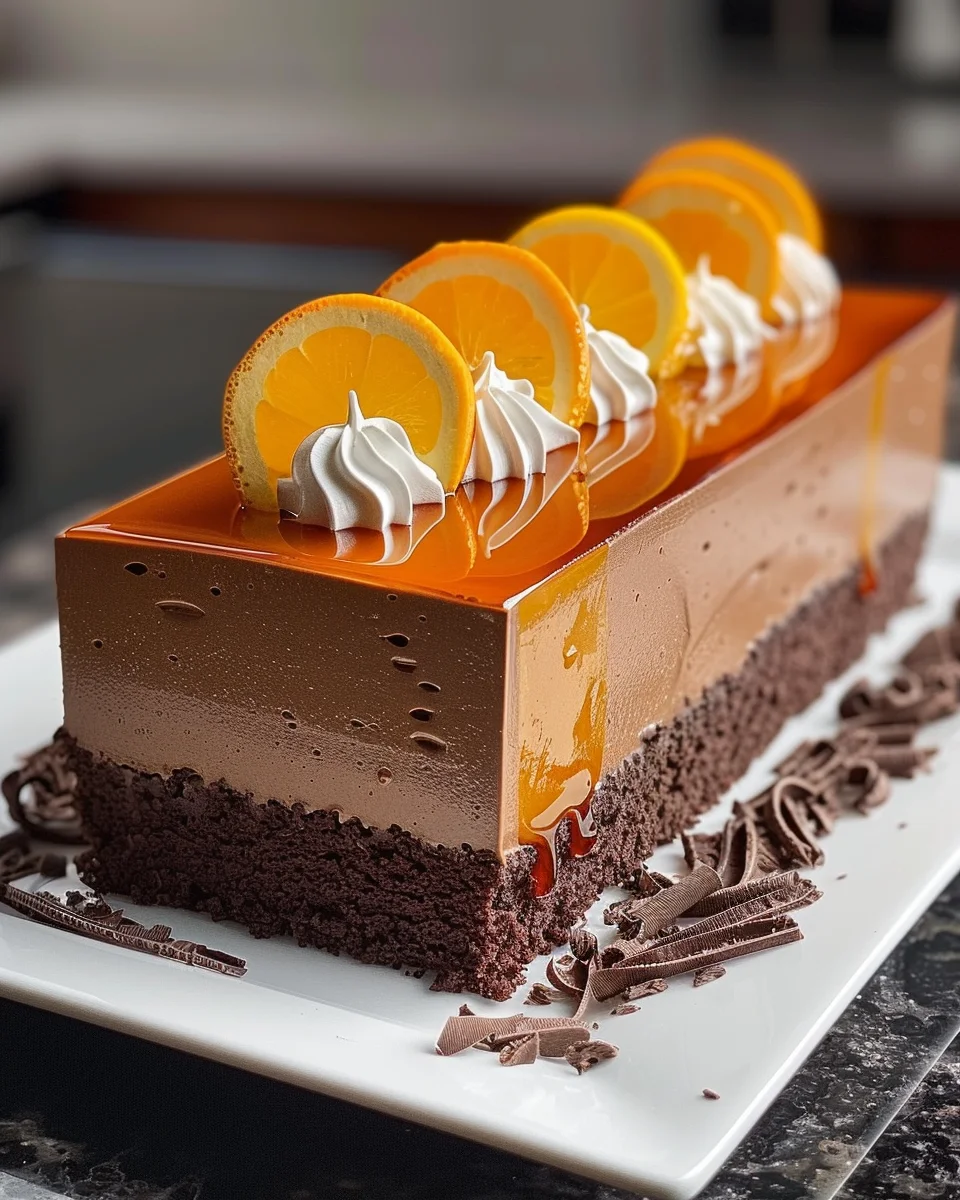
The final layer is the chocolate ganache, and it’s what ties everything together. Glossy, smooth, and slightly decadent, it adds a luxurious finish that makes the cake look as good as it tastes.
Ganache isn’t just about appearance—it also adds a deeper chocolate flavor that complements the mousse. As it sets, it creates a soft shell that contrasts beautifully with the airy mousse beneath.
When poured correctly, it drips slightly over the edges, creating that irresistible bakery-style look. It’s the kind of finish that makes people think you spent hours perfecting the cake—even if the process was simpler than it looks.
Ingredient Breakdown and Their Roles
Understanding your ingredients is like understanding the rules of a game—it gives you control and confidence. Each component in this cake has a purpose, and knowing why it’s there helps you get better results every time.
Flour provides structure, while cocoa powder delivers that deep chocolate flavor. Sugar does more than sweeten—it also keeps the cake moist. The combination of oil and water ensures a soft texture that doesn’t dry out بسهولة.
In the mousse, heavy cream is the star. When whipped, it creates volume and lightness. The powdered sugar blends seamlessly, avoiding any grainy texture. Melted chocolate stabilizes the mousse slightly, giving it body without making it dense.
Orange zest is one of the most powerful ingredients in this recipe. It contains concentrated oils that deliver intense flavor without adding extra liquid. Fresh orange juice, on the other hand, adds brightness and a subtle tang.
Cocoa and Chocolate Quality Matters
Not all chocolate is created equal. Using high-quality cocoa powder and chocolate chips can dramatically improve the flavor of your cake. Lower-quality chocolate often contains more sugar and less cocoa, which can make the dessert taste flat.
Experts recommend using chocolate with at least 60% cocoa content for a richer, more balanced flavor. It might cost a bit more, but the difference is noticeable from the first bite.
Fresh Orange vs Artificial Flavoring
Fresh oranges make a world of difference. Artificial flavorings can taste overly sweet or slightly chemical, بينما fresh zest and juice provide a natural, vibrant flavor that feels authentic.
If you want your cake to stand out, always go for fresh ingredients. It’s a small choice that has a big impact.
Essential Tools for Making a Perfect Mousse Cake
Creating a cake like this doesn’t require a professional kitchen, but having the right tools makes the process smoother and more enjoyable. A simple 8-inch cake pan is essential for baking the base evenly, while a sharp serrated knife helps you slice it cleanly into layers.
A hand mixer or stand mixer is crucial for whipping cream to the right consistency. Achieving soft and stiff peaks by hand can be tiring and inconsistent. A mixer gives you control and precision.
You’ll also need a heatproof bowl for melting chocolate and a saucepan for preparing ganache. A spatula is key for folding the mousse gently without deflating it.
For a more polished finish, an offset spatula helps spread mousse evenly, and a cake turntable can make decorating much easier. These tools aren’t mandatory, but they definitely elevate the final result.
Step-by-Step Preparation Guide
Baking the Chocolate Cake
The first step is building your foundation. Preheating the oven ensures even baking, which is crucial for achieving a consistent texture. Mixing dry and wet ingredients separately helps distribute everything evenly before combining.
When you mix the batter, aim for “just combined.” Overmixing can make the cake tough instead of soft. Once baked, letting it cool completely is essential—cutting a warm cake can cause it to crumble.
Preparing the Orange Chocolate Mousse
Whipping the cream to soft peaks first gives you control over texture. As you add sugar and vanilla, the mixture becomes stable and fluffy. Folding in orange zest and juice adds that refreshing citrus note.
The melted chocolate should be slightly cooled before adding it. Too hot, and it can deflate the whipped cream. The goal is a smooth, airy mousse with no streaks.
Assembling the Cake Layers
This is the moment where everything starts to come together, and honestly, it’s one of the most satisfying parts of the entire process. You’ve baked your cake, whipped your mousse, and now it’s time to transform those individual components into a stunning chocolate orange mousse cake. The key here isn’t speed—it’s precision and a bit of patience.
Start by placing the first layer of your chocolate cake onto a stable serving plate or cake board. If your cake has a slight dome, gently level it with a serrated knife. This small step makes a huge difference because it ensures your layers stack evenly rather than leaning or sliding later. Once your base is ready, spread half of the orange chocolate mousse over the top. Use an offset spatula if you have one, or even the back of a spoon, and work from the center outward for an even layer.
Now comes the second cake layer. Carefully place it on top, aligning it as closely as possible with the bottom layer. Press it down very gently—just enough to secure it without squeezing out the mousse. Then spread the remaining mousse over the top and, if you like, lightly around the sides for a semi-naked finish. You don’t need perfection here; a slightly rustic look can actually feel more inviting and homemade.
Once assembled, refrigerate the cake for at least 2 hours, though longer is even better. This chilling time allows the mousse to firm up and hold everything together. Skipping this step or rushing it can lead to a cake that shifts or collapses when you try to add the ganache. Think of this stage as letting the cake “set its structure”—it’s what gives you those clean, beautiful slices later.
Making the Glossy Chocolate Ganache
If the mousse is the heart of the cake, then the chocolate ganache is definitely its crown. It’s what gives the cake that rich, glossy finish that instantly makes it look bakery-worthy. And the best part? It’s surprisingly simple to make when you understand the basics.
Start by heating the heavy cream in a small saucepan over medium heat. You’re not trying to boil it—just bring it to a gentle simmer where you see small bubbles forming around the edges. Pour this hot cream over your chocolate chips in a heatproof bowl and let it sit for a couple of minutes. This resting time allows the heat to melt the chocolate धीरे without burning it.
After a few minutes, stir slowly from the center outward until the mixture becomes smooth and shiny. This transformation is almost magical—the mixture goes from separated to silky in just a few strokes. If you notice any unmelted bits, you can microwave it for a few seconds, but be careful not to overheat.
Before pouring, let the ganache cool slightly. It should be pourable but not hot. Pouring it while it’s too warm can melt the mousse underneath, ruining the structure you worked so hard to build. When ready, pour it gently over the center of the chilled cake and let it naturally flow toward the edges. Use a spatula only if needed—gravity does most of the work here.
The result? A smooth, glossy layer that drips slightly over the sides, creating that irresistible finish.
Common Mistakes to Avoid
Even though this recipe is approachable, there are a few common pitfalls that can trip you up if you’re not careful. One of the biggest mistakes is overmixing the cake batter. It might seem harmless, but overmixing develops gluten, which can turn your soft cake into something dense and chewy instead of light and tender.
Another issue is adding melted chocolate to the mousse while it’s too hot. This can deflate the whipped cream, leaving you with a heavy, less airy texture. Always let the chocolate cool slightly before folding it in.
Not chilling the cake long enough is another frequent problem. The mousse needs time to set properly, and rushing this step can result in layers that slide or collapse. Patience here makes all the difference.
Lastly, pouring ganache at the wrong temperature can either melt your mousse or create a thick, uneven layer. Getting that perfect “just warm” consistency is key to achieving a smooth finish.
Pro Tips for a Bakery-Style Finish
If you want your cake to look like it came straight from a professional pastry shop, a few small tricks can make a huge difference. One of the easiest upgrades is using a cake ring or acetate strip during assembly. This helps create perfectly smooth sides and sharp edges.
Another tip is to chill your cake slightly in the freezer for about 15–20 minutes before pouring ganache. This helps the ganache set quickly and evenly, giving you that flawless finish.
When it comes to decoration, less is often more. A few orange zest curls, chocolate shavings, or candied orange slices can elevate the look without overwhelming it. These simple touches add both visual appeal and a hint of what flavors to expect.
Storage and Shelf Life
This cake is best stored in the refrigerator due to its mousse and ganache layers. Keep it in an airtight container or loosely covered to prevent it from absorbing fridge odors. It stays fresh for about 2–3 days, maintaining both flavor and texture.
If you need to store it longer, you can freeze it without the ganache. Wrap it tightly and freeze for up to a month. When ready to serve, thaw it overnight in the fridge and add fresh ganache before serving.
Creative Variations and Flavor Twists
Once you’ve mastered this recipe, it opens the door to endless creativity. You can swap the orange for lemon or raspberry for a different citrus or berry twist. Adding a layer of chocolate crunch or biscuit base can introduce an extra texture that makes each bite more interesting.
For a richer version, try using dark chocolate instead of semi-sweet, or even add a hint of espresso to intensify the chocolate flavor. Small changes like these can completely transform the dessert while keeping its elegant structure.
Nutritional Insights
This cake is definitely an indulgent treat, with each slice averaging around 350–450 calories depending on portion size. The cream and chocolate contribute to its richness, while the orange adds a small boost of vitamin C and antioxidants.
It’s not meant to be an everyday snack—but that’s what makes it special. Enjoying it occasionally makes the experience more meaningful and satisfying.
Serving and Presentation Ideas
Serving this cake is all about showcasing those beautiful layers. Use a warm, sharp knife to slice cleanly, wiping it between cuts for neat edges. Serve each slice on a simple plate to let the cake stand out.
Pair it with coffee, tea, or even a light citrus drink to complement the flavors. A small garnish like a fresh orange slice or mint leaf can add a final touch of elegance.
Conclusion
The chocolate orange mousse cake is more than just a dessert—it’s a celebration of flavor contrast and texture harmony. From the moist chocolate base to the airy citrus mousse and glossy ganache, every layer works together to create something memorable.
It’s the kind of cake that feels impressive yet approachable, making it perfect for both special occasions and personal baking challenges. Once you’ve made it, you’ll realize it’s not just about following steps—it’s about creating an experience worth sharing.
FAQs
1. Can I make this cake a day in advance?
Yes, and it actually tastes better after chilling overnight as the flavors meld together beautifully.
2. Can I use bottled orange juice?
Fresh orange juice is recommended for the best flavor, but bottled can work in a pinch.
3. Why did my mousse turn dense?
This usually happens if the whipped cream was overmixed or the chocolate was too hot when added.
4. Can I make this cake without eggs?
Yes, the cake base in this recipe is already egg-free, making it suitable for more dietary preferences.
5. How do I get clean cake slices?
Use a warm knife and wipe it clean between each cut for neat, professional-looking slices.
Print
Chocolate Orange Mousse Cake
Description
There’s a reason why chocolate and orange have stood the test of time as one of the most beloved flavor combinations in desserts. It’s not just tradition—it’s chemistry. The deep, slightly bitter richness of chocolate contrasts beautifully with the bright, tangy sweetness of orange. When these two come together, they don’t compete—they elevate each other.
Ingredients
Chocolate Cake Ingredients
- 1 cup All-purpose flour
- 1 cup Granulated sugar
- 1/3 cup Unsweetened cocoa powder
- 1 tsp Baking soda
- 1/2 tsp Salt
- 1/3 cup Vegetable oil
- 1 tsp Vanilla extract
- 1 tsp White vinegar
- 1 cup Water
Orange Mousse Ingredients
- 1 cup Heavy whipping cream
- 1/2 cup Powdered sugar
- 1/2 tsp Vanilla extract
- 1 Orange zest
- 1/4 cup Fresh orange juice
- 1/2 cup Semi-sweet chocolate chips (melted)
Ganache Ingredients
- 1/2 cup Heavy cream
- 1 cup Semi-sweet chocolate chips
Instructions
- Preheat your oven to 350°F (175°C). Grease and flour an 8-inch round cake pan.
- In a large bowl, whisk together the flour, sugar, cocoa powder, baking soda, and salt.
- In another bowl, combine the vegetable oil, vanilla extract, white vinegar, and water. Mix well.
- Pour the wet ingredients into the dry ingredients and stir until just combined.
- Pour the batter into the prepared cake pan and bake for 30-35 minutes, or until a toothpick inserted in the center comes out clean. Let it cool completely in the pan before transferring to a wire rack.
- In a large bowl, whip the heavy cream until soft peaks form. Gradually add the powdered sugar and vanilla extract, and continue to whip until stiff peaks form.
- Gently fold in the orange zest and fresh orange juice until combined.
- Carefully fold in the melted chocolate until no streaks remain. Set aside.
- Once the chocolate cake has cooled, cut it in half horizontally to create two layers.
- Place one layer on a serving plate. Spread half of the orange mousse over the first layer.
- Place the second layer of cake on top and spread the remaining mousse over the top and sides of the cake. Refrigerate for at least 2 hours to set.
- In a small saucepan, heat the heavy cream over medium heat until just simmering.
- Remove from heat and add the chocolate chips. Let sit for a few minutes, then stir until smooth and glossy.
- Pour the ganache over the chilled mousse cake, allowing it to drip down the sides.
- Chill the cake for an additional 30 minutes before serving.