Introduction to Easter Cake Roll
Cake rolls, often called Swiss rolls or jelly rolls, have been charming dessert lovers for generations. These soft, sponge-based cakes are baked thin, filled with cream or jam, and carefully rolled into a spiral that looks as impressive as it tastes. While their exact origin is debated, many historians trace them back to Central Europe, where rolled sponge cakes became popular due to their simple ingredients and elegant presentation. Over time, they evolved into a global favorite, showing up in bakeries, holiday tables, and family kitchens alike.
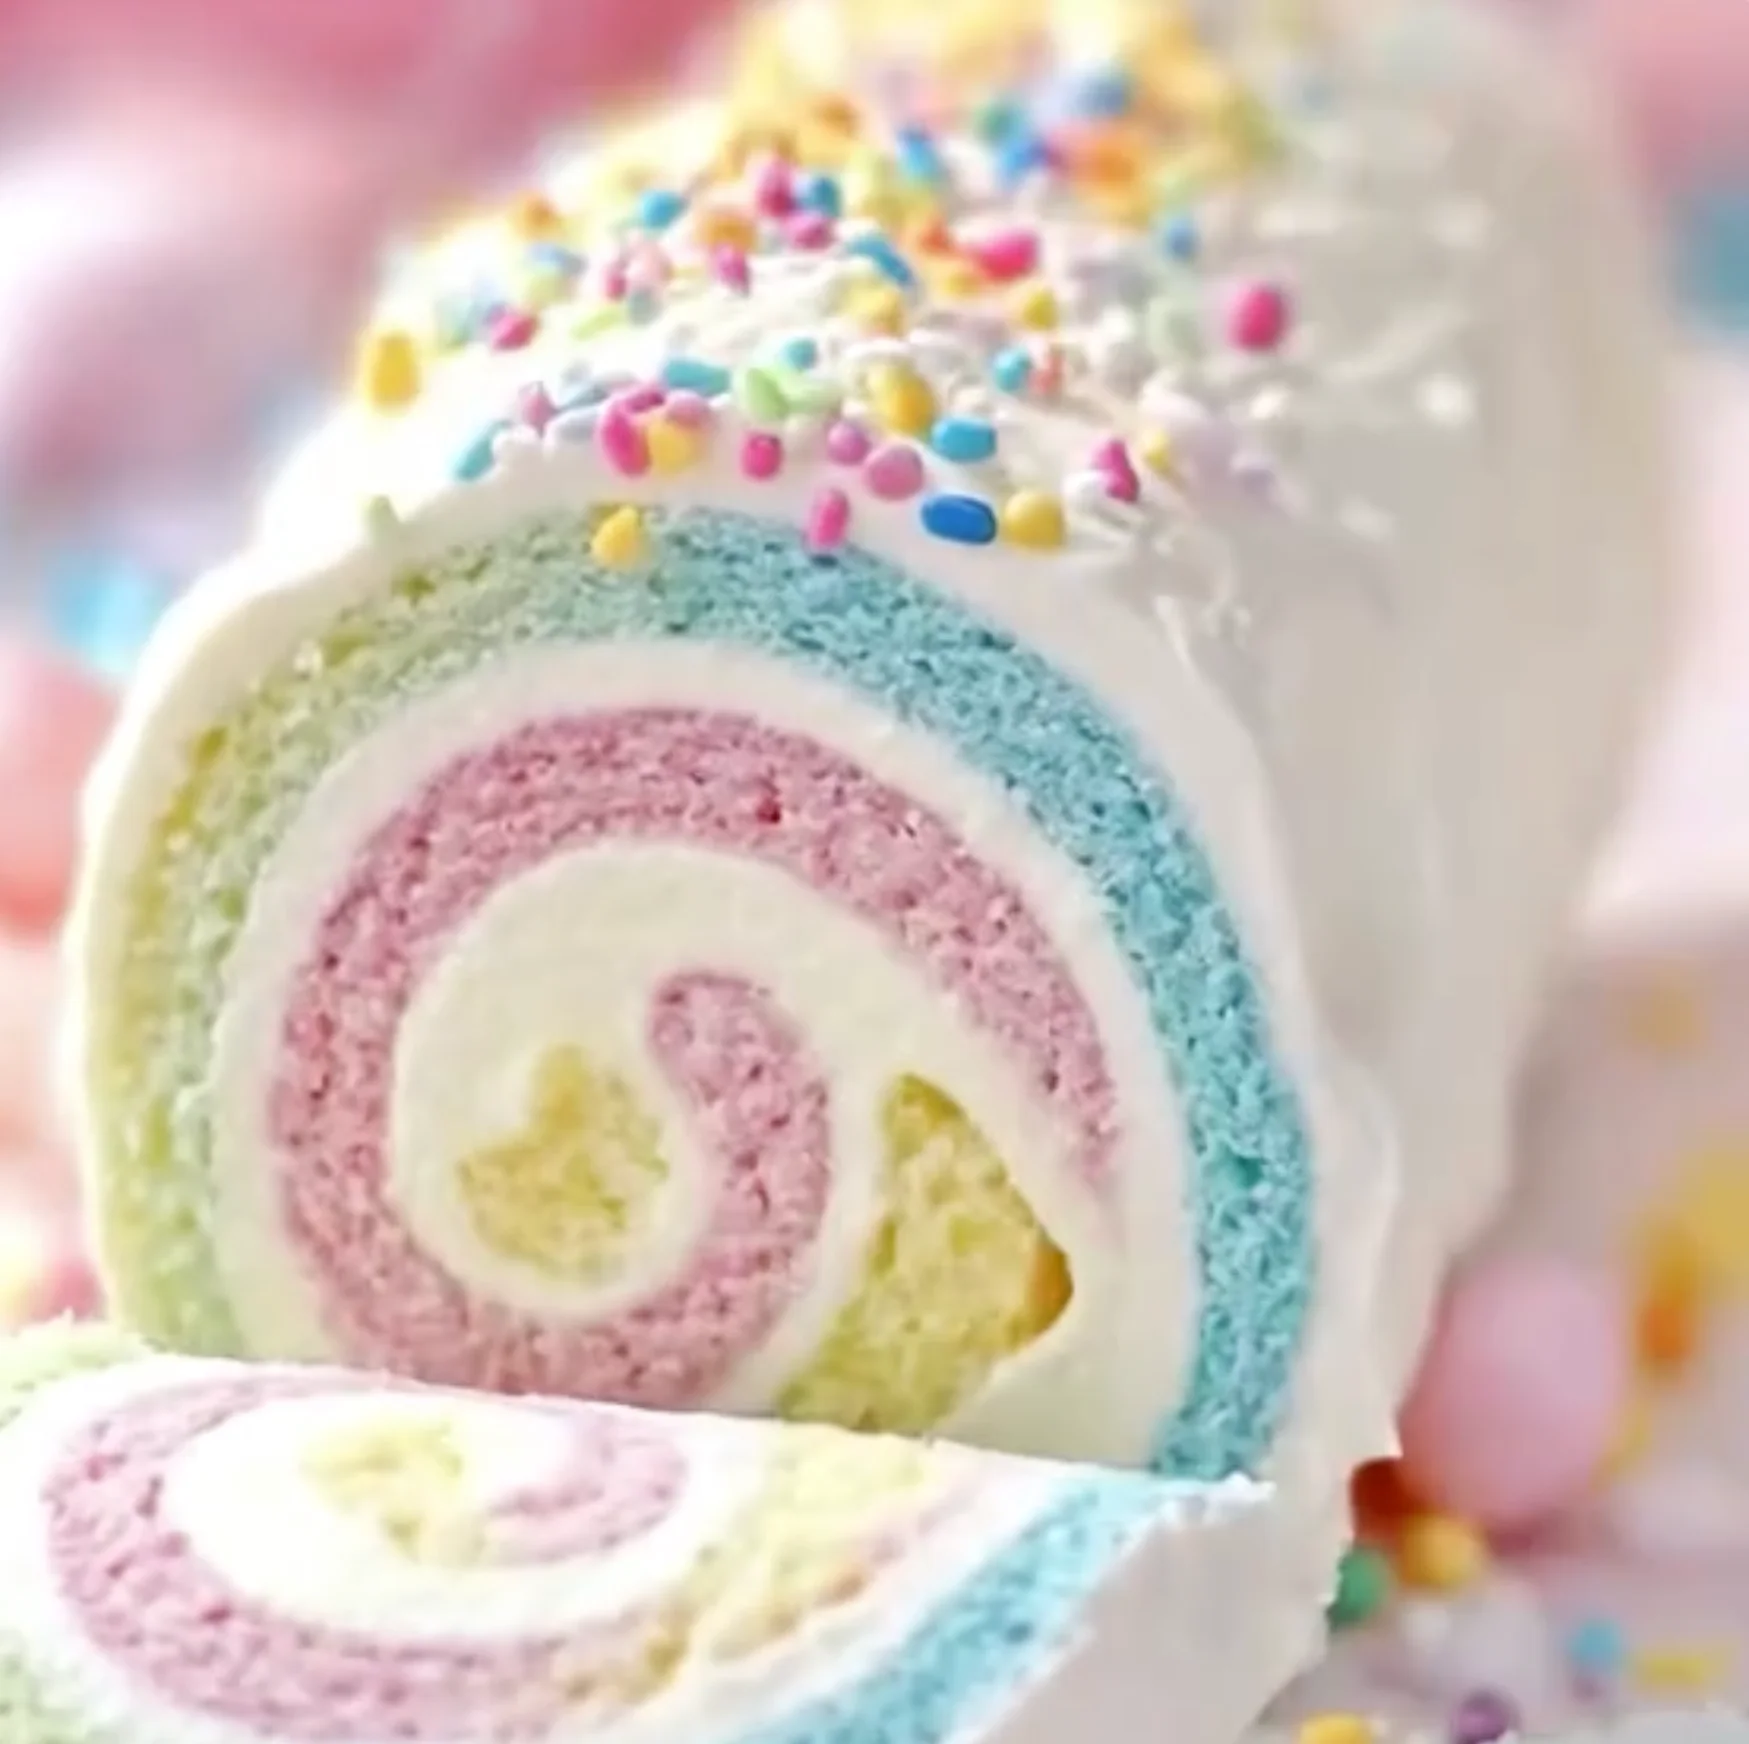
Now, when you bring Easter into the picture, something magical happens. The traditional cake roll transforms into a colorful, festive dessert that feels like spring on a plate. Think soft pastel swirls, light whipped cream filling, and playful decorations—it’s like capturing the joy of Easter in edible form. What makes it even better is how customizable it is. You can play with colors, fillings, and toppings to match your vibe or theme.
If you’ve ever felt intimidated by the idea of rolling a cake, you’re definitely not alone. It sounds tricky, but once you understand the technique, it becomes surprisingly manageable—and even fun. In fact, many home bakers say their first successful cake roll feels like unlocking a new level in baking. It’s one of those desserts that looks complicated but is actually quite approachable when broken down step by step.
Why You’ll Love This Easter Cake Roll
This *Easter Cake Roll* is a game changer! It’s not just visually stunning; it tastes heavenly too. If you’re juggling work, kids, and everything in between, this dessert is your best ally. It comes together quickly and requires minimal effort. Plus, the vibrant colors will make it a showstopper on your holiday table. Your family and friends will be asking for seconds, and you’ll still have time for that well-deserved coffee break!
Ingredients for Easter Cake Roll
Gathering the right ingredients for your *Easter Cake Roll* is half the fun! Here’s what you’ll need:
- Large eggs: Acts as the structure and richness in the cake.
- Granulated sugar: Adds sweetness and helps in creating a light, fluffy texture.
- Vanilla extract: Infuses delightful flavor; pure vanilla adds richness.
- Vegetable oil: Keeps the cake moist and tender.
- Milk: Balances the batter’s consistency and adds creaminess.
- All-purpose flour: Essential for the cake’s framework; ensures a light crumb.
- Baking powder: Provides leavening; helps the cake rise beautifully.
- Salt: Enhances the sweetness and balances flavors.
- Gel food coloring: Choose pastel shades—like pink, green, blue, and yellow—to create a cheerful, swirled appearance.
- Heavy whipping cream: Forms the luscious filling; it whips into billowy clouds.
- Powdered sugar: Sweetens the whipped cream while stabilizing it.
- Whipped cream: Optional, for a lovely topping that adds another creamy layer.
- Pastel sprinkles: Optional, a delightful way to add a little sparkle and festivity!
Each ingredient plays a crucial role in crafting this colorful beauty. For precise measurements, you can find them at the bottom of the article and print them out for easy reference!
How to Make Easter Cake Roll
Now, let’s dive into creating your lovely *Easter Cake Roll*! Follow these simple steps, and you’ll be on your way to a colorful masterpiece that will leave everyone in awe.
Step 1: Prepare the Baking Pan
Start by preheating your oven to 350°F (175°C). Line a 10×15-inch jelly roll pan with parchment paper and give it a light grease. This will help your cake roll come out cleanly. Trust me, you don’t want to deal with a sticky mess!
Step 2: Mix the Batter
In a large mixing bowl, whisk together those eggs and granulated sugar. You want to beat them until they’re thick and pale—this takes about 5 to 7 minutes. Then, mix in the vanilla extract, vegetable oil, and milk. This creamy blend will form the base of your delightful cake!
Step 3: Color the Batter
In another bowl, whisk together the all-purpose flour, baking powder, and salt. Gradually fold this mixture into your egg mixture. Now, divide your batter into four bowls. Here’s where the magic happens! Using your gel food coloring, tint each bowl with a different pastel color. Spoon dollops of each color onto the prepared pan and gently swirl them together with a skewer or knife. Just a little swirl; you want it to look fun, not mixed!
Step 4: Bake the Cake
Time to bake! Place your pan in the oven and let it bake for about 10–12 minutes. You’ll know it’s ready when the cake springs back at a gentle touch. That’s the sign of a perfect, fluffy cake!
Step 5: Roll and Cool the Cake
Once baked, immediately turn the cake out onto a clean towel that’s dusted with powdered sugar. Peel off the parchment paper. Now, here’s a little tip: roll the cake up from the short end, still wrapped in the towel. Allow it to cool completely in its cozy towel wrap. This will help it keep its shape without cracking!
Step 6: Make the Filling
While your cake is cooling, let’s whip up the filling! In a bowl, beat the heavy whipping cream, powdered sugar, and vanilla extract until stiff peaks form. It should look like fluffy clouds ready for a dreamy cake!
Step 7: Assemble the Cake Roll
Unroll your cooled cake gently and spread an even layer of the whipped cream across. Roll it back up carefully, just like you did before. Frost the top with any remaining whipped cream and sprinkle some pastel sprinkles if you like that extra festive touch. Allow it to chill for about 30 minutes before slicing, if you can resist the temptation!
Tips for Success
- Always roll the cake while it’s still warm to prevent cracking.
- Use gel food coloring for vibrant hues without thinning the batter.
- Don’t skip the powdered sugar on the towel; it keeps the cake from sticking.
- Cover the cake roll with plastic wrap if you’re chilling it for later.
- Experiment with different fillings like fruit preserves for a fun twist!
Equipment Needed
- Jelly roll pan: You can use a baking sheet if you don’t have one.
- Parchment paper: Wax paper works too, but it may not be as non-stick.
- Mixing bowls: A medium bowl and a large bowl will get the job done.
- Whisk: A hand mixer is great if you want to save time!
- Spatula: A rubber spatula is ideal for folding the batter gently.
Variations for Easter Cake Roll
- Coconut Easter Cake Roll: Add shredded coconut to the whipped cream filling for a tropical twist.
- Chocolate Cake Roll: Substitute half of the all-purpose flour with cocoa powder for a rich, chocolatey flavor.
- Gluten-Free Option: Replace all-purpose flour with a gluten-free flour blend; just ensure it has xanthan gum for structure.
- Fruit-Infused Filling: Fold in fresh berries or fruit puree into the whipped cream for an extra fruity burst.
- Carrot Cake Roll: Incorporate finely grated carrots and spices like cinnamon and nutmeg into the batter for a seasonal spin.
Serving Suggestions for Easter Cake Roll
- Pair your *Easter Cake Roll* with fresh berries for a bright, fruity contrast.
- Serve it alongside a dollop of whipped cream for added sweetness.
- Consider a light citrus drink like lemonade or sparkling water to refresh the palate.
- For presentation, place the roll on a festive serving platter and garnish with edible flowers.
- Don’t forget to sprinkle some extra pastel sprinkles on top for a cheerful finish!
FAQs about Easter Cake Roll
Got questions about the delightful *Easter Cake Roll*? I’ve got answers! Here are some common queries I hear, along with helpful tips to make your baking adventure even smoother.
How do I store the Easter Cake Roll?
To keep your cake roll fresh, wrap it tightly in plastic wrap and refrigerate. It’ll stay good for up to three days! If it lasts that long, that is!
Can I make the cake roll in advance?
Absolutely! You can bake the cake and prepare the filling a day ahead. Just assemble the cake roll the day you plan to serve it for the best texture.
What if my cake cracks while rolling?
Don’t worry! If it cracks, try to patch it up with whipped cream. A little frosting can cover any imperfections, and your guests will be none the wiser!
Can I freeze the Easter Cake Roll?
Yes, you can! Just ensure it’s wrapped well. To enjoy it later, thaw it in the fridge overnight. Fresh as a daisy!
What other fillings can I try?
The sky’s the limit! You can use fruit preserves, cream cheese frosting, or even chocolate mousse. Just let your creativity flow!
Final Thoughts
Making this *Easter Cake Roll* is more than just baking; it’s about creating joyful moments. Each swirling color and fluffy bite brings smiles to faces around your table. I cherish the laughter shared while tasting this delightful treat, whether it’s during a festive brunch or a simple family gathering. As you roll this cake, remember: it’s not just a dessert; it’s a centerpiece of love and warmth. So, gather your loved ones and celebrate the beauty of togetherness with this delightful dessert. Enjoy every slice, and may your Easter be as bright and cheerful as the colors on your cake!
Print
Easter Cake Roll
- Prep Time: 25 minutes
- Cook Time: 12 minutes
- Total Time: 1 hour 22 minutes
- Yield: 10 slices 1x
- Category: Dessert
- Method: Baking
- Cuisine: American
- Diet: Vegetarian
Description
A delightful and colorful Easter Cake Roll that will impress your guests with its fun design and delicious taste.
Ingredients
- 3 large eggs
- 3/4 cup granulated sugar
- 1 tsp vanilla extract
- 1 tbsp vegetable oil
- 1/4 cup milk
- 3/4 cup all-purpose flour
- 1 tsp baking powder
- Pinch of salt
- Gel food coloring (pastel pink, green, blue, yellow)
- 1 1/2 cups heavy whipping cream
- 1/4 cup powdered sugar
- 1/2 tsp vanilla extract
- Whipped cream (for topping, optional)
- Pastel sprinkles (for topping, optional)
Instructions
- Preheat oven to 350°F (175°C). Line a 10×15-inch jelly roll pan with parchment paper and lightly grease.
- In a large bowl, beat eggs and sugar until thick and pale (5–7 minutes). Mix in vanilla, oil, and milk.
- In a separate bowl, whisk flour, baking powder, and salt. Gradually fold dry ingredients into wet.
- Divide batter into 4 bowls and tint each with a different pastel food color. Spoon dollops randomly onto the prepared pan, then gently swirl with a skewer or knife.
- Bake for 10–12 minutes until the cake springs back when touched.
- Immediately turn the cake out onto a clean towel dusted with powdered sugar. Peel off parchment and roll cake up (short end to short end) in the towel. Let cool completely.
- For filling, beat heavy cream, powdered sugar, and vanilla until stiff peaks form.
- Unroll cooled cake, spread whipped cream evenly across, then re-roll.
- Frost the top with extra whipped cream and decorate with sprinkles if desired. Chill for 30 minutes before slicing.
Notes
- Roll the cake while warm to prevent cracking.
- Use gel food coloring for brighter pastel swirls without thinning the batter.
Nutrition
- Serving Size: 1 slice
- Calories: 230