What Is a Sourdough Starter?
The Science Behind Wild Fermentation
A sourdough starter is a living culture made from just two simple ingredients: flour and water. At first glance, it might seem unbelievable that these basic pantry staples can eventually create bread that rises naturally without commercial yeast. But once flour and water combine, wild yeast and beneficial bacteria already present in the environment begin feeding on the natural sugars inside the flour. Over time, these microorganisms multiply and create the fermentation power needed to leaven bread.
This process is known as wild fermentation, and it’s one of the oldest baking methods in human history. Long before packaged yeast existed, bakers relied entirely on naturally fermented starters to make bread rise. The wild yeast produces carbon dioxide, which creates air pockets inside dough, while lactic acid bacteria develop flavor and improve texture. Together, they form a balanced microbial ecosystem that becomes stronger and more stable over time.
What makes sourdough fascinating is that every starter develops its own personality. The exact balance of yeast and bacteria depends on your flour, water, environment, temperature, and feeding habits. That means no two starters are ever completely identical. A starter created in one kitchen may produce slightly different flavors and fermentation behavior than one made somewhere else.
During the first few days of fermentation, your starter might seem unpredictable. Some days it may bubble aggressively, while other days appear quiet. This is completely normal. The microbial balance inside the jar is still developing and stabilizing. Patience is one of the most important ingredients during this stage.
Why Homemade Starters Taste Better
There’s something incredibly rewarding about baking bread with a starter you created yourself. While commercial yeast produces reliable rise quickly, homemade sourdough starters develop layers of flavor that simply cannot be replicated with packaged yeast alone. The slow fermentation process creates organic acids, aromatic compounds, and subtle flavor notes that make sourdough bread taste deeper, richer, and more complex.
One of the biggest reasons homemade starters taste better is microbial diversity. Commercial yeast contains a single controlled strain designed for speed and consistency. A sourdough starter, on the other hand, contains a living community of wild yeast and beneficial bacteria working together. This creates nuanced flavors ranging from mildly sweet and creamy to tangy and earthy depending on how the starter is maintained.
The flour you choose also influences flavor dramatically. Whole wheat and rye flours contain more minerals, oils, and natural microorganisms than refined white flour, which contributes additional depth during fermentation. Many experienced bakers describe homemade sourdough as having flavors reminiscent of yogurt, toasted nuts, fruit, or even mild cheese depending on fermentation conditions.
Another major advantage is freshness. Store-bought bread often relies on preservatives and rapid production methods that sacrifice flavor for speed. Homemade sourdough ferments slowly, allowing the dough to develop naturally over many hours. This extended fermentation not only improves taste but also enhances texture and crust development.
Many people also find sourdough easier to digest than conventional bread. The fermentation process helps break down some starches and proteins, making nutrients more accessible and reducing heaviness for some individuals. While sourdough isn’t gluten-free, long fermentation changes the structure of the dough significantly compared to standard bread.
Ingredients You Need for a Strong Starter
Choosing the Best Flour
When making a sourdough starter, flour is far more than just an ingredient — it’s the primary food source for the yeast and bacteria developing inside your jar. Choosing the right flour can dramatically affect how quickly your starter becomes active and how strong it grows over time.
For beginners, a combination of unbleached all-purpose flour or bread flour mixed with whole grain flour works exceptionally well. Unbleached flour is important because bleaching agents can weaken microbial activity. Bread flour contains slightly more protein, which can improve structure and fermentation stability, though all-purpose flour works perfectly fine too.
Whole grain flour plays a particularly important role during the early stages of starter development. Whole wheat and rye flours contain more nutrients, enzymes, and naturally occurring microorganisms than refined white flour. These extra nutrients give wild yeast and bacteria the energy they need to establish themselves quickly.
Rye flour is especially popular among sourdough bakers because it ferments aggressively and encourages strong microbial activity. Even adding a small amount of rye can noticeably boost starter performance. Many bakers use a 50/50 blend of white flour and whole grain flour during the first week to encourage rapid fermentation.
Freshly milled flour can provide even stronger fermentation because it contains more active nutrients and oils. If you have access to local mills or freshly ground grains, your starter may develop faster and produce more complex flavors. If not, high-quality commercial brands like Bob’s Red Mill are excellent alternatives widely trusted by home bakers.
Consistency matters too. Switching flours constantly can alter fermentation behavior and confuse beginners trying to understand their starter’s rhythm. Starting with a reliable flour blend and sticking with it initially makes the process easier to monitor.
The smell and texture of your starter often reflect flour quality directly. Healthy starters made with nutritious flour tend to smell pleasantly tangy, fruity, or slightly sweet rather than harsh or unpleasant. Feeding your starter quality flour is essentially like feeding your body healthy food — better nutrition leads to stronger performance.
Why Water Quality Matters
Water may seem like the simplest ingredient in sourdough, but it plays a surprisingly important role in starter health. Since sourdough relies entirely on living microorganisms, the quality of your water can either support fermentation or interfere with it significantly.
The biggest concern is chlorine and chloramine, which are commonly added to municipal tap water to kill bacteria and disinfect water supplies. While these chemicals are safe for drinking, they can slow down or weaken the beneficial yeast and bacteria developing inside a sourdough starter. In some cases, highly chlorinated water can prevent proper fermentation altogether.
Fortunately, many people can still use tap water successfully. A simple smell test often helps. If your tap water has a strong chlorine odor, switching to filtered or spring water is usually a good idea. Letting water sit uncovered overnight may also allow some chlorine to evaporate naturally, though chloramine does not disappear this way as easily.
Filtered water often works best because it removes unwanted chemicals while retaining beneficial minerals. Minerals are important because yeast and bacteria rely on them for healthy growth and fermentation activity. This is why distilled or heavily purified water is generally not recommended for sourdough starters. Those waters may lack the minerals necessary for optimal microbial health.
Temperature matters too. Water that’s too hot can damage microorganisms, while very cold water slows fermentation dramatically. Most bakers aim for room temperature or slightly warm water around 75°F when feeding starters.
Water consistency can affect texture as well. Hard water with high mineral content sometimes creates stronger fermentation, while extremely soft water may produce slower activity. Every environment behaves slightly differently, which is why observing your starter carefully is more useful than following rigid rules blindly.
Once you establish a healthy starter, it becomes fairly resilient. But during the first week especially, using quality water can make the difference between a weak sluggish culture and a thriving active starter. Since sourdough depends entirely on natural fermentation, creating the best possible environment from the beginning helps the process develop smoothly and successfully.
Tools and Equipment for Beginners
Best Containers for Sourdough Starter
One of the most common beginner questions is whether special equipment is necessary for making a sourdough starter. The good news is that sourdough itself is incredibly simple. You don’t need expensive tools or professional bakery gear to create a healthy starter at home. In fact, some of the best sourdough starters in the world live in ordinary kitchen jars.
The ideal container should be clean, durable, and large enough to allow the starter to rise comfortably. Glass jars are especially popular because they make it easy to monitor fermentation activity visually. You can clearly see bubbles forming, track how much the starter rises, and notice changes in texture over time. Wide-mouth mason jars are one of the most common choices among home bakers because they’re affordable, easy to clean, and practical for stirring.
Container size matters more than many beginners realize. During active fermentation, a healthy starter can double or even triple in volume. If your jar is too small, the starter may overflow and create a sticky mess on your counter. Choosing a container with plenty of extra room gives the culture space to expand naturally.
Another important detail is airflow. Your starter needs some exposure to air while still being protected from contamination. Most bakers loosely cover the jar using a lid placed gently on top, a cloth secured with a rubber band, or a silicone cover designed for fermentation. Airtight sealing is usually avoided during active fermentation because gas buildup can create pressure inside the container.
Some bakers prefer ceramic or food-safe plastic containers as well, though glass remains the easiest option for observing activity. Avoid reactive metals like aluminum since acidic fermentation can sometimes interact with them over time.
Keeping the container clean also helps maintain a healthy microbial balance. Dried starter buildup around the rim can encourage mold growth if neglected. Many bakers transfer their starter into a freshly cleaned jar every few feedings to keep things sanitary and visually manageable.
At its core, sourdough is beautifully low-tech. A simple jar, quality flour, and patience are enough to begin creating a thriving starter that can eventually bake incredible homemade bread.
Helpful Tools That Make Feeding Easier
Although sourdough can absolutely be made with minimal equipment, a few simple tools can make the feeding and maintenance process much easier, especially for beginners still learning fermentation patterns.
A digital kitchen scale is probably the most useful sourdough tool you can own. Measuring ingredients by weight instead of volume creates far more consistent results because flour density changes depending on how it’s scooped or stored. Even small differences in hydration can noticeably affect starter texture and fermentation behavior. A scale helps remove guesswork and makes feeding routines much easier to repeat accurately.
Flexible silicone spatulas are another incredibly useful tool. Sourdough starter can become sticky and difficult to scrape from containers using ordinary spoons. Silicone spatulas allow you to mix thoroughly while cleaning the sides of the jar efficiently. This not only reduces waste but also keeps the container cleaner between feedings.
Many bakers also use rubber bands or dry-erase markers to track starter growth. Simply placing a rubber band around the jar at the starter’s starting level allows you to monitor rise progress easily. This visual cue becomes extremely helpful when learning how long your starter takes to peak after feeding.
Thermometers can help as well, especially in kitchens with fluctuating temperatures. Sourdough fermentation is heavily influenced by warmth. Most starters thrive around 72°F to 78°F, and knowing your room temperature can explain why your starter behaves differently from day to day.
Some bakers eventually invest in proofing boxes, bannetons, dough scrapers, or Dutch ovens for bread baking later on. But during the starter-building phase, simplicity is often better. Too many gadgets can overwhelm beginners unnecessarily.
Perhaps the most underrated “tool” is consistency itself. Feeding your starter at similar times, using familiar flour, and observing changes carefully teaches you more than any expensive accessory ever could. Over time, you begin recognizing healthy fermentation almost instinctively through smell, texture, and appearance.
The beauty of sourdough lies in its balance between science and intuition. Helpful tools support the process, but observation and patience remain the true skills that transform flour and water into a thriving living culture.
Day-by-Day Guide to Making a Sourdough Starter
Day 1 – Mixing Your First Culture
The first day of making a sourdough starter feels surprisingly exciting considering how simple the process actually is. You’re essentially combining flour and water, yet that small act begins the creation of a living fermentation culture that could potentially last for years or even decades.
Start by preparing your flour blend. A balanced combination of unbleached all-purpose flour or bread flour mixed with whole wheat or rye flour works extremely well. Many bakers use a 50/50 mix because whole grain flour provides extra nutrients and microorganisms that help kickstart fermentation.
In a clean jar, combine 30 grams of flour blend with 30 grams of room-temperature water. Stir thoroughly until no dry flour remains. The mixture should resemble a thick paste rather than a thin liquid. If needed, adjust with a tiny bit more flour or water to achieve a consistency similar to thick pancake batter or soft dough.
Once mixed, loosely cover the jar. Avoid sealing it airtight because fermentation gases need room to escape. Place the jar somewhere warm but not excessively hot. Ideal temperatures usually fall between 72°F and 75°F. A kitchen counter away from direct sunlight often works perfectly.
At this stage, patience becomes essential. During the first 24 hours, the mixture may appear lifeless, but microscopic activity has already begun. Wild yeast and bacteria naturally present in the flour and surrounding environment are starting to colonize the mixture.
Some beginners become anxious immediately and want to feed the starter repeatedly on the first day. Resist that temptation. Overfeeding too early can actually dilute developing microbial activity before it becomes established. The goal during Day 1 is simply creating an environment where fermentation can begin naturally.
You may notice subtle changes after several hours. Sometimes the surface develops tiny bubbles or a faint earthy smell. Other times, nothing visible happens yet. Both scenarios are completely normal. Sourdough starters develop at different speeds depending on flour type, temperature, water quality, and environmental conditions.
The most important thing on Day 1 is understanding that sourdough is a process of gradual biological development. You aren’t making instant yeast. You’re cultivating an entire microbial ecosystem that needs time to stabilize and grow strong naturally.
Days 2 to 3 – Watching for Early Activity
The second and third days of sourdough development are often the most confusing for beginners because starter behavior can seem unpredictable. One moment the jar appears full of bubbles and life, and the next it may suddenly become quiet again. Understanding what’s happening biologically helps prevent unnecessary panic during this stage.
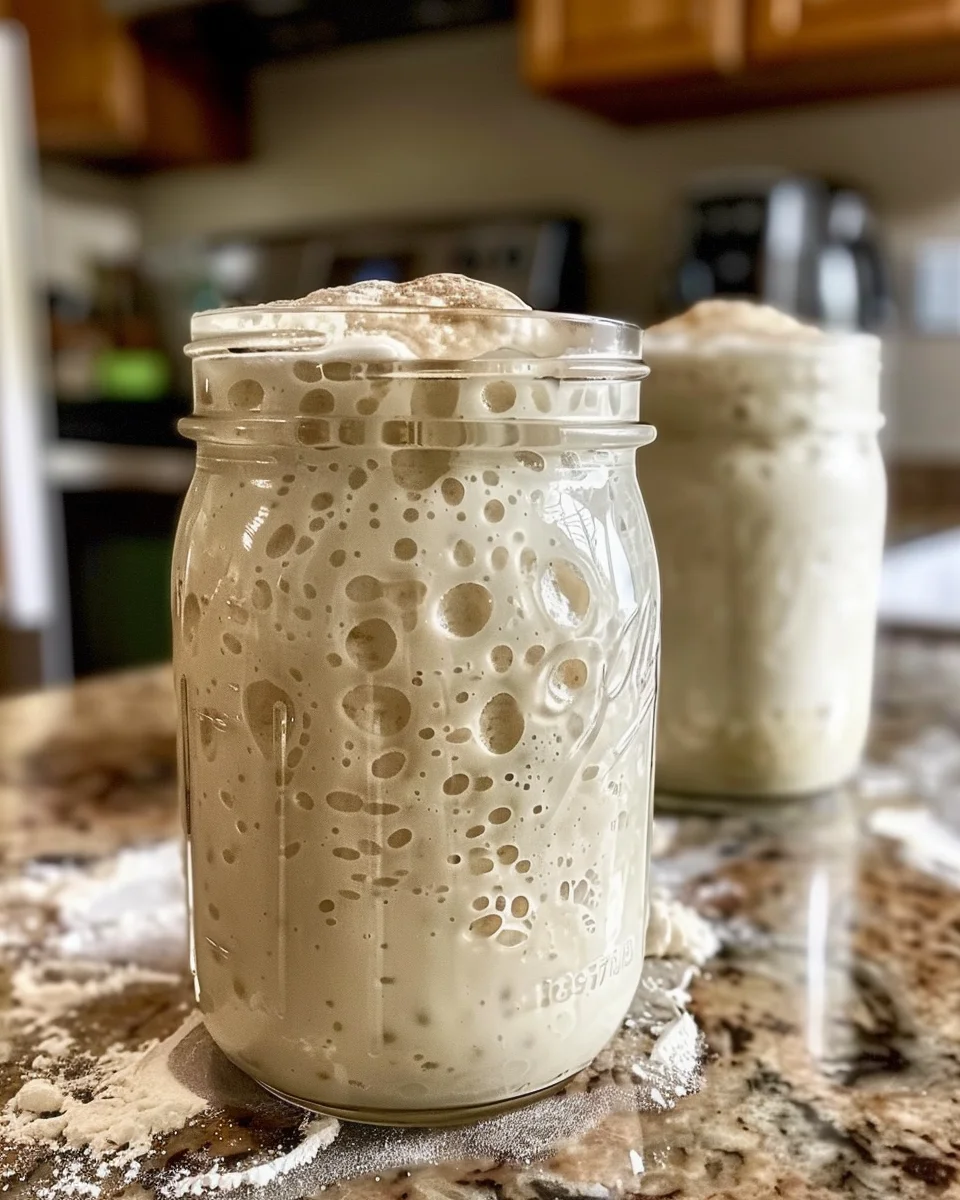
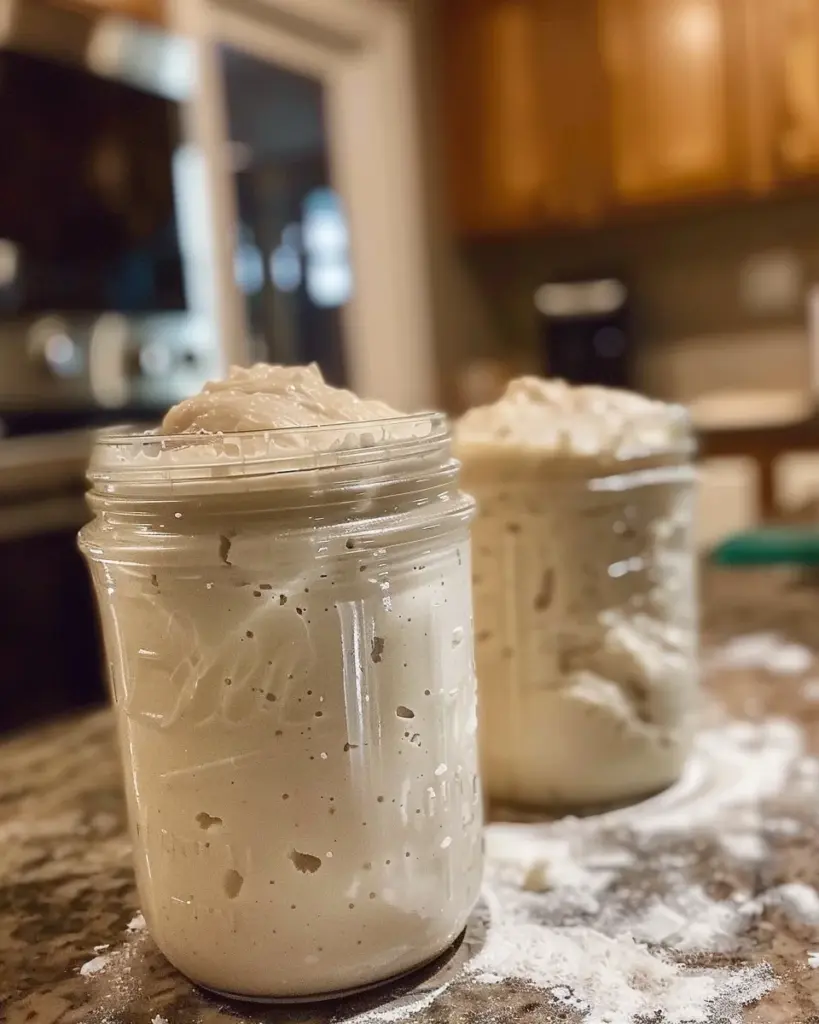
By Day 2, many starters begin showing their first visible signs of fermentation. Small bubbles may appear on the surface or throughout the mixture, and the starter might rise slightly in the jar. The smell often changes too, developing notes that range from mildly sweet and yeasty to slightly sour or fruity.
At this point, harmful bacteria naturally present in flour are being replaced gradually by acid-tolerant microorganisms better suited for fermentation. This transition phase sometimes creates strange smells temporarily. A starter may smell cheesy, overly sour, or even slightly unpleasant for a short time. While alarming to beginners, these odors are usually normal as long as no mold appears.
Around Day 2 or 3, you can begin your first feeding routine. Discard roughly half the starter and feed it with fresh flour and water. Many beginners struggle emotionally with discarding starter, but it’s an essential part of maintaining balance. Without discarding, the culture grows too large and quickly exhausts its food supply.
A common feeding approach is combining:
- 30 grams mature starter
- 30 grams flour blend
- 30 grams water
Stir thoroughly, scrape down the sides of the jar, and return it to its warm resting spot.
One of the biggest misconceptions during this phase involves early bubbling. Many starters show dramatic activity around Day 2 before becoming quieter afterward. Beginners often assume they’ve “killed” the starter when activity slows. In reality, this temporary slowdown is completely normal. The microbial ecosystem is still stabilizing and shifting toward the stronger yeast and bacteria necessary for long-term fermentation.
Patience becomes incredibly important here. Some starters become active quickly while others take a full week or longer before developing consistent rising power. Environmental factors like temperature and flour quality influence timing heavily.
The key during Days 2 and 3 is consistency. Feed regularly, keep the starter warm, observe changes carefully, and avoid overreacting to temporary fluctuations. Healthy sourdough development is rarely perfectly linear, especially in the beginning.
Days 4 to 5 – Feeding and Strengthening
By Days 4 and 5, your sourdough starter begins entering one of the most important stages of development. The early microbial chaos starts settling down, and the stronger wild yeast and beneficial bacteria gradually establish dominance inside the jar. This is when many beginners either gain confidence or accidentally give up too soon because the starter may not yet look as active as expected.
One of the most common surprises during this phase is the temporary slowdown in bubbling. Many starters become extremely active around Day 2 or 3, then suddenly appear sluggish afterward. This often causes panic, but it’s actually a normal biological transition. The initial burst of activity usually comes from bacteria that aren’t ideal for long-term sourdough fermentation. As acidity increases, those organisms die off, allowing the more stable yeast and lactic acid bacteria to take over gradually.
At this point, feeding consistency matters more than dramatic visible growth. Continue discarding a portion of the starter daily and refreshing it with equal parts flour and water. Many bakers continue using:
- 30 grams starter
- 30 grams flour blend
- 30 grams water
If your kitchen is particularly warm, you may notice faster fermentation. In cooler kitchens, activity might still feel slow. Temperature plays a massive role in fermentation speed, which is why many bakers keep their starter in a warm area like near the oven, inside a microwave with the light on, or near a warm appliance.
Smell becomes one of your best indicators during this stage. Healthy starters often begin developing pleasant aromas similar to yogurt, fruit, fresh dough, or mild vinegar. Sharp rotten smells or visible mold are warning signs, but slight sourness is perfectly normal and expected.
You may also begin noticing stronger rise patterns. Instead of only surface bubbles, the starter might visibly expand in volume several hours after feeding. Marking the jar with a rubber band can help track growth more accurately.
The texture often changes too. As fermentation strengthens, the starter becomes lighter and more aerated. Stirring it may reveal web-like strands and trapped gas pockets developing inside the mixture.
Perhaps the most important lesson during Days 4 and 5 is learning patience. Sourdough is not an instant process. Every starter develops according to its own timeline based on flour quality, room temperature, and microbial conditions. Some starters become bake-ready within a week, while others need closer to two weeks before reaching full strength.
Staying consistent during this phase builds the foundation for a powerful, reliable starter later on.
Days 6 to 7 – Building Fermentation Power
By Days 6 and 7, many sourdough starters finally begin behaving more predictably. This stage often feels exciting because the culture starts showing signs of real fermentation strength instead of random bubbling. While not every starter becomes fully mature within a week, this is usually the period where noticeable stability begins developing.
A healthy starter at this stage should rise consistently after feedings, often doubling in size within several hours depending on temperature and feeding ratio. The bubbles become more organized and plentiful, and the texture feels airy rather than heavy or paste-like. When stirred, the starter may feel elastic and full of trapped gas.
The smell also becomes much more balanced. Instead of unpleasant or overly sharp odors, mature fermentation tends to smell mildly tangy, yeasty, fruity, or creamy. Many bakers describe healthy sourdough aromas as comforting and bread-like.
This is the stage where feeding schedules become especially important. A hungry starter weakens quickly if left unfed for too long. Continuing regular feedings helps strengthen the yeast population and stabilize microbial balance further. Some bakers begin experimenting with slightly larger feeding ratios at this point, such as 1:2:2 or 1:3:2, to provide additional nutrients and improve long-term strength.
You can also begin testing fermentation readiness more seriously. One common method is observing rise and collapse patterns. A strong starter rises predictably after feeding, reaches a clear peak, and eventually begins falling back down once food supplies become depleted.
Another popular technique is the float test. A spoonful of starter dropped into water may float if enough gas has developed inside. While not perfectly reliable on its own, floating often suggests the starter contains strong fermentation activity capable of helping dough rise.
Many beginners become eager to bake immediately once the starter starts bubbling consistently. Technically, you can attempt baking around this stage, but young starters sometimes still lack full fermentation power. If your first loaf feels dense or sluggish, the starter likely just needs additional time and feeding consistency to mature further.
One of the most valuable things you develop during Days 6 and 7 is intuition. You begin recognizing the rhythm of your starter — how it smells when healthy, how quickly it rises, how texture changes over time, and how environmental conditions influence activity.
This growing familiarity is what eventually transforms sourdough from a confusing science experiment into a deeply rewarding baking skill. The starter stops feeling unpredictable and starts feeling alive in a way you can genuinely understand and manage confidently.
Common Problems and How to Fix Them
Why Your Starter Isn’t Bubbling
Few things frustrate beginners more than staring at a jar of flour and water that seems completely lifeless. One of the most common sourdough concerns is a starter that refuses to bubble or rise noticeably after several days. Fortunately, most inactive starters aren’t dead — they simply need adjustments in environment, feeding, or patience.
Temperature is usually the biggest factor. Sourdough microorganisms thrive best in warm environments between 72°F and 78°F. If your kitchen is too cold, fermentation slows dramatically. During winter months especially, starters can appear inactive simply because microbial growth is moving very slowly. Placing the jar in a warmer location often solves the issue quickly.
Flour quality matters too. Highly processed or bleached flours contain fewer nutrients and microorganisms compared to whole grain flour. Adding rye or whole wheat flour can often boost sluggish starters significantly because these flours provide extra enzymes and natural yeast activity.
Water can also interfere with fermentation. Strongly chlorinated tap water may weaken microbial growth, especially during the first week. If your water smells heavily treated, switching to filtered or spring water may improve activity noticeably.
Another major issue is overfeeding too early. Many beginners panic when they don’t see bubbles and start feeding constantly. But repeatedly diluting the starter before microbial colonies establish themselves can actually slow development further. During the early days, consistency and patience work better than excessive feeding.
Timing confusion is also extremely common. Some starters simply develop slower than others. While online tutorials often promise active starters within five days, real-world fermentation varies enormously depending on environmental conditions. Some healthy starters take 10 to 14 days before becoming fully reliable.
It’s important to observe multiple signs rather than focusing only on bubbles. Smell changes, texture development, and slight volume increases all indicate microbial activity even if dramatic rising hasn’t appeared yet.
One of the biggest lessons sourdough teaches is patience. Fermentation is a biological process, not an exact machine. Sometimes the best solution is simply continuing consistent feedings while giving the microorganisms more time to stabilize naturally.
Dealing With Bad Smells or Mold
Strange smells during sourdough development can alarm beginners quickly, but not every unpleasant aroma means something is wrong. In fact, temporary odd smells are often a completely normal part of the starter’s early microbial transition phase.
During the first few days, starters sometimes smell cheesy, overly sour, sweaty, or even slightly rotten. This happens because different bacteria temporarily dominate before the ideal fermentation organisms fully establish themselves. As acidity increases, healthier yeast and lactic acid bacteria gradually take over, and the smell usually improves naturally.
A healthy mature starter typically smells mildly tangy, fruity, yeasty, or yogurt-like. Sharp vinegar aromas can indicate hunger or excessive acidity, while mild alcohol smells often mean the starter needs feeding soon.
Mold, however, is different and should be taken seriously. Visible fuzzy growth in colors like green, pink, orange, or black usually means contamination has occurred. If mold appears, the safest choice is discarding the starter entirely and starting fresh.
Contamination often results from poor hygiene, dirty containers, trapped food residue around the jar rim, or excessive moisture buildup. Using clean jars, fresh utensils, and regular container cleaning helps reduce these risks significantly.
Another warning sign is unpleasant putrid odors that persist even after several feedings. While temporary strange smells are normal early on, persistent rotten smells combined with discoloration may suggest harmful bacterial contamination.
One surprisingly common issue is hooch — a gray or dark liquid forming on top of the starter. Hooch itself is usually harmless and simply indicates the starter is hungry. You can either stir it back in for stronger sour flavor or pour it off before feeding.
Learning to distinguish between normal fermentation smells and actual spoilage takes practice. Over time, you become familiar with your starter’s natural aroma patterns and can recognize healthy activity instinctively.
How to Know When Your Starter Is Ready
Signs of a Healthy Starter
One of the biggest questions every beginner asks is, “How do I know my sourdough starter is finally ready to bake with?” The answer isn’t based on a single perfect test. Instead, experienced bakers look for several consistent signs that together indicate a healthy, mature fermentation culture.
The first and most obvious sign is predictable rising behavior. A strong starter should reliably increase in size after feeding, often doubling within 4 to 8 hours depending on room temperature and feeding ratio. This rise shows that the yeast population is producing enough carbon dioxide to create strong fermentation activity.
The texture also changes dramatically as the starter matures. Instead of feeling dense and paste-like, a healthy starter becomes airy, elastic, and full of trapped gas bubbles. When stirred, you may notice web-like strands stretching through the mixture. Those trapped gases are exactly what eventually help bread dough rise.
Smell becomes another incredibly useful indicator. Healthy sourdough starters usually smell pleasantly tangy, mildly fruity, yeasty, or slightly sweet. Some people compare the aroma to yogurt, apples, beer, or fresh bread dough. Sharp rotten odors or visible mold are warning signs, but mild sourness is completely normal and expected.
Another important detail is consistency in performance. A mature starter behaves predictably from feeding to feeding. It rises, peaks, and falls in a recognizable cycle rather than behaving randomly each day. This stability matters because predictable fermentation makes bread baking far easier to manage successfully.
Color can provide clues too. Healthy starters are usually creamy white, beige, or light brown depending on the flour used. Dark streaks, pink discoloration, or fuzzy growth suggest contamination and should not be ignored.
Perhaps most importantly, a ready starter recovers quickly after feeding. Weak immature cultures may bubble briefly then collapse without much strength. Strong starters bounce back consistently and maintain activity over time.
Many beginners rush into baking as soon as they see bubbles, but bubbling alone doesn’t guarantee strength. The real goal is developing a balanced culture capable of producing enough fermentation power to lift bread dough properly. Patience during the early stages almost always leads to stronger and more reliable baking results later.
The Float Test Explained
The float test is one of the most widely discussed sourdough techniques online, but it’s also one of the most misunderstood. Many beginners treat it like a definitive pass-or-fail exam for starter readiness, when in reality it’s simply one helpful indicator among several others.
The test itself is very simple. After your starter reaches peak activity following a feeding, scoop a small spoonful gently and place it into a bowl of room-temperature water. If the starter floats, it suggests enough gas has accumulated inside to support fermentation strength. If it sinks, the starter may still need more development or may simply not be at peak fermentation yet.
The reason floating matters comes down to trapped carbon dioxide. Healthy yeast activity fills the starter with gas bubbles, creating a lighter texture that can remain suspended in water temporarily. In theory, a floating starter indicates strong fermentation activity capable of helping bread rise.
However, the float test is not perfectly reliable. Some perfectly healthy starters fail the float test because they were disturbed while scooping, fed recently, or maintained at lower hydration levels. Thick starters especially may not float as dramatically despite being very strong.
Timing also matters enormously. Even mature starters rise and fall throughout the day. Testing too early or too late in the fermentation cycle may produce misleading results. Most bakers perform the test near the starter’s peak rise when gas retention is strongest.
One of the biggest mistakes beginners make is relying entirely on the float test while ignoring other signs of starter health. A consistently rising starter with good aroma, strong bubbling, and predictable fermentation patterns is often ready for baking regardless of whether it floats perfectly.
In many ways, the float test works best as a confidence booster rather than a strict scientific measurement. If your starter floats, that’s certainly encouraging. But if it doesn’t, it doesn’t automatically mean failure.
Over time, experienced bakers rely less on individual tests and more on observation as a whole. Smell, texture, rise behavior, and fermentation timing together tell a far more complete story than any single test alone ever could.
The most important thing is understanding that sourdough is a living process. Readiness develops gradually, and intuition grows naturally through repeated observation and baking experience.
Feeding and Maintaining Your Starter
Daily Feeding Routine
Once your sourdough starter becomes active and reliable, maintaining it turns into a simple routine rather than a complicated science experiment. The key to long-term success is consistency. A healthy starter thrives when it receives regular fresh flour and water before becoming overly acidic or starving.
For bakers who keep their starter at room temperature, daily feeding is usually necessary. A common maintenance ratio is:
- 1 part starter
- 1 part flour
- 1 part water
For example:
- 50 grams starter
- 50 grams flour
- 50 grams water
This feeding refreshes the microbial balance and provides fresh nutrients for continued fermentation. Some bakers prefer larger feeding ratios like 1:2:2 or 1:3:2 because they slow fermentation slightly and create stronger yeast activity over time.
Before feeding, most bakers discard a portion of the existing starter. This prevents the jar from growing endlessly while keeping acidity balanced. While discarding can feel wasteful initially, it’s an essential part of maintaining healthy fermentation. Many people eventually use discard in pancakes, crackers, muffins, and other recipes to reduce waste.
Timing matters too. Feeding at roughly the same times each day helps establish predictable fermentation cycles. Warm kitchens speed up fermentation, while cooler environments slow it significantly.
Texture observation becomes extremely valuable during maintenance. A healthy starter should feel airy and elastic near peak activity. If it becomes overly runny, sharply acidic, or sluggish, adjustments in feeding ratio or frequency may help restore balance.
The type of flour used for maintenance also influences starter behavior. Some bakers maintain entirely white flour starters for milder flavor, while others continue adding whole grain flour periodically for extra microbial strength.
Another useful habit is keeping the jar relatively clean. Dried starter buildup around the rim can encourage mold growth over time. Many bakers transfer the starter into a freshly cleaned jar every few feedings.
What eventually surprises most beginners is how intuitive starter maintenance becomes. At first, every feeding feels technical and stressful. But over time, you begin recognizing hunger, peak activity, and fermentation health almost instinctively through smell, texture, and rise patterns.
That familiarity is one of the most rewarding parts of sourdough baking. The starter stops feeling mysterious and starts feeling like a living rhythm naturally integrated into your kitchen routine.
Conclusion
Making a sourdough starter at home is one of the most rewarding experiences in baking because it transforms simple ingredients into a living culture capable of producing incredible bread naturally. Flour and water may seem ordinary on their own, but with time, patience, and proper care, they become the foundation for rich flavor, beautiful texture, and authentic artisan baking.
The process itself teaches valuable lessons about fermentation, patience, and observation. During the first week, your starter may bubble dramatically one day and appear sluggish the next. Smells may shift, textures may change, and progress may sometimes feel slow. But all of these stages are part of building a healthy microbial ecosystem.
FAQs
1. How long does it take to make a sourdough starter?
Most sourdough starters take about 7 to 14 days to become strong enough for baking. Some develop faster depending on temperature, flour quality, and feeding consistency.
2. What is the best flour for a sourdough starter?
A combination of unbleached all-purpose flour and whole grain flour like rye or whole wheat works very well. Rye flour is especially effective because it encourages strong fermentation activity.
3. Can I use tap water for my starter?
Yes, many people successfully use tap water. However, if your water smells strongly of chlorine, filtered or spring water may help fermentation perform better.
4. Why does my starter smell bad?
Temporary unpleasant smells are common during the first few days of fermentation. Healthy starters eventually develop mild tangy, fruity, or yeasty aromas as the microbial balance stabilizes.
5. Do I need to feed my starter every day?
If kept at room temperature, daily feeding is usually recommended. If stored in the refrigerator, many starters only need feeding once every 5 to 7 days.
Print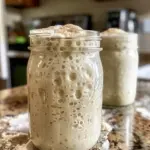
How to Make a Sourdough Starter at Home
Description
This Homemade Sourdough Starter is the heart of incredible homemade bread! Made with just flour and water, this natural wild yeast starter develops rich flavor, beautiful bubbles, and the perfect tangy aroma. Whether you’re new to sourdough or ready to bake bakery-style loaves at home, this easy step-by-step method will help you build a strong, active starter from scratch! 🌟 Crispy Crust & Airy Bread 🍞 Naturally Fermented & Full of Flavor 🔥 Beginner-Friendly & Budget-Friendly
Ingredients
Flour Blend
- 150g unbleached all-purpose flour or bread flour
- 150g whole wheat flour or rye flour
Starter Feed
- 30g flour blend
- 30g filtered or spring water
Instructions
Step 1: Make the Flour Blend
In a container, combine the unbleached flour with the whole wheat or rye flour. Mix well and keep it stored for daily feedings.
Step 2: Start the Culture
In a clean glass jar, mix:
- 30g flour blend
- 30g water
Stir until no dry flour remains. The mixture should resemble a thick pancake batter.
Step 3: Cover & Rest
Loosely cover the jar with:
- a lid placed gently on top
- or cloth secured with a rubber band
Place the jar somewhere warm, ideally around 72°F–75°F.
Step 4: Wait for Fermentation
Over the next 24–72 hours, look for:
- tiny bubbles
- slight rising
- a mild sour aroma
This means your wild yeast is waking up and the fermentation process has started!
Pro Tips
- Rye flour usually speeds up fermentation faster than wheat flour.
- Avoid distilled water because natural minerals help yeast grow.
- If your kitchen is cold, place the jar near a warm appliance or inside the oven with the light on.
- A thick starter often develops stronger structure and bigger bubbles.
Feeding Schedule (After Activity Begins)
Once bubbles appear:
- Discard half the starter.
- Feed with:
- 30g flour blend
- 30g water
- Repeat every 24 hours until the starter reliably doubles in size.
Signs Your Starter is Ready
Your starter is ready for baking when it:
- doubles within 4–8 hours after feeding
- smells pleasantly tangy
- has lots of bubbles throughout
- passes the float test
Storage
- Keep at room temperature if baking often.
- Store in the fridge and feed weekly if baking occasionally.
Perfect For
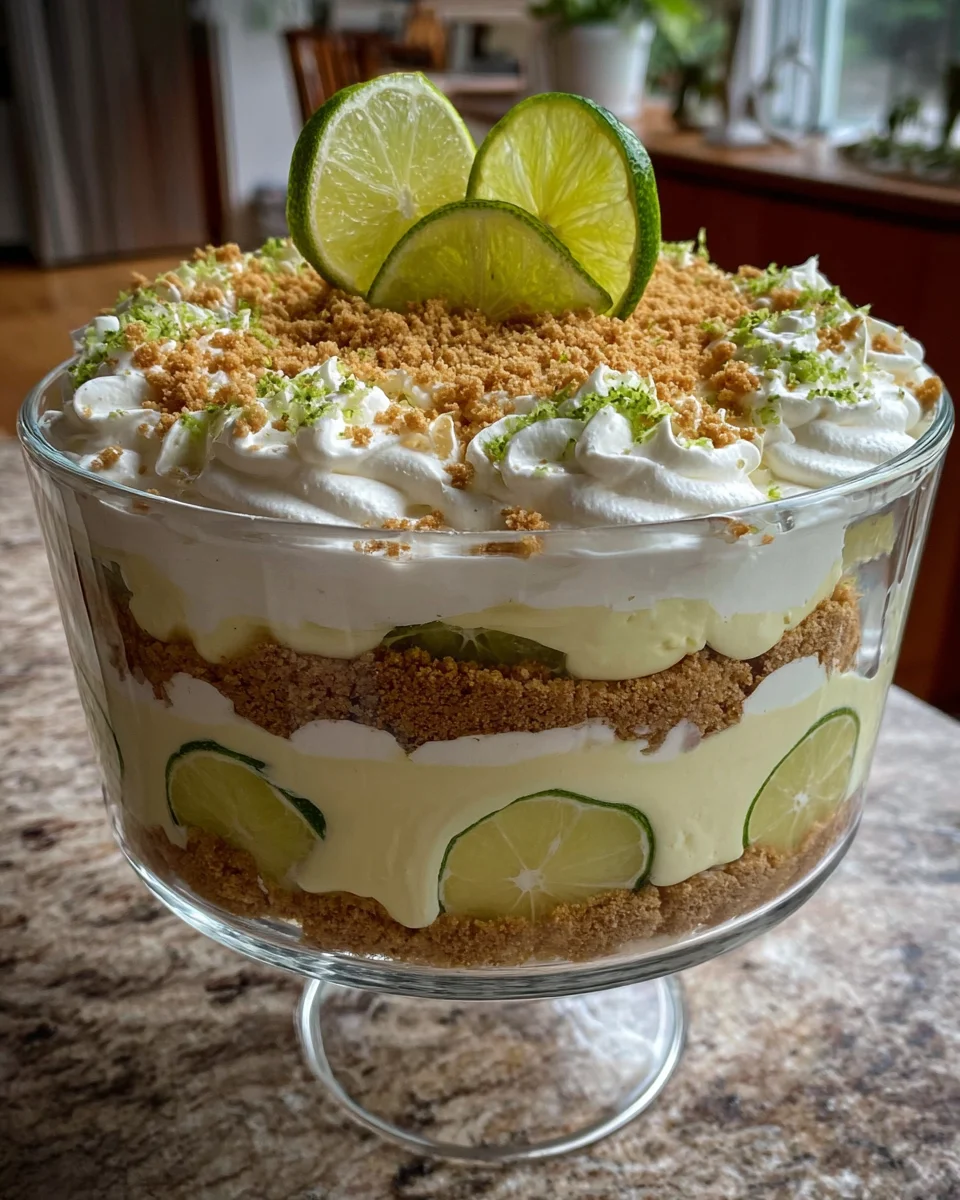
- Artisan sourdough bread
- Sourdough pizza crust
- Bagels
- Pancakes
- Cinnamon rolls