
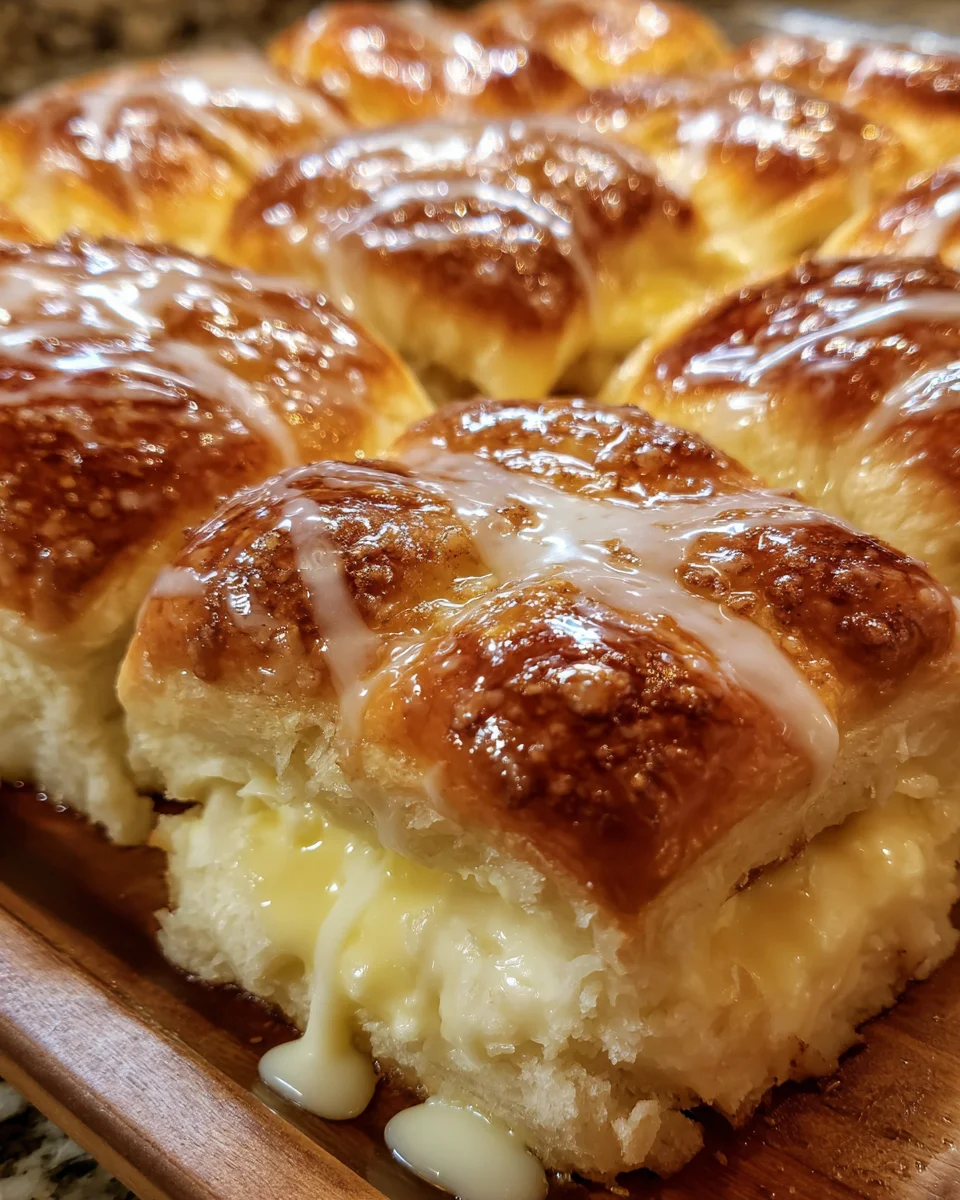
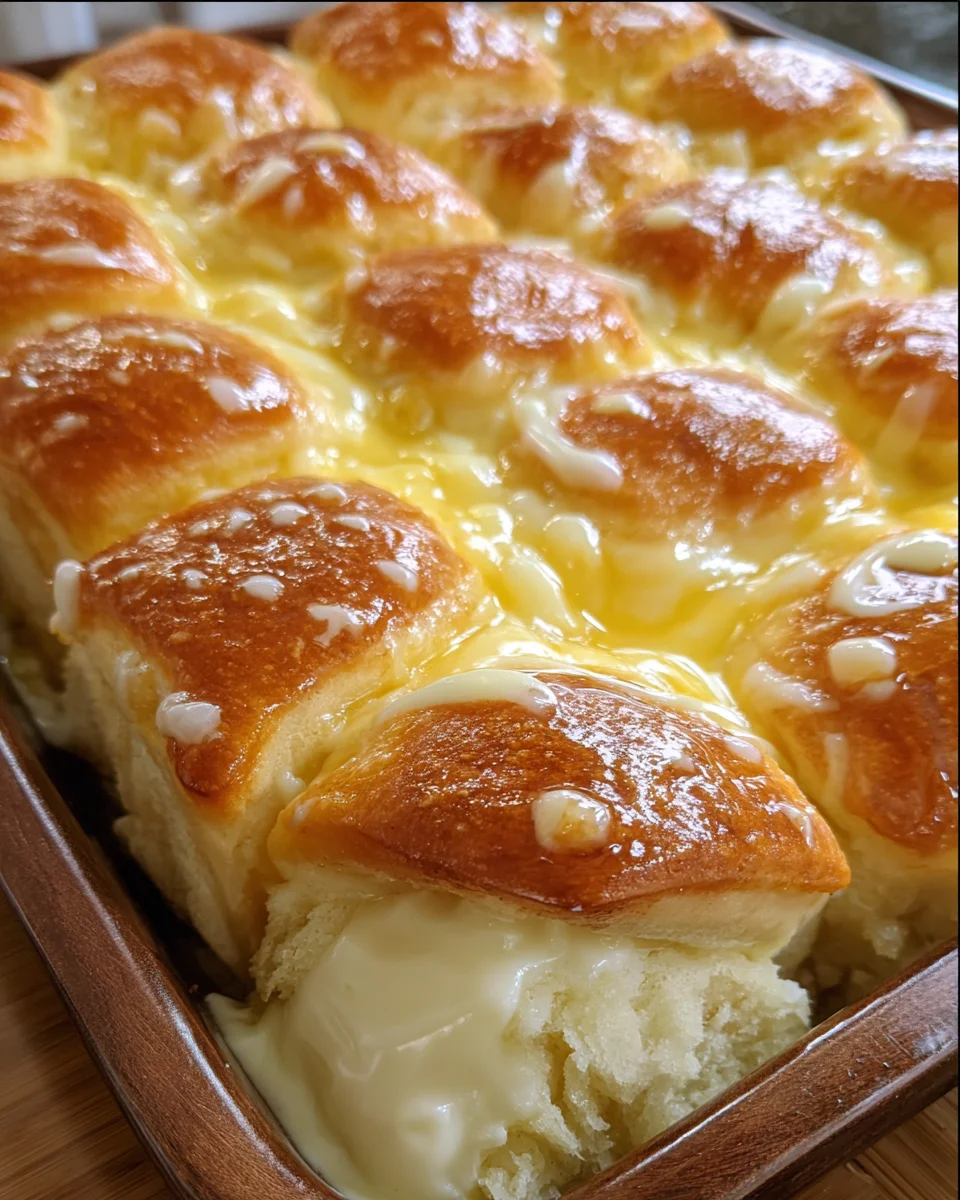
Introduction to King’s Hawaiian Cheesecake Danish
When I think about breakfast bliss, the first thing that comes to my mind is the
King’s Hawaiian Cheesecake Danish. There’s just something magical about sinking your teeth into a fluffy, sweet roll filled with creamy cheesecake that melts in your mouth.
As a busy mom, I know the struggle of balancing hectic mornings, so this recipe is my secret weapon! It’s quick and easy to whip up, whether you’re dazzling guests on a weekend or treating your family on a busy weekday. Trust me, this delightful treat is sure to impress everyone at your table.
Save this recipe and cook smarter
Keep your favorite Cooking Layer recipes in one place, plan your weekly meals, and quickly find dinner ideas whenever you need them.
Free to download • Fast and easy to use
Why You’ll Love This King’s Hawaiian Cheesecake Danish
The King’s Hawaiian Cheesecake Danish is a breakfast delight that meets the demands of our busy lives. It’s incredibly easy to prepare, making it perfect for those rushed mornings when you desire something special. The gentle sweetness of the rolls combined with the rich cream cheese filling is not just delicious; it’s comfort food at its finest. Plus, it brings warmth to your kitchen and heart in one delightful bite!
Ingredients for King’s Hawaiian Cheesecake Danish
To create the scrumptious King’s Hawaiian Cheesecake Danish, you’ll need several key ingredients. Let’s break them down so you know exactly what to gather for your baking adventure.
- Hawaiian sweet rolls: These fluffy, little darlings are the heart of our dish. Their sweetness complements the cheesecake beautifully.
- Unsalted butter: We’ll need this buttery goodness in two parts: one for brushing the pan and another for that luscious spiced topping. Unsalted butter helps control the saltiness in your dish.
- Light brown sugar: This sugar adds a warm, caramel flavor. It’s the secret to making the topping feel rich and indulgent.
- Ground cinnamon: Just a sprinkle of this aromatic spice elevates the flavor to heavenly levels.
- Ground nutmeg (optional): If you want a touch of cozy spice, nutmeg is your friend. It adds depth without overpowering.
- Full-fat cream cheese: The star of our filling! It provides that creamy texture we adore, creating a filling that’s velvety and rich.
- Egg: A lightly beaten egg binds our cheesecake filling together, making it smooth and fluffy.
- Granulated white sugar: A little sugar in the filling balances the cream cheese’s tanginess, ensuring each bite is perfectly sweet.
Don’t worry about measuring right now; you can find the exact quantities at the bottom of the article, ready for you to print out!
How to Make King’s Hawaiian Cheesecake Danish
Now that we have our ingredients ready, let’s dive into the joyful process of making the
King’s Hawaiian Cheesecake Danish. I promise it’s simpler than it seems, and with each step, you’ll be one step closer to breakfast bliss!
Step 1: Preheat and Prepare the Pan
Setting the Oven and Preparing the Baking Dish
First things first: preheat your oven to 375°F (190°C). This is important because it ensures your danishes will bake evenly.
While the oven is warming up, grab a 9×13-inch baking dish. Brush the bottom with 1 tablespoon of melted butter. This not only adds flavor but also helps prevent sticking. Don’t skip this part; it’s the key to a beautiful finish!
Step 2: Arrange and Core the Rolls
Properly Preparing the Hawaiian Rolls
With the pan ready, it’s time to arrange those delectable Hawaiian sweet rolls. Place all 12 rolls in the pan, keeping them snug but not squished.
Using a small knife, carefully cut an “X” into the top of each roll, going about two-thirds of the way down. The goal is to create a small well without cutting all the way through. Gently pull apart the quarters; this will hold all that creamy goodness!
Step 3: Make the Spiced Butter Topping
Creating the Flavorful Layer
Grab a small bowl and combine ⅓ cup of melted butter, light brown sugar, and ground cinnamon. If you’re feeling adventurous, add that pinch of nutmeg for an extra layer of flavor.
Mix until it’s well combined, then drizzle this delicious spiced butter topping evenly over the rolls. Let it seep down into those cuts; it’s where the magic happens!
Step 4: Prepare the Cheesecake Filling
Ensuring a Smooth Consistency
Next, it’s time to make the luscious cheesecake filling. In a medium bowl, beat the softened cream cheese until it’s perfectly smooth.
Add in the granulated sugar and beat it until well incorporated. Finally, stir in the lightly beaten egg. This mixture should be creamy and homogenous. It’s like a hug for your taste buds!
Step 5: Fill the Rolls
Techniques for Filling the Rolls
Now the fun part—filling the rolls! Transfer your cheesecake mixture into a piping bag, or use a zip-top bag with one corner snipped off.
Pipe the filling directly into the center of each roll’s “X.” Don’t be shy! Fill them slightly mounding in the middle. If you prefer, you can also use a spoon, just remember to press gently to fill the cavity.
Step 6: Bake
Achieving the Perfect Bake
Pop your baking pan in the preheated oven and let those beauties bake uncovered for 12 to 15 minutes.
At around 12 minutes, the rolls will be soft, and the filling should have set beautifully. For a crispier bottom, bake them for the full 15 minutes. Don’t forget—your filling should reach an internal temperature of at least 145°F (63°C).
Step 7: Rest and Serve
Tips for Serving
Once baked, let your danishes cool in the pan for about 2 to 3 minutes. This step is crucial! The filling will be molten hot straight from the oven. Serve them warm for the best experience. Trust me, your loved ones will be drooling!
Step 8: Store Leftovers
Best Practices for Storing
If by some miracle you have leftovers, congratulations!
Store these delightful pastries in an airtight container for up to 3 to 4 days. When you want to revisit your creation, simply reheat gently in the microwave or a toaster oven. This way, you can relive that breakfast bliss all over again!
Tips for Success
- Always preheat your oven for even baking.
- Use room temperature cream cheese for smoother mixing; it scrambles less.
- Don’t skip the cooling time! This prevents burns when filling your mouth.
- Experiment with add-ins like chocolate chips or berries in the filling.
- Keep an eye on baking time to avoid overbaking — you want soft rolls!
Equipment Needed
- 9×13-inch baking dish or rimmed sheet pan (a glass or ceramic dish works too)
- Mixing bowls (make sure to grab a medium and a small one)
- Small knife (for cutting the rolls)
- Piping bag or zip-top bag (to fill the rolls easily)
- Measuring spoons and cups (for precise ingredient amounts)
Variations on King’s Hawaiian Cheesecake Danish
- Fruit-Topped Delight: Add fresh berries or sliced bananas on top of the danishes before baking for a burst of fruity flavor.
- Chocolate Lovers: Mix in mini chocolate chips into the cheesecake filling for a rich and decadent touch.
- Nuts for Crunch: Sprinkle chopped pecans or walnuts over the top before baking for a delightful crunch.
- Lighten It Up: Use low-fat cream cheese or Greek yogurt in the filling for a lighter version, adjusting sweetness as needed.
- Spiced Variations: Experiment with flavored extracts like almond or coconut for a unique twist on the classic cheesecake taste.
Serving Suggestions for King’s Hawaiian Cheesecake Danish
- Pair with a steaming cup of coffee or tea for a perfect morning treat.
- Serve alongside fresh fruit salad for a refreshing contrast.
- Drizzle with a simple icing made of powdered sugar and milk for added sweetness.
- Garnish with a sprinkle of powdered sugar for a delicate touch.
- Present on a beautiful platter to impress guests during brunch!
FAQs about King’s Hawaiian Cheesecake Danish
I often get asked a few common questions about the King’s Hawaiian Cheesecake Danish. Here are some answers to help make your baking experience even smoother!
Can I use a different type of roll?
Absolutely! While Hawaiian sweet rolls offer unique sweetness and texture, you can substitute them with other soft rolls. Just keep an eye on the baking time, as other varieties might bake differently.
How can I make this recipe gluten-free?
To create a gluten-free version, use gluten-free sweet rolls and check that your cream cheese and other ingredients are gluten-free. Always read labels to be sure!
Can I prepare the filling ahead of time?
Yes, you can whip up the cream cheese filling a day in advance! Just store it in an airtight container in the fridge. This can save you precious time in the morning.
What toppings do you recommend?
I love fresh fruit toppings or a drizzle of icing! You can also sprinkle powdered sugar on top after baking. It not only adds sweetness but also gives your danish a beautiful finish!
How do I prevent overbaking?
Check your danishes around the 12-minute mark. The filling should be set, and the rolls should be soft but not browned. Overbaking can lead to a dry texture, which we definitely want to avoid!
Final Thoughts
Making the King’s Hawaiian Cheesecake Danish is like bringing a slice of paradise into your kitchen. With its soft, sweet rolls and luscious cheesecake filling, it’s a joyful recipe that turns any breakfast into a special occasion. I can still hear the delightful gasps from my family as they take their first bite! Whether you’re hosting a brunch or just treating yourself on a busy morning, this recipe is a game-changer. So why not sprinkle some love into your breakfast table? Trust me, this is one treat you won’t forget!
Enjoyed this recipe?
Discover more delicious recipes, save your favorites, and plan your meals with the Cooking Layer app.
Free to download • Fast and easy to use

King’s Hawaiian Cheesecake Danish
- Prep Time: 15 minutes
- Cook Time: 15 minutes
- Total Time: 30 minutes
- Yield: 12 servings 1x
- Category: Breakfast/Dessert
- Method: Baking
- Cuisine: Hawaiian/American
- Diet: Vegetarian
Description
King’s Hawaiian Cheesecake Danish transforms breakfast bliss with delightful sweetness and a creamy cheesecake filling.
Ingredients
- 12 Hawaiian sweet rolls
- 1 tbsp unsalted butter, melted
- ⅓ cup unsalted butter, melted
- 2 tbsp light brown sugar, packed
- ½ tbsp ground cinnamon
- ⅛ tsp ground nutmeg (optional)
- 8 oz full‑fat cream cheese
- 1 large egg, lightly beaten
- 3 tbsp granulated white sugar
Instructions
- Preheat and prepare pan – Set oven to 375°F (190°C). Brush the bottom of a 9×13‑inch baking dish or rimmed sheet pan with 1 tablespoon melted butter.
- Arrange and core rolls – Place all 12 rolls in the pan, keeping them close together. Using a small knife, cut an “X” into the top of each roll, going about two‑thirds of the way down. Do not cut through the bottom. Gently pull the four quarters slightly apart to create a small well.
- Make spiced butter topping – In a small bowl, combine ⅓ cup melted butter, brown sugar, cinnamon, and nutmeg. Pour evenly over the rolls, letting it seep into the cuts and around the bases.
- Prepare cheesecake filling – In a medium bowl, beat the softened cream cheese until completely smooth. Add granulated sugar and beat until incorporated. Stir in the beaten egg until the mixture is homogenous and creamy.
- Fill the rolls – Transfer the cream cheese mixture to a piping bag (or a zip‑top bag with one corner snipped off). Pipe the filling directly into the center of each roll’s “X” until slightly mounded. Alternatively, spoon the filling in, pressing gently to fill the cavity.
- Bake – Place the pan in the preheated oven and bake uncovered for 12–15 minutes. At 12 minutes, the rolls will be soft and the filling set. For a crispier bottom, bake up to 15 minutes. The internal temperature of the filling should reach at least 145°F (63°C) for 15 seconds.
- Rest and serve – Let the danishes cool in the pan for 2–3 minutes before serving. The filling will be very hot and fluid straight from the oven. Serve warm.
- Store leftovers – Refrigerate any remaining pastries in an airtight container for up to 3–4 days. Reheat gently in a microwave or toaster oven before serving.
Notes
- The danishes are best served warm and fresh from the oven.
- You can add fruit toppings or drizzle with icing for additional flavor.
- Ensure not to overbake to maintain the soft texture of the rolls.
Nutrition
- Serving Size: 1 Danish
- Calories: 220
- Sugar: 10g
- Sodium: 250mg
- Fat: 10g
- Saturated Fat: 6g
- Unsaturated Fat: 2g
- Trans Fat: 0g
- Carbohydrates: 27g
- Fiber: 1g
- Protein: 3g
- Cholesterol: 30mg


