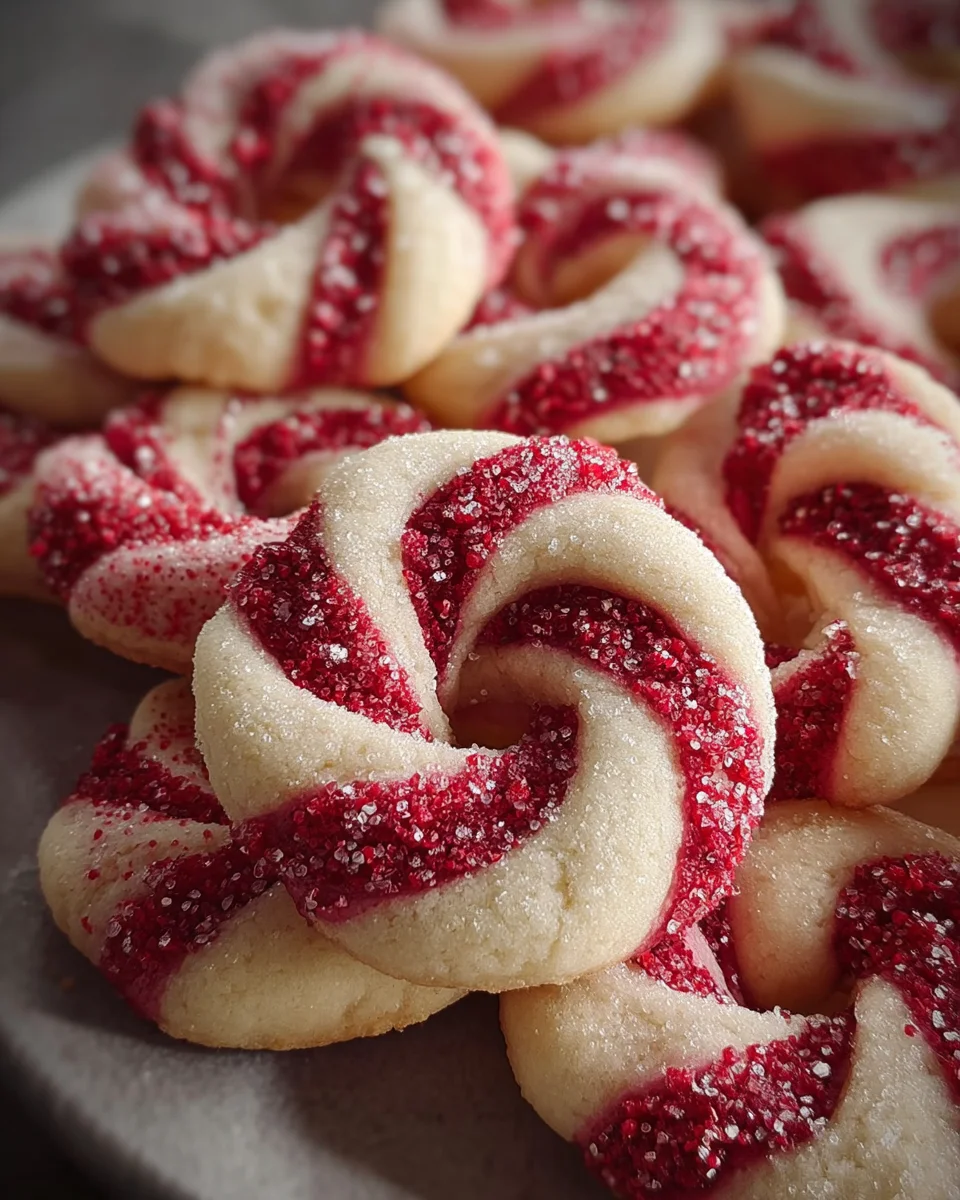
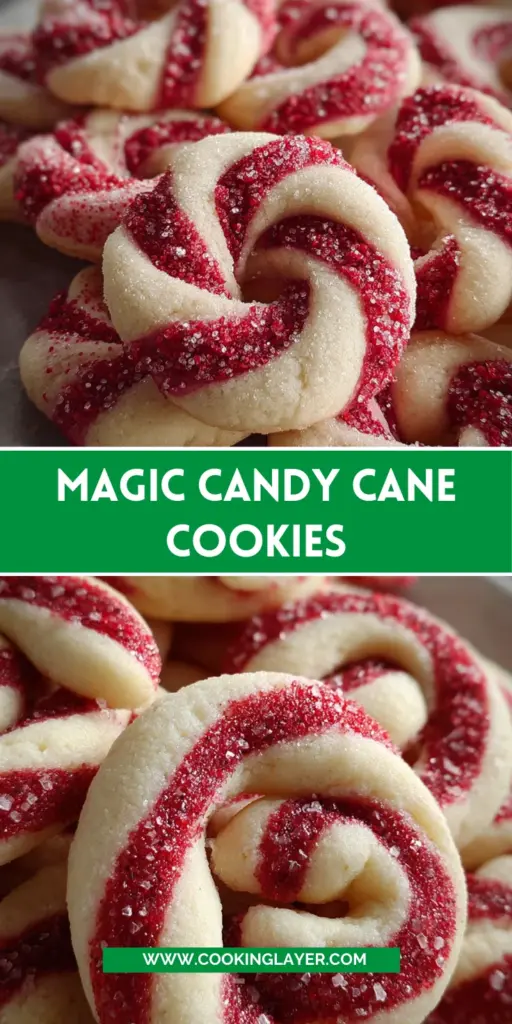
Introduction to Magic Candy Cane Cookies
As the holiday season approaches, I find myself reminiscing about the delicious treats that fill the air with festive joy. One of my absolute favorites to whip up are these delightful Magic Candy Cane Cookies. They’re not just pretty to look at; they bring the cheerful essence of Christmas right into your kitchen. If you’re a busy mom or a professional on the go, these cookies are the perfect solution for a last-minute dessert or to impress your loved ones at gatherings. Quick, fun to make, and oh-so-tasty, these little delights are sure to spread merry vibes!
Why You’ll Love This Magic Candy Cane Cookies
These Magic Candy Cane Cookies are truly a holiday favorite, and here’s why you’ll adore them! First, they’re incredibly easy and quick to make, fitting perfectly into your busy schedule. The sweet peppermint flavor mixed with buttery richness creates a delectable treat that’s hard to resist. Plus, the cheerful red and white swirls add a festive flair to your dessert table, making them a visual delight. What’s not to love?
Save this recipe and cook smarter
Keep your favorite Cooking Layer recipes in one place, plan your weekly meals, and quickly find dinner ideas whenever you need them.
Free to download • Fast and easy to use
Ingredients for Magic Candy Cane Cookies
Gathering your ingredients is half the fun in baking these cheerful Magic Candy Cane Cookies! Here’s what you’ll need:
- Unsalted butter: Soften it to get that creamy texture. It’s the base that makes our cookies rich and buttery.
- Powdered sugar: This adds sweetness and a touch of delicacy to the cookies. It blends smoothly into the butter like a dream.
- Egg: A large egg at room temperature helps bind the ingredients together and adds moisture.
- Vanilla extract: A dash of this magical essence elevates the flavor profile, giving your cookies that warm, homey taste.
- Peppermint extract: This is the pièce de résistance! Adjust the amount depending on how festive you want those minty notes to shine.
- All-purpose flour: The backbone of our dough, giving structure without weighing it down. You can also use a gluten-free blend if needed!
- Salt: A pinch enhances all the other flavors, making those sweet notes pop.
- Red gel food coloring: For that iconic candy cane look, this gel coloring lets you control just how vibrant you want your cookies to be.
How to Make Magic Candy Cane Cookies
Now comes the fun part! Making these delightful Magic Candy Cane Cookies is a joyous adventure in your kitchen. I’ve broken it down into simple steps so you can enjoy every moment of baking. Let’s get started!
Step 1: Cream Butter and Sugar
Begin by placing the softened butter and powdered sugar in a mixing bowl. Beat them together until the mixture is smooth and fluffy. This is where the magic starts! You’re creating a base that’s rich and airy, perfect for our cookies.
Step 2: Add Egg and Extracts
Next, crack in the large egg along with the vanilla and peppermint extracts. Mix until everything is fully combined and creamy. The extracts bring in that delightful flavor, and trust me, you’ll want it in every bite!
Step 3: Combine Dry Ingredients
In a separate bowl, whisk together the all-purpose flour and salt. Gradually add this dry mixture to the wet ingredients. Mix until a soft dough forms. If the dough looks crumbly, don’t worry! Just keep mixing until it comes together. Use this time to sneak a taste of the dough—delicious!
Step 4: Color the Dough
Now, divide your dough in half. Tint one half with the red gel food coloring, kneading it until you achieve your desired shade. This step is like painting; the more vibrant your color, the more festive your cookies will be!
Step 5: Chill the Dough
Wrap each portion of dough in plastic wrap. Pop them in the fridge for about an hour. Chilling helps firm up the dough, making it easier to shape. It’s the perfect time to sip on some hot cocoa while you wait!
Step 6: Preheat the Oven
While the dough chills, go ahead and preheat your oven to 180°C (350°F). This ensures that when those cookies hit the oven, they’ll bake evenly and perfectly. Get your baking sheets lined with parchment paper—your festive creation is almost ready!
Step 7: Shape the Cookies
Once the dough has chilled, roll equal portions of the red and white dough into thin ropes. Twist them together and shape into candy cane forms. It’s like creating a fun little art project right in your kitchen. Don’t stress if they aren’t perfect, they’ll all taste amazing!
Step 8: Bake and Cool
Place your beautifully shaped cookies on the parchment-lined baking sheet. Bake them for about 8 to 10 minutes, or until they’re set but not browned. Let them cool for a few minutes on the tray before transferring them to a wire rack. The aroma that fills the kitchen is pure holiday magic!
Tips for Success
- Always ensure your butter is at room temperature for easier mixing.
- Adjust the peppermint extract based on personal taste; a little goes a long way!
- Chill the dough thoroughly to make shaping the cookies a breeze.
- Check your cookies at the lower baking time to avoid over-baking.
- For a fun twist, sprinkle crushed peppermint on top before baking!
Equipment Needed
- Mixing bowl: A large bowl will do; you can use a stand mixer or a handheld one.
- Measuring cups and spoons: For precise ingredient measurements; a kitchen scale is an option too!
- Baking sheet: Line it with parchment paper; any flat tray works in a pinch.
- Plastic wrap: To chill the dough; use a reusable silicone bag as an alternative.
- Wire rack: Perfect for cooling cookies; a plate works if you don’t have one!
Variations of Magic Candy Cane Cookies
- Chocolate Drizzle: After baking, drizzle melted chocolate over the cooled cookies for an extra decadent treat.
- Gluten-Free Option: Substitute all-purpose flour with a 1:1 gluten-free baking blend to make these cookies suitable for gluten-sensitive folks.
- Vegan Twist: Replace butter with coconut oil and the egg with a flaxseed meal mixture (1 tablespoon flaxseed meal + 3 tablespoons water) for a vegan version.
- Mint Chocolate: Add mini chocolate chips to the dough for a delightful chocolate-mint surprise in every bite.
- Spice it Up: Incorporate a pinch of ground cinnamon or nutmeg for a warm, holiday spice flavor in your cookies.
Serving Suggestions for Magic Candy Cane Cookies
- Serve with a steaming cup of hot chocolate for the ultimate cozy treat.
- Pair with peppermint tea to enhance those festive flavors while unwinding.
- Presentation tip: arrange on a vibrant platter, garnishing with crushed candy canes for extra cheer.
- Wrap in clear bags tied with a red ribbon for delightful holiday gifts.
FAQs about Magic Candy Cane Cookies
Have questions about making these festive Magic Candy Cane Cookies? You’re not alone! Here are some common inquiries that might pop up while you’re baking.
Can I make the dough ahead of time? Yes! You can prepare the dough a day in advance and store it in the refrigerator. Just remember to wrap it tightly in plastic wrap to maintain freshness.
How do I store these cookies? To keep your cookies fresh, store them in an airtight container at room temperature. They should stay delicious for about a week—if they last that long!
Can I freeze Magic Candy Cane Cookies? Absolutely! Once baked and cooled, these cookies can be frozen. Place them in a single layer in a freezer-safe container, separating layers with parchment paper. They can last for up to three months.
What can I do if my dough is too sticky? If you find the dough too sticky to shape, add a bit more flour, a tablespoon at a time, until it’s manageable. Just be cautious not to add too much flour, as it can affect the texture.
How do I color the dough without staining my hands? Wearing disposable gloves can help keep your hands clean while kneading in the gel food coloring. This way, you won’t have to worry about pink-tinted hands while making your festive treats!
Final Thoughts
Baking these Magic Candy Cane Cookies is more than just a recipe; it’s a celebration of joy and togetherness. The delightful aroma that fills your home creates a warm atmosphere, perfect for sharing with family and friends. Just imagine the smiles on their faces as they enjoy these sweet, festive treats! As you create each candy cane masterpiece, you’ll find that this simple act of baking becomes a cherished memory. So roll up your sleeves and dive in—these cookies are sure to spark joy and become a holiday tradition for years to come!
Enjoyed this recipe?
Discover more delicious recipes, save your favorites, and plan your meals with the Cooking Layer app.
Free to download • Fast and easy to use

Magic Candy Cane Cookies
- Prep Time: 15 minutes
- Cook Time: 10 minutes
- Total Time: 1 hour 25 minutes
- Yield: 24 cookies 1x
- Category: Dessert
- Method: Baking
- Cuisine: American
- Diet: Vegetarian
Description
Delicious and festive Magic Candy Cane Cookies, perfect for the holiday season.
Ingredients
- 225 g unsalted butter, softened
- 120 g powdered sugar
- 1 large egg, at room temperature
- 1 teaspoon vanilla extract
- 0.5 teaspoon peppermint extract
- 315 g all-purpose flour
- 0.5 teaspoon salt
- Red gel food coloring
Instructions
- Beat the softened butter with powdered sugar until the mixture is smooth and fluffy.
- Mix in the egg along with vanilla and peppermint extracts until fully combined.
- In a separate bowl, whisk together flour and salt. Gradually add the dry mixture to the wet ingredients, mixing until a soft dough forms.
- Divide the dough in half. Tint one half with red gel food coloring until desired shade is achieved. Wrap each portion in plastic and chill for 1 hour.
- Preheat the oven to 180°C.
- Roll equal portions of red and white dough into thin ropes. Twist together and shape into candy cane forms.
- Place shaped dough on a parchment-lined baking sheet. Bake for 8 to 10 minutes, or until set but not browned. Cool on trays before serving.
Notes
- Ensure the butter is softened for easy mixing.
- Adjust the peppermint extract to taste for stronger flavor.
- Chilling the dough helps in shaping the cookies easily.
Nutrition
- Serving Size: 1 cookie
- Calories: 120
- Sugar: 6 g
- Sodium: 40 mg
- Fat: 6 g
- Saturated Fat: 4 g
- Unsaturated Fat: 2 g
- Trans Fat: 0 g
- Carbohydrates: 15 g
- Fiber: 0 g
- Protein: 1 g
- Cholesterol: 20 mg