
A Creamy, Fruity, Old-Fashioned Dessert Everyone Loves
There’s something magical about a classic banana split transformed into a chilled, layered dessert. This No-Bake Banana Split Dessert brings together everything people love about the famous ice cream treat—sweet bananas, juicy strawberries, crushed pineapple, fluffy whipped topping, crunchy nuts, and chocolate drizzle—but in an easy-to-make dessert bar form that doesn’t require turning on the oven. It’s rich without being too heavy, refreshing without being overly sweet, and incredibly simple to prepare ahead of time for parties, holidays, potlucks, or summer gatherings.
What makes this dessert truly special is the balance of textures and flavors. The buttery graham cracker crust creates the perfect crunchy base, while the cream cheese layer adds a silky richness that ties all the fruit together. Every bite tastes nostalgic, almost like something straight from a family cookbook that gets passed around at reunions and birthday celebrations. Because it’s chilled for several hours before serving, the layers settle beautifully, giving you clean slices with stunning presentation.
Save this recipe and cook smarter
Keep your favorite Cooking Layer recipes in one place, plan your weekly meals, and quickly find dinner ideas whenever you need them.
Free to download • Fast and easy to use
Another reason this recipe stands out is its flexibility. You can customize the toppings, swap fruits, or even make it slightly lighter depending on your preferences. It’s one of those desserts that looks impressive on the table but secretly takes very little effort. If you’re searching for an easy crowd-pleasing dessert that feels both retro and timeless, this recipe checks every box.
Recipe Overview
| Detail | Information |
|---|---|
| Prep Time | 25 minutes |
| Chill Time | 4 hours minimum |
| Total Time | About 4 hours 25 minutes |
| Servings | 12–15 squares |
| Difficulty | Easy |
| Best Served | Cold |
Ingredients
For the Crust
- 2 cups graham cracker crumbs
- 1/2 cup melted butter
- 1/4 cup granulated sugar
For the Cream Layer
- 2 (8 oz) blocks cream cheese, softened
- 1 cup powdered sugar
- 1 teaspoon vanilla extract
- 1 (8 oz) whipped topping (such as Cool Whip)
For the Fruit Layers
- 3–4 bananas, sliced
- 1 (20 oz) can crushed pineapple, very well drained
- 1 cup strawberry pie filling or mashed sweetened strawberries
For the Topping
- 1–2 cups whipped topping
- Chocolate syrup
- 1/2 cup chopped peanuts or walnuts
- Maraschino cherries
Why This No-Bake Dessert Works So Well
The Perfect Combination of Creamy and Crunchy
One of the biggest reasons people fall in love with this dessert is the contrast between textures. The crust has a buttery crunch that supports the softer layers above it without becoming soggy too quickly. The cream cheese filling is smooth and airy, while the fruit adds freshness and natural sweetness. Then, the whipped topping and crunchy nuts on top create that classic banana split experience everyone recognizes instantly.
Unlike many layered desserts that become overly dense, this recipe stays light because of the whipped topping folded into the cream layer. That small detail changes everything. It creates a mousse-like texture that practically melts in your mouth while still holding its shape beautifully after chilling.
A Make-Ahead Dream Dessert
Some desserts are stressful because they require last-minute preparation. This one actually gets better as it sits in the refrigerator. Overnight chilling allows the flavors to blend together while firming up the layers for cleaner slicing. That makes it ideal for birthdays, cookouts, holiday dinners, baby showers, and weekend gatherings.
Because the dessert is served cold, it’s especially popular during warmer months. You can make it the night before and simply garnish before serving. Easy recipes that save time while still looking impressive are always winners, and this dessert delivers exactly that.
Step-by-Step Instructions
Step 1: Prepare the Graham Cracker Crust
In a medium-sized mixing bowl, combine the graham cracker crumbs, melted butter, and granulated sugar. Stir until every crumb is coated and the mixture resembles damp sand. When pressed between your fingers, it should hold together easily without crumbling apart.
Transfer the crumb mixture into a 9×13-inch glass baking dish. Use the bottom of a measuring cup or glass to firmly press the crust into an even layer. Pay extra attention to the corners because uneven crust thickness can affect slicing later.
Place the dish into the refrigerator for about 20–30 minutes. Chilling helps the butter firm up, which creates a sturdier crust capable of supporting the creamy filling.
A properly prepared crust is the foundation of this dessert. If it’s too loose, the bars may fall apart during serving. Taking a few extra minutes to compact it firmly makes a huge difference in the final result.
Step 2: Make the Cream Cheese Layer
In a large bowl, beat the softened cream cheese using a hand mixer until completely smooth. This step matters more than people realize. Any lumps left in the cream cheese will remain visible in the finished dessert, so continue mixing until silky.
Add powdered sugar and vanilla extract, then beat again until creamy and fluffy. Once smooth, gently fold in the whipped topping using a spatula rather than a mixer. Folding keeps the mixture airy and light instead of dense.
Spread the cream layer evenly over the chilled crust. Work slowly and carefully so the crust stays intact underneath. An offset spatula works especially well for smoothing the surface neatly.
This layer acts almost like the “ice cream” portion of a banana split. It’s rich, sweet, slightly tangy from the cream cheese, and balances the fruit layers perfectly.
Step 3: Add the Banana Layer
Slice the bananas into evenly sized rounds. Slightly firm bananas work best because overly ripe bananas become mushy and may brown quickly.
Arrange banana slices around the outer edges of the dish first. This creates beautiful visible layers when the dessert is sliced. After lining the edges, distribute the remaining banana slices evenly across the cream layer.
Bananas are the heart of any banana split dessert, so using fresh fruit makes a noticeable difference. Their natural sweetness pairs beautifully with the tangy cream cheese and juicy pineapple.
If you’re preparing the dessert far ahead of time, lightly brushing the banana slices with lemon juice can help slow browning. Don’t overdo it though—you want the bananas to stay sweet without a strong citrus flavor.
Step 4: Add the Pineapple Layer
Drain the crushed pineapple extremely well before adding it to the dessert. This is one of the most important steps in the entire recipe. Excess liquid can make the layers watery and prevent the dessert from setting properly.
Spread the drained pineapple evenly over the bananas. Use a spoon to gently distribute it without pressing down too firmly. Keeping the layers light helps preserve the dessert’s fluffy texture.
The pineapple brings brightness and acidity that balances the sweetness of the other ingredients. It also adds a refreshing tropical flavor that makes the dessert taste lighter than many traditional cream-based desserts.
Fresh pineapple can technically be used, but canned crushed pineapple usually works better because the texture is softer and more evenly distributed.
Step 5: Add the Strawberry Layer
Spoon the strawberry pie filling over the pineapple layer and gently spread it out. If using mashed sweetened strawberries instead, make sure they’re thick enough not to become runny.
This layer gives the dessert its signature banana split flavor profile. The strawberries add vibrant color and fruity sweetness that pairs perfectly with chocolate syrup later on.
Try not to overmix the fruit layers while spreading. Keeping each layer distinct creates a more visually appealing dessert and helps maintain those beautiful clean slices when serving.
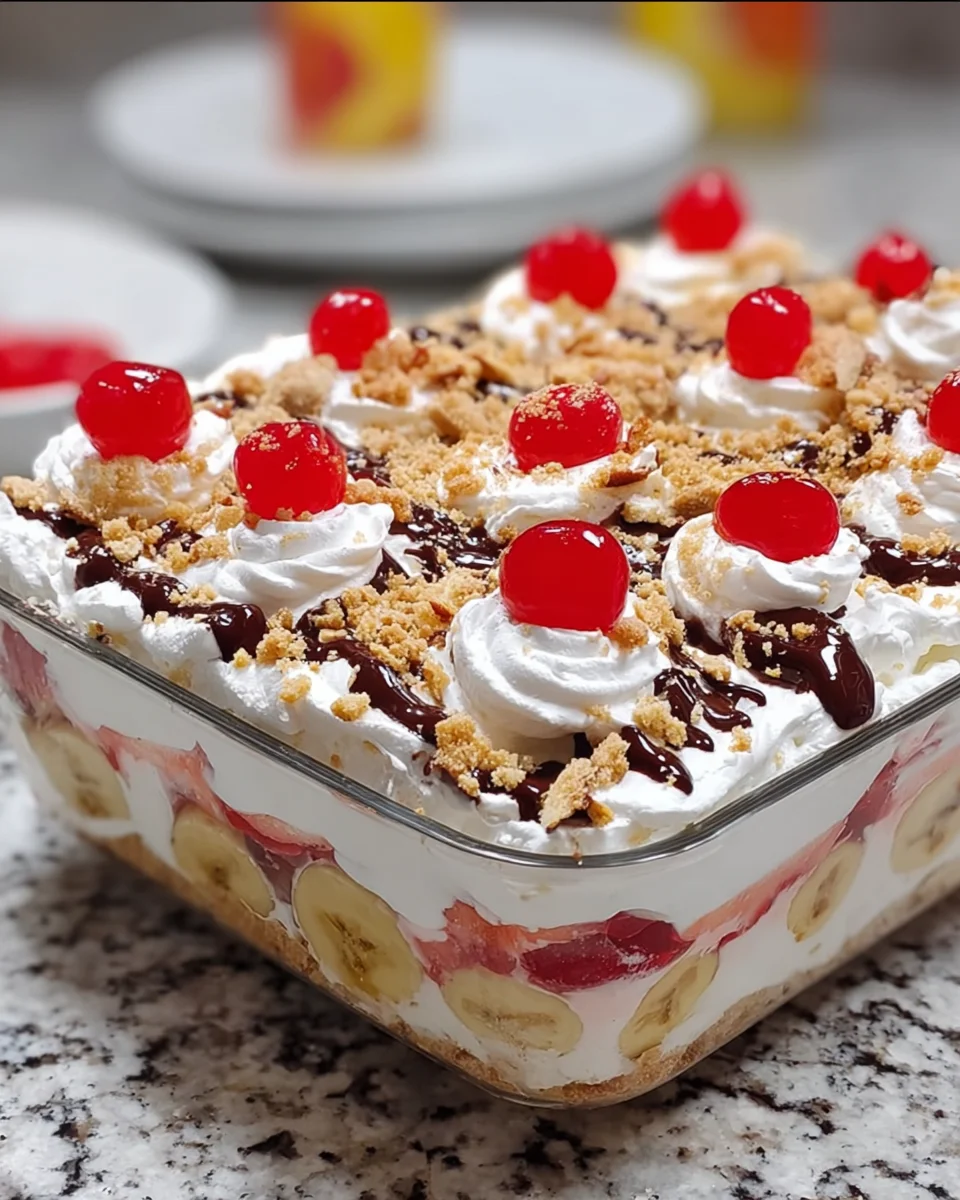
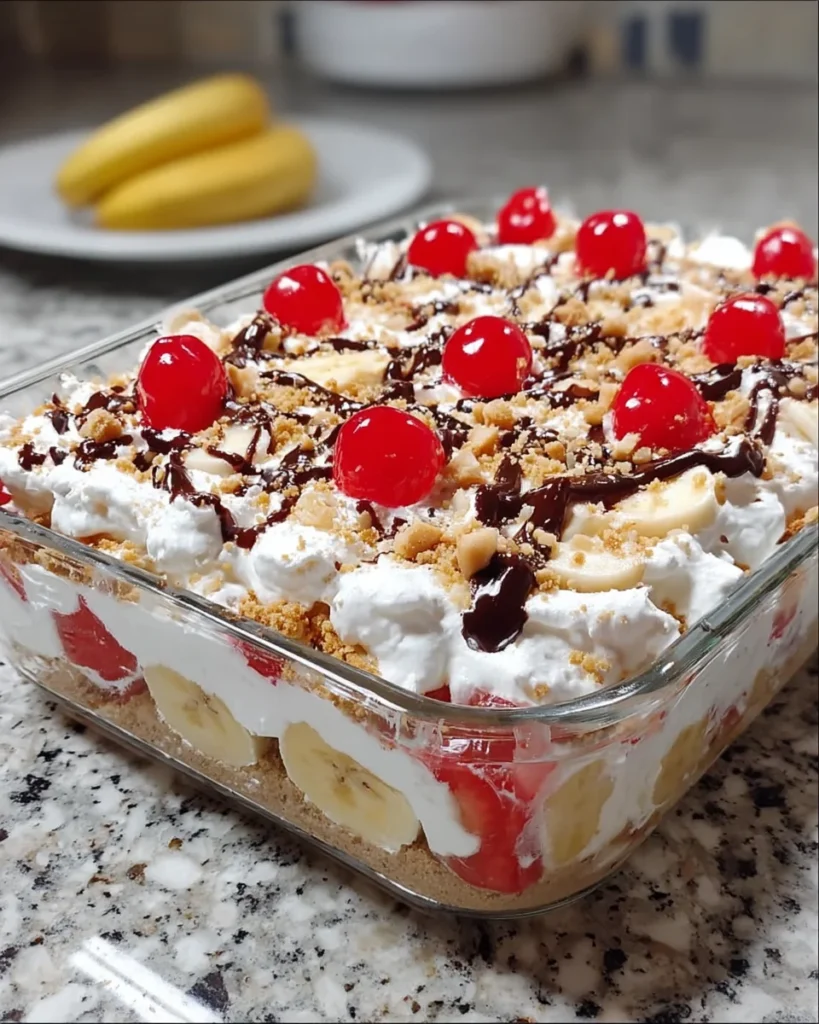
The contrast between the red strawberries, yellow bananas, and white cream filling makes this dessert especially eye-catching on a dessert table.
Step 6: Finish with Toppings
Spread a generous layer of whipped topping across the entire dessert. Create soft swirls with a spatula for a bakery-style appearance.
Drizzle chocolate syrup generously over the whipped topping. Then sprinkle chopped peanuts or walnuts evenly across the surface. Finally, top with maraschino cherries placed strategically for that classic banana split look.
These toppings transform the dessert from simple layered bars into a true banana split experience. The chocolate adds richness, the nuts provide crunch, and the cherries bring color and nostalgia.
If serving for a special occasion, you can even add rainbow sprinkles or mini chocolate chips for extra flair.
Chilling and Serving Tips
Why Overnight Chilling Is Best
Technically, the dessert can be served after about four hours of chilling, but overnight refrigeration produces the best texture. During that time, the layers firm up properly and the flavors meld together beautifully.
A fully chilled dessert slices more cleanly and holds its shape much better on serving plates. The crust also softens slightly while still maintaining enough structure for easy serving.
When cutting, use a sharp knife and wipe it clean between slices. This simple trick helps create neat, professional-looking squares.
Because the dessert is served cold, it stays refreshing even on hot summer days. That’s one reason it’s such a popular choice for outdoor gatherings and family cookouts.
Variations and Creative Twists
Chocolate Lovers Version
Add mini chocolate chips between layers or drizzle melted chocolate between the fruit sections for an even richer dessert. Chocolate graham crackers can also replace traditional graham crumbs for a deeper cocoa flavor.
Tropical Banana Split Dessert
Swap strawberries for mango or cherries and add toasted coconut flakes on top. This creates a tropical-inspired version perfect for summer parties.
Lighter Version
Use reduced-fat cream cheese, sugar-free whipped topping, and fresh strawberries instead of pie filling to reduce calories while keeping the dessert delicious.
Nut-Free Alternative
Simply skip the nuts if allergies are a concern. Crushed pretzels or granola can provide crunch without using nuts.
Common Mistakes to Avoid
| Mistake | Why It Matters | Solution |
|---|---|---|
| Not draining pineapple enough | Creates watery layers | Drain thoroughly using paper towels |
| Using warm cream cheese | Causes lumps | Soften fully before mixing |
| Skipping chill time | Dessert won’t set properly | Chill at least 4 hours |
| Using overripe bananas | Texture becomes mushy | Choose slightly firm bananas |
| Pressing layers too hard | Compacts dessert excessively | Spread gently |
Storage Instructions
This dessert should always be stored covered in the refrigerator. It stays freshest for about 2–3 days, though the bananas may gradually soften over time.
Freezing is possible, but the texture changes slightly after thawing because of the fruit and whipped topping. For best results, enjoy it fresh from the refrigerator.
If preparing ahead for an event, adding the chocolate drizzle and cherries shortly before serving helps maintain the prettiest presentation.
What to Serve with Banana Split Dessert
Because this dessert is rich and creamy, it pairs beautifully with lighter beverages like:
- Iced coffee
- Cold brew
- Lemonade
- Unsweetened iced tea
- Fresh fruit punch
For parties, serving small squares works best because the dessert is quite satisfying. Many guests go back for seconds anyway.
Conclusion
This No-Bake Banana Split Dessert combines nostalgic flavors, creamy textures, and vibrant fruit layers into one incredibly easy dessert that always impresses. It captures everything people love about a classic banana split while transforming it into a chilled make-ahead treat perfect for sharing. From the buttery graham cracker crust to the fluffy cream cheese filling and colorful toppings, every layer brings something delicious to the table.
The beauty of this recipe lies in its simplicity. No oven, no complicated techniques, and no fancy ingredients—just straightforward comfort food that tastes amazing every single time. Whether you’re making it for a summer barbecue, birthday celebration, holiday gathering, or casual weekend dessert, it’s almost guaranteed to disappear quickly.
Once you make it, there’s a good chance it’ll become one of those reliable recipes everyone requests again and again.
FAQs
1. Can I make this dessert a day ahead?
Yes, and it actually tastes better after chilling overnight because the layers set more firmly and the flavors blend together beautifully.
2. How do I keep bananas from turning brown?
Using slightly firm bananas helps, and you can lightly brush slices with lemon juice to slow browning without affecting flavor too much.
3. Can fresh whipped cream replace Cool Whip?
Absolutely. Stabilized homemade whipped cream works wonderfully and gives the dessert a richer homemade flavor.
4. What’s the best way to drain crushed pineapple?
Place the pineapple in a fine mesh strainer and press gently with paper towels or the back of a spoon to remove excess liquid thoroughly.
5. Can I use a different crust?
Yes. Vanilla wafer crumbs, Oreo crumbs, or shortbread cookie crumbs all make excellent alternatives to graham crackers.
Print
No-Bake Banana Split Dessert
Ingredients
For the Crust
2 cups graham cracker crumbs
1/2 cup melted butter
1/4 cup granulated sugar
For the Cream Layer
2 (8 oz) blocks cream cheese, softened
1 cup powdered sugar
1 teaspoon vanilla extract
1 (8 oz) whipped topping (like Cool Whip)
For the Fruit Layers
3–4 bananas, sliced (slightly firm works best)
1 (20 oz) can crushed pineapple, very well drained
1 cup strawberry pie filling or mashed sweetened strawberries
For the Topping
1–2 cups whipped topping
Chocolate syrup (for drizzling)
1/2 cup chopped peanuts or walnuts
Maraschino cherries
Instructions
Prepare the Crust
In a bowl, mix graham cracker crumbs, melted butter, and sugar until evenly combined. The texture should resemble damp sand. Press the mixture firmly into a 9×13-inch glass dish, making sure it’s even and compact, especially in the corners. Chill in the refrigerator for 20–30 minutes until set.
Make the Cream Layer
In a large mixing bowl, beat the softened cream cheese until completely smooth and free of lumps. Add powdered sugar and vanilla extract, then mix until creamy. Gently fold in the whipped topping until light and fluffy.
Assemble the Base Layers
Spread the cream mixture evenly over the chilled crust. Take your time to smooth it out without disturbing the crust underneath.
Add the Banana Layer
Arrange banana slices along the edges of the dish first (this creates that pretty layered look when sliced), then spread the remaining slices evenly across the surface.
Add Pineapple Layer
Spread the well-drained crushed pineapple evenly over the bananas. Avoid pressing too hard to keep layers intact.
Add Strawberry Layer
Spoon and spread the strawberry filling over the pineapple layer. Keep it even but don’t overmix the layers.
Top It Off
Spread a thick layer of whipped topping across the entire dessert. Drizzle generously with chocolate syrup, sprinkle chopped nuts, and place cherries evenly across the top.
Chill and Set
Refrigerate for at least 4 hours, but overnight is best for clean slices and fully set layers.
Serve Cold
Slice into squares and serve chilled. Use a clean knife between cuts for neat layers.
Enjoyed this recipe?
Discover more delicious recipes, save your favorites, and plan your meals with the Cooking Layer app.
Free to download • Fast and easy to use


