
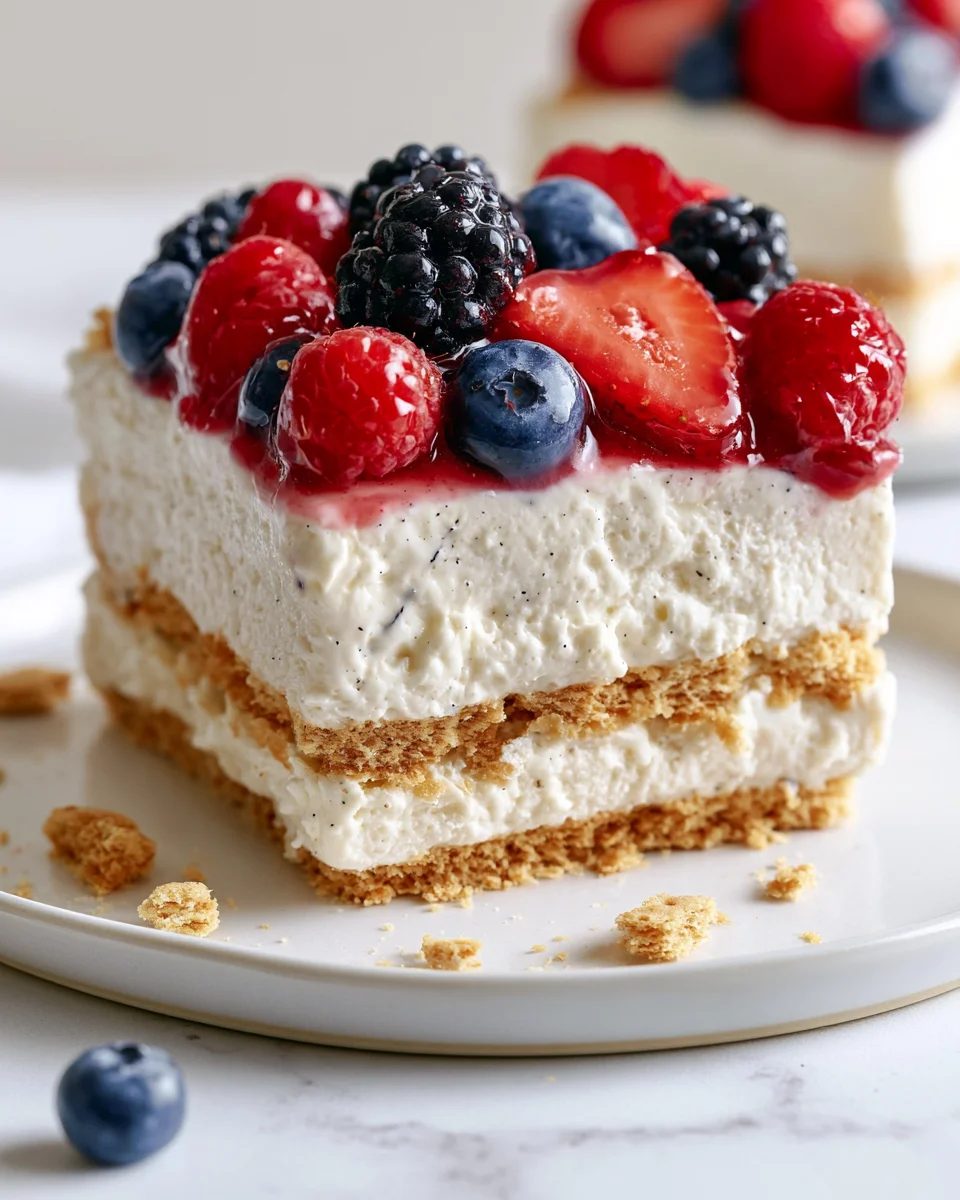
Introduction to No-Bake Berry Icebox Cake
As the sun shines brighter and the days get longer, I crave simple, refreshing desserts that can be made without breaking a sweat. Enter the No-Bake Berry Icebox Cake! This delightful treat is a lifesaver for busy moms and professionals like us. With layers of luscious cream, fresh berries, and graham crackers, it makes for an impressive dish at any gathering. Plus, no oven is needed, so you can keep your kitchen cool while creating something that feels special. Trust me, the compliments will pour in just like the summer sun!
Why You’ll Love This No-Bake Berry Icebox Cake
This No-Bake Berry Icebox Cake is the ultimate summer dessert for anyone on the go. It’s quick to assemble, allowing you to whip up a treat in just 30 minutes, leaving more time to relax. The creamy layers paired with fresh berries create a symphony of flavors that dance on your palate. Plus, it’s always a crowd-pleaser, making it a go-to for parties, picnics, or just a cozy night in!
Ingredients for No-Bake Berry Icebox Cake
Gathering the right ingredients is the first step towards crafting this magical No-Bake Berry Icebox Cake. It isn’t just about the berries; each component plays a vital role in creating that beloved creamy texture and delightful taste. Here’s what you’ll need:
- Heavy whipping cream: The star of the show, this makes your cake decadently creamy.
- Powdered sugar: A touch of sweetness that dissolves perfectly, leaving no graininess.
- Vanilla extract: This adds a lovely depth of flavor that complements the berries.
- Cream cheese: Softened for an ultra-smooth filling; it gives a rich taste.
- Vanilla instant pudding mix: A magical ingredient that fortifies the filling and gives it that fantastic flavor.
- Cold milk: Helps to combine the pudding mix with cream cheese, creating that perfect consistency.
- Graham crackers: These crunchy layers provide a lovely contrast to the creamy filling.
- Fresh strawberries: Sweet, vibrant, and essential for that summery flavor. Use a combo of sliced and whole for presentation.
- Fresh blueberries: These are a burst of flavor and add a pop of color.
- White chocolate chips: Melted and drizzled on top for a sweet finishing touch.
Feeling creative? You can easily switch out the fruits with your favorites, like raspberries or peaches, depending on what’s in season. There are no strict rules here! Check out the bottom of the article for specific measurements if you’re ready to get started.
How to Make No-Bake Berry Icebox Cake
Creating this No-Bake Berry Icebox Cake is a delightful adventure. It’s as simple as layering goodness together! Follow these steps, and trust me, you’ll be the star of your next summer gathering.
Step 1: Prepare the Whipped Cream
Start by pouring the chilled heavy whipping cream into a large mixing bowl. Add in the powdered sugar and vanilla extract. Whip them together with an electric mixer on high speed. Keep going until stiff peaks form — think of fluffy clouds! This step is crucial because the whipped cream adds airiness to our dessert. Once you’ve achieved this, set the whipped cream aside gently.
Step 2: Make the Cream Cheese Mixture
In another bowl, toss in your softened cream cheese. Use the mixer to beat it until it’s perfectly smooth. This should feel as easy as spreading butter on warm toast! Next, sprinkle in the vanilla instant pudding. Slowly pour in about half of the cold milk, while mixing. Keep blending until well combined. Once it’s all mixed together seamlessly, now it’s time to add the remaining milk. Blend until you adore the texture!
Step 3: Layer the Dessert
The fun really begins here! Grab a 13 x 9-inch casserole dish and spread a thin layer of the creamy filling on the bottom. This small act will help anchor the first layer of graham crackers. Now, create your first layer of graham crackers. Don’t be afraid to break them to fit! Spread one third of the cream mixture over those crackers, like icing a cake.
Next, carefully arrange one layer of sliced strawberries over the filling. Scatter about one cup of blueberries in the gaps like tiny jewels. This colorful addition not only adds sweetness but also makes it visually stunning! Repeat the layering — graham crackers, filling, more strawberries, and blueberries until you reach the last stage. Finish with that lovely layer of cream mixture as the crowning glory!
Step 4: Final Touches and Refrigeration
Now for the finishing touches that will excite everyone’s taste buds! Grab those remaining strawberry halves and whole blueberries to decorate the top. Drizzle melted white chocolate chips over the garnished delight — because every dessert deserves a little sparkle. Now, cover your cake with plastic wrap and place it in the fridge for at least six hours, or even better, overnight. This chilling time lets the flavors melt into one another beautifully.
Once it’s set, you’ll have a spectacular dessert that’s just waiting to be enjoyed!
Tips for Success
- Use chilled tools for the whipped cream to help it whip up faster.
- Feel free to swap berries based on your family’s favorites.
- For a lighter version, substitute half of the cream with Greek yogurt.
- Make sure your cream cheese is softened for easy mixing.
- Always let the cake chill overnight for the best flavor and texture.
Equipment Needed
- Mixing bowls: Use a large bowl for whipping cream and another for mixing the cream cheese. Any size works, but metal bowls keep things cool.
- Electric mixer: A hand mixer is perfect, but a stand mixer saves you effort and gets the job done.
- 13 x 9-inch casserole dish: This is the ideal size for layering; a similar-sized dish can also work in a pinch.
- Spatula: A rubber spatula helps with folding in the whipped cream without losing air.
- Plastic wrap: Needed for covering your dessert while it chills in the fridge.
Variations of No-Bake Berry Icebox Cake
- Chocolate Lovers: Swap out some graham crackers for chocolate wafers for a rich chocolatey twist.
- Berry Medley: Use a mix of your favorite berries—raspberries, blackberries, or even peaches for a vibrant combination.
- Gluten-Free Option: Substitute traditional graham crackers with gluten-free options for a treat everyone can enjoy.
- Yogurt Delight: Replace half the heavy cream with Greek yogurt for a tangy twist and added protein.
- Oreo Delight: Crush Oreo cookies and sprinkle them between layers for a delightful crunch and chocolatey flavor.
- Citrus Zest: Add a sprinkle of lemon or lime zest to the cream cheese mixture for a refreshing zing.
Serving Suggestions for No-Bake Berry Icebox Cake
- Pair with a scoop of vanilla ice cream for a lovely creamy contrast.
- Serve alongside iced tea or sparkling lemonade to brighten up those summer days.
- Garnish with fresh mint leaves for an inviting touch.
- Present it on a colorful platter for a festive look at gatherings.
- For added elegance, sprinkle some crushed nuts for a delightful crunch.
FAQs about No-Bake Berry Icebox Cake
Can I use frozen berries instead of fresh?
Absolutely! While fresh berries bring vibrant flavor, frozen berries work well too. Just thaw them and drain the excess liquid to prevent a soggy cake.
How long can I store the No-Bake Berry Icebox Cake?
You can keep it in the fridge for about 3-4 days. Just make sure it’s well-covered to maintain its freshness!
Do I need to use cream cheese?
If you’re not a fan, you can substitute it with a creamy yogurt or mascarpone cheese. However, it might alter the flavor and texture a bit!
Can I prepare the cake in advance?
Yes! In fact, it’s best when made a day ahead. The longer it sits, the more the flavors blend, resulting in a masterpiece!
Is the No-Bake Berry Icebox Cake suitable for a gluten-free diet?
Yes! Just swap the regular graham crackers with gluten-free ones, and you’re good to go!
Final Thoughts
There’s something truly magical about creating a No-Bake Berry Icebox Cake. Each layer holds a sweet memory, a shared moment, and a refreshing burst of summer flavor. This dessert isn’t just about satisfying a sweet tooth; it brings family and friends together, sparking joy with every chilled slice. I love serving it during gatherings, watching faces light up with delight. As you create this masterpiece, remember: it’s not just about the cake, but the happiness it brings. So grab those berries, whip that cream, and dive into a summer filled with laughter and delicious sweetness!
Print
No-Bake Berry Icebox Cake
- Prep Time: 30 minutes
- Cook Time: 0 minutes
- Total Time: 6 hours 30 minutes
- Yield: 12 servings 1x
- Category: Dessert
- Method: No-Bake
- Cuisine: American
- Diet: Vegetarian
Description
A refreshing no-bake dessert featuring layers of cream, berries, and graham crackers, perfect for summer.
Ingredients
- 3 cups (720 ml) heavy whipping cream
- 1/3 cup (40 grams) powdered sugar
- 2 teaspoons vanilla extract
- 8 oz. (226 grams) cream cheese-softened
- 2 (3.4 oz.) boxes vanilla instant pudding mix
- 2 1/2 cups (600 ml) cold milk
- 14 oz. (400 grams) graham crackers
- 2 lb. (900 grams) fresh strawberries ( 1 lb. thinly sliced and 1 lb. sliced in half)
- about 3 cups (400 grams) fresh blueberries- depending on sizes
- 1/4 cup white chocolate chips
Instructions
- Beat chilled heavy whipping cream, powdered sugar, and vanilla extract until stiff peaks form, then set aside.
- In a large mixing bowl, beat the cream cheese until smooth.
- Add vanilla instant pudding and about half of the milk, and continue mixing while slowly pouring in the remaining milk. Mix until fully combined.
- Add whipped cream and mix until smooth.
- Spread a thin layer of filling in the bottom of a 13 x 9-inch casserole dish (about 1/2 cup of filling, just to stick the bottom layer of graham crackers).
- Arrange a layer of crackers. Break them apart to fit as needed.
- Spread 1/3 of the filling (about 2.5-3 cups).
- Arrange sliced strawberries and scatter about 1 cup of blueberries in the gaps.
- Repeat the process: arrange single layers of crackers, spread 1/3 of the filling, cover with sliced strawberries, and whole blueberries.
- Arrange the final, third layer of graham crackers, and spread the remaining third of the filling.
- Decorate with strawberries sliced in half and whole blueberries.
- Melt white chocolate chips and drizzle over the top.
- Place in the fridge for at least 6 hours before serving, and preferably overnight for the best results.
- Store in the fridge for 3-4 days.
Notes
- This dessert is best made a day in advance.
- You can use different berries or add your favorite fruits.
- Keep leftovers covered in the fridge.
Nutrition
- Serving Size: 1 slice
- Calories: 350
- Sugar: 20g
- Sodium: 100mg
- Fat: 25g
- Saturated Fat: 15g
- Unsaturated Fat: 5g
- Trans Fat: 0g
- Carbohydrates: 30g
- Fiber: 2g
- Protein: 5g
- Cholesterol: 60mg