Introduction to No Bake Orange Dreamsicle Lasagna
As a mom juggling a million things, I crave desserts that bring joy without taking hours to make. That’s why I’m thrilled to share my No Bake Orange Dreamsicle Lasagna! This delightful no-bake treat is a refreshing twist on traditional desserts. It’s perfect for busy days when you want to impress your loved ones with something delicious yet simple. With its creamy orange layers and dreamy texture, it’s sure to brighten up any gathering. Trust me, you’ll want to keep this recipe on hand for every occasion!
Why You’ll Love This No Bake Orange Dreamsicle Lasagna
This No Bake Orange Dreamsicle Lasagna will quickly become your go-to dessert. It’s incredibly easy to whip up, especially when time is tight. The bright orange flavor dances with creamy layers, making it a hit among kids and adults alike. Plus, there’s no baking involved! Just chill and serve. You’ll love how it magically transforms simple ingredients into a luscious, nostalgic treat, bringing smiles all around.
Ingredients for No Bake Orange Dreamsicle Lasagna
Gathering your ingredients is half the fun of making the No Bake Orange Dreamsicle Lasagna! Here’s what you’ll need:
Save this recipe and cook smarter
Keep your favorite Cooking Layer recipes in one place, plan your weekly meals, and quickly find dinner ideas whenever you need them.
- Save favorite recipes
- Weekly meal planner
- Easy recipe search
- New meal ideas
- Graham cracker crumbs: These form the buttery, crunchy crust. You can use store-bought or crush your own if you’re feeling adventurous.
- Butter: Melted butter binds the crust together, adding richness. A dairy-free option would work beautifully too!
- Cream cheese: Softened for easy blending, cream cheese creates a smooth, creamy layer that’s simply irresistible.
- Powdered sugar: This sweetens the cream cheese layer perfectly, giving it that delightful sweetness without the graininess of granulated sugar.
- Cool Whip: This is your secret weapon for achieving a light and fluffy topping. You can substitute with homemade whipped cream if preferred.
- Orange Jell-O: The star of this dessert, orange Jell-O infuses each bite with that nostalgic, citrusy flavor we all love.
- Boiling water: Just a small amount to dissolve the Jell-O and provide an essential step in its preparation.
- Vanilla pudding mix: Instant pudding mix adds yet another layer of creaminess while balancing the citrusy notes.
- Cold milk: This is mixed with the pudding to create a creamy texture. Use any kind of milk you have on hand.
- Mandarin orange segments: For a burst of freshness on top, these add a juicy contrast to the creamy layers. Fresh oranges can also be a delightful alternative!
For exact quantities of these ingredients, check the bottom of the article where you’ll find everything you need to throw together this luscious dessert!

How to Make No Bake Orange Dreamsicle Lasagna
Now that you have all your ingredients lined up, let’s dive into the fun part: making the No Bake Orange Dreamsicle Lasagna! I’ll take you through each step smoothly, ensuring you have a delightful experience along the way.
Step 1: Prepare the Crust
Start by combining the graham cracker crumbs and melted butter in a medium bowl.
Mix until the crumbs are evenly coated. It should look like damp sand—perfect for holding its shape!
Press this mixture firmly into the bottom of a 9×13 dish to create your crust. I like to use the bottom of a measuring cup to get it nice and compact.
Now, pop it into the freezer for about 10 to 15 minutes. This little chill session helps it firm up nicely!
Step 2: Make the Orange Jell-O Layer
While the crust sets, grab a small bowl.
Whisk together the orange Jell-O and boiling water until the gelatin fully dissolves. It should have a bright, cheerful color at this point!
Set this bowl aside for a moment, allowing it to cool a bit. We want it warm, but not hot, for the next steps.
Step 3: Prepare the Vanilla Pudding
In a large bowl, prepare the vanilla pudding according to the package instructions. Use cold milk for a creamy consistency.
Once it’s nicely blended, gently fold in the cooled orange Jell-O mixture. Let it stand for five minutes, giving it a quick stir occasionally.
Trust me, this orange-vanilla combination is already drool-worthy!
Step 4: Mix Cream Cheese Layer
In another large bowl, beat the softened cream cheese and powdered sugar until smooth.
Add in 2 cups of the Cool Whip, and mix until everything is well combined. This heavenly mixture will add a luscious layer to your dessert.
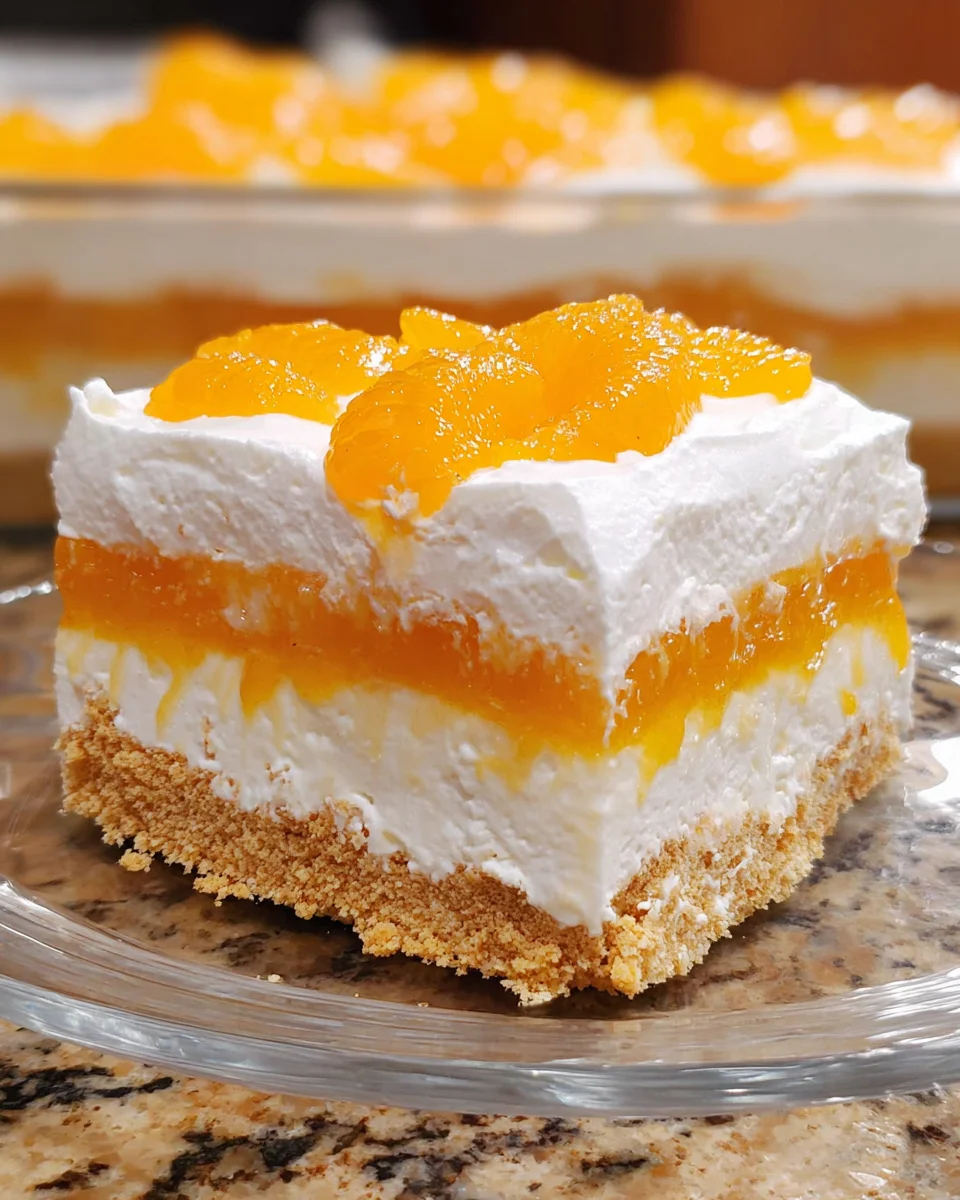
Step 5: Assemble the Layers
Now it’s assembly time! Spread the cream cheese layer evenly over the chilled graham cracker crust.
Next, gently pour the pudding layer over the cream cheese. Spread it out evenly with a spatula.
Finally, take the remaining Cool Whip and dollop it on top. Using a spatula, carefully spread it out until it covers everything.
Step 6: Chill and Serve
Cover the dish with plastic wrap and refrigerate it for at least two hours, but ideally overnight. Waiting will intensify the flavors.
When you’re ready to serve, sprinkle those adorable mandarin orange segments on top for that extra burst of flavor!
Now, call your loved ones to the table and let the compliments roll in!
Tips for Success
- Chill the dessert overnight for the best flavor and texture—it’s worth the wait!
- Use fresh oranges for a natural burst of flavor and extra vitamin C.
- Ensure the cream cheese is fully softened for silky smooth blending.
- For a thicker crust, add more graham cracker crumbs and butter.
- Don’t rush the chilling process; let the layers set for optimal enjoyment!
Equipment Needed
- 9×13 inch dish: A classic glass or porcelain baking dish works great. You can also use a metal pan.
- Mixing bowls: Use medium and large bowls for easy mixing. A separate bowl for the Jell-O is handy too!
- Whisk and spatula: Essential for blending and spreading. A hand mixer speeds things up!
- Measuring cups and spoons: Accurate measurements ensure perfectly layered flavors.
Variations
- Chocolate Dreamsicle: Swap the orange Jell-O for chocolate pudding and use chocolate graham crackers for a decadent twist.
- Berry Bliss: Use strawberry or raspberry Jell-O with mixed berries instead of mandarin oranges for a refreshing summer berry delight.
- Dairy-Free Option: Substitute cream cheese with vegan cream cheese and use coconut whipped cream for a creamy, dairy-free treat.
- Gluten-Free Version: Use gluten-free graham cracker crumbs for those with dietary restrictions without losing any of the deliciousness!
- Additions: Consider adding a layer of fresh fruit, like sliced bananas or peaches, between the cream cheese and pudding layers for extra flavor and texture.
Serving Suggestions for No Bake Orange Dreamsicle Lasagna
- Pair with a light fruit salad: A fresh fruit salad complements the creamy dessert beautifully.
- Serve with iced tea or sparkling water: These refreshing drinks enhance the bright flavors.
- Garnish with mint leaves: A sprinkle of mint adds color and a refreshing hint.
- Cut into squares: Present in individual dessert cups for an elegant touch.
- Top with extra Cool Whip: For those who love extra creaminess!
FAQs about No Bake Orange Dreamsicle Lasagna
As a passionate home cook, I often get questions about this delightful dessert. Here are some frequently asked questions about the No Bake Orange Dreamsicle Lasagna that I hope will help you create the perfect treat!
Can I make No Bake Orange Dreamsicle Lasagna in advance?
Absolutely! In fact, making it a day in advance enhances the flavors. Just keep it covered in the fridge until you’re ready to serve!
How long does the No Bake Orange Dreamsicle Lasagna last in the refrigerator?
This dessert can usually last about 3 to 5 days in the fridge if it’s stored properly. Just cover it tightly to keep it fresh!
Can I use fresh oranges instead of mandarin segments?
You sure can! Fresh oranges add a vibrant flavor and are a fabulous option to elevate this dessert.
What can I substitute for Cool Whip?
If you prefer, homemade whipped cream works perfectly. Just whip heavy cream with a bit of powdered sugar until peaks form for a delicious alternative!
Is this dessert suitable for special diets?
Yes! You can easily make a dairy-free version by using plant-based cream cheese and coconut whipped cream. For gluten-free diners, simply swap graham cracker crumbs with gluten-free options.
Final Thoughts
The No Bake Orange Dreamsicle Lasagna is more than just a dessert; it’s a celebration of flavors and memories. Each bite takes me back to carefree summer days, reminding me of the importance of simple joys. This recipe not only satisfies a sweet craving, but it also brings people together around the table. I love how easy it is to create such a delightful treat, allowing me to spend more quality time with family and friends. So, whether it’s a backyard barbecue or a cozy family dinner, this dessert will undoubtedly steal the spotlight and warm hearts.
Print
No Bake Orange Dreamsicle Lasagna
- Prep Time: 30 minutes
- Cook Time: 0 minutes
- Total Time: 2 hours 30 minutes
- Yield: 10 servings 1x
- Category: Dessert
- Method: No Bake
- Cuisine: American
- Diet: Vegetarian
Description
A delightful no-bake dessert that combines the flavors of orange and cream cheese, layered with graham cracker crust and whipped topping.
Ingredients
- 2 cups graham cracker crumbs
- 1 stick butter, melted
- 8 oz cream cheese, softened
- 1 cup powdered sugar
- 12 oz Cool Whip, frozen whipped topping, thawed, divided
- 2 (3 oz) Jell-O Orange Jelly Powder
- 1/3 cup boiling water
- 2 (3.4 oz) Jell-O vanilla-flavor instant pudding mix
- 2 1/2 cups cold milk
- 1/2 cup canned mandarin orange segments, drained
Instructions
- In a medium bowl, combine graham cracker crumbs and melted butter.
- Firmly press into a crust in the bottom of a 9 x 13 glass or porcelain dish. Let it chill in the freezer for about 10-15 minutes to firm up.
- In a small bowl, whisk orange Jell-O and boiling water until gelatin has dissolved.
- In a large bowl, make vanilla pudding according to package directions. Stir in dissolved gelatin and let stand for 5 minutes, stirring occasionally.
- In a large bowl, combine the softened cream cheese and powdered sugar. Beat in 2 cups of the whipped topping. Spread over the cooled crust.
- Pour pudding mixture over cream cheese layer and spread evenly over the top.
- Top with the remaining whipped topping by spoonfuls and carefully spread until even.
- Refrigerate for at least 2 hours, preferably overnight.
- When ready to serve, sprinkle orange segments on top.
- Cover and refrigerate any remaining pieces.
Notes
- For best results, allow the dessert to chill overnight.
- Feel free to use fresh oranges instead of canned mandarin segments for topping.
- This dessert can be made a day in advance.
Nutrition
- Serving Size: 1 piece
- Calories: 300
- Sugar: 22g
- Sodium: 150mg
- Fat: 15g
- Saturated Fat: 8g
- Unsaturated Fat: 0g
- Trans Fat: 0g
- Carbohydrates: 34g
- Fiber: 1g
- Protein: 3g
- Cholesterol: 30mg