

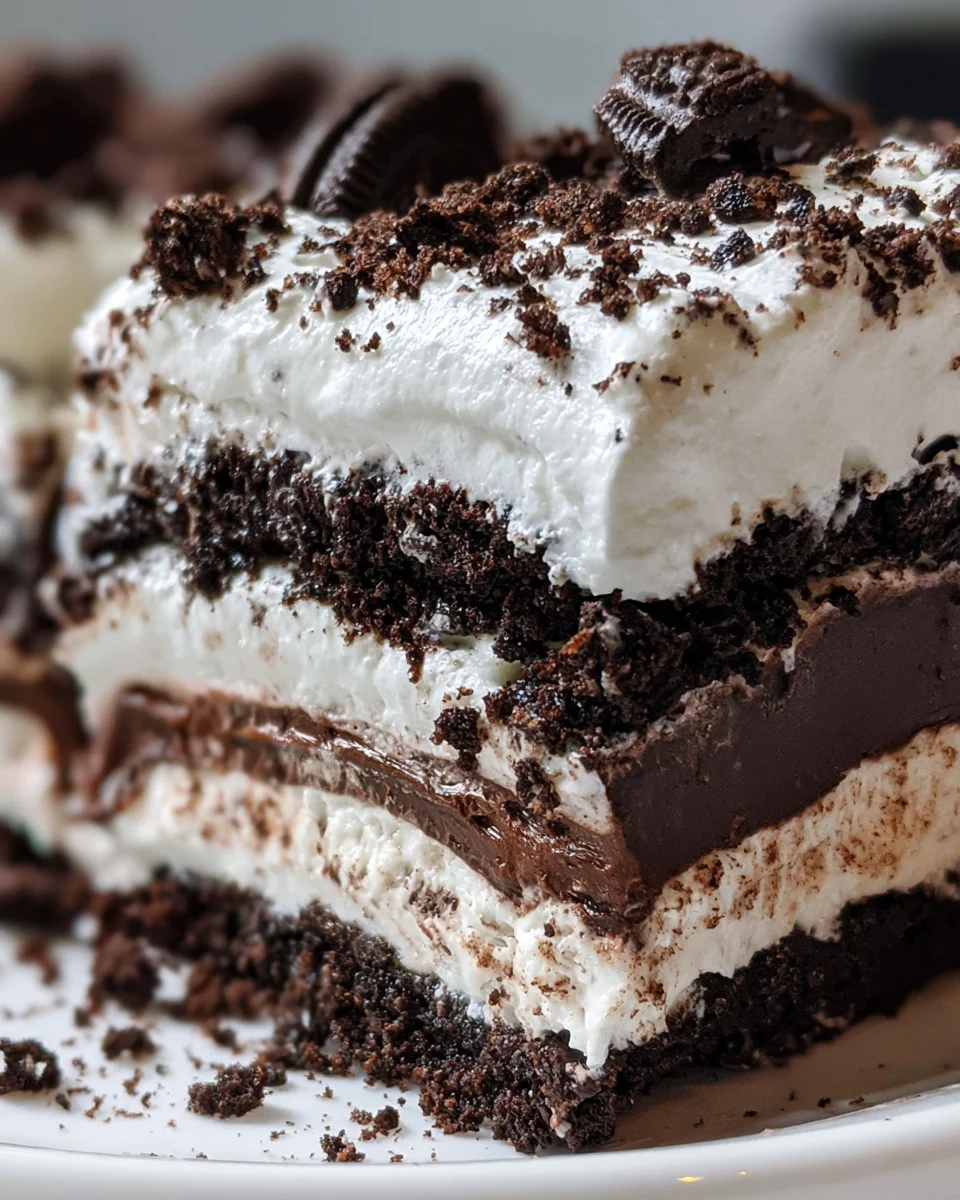
Introduction to Oreo Lasagna
Have you ever found yourself in need of a dessert that brings smiles and joy, all while being incredibly simple to make? I can relate! That’s why I absolutely adore this Oreo Lasagna recipe. It’s a no-bake, layered dessert that’s a crowd-pleaser every time. With its creamy layers and crunchy Oreo goodness, it’s perfect for busy moms and professionals who crave something delightful without spending hours in the kitchen. So, let’s dive in and make this sweet indulgence together—because life is too short not to enjoy a little chocolatey bliss, right?
Why You’ll Love This Oreo Lasagna
This Oreo Lasagna is a game changer for anyone wanting a quick yet decadent dessert. With minimal effort, you’ll create layers of creamy, dreamy goodness that will have your family asking for seconds. It’s a no-bake recipe, so there’s no fuss with the oven. Plus, who can resist the classic chocolate and cream combination? This dessert is as comforting as a warm hug!
Ingredients for Oreo Lasagna
Gathering the ingredients for this mouthwatering Oreo Lasagna is half the fun! You’ll need a delightful mix of sweet and creamy elements to achieve that perfect balance. Here’s what you’ll be looking for:
- Oreo cookies: Finely crushed, these will form the base and add a chocolaty crunch to your layers.
- Salted butter: Melted, it binds the crushed Oreos together for a sturdy crust while adding richness.
- Cream cheese: Softened to room temperature, it brings creaminess to the filling and a touch of tang.
- Powdered sugar: This sweetener ensures your cream cheese filling is perfectly sweet without any graininess.
- Cool Whip: Thawed, it adds lightness and fluffiness, making your dessert melt in your mouth.
- Vanilla extract: Just a teaspoon elevates the flavor profile, bringing a hint of warmth.
- Half and half or whole milk: This creamy base is essential for the pudding layer, allowing it to thicken beautifully.
- Instant chocolate pudding mix: The star of the show! This creates a luscious, chocolatey layer without any cooking.
- Extra crushed Oreos: For topping, these add that extra crunch and visual appeal.
The exact quantities of each ingredient can be found at the bottom of this article, perfect for printing! Feel free to get creative! You can use fat-free Cool Whip for a lighter option, or substitute with different flavors of pudding mix if you’re feeling adventurous!
How to Make Oreo Lasagna
Now that you have gathered all your ingredients, let’s jump into making this dreamy Oreo Lasagna! You’ll be amazed at how easily everything comes together. Just follow these simple steps, and soon you’ll have a layered dessert that looks as delicious as it tastes! Here’s how to create this sweet masterpiece:
Step 1: Make the Oreo Crust
To start, take your finely crushed Oreo cookies and melt the salted butter. In a large bowl, mix the crushed Oreos with the melted butter until well combined. The mixture should resemble wet sand. Next, pour this crunchy delight into a 9×13 inch baking dish. Press it firmly into an even layer to form a crust. This will be the sturdy base of your Oreo Lasagna! Pop the dish into the refrigerator while you tackle the cream cheese filling.
Step 2: Prepare the Cream Cheese Filling
In a large mixing bowl, add softened cream cheese and powdered sugar. Beat them together using a hand or stand mixer until the mixture is smooth and creamy. Avoid any lumps—nobody wants a bumpy layer! Now, gently fold in the thawed Cool Whip and a teaspoon of vanilla extract. For an extra touch, stir in those crushed Oreos to give your filling that sweet, chocolatey kick. This indulgent layer is going to elevate your dessert!
Step 3: Layer the Cream Cheese Mixture
Once your cream cheese filling is ready, it’s time to layer it on your crust. Carefully spread the cream cheese mixture over the cooled Oreo crust, making sure to cover it evenly. Take your time, as this layer needs to look lovely! After you’ve spread it out, return the dish to the refrigerator. Chilling it helps the layers bond together while you prepare the pudding.
Step 4: Whisk the Pudding
In another large bowl, whisk together the half and half (or whole milk) with the instant chocolate pudding mix. Keep whisking until the pudding thickens—this part is quick! Next, fold in those last crushed Oreos for a delightful texture throughout the pudding. This layer is what makes the Oreo Lasagna so rich and satisfying. You’ll love the chocolatey goodness it adds!
Step 5: Layer the Pudding
Spread the chocolate pudding mixture evenly over the cream cheese layer. Try to be gentle, so you don’t disturb the bottom layers too much! Once that’s done, pop the dish back into the refrigerator for just 5 minutes. This quick chill allows the pudding to set slightly and get cozy with the cream cheese. It’s a match made in dessert heaven!
Step 6: Final Touches with Cool Whip
Now for the grand finale! Take that remaining Cool Whip and spread it over the pudding layer for a fluffy top. Don’t be shy; make it generous! Finally, sprinkle the last of your crushed Oreos on top to finish it off with a delicious crunch. Once it’s all set, cover the dish with plastic wrap, and let it chill in the refrigerator for at least four hours—or overnight if you can wait! This will give the flavors time to meld beautifully.
Tips for Success
- Make sure your cream cheese is at room temperature for easy mixing.
- Allow enough chilling time—four hours minimum—for the best texture.
- Use a rubber spatula to help gently fold ingredients without deflating the Cool Whip.
- For a fun twist, combine different flavors of pudding with crushed cookies for variety.
- Pre-crush Oreos in a resealable bag for less mess!
Equipment Needed
- 9×13 inch baking dish: Any similar-sized dish works.
- Mixing bowls: Use a large bowl and a smaller one.
- Hand or stand mixer: A whisk can also do the job!
- Rubber spatula: A spoon will work, but spatulas help with folding.
- Whisk: Essential for mixing pudding—any whisk will do!
Variations of Oreo Lasagna
- Mint Oreo Lasagna: Swap regular Oreos for Mint Oreos for a refreshing twist that adds a layer of minty flavor.
- Peanut Butter Oreo Lasagna: Create a peanut butter layer by mixing some peanut butter into the cream cheese filling for a nutty richness.
- Gluten-Free Oreo Lasagna: Use gluten-free sandwich cookies to make this dessert accessible for those with dietary restrictions.
- Berry Oreo Lasagna: Add layers of fresh strawberries or raspberries between the cream cheese and pudding layers for a fruity burst.
- Chocolate Chip Oreo Lasagna: Stir chocolate chips into the cream cheese filling to enhance the chocolatey experience!
- Vegan Oreo Lasagna: Substitute cream cheese with a dairy-free alternative and use coconut whipped cream for the light, fluffy layer.
Serving Suggestions for Oreo Lasagna
- Serve with fresh berries like strawberries or raspberries for a pop of color and flavor.
- Pair with a scoop of vanilla ice cream for added creaminess.
- Drizzle chocolate syrup on top for an extra decadent touch.
- Present in individual cups for a fun, portioned treat at parties.
- Enjoy with a cup of coffee or iced tea to balance the sweetness!
FAQs about Oreo Lasagna
As I’ve enjoyed sharing this delightful Oreo Lasagna recipe, I’ve come across a few questions that many of you might have. Let’s dive into some of the most frequently asked questions to help make your dessert experience even sweeter!
Can I make Oreo Lasagna a day in advance?
Absolutely! In fact, making it the day before allows the flavors to meld beautifully. Just be sure to keep it covered in the refrigerator until you’re ready to serve it.
What can I substitute for Cool Whip?
If you prefer a homemade option, you can whip up heavy cream with a little sugar and vanilla for a delightful alternative to Cool Whip. Just ensure it’s whipped to soft peaks for that creamy texture.
How long does Oreo Lasagna last in the fridge?
This dessert typically lasts about 3–5 days in the refrigerator. Just be sure to cover it well to keep it fresh and tasty!
Can I freeze Oreo Lasagna?
While you can freeze it for up to a month, the texture may change slightly once thawed. However, if you dare, it still tastes delicious! Just thaw it in the fridge before serving.
What variations can I try with this recipe?
The options are endless! Think about adding different flavors of pudding, mixing in fruits, or even trying different sandwich cookies. Let your imagination run wild!
Final Thoughts
As I reflect on the joy that this Oreo Lasagna brings, I’m reminded of the laughter shared at the table and the smiles on my family’s faces. Each layer is like a sweet embrace, comforting after a long day. This dessert is more than just a treat; it’s a delightful experience that brings us together. I hope you enjoy making it as much as I do! So gather your loved ones, dive into a slice, and revel in the sweetness of life—because nothing unites us quite like a delicious dessert, especially one as fabulous as this Oreo Lasagna!
Print
Oreo Lasagna
- Prep Time: 30 minutes
- Cook Time: 0 minutes
- Total Time: 4 hours 30 minutes
- Yield: 12 servings 1x
- Category: Dessert
- Method: No-Bake
- Cuisine: American
- Diet: Vegetarian
Description
Oreo Lasagna is a delicious layered dessert that combines creamy layers of cream cheese and pudding with crushed Oreo cookies for a delightful treat.
Ingredients
- 48 Oreo cookies finely crushed
- 10 tablespoons salted butter melted
- 12 ounces cream cheese room temperature (1 ½ bricks)
- ¾ cup powdered sugar
- 8 ounces Cool Whip thawed
- 1 teaspoon vanilla extract
- 6 Oreo cookies finely crushed
- 3 cups half and half or whole milk
- 7.8 ounces (2 3.9-ounce) boxes of instant chocolate pudding
- 6 Oreo cookies finely crushed
- 8 ounces Cool Whip thawed
- 12 Oreo cookies finely crushed
Instructions
- Mix the Oreo crumbs and melted butter in a large bowl until well combined. Pour the cookie mixture into a 9×13 inch baking dish and press into an even layer to form the crust. Refrigerate the crust while you prepare the cream cheese filling.
- Beat the cream cheese and powdered sugar in a large bowl with a hand or stand mixer until smooth and creamy.
- Add the Cool Whip and vanilla and beat until well combined. Fold in the crushed Oreos.
- Spread the cream cheese mixture into an even layer over the Oreo crust. Refrigerate while you prepare the pudding.
- Whisk the half and half and the pudding mix in a large bowl until the pudding thickens. Fold in the Oreo crumbs.
- Spread an even layer of the pudding over the cream cheese layer. Refrigerate for 5 minutes.
- Spread the Cool Whip over the pudding layer and sprinkle the crushed Oreos over top.
- Refrigerate for at least four hours to allow the pudding to set before serving.
Notes
- For best results, make sure the cream cheese is at room temperature before mixing.
- This dessert needs to chill in the refrigerator for at least four hours or overnight for the best texture.
- You can use fat-free Cool Whip for a lighter option.
Nutrition
- Serving Size: 1 slice
- Calories: 450
- Sugar: 30g
- Sodium: 200mg
- Fat: 25g
- Saturated Fat: 12g
- Unsaturated Fat: 10g
- Trans Fat: 0g
- Carbohydrates: 50g
- Fiber: 2g
- Protein: 6g
- Cholesterol: 40mg