
Why Peanut Butter Icebox Cake Is So Popular
The No-Bake Convenience Everyone Loves
Let’s be real—sometimes you want an impressive dessert without turning your kitchen into a sauna. That’s exactly where Peanut Butter Icebox Cake comes in. No oven, no complicated steps, no stress. Just layering, chilling, and enjoying.
This dessert is all about letting time do the work. Instead of baking, the refrigerator transforms the ingredients. The graham crackers soften into cake-like layers, while the creamy filling settles into a rich, smooth texture. It’s almost like watching a magic trick happen overnight.
Save this recipe and cook smarter
Keep your favorite Cooking Layer recipes in one place, plan your weekly meals, and quickly find dinner ideas whenever you need them.
Free to download • Fast and easy to use
What makes it even better is how beginner-friendly it is. You don’t need to worry about baking times, temperatures, or whether something will rise correctly. If you can layer ingredients, you can make this cake.
It’s also perfect for busy days. You can prepare it in advance, leave it in the fridge, and have a ready-to-serve dessert waiting for you. Whether it’s for a family dinner, a party, or just a personal treat, it fits effortlessly into your schedule.
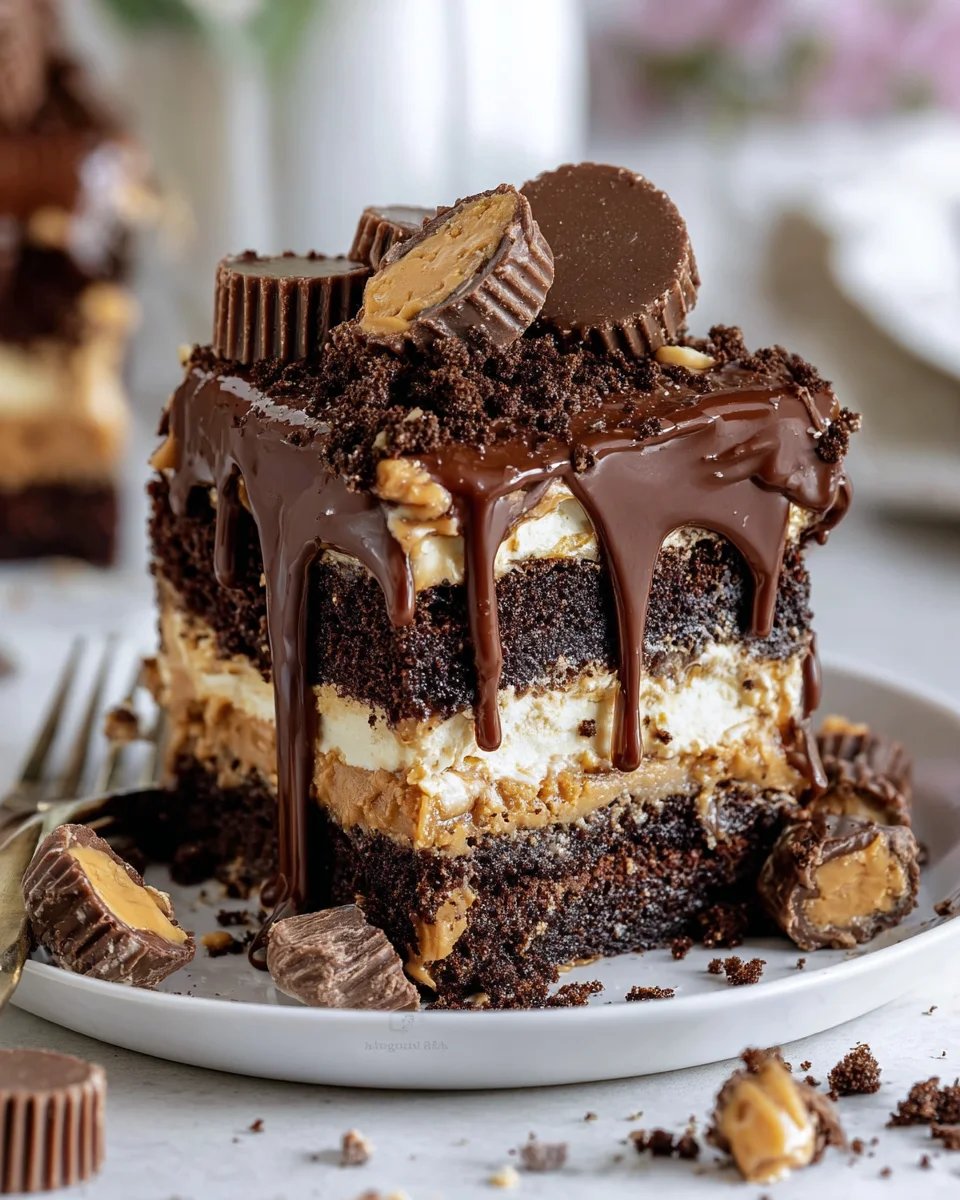
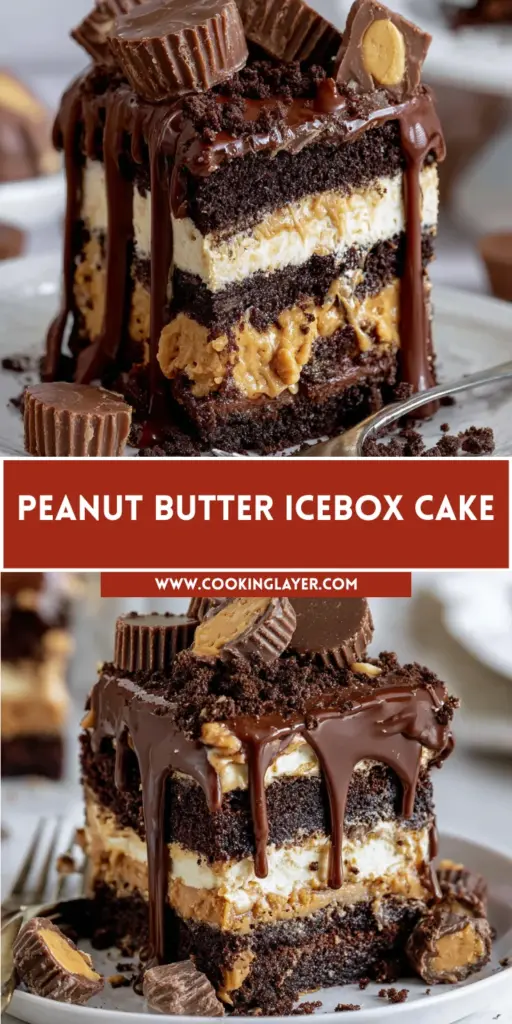
The Irresistible Peanut Butter and Chocolate Combo
There’s a reason peanut butter and chocolate are considered one of the best flavor pairings ever. It’s all about contrast and balance.
The peanut butter brings richness and a slightly salty, nutty flavor that feels comforting and bold. Then the hot fudge sauce steps in with deep chocolate sweetness, creating that perfect harmony.
And when you add Reese’s candy pieces, you’re taking things to another level. You get little bursts of crunch, extra sweetness, and that familiar peanut butter-chocolate combo in every bite.
It’s not just a dessert—it’s layered indulgence. Each forkful delivers something slightly different, which keeps it exciting from the first bite to the last.
Ingredients for Peanut Butter Icebox Cake
To create this dreamy Peanut Butter Icebox Cake, you’ll need a delightful mix of ingredients that come together in perfect harmony. Let’s dive into what you’ll need:
- Graham Crackers: The classic base of this dessert. They provide a lovely crunch and hold everything together. If you have leftover crackers, feel free to use them for the crumble.
- Hot Fudge Sauce: Rich and chocolatey, this gooey sauce adds a decadent layer. You can use store-bought or homemade – whichever you prefer!
- Heavy Whipping Cream: Essential for the luxurious whipped cream topping and the cheesecake layer. Make sure it’s cold for the best results.
- Challenge Cream Cheese: The star of the cheesecake layer, it should be softened to ensure a smooth blend with the peanut butter.
- Peanut Butter: This is the flavor hero of the cake! Choose creamy or chunky based on your preference.
- Powdered Sugar: This sweetener helps to balance flavors in the cheesecake layer and makes the whipped cream topping light and fluffy.
- Vanilla Extract: A splash of this extract enhances the overall taste, making everything a bit sweeter and more aromatic.
- Reese’s Candy: These chocolate-peanut butter cups add an extra crunch and burst of flavor to the layers. You can chop them up or leave them whole, depending on your style!
- Graham Cracker Crumbs: You’ll make these from leftover graham crackers for a sweet, crumbly topping. They add texture and visual appeal.
- Unsalted Butter: Melted to create that perfect graham cracker crumble. Unsalted is best to control the overall saltiness of the dessert.
- Sugar: Used in the crumble to add a touch of sweetness – a little goes a long way!
Exact quantities of each ingredient for your Peanut Butter Icebox Cake can be found at the bottom of this article. Happy baking!
How to Make Peanut Butter Icebox Cake
Step 1: Prepare the Baking Dish
To start, grab your 9 x 13 baking dish. Lay the graham crackers flat in a single layer across the bottom. Don’t worry if some need breaking apart; just get them to fit snugly. This crunchy base sets the foundation for your Peanut Butter Icebox Cake. You’ll love how sturdy it holds everything together, making this cake a treat to slice and serve later!
Step 2: Layer the Hot Fudge Sauce
Now, it’s time to bring on the chocolate! Drizzle half of the hot fudge sauce over the graham crackers, making sure to spread it evenly. Each cracker should be tantalizingly coated, allowing the chocolatey goodness to seep in. That warm richness begins to mingle with the crunch, setting the stage for your rich dessert experience. Don’t be shy here; get every drop on those crackers!
Step 3: Make the Whipped Cream
Next, let’s whip up some magic! In a large bowl, pour in the heavy whipping cream. Using a mixer, beat it on high until you see stiff peaks forming – it should look like cloud fluff! This will be the foundation of your cake’s light and airy texture. Once you reach that perfect consistency, set it aside gently. We’ll bring it back into the mix shortly!
Step 4: Mix the Peanut Butter Cheesecake Layer
In another bowl, beat the softened cream cheese for 2–3 minutes until it’s light and fluffy. Add your peanut butter, mixing until fully combined. Then, sprinkle in powdered sugar and a splash of vanilla extract, stirring until smooth. You want this layer to be creamy and dreamlike. This indulgent mixture is the heart of your Peanut Butter Icebox Cake, bringing that nostalgic flavor bursting with cozy vibes!
Step 5: Combine and Spread
Gently fold the whipped cream into the peanut butter mixture. This technique keeps it light and airy. Then, spread half of this heavenly cheesecake mixture on top of the hot fudge layer. The contrast of textures is key here, ensuring each bite is a blend of creamy and crunchy goodness. You’re well on your way to creating a dessert everyone will rave about!
Step 6: Finish Layering
Time to repeat the deliciousness! Add another layer of graham crackers over the cheesecake, followed by the remaining half of the hot fudge sauce. Spread it evenly, just like you did before. Then, top it again with the remaining cheesecake mixture. This will create a stunning visual when you cut into the cake. Trust me; your guests will be amazed by the beautiful layers!
Step 7: Prepare the Whipped Cream Topping
Don’t forget about the topping! Whip together the remaining heavy cream, powdered sugar, and vanilla extract until stiff peaks form. This fluffy layer will crown your Peanut Butter Icebox Cake perfectly. Spread it generously over the top, creating a rich, cloud-like finish that pairs splendidly with the layers beneath. It’s the kind of topping that makes people go back for seconds – or thirds!
Step 8: Add Graham Cracker Crumble
Let’s add some crunch to the top! In a small bowl, combine graham cracker crumbs, melted butter, and sugar. Mix until it’s all moistened. Sprinkle this yummy crumble over the whipped cream topping; it will give a delightful texture and an extra layer of flavor. Plus, it looks oh-so-inviting, making your cake irresistible straight from the fridge!
Step 9: Chill and Serve
Your masterpiece needs time to set! Cover the cake and chill it in the refrigerator for at least 8 hours, or overnight if you can wait. This chilling time allows the flavors to meld beautifully, enhancing your dessert experience. When you’re ready to serve, cut it into squares and watch as every slice reveals those gorgeous layers. Everyone will be enchanted by the creamy, chocolatey goodness!
Tips for Success
- Ensure your cream cheese is at room temperature for smooth mixing.
- Pre-chill the mixing bowl and beaters for the whipped cream to achieve maximum fluffiness.
- Layer the hot fudge sauce evenly to ensure every bite is chocolatey.
- Let the cake chill overnight for the best flavor and texture.
- Feel free to experiment with different toppings, like crushed nuts or varied candies!
Equipment Needed
- Baking Dish: A 9 x 13 inch dish works best, but any similar size will do.
- Mixing Bowls: Have at least two on hand for easy mixing. Use any size that fits your needs.
- Electric Mixer: A stand mixer is ideal, but a hand mixer can also do the job.
- Spatula: A silicone or rubber spatula helps in folding and spreading.
- Whisk: Handy for mixing ingredients, especially for the whipped cream topping.
Variations for Peanut Butter Icebox Cake
- Chocolate Peanut Butter: Add chocolate chips to the peanut butter cheesecake layer for an extra chocolatey kick.
- Nut-Free Option: Substitute sunflower butter for peanut butter to create a delicious nut-free version.
- Fruit Topping: Add layers of sliced bananas or strawberries between the cheesecake layers for a fruity twist.
- Vegan Version: Use coconut cream instead of heavy cream, and a dairy-free cream cheese alternative for a vegan-friendly treat.
- Mint Chocolate: Incorporate peppermint extract into the cheesecake layer for a refreshing minty flavor!
- Churro Style: Mix cinnamon into the graham cracker crumble for a fun churro-like topping.
Serving Suggestions for Peanut Butter Icebox Cake
- Fresh Berries: Serve with a side of raspberries or strawberries for a refreshing contrast.
- Iced Coffee: Pair with a chilled iced coffee or mocha for a delightful afternoon treat.
- Chilled Milk: A classic glass of cold milk complements the rich flavors perfectly.
- Presentation Tip: Garnish each slice with extra chopped Reese’s or a drizzle of hot fudge for an eye-catching finish!
- Serving Style: Use a decorative platter to showcase the layers beautifully when serving.
FAQs about Peanut Butter Icebox Cake
Can I make this Peanut Butter Icebox Cake ahead of time? Absolutely! In fact, it’s best when chilled overnight. Preparing it a day in advance allows the flavors to meld beautifully, making the dessert even more delicious.
What can I substitute for heavy cream? If you don’t have heavy cream, you can use coconut cream for a dairy-free option. However, keep in mind that it may alter the flavor slightly. For a lighter alternative, whole milk can work, but your whipped cream won’t be as fluffy.
Can I change the amount of sugar in the recipe? Yes! You can adjust the powdered sugar to your preference. Just remember, the sugar not only adds sweetness but also helps maintain the texture of the cream cheese layer. So, small adjustments are fine, but avoid going too low!
How should I store leftovers? Store any leftover Peanut Butter Icebox Cake in an airtight container in the refrigerator. It’s best enjoyed within three days, but let’s be real, it might not last that long – it’s too yummy!
Can I freeze Peanut Butter Icebox Cake? While you can freeze it, I recommend doing so only before adding the whipped cream topping. Once thawed, the cream may not hold up as well, but the cake still tastes delicious after freezing!
Final Thoughts
Every bite of this Peanut Butter Icebox Cake is a little celebration! Its creamy layers and crunchy bits bring joy to any occasion, reminding me of cherished moments spent with family and friends. This dessert embodies a balance of simplicity and indulgence, making it perfect for my busy yet sweet-filled life. Whether it’s a birthday bash or a cozy weeknight treat, this cake never fails to impress. So, roll up your sleeves, embrace the magic of no-bake desserts, and share a slice of happiness today. Trust me, your loved ones will be coming back for seconds!
Enjoyed this recipe?
Discover more delicious recipes, save your favorites, and plan your meals with the Cooking Layer app.
Free to download • Fast and easy to use
Peanut Butter Icebox Cake
- Prep Time: 30 minutes
- Cook Time: 0 minutes
- Total Time: 8 hours 30 minutes
- Yield: 12 servings 1x
- Category: Dessert
- Method: No-Bake
- Cuisine: American
- Diet: Vegetarian
Description
A delicious no-bake dessert combining layers of peanut butter cheesecake and chocolate fudge, topped with whipped cream and graham cracker crumble.
Ingredients
- 18 oz graham crackers (enough for three layers – 4 sleeves)
- 1 1/2 cups hot fudge sauce
- Peanut Butter Cheesecake Layer:
- 1 1/2 cups heavy whipping cream
- 20 oz Challenge cream cheese, softened
- 1/2 cup peanut butter
- 1/2 cup powdered sugar
- 1 tsp vanilla extract
- 16 Reese’s (full size, coarsely chopped)
- Whipped Cream:
- 1 cup heavy whipping cream
- 2 tbsp powdered sugar
- 1/2 tsp vanilla extract
- Graham Cracker Crumble:
- 1 cup graham cracker crumbs (use leftover graham crackers)
- 2 tbsp Challenge unsalted butter (melted)
- 2 tbsp sugar
Instructions
- Lay graham crackers in a single layer across the bottom of a 9 x 13 baking dish, breaking apart as necessary.
- Spread half of the hot fudge sauce on top of the graham crackers. Set aside.
- Using a stand mixer or hand mixer, whip heavy cream until stiff peaks form. Set aside.
- In a separate bowl, beat cream cheese for 2 to 3 minutes on medium-high speed until light and fluffy. Add peanut butter and beat until combined.
- Add powdered sugar and beat until no lumps remain. Beat in vanilla extract.
- Fold in whipped cream. Fold in chopped Reese’s.
- Spread half of cheesecake mixture on top of hot fudge sauce.
- Add a layer of graham crackers, remaining half of hot fudge sauce, and remaining cheesecake mixture. Top with another layer of graham crackers.
- For the whipped cream topping, whip heavy whipping cream, powdered sugar, and vanilla extract until stiff peaks form.
- Spread whipped cream on top of graham crackers.
- For the graham cracker crumble, combine graham cracker crumbs, melted butter, and sugar in a small bowl. Mix to combine and sprinkle over the top of the cake.
- Cover and chill for at least 8 hours.
- Top with additional Reese’s candy before serving, if desired.
Notes
- Make sure the cream cheese is softened to ensure a smooth mixture.
- Chilling the cake overnight will enhance the flavors.
- Feel free to customize with different toppings or additional candies.
Nutrition
- Serving Size: 1 slice
- Calories: 400
- Sugar: 25g
- Sodium: 250mg
- Fat: 30g
- Saturated Fat: 15g
- Unsaturated Fat: 10g
- Trans Fat: 0g
- Carbohydrates: 35g
- Fiber: 2g
- Protein: 6g
- Cholesterol: 75mg


