

Introduction to Soft Sourdough Sandwich Bread Recipe
There’s something incredibly satisfying about creating your own *Soft Sourdough Sandwich Bread*, isn’t there? The heavenly aroma wafts through the house, evoking memories of warm kitchens and family gatherings. This recipe is my go-to for busy weekdays and lazy weekends alike. With just a few simple ingredients, you can whip up a loaf that’s perfect for sandwiches or toast. It’s a delightful way to impress your loved ones or enjoy a homemade touch during rushed mornings. Trust me, once you taste this bread, you’ll wonder why you ever bought store-bought!
Why You’ll Love This Soft Sourdough Sandwich Bread Recipe
This *Soft Sourdough Sandwich Bread Recipe* is a lifesaver for busy moms and professionals. It combines convenience and taste in every slice. You’ll love how easy it is to make, with minimal hands-on time. Plus, the subtle tang from the sourdough combined with a plush texture make it irresistible. Perfect for quick lunches, weekend brunches, or midnight snacks, this loaf adds a bit of love to your everyday meals!
Save this recipe and cook smarter
Keep your favorite Cooking Layer recipes in one place, plan your weekly meals, and quickly find dinner ideas whenever you need them.
Free to download • Fast and easy to use
Ingredients for Soft Sourdough Sandwich Bread Recipe
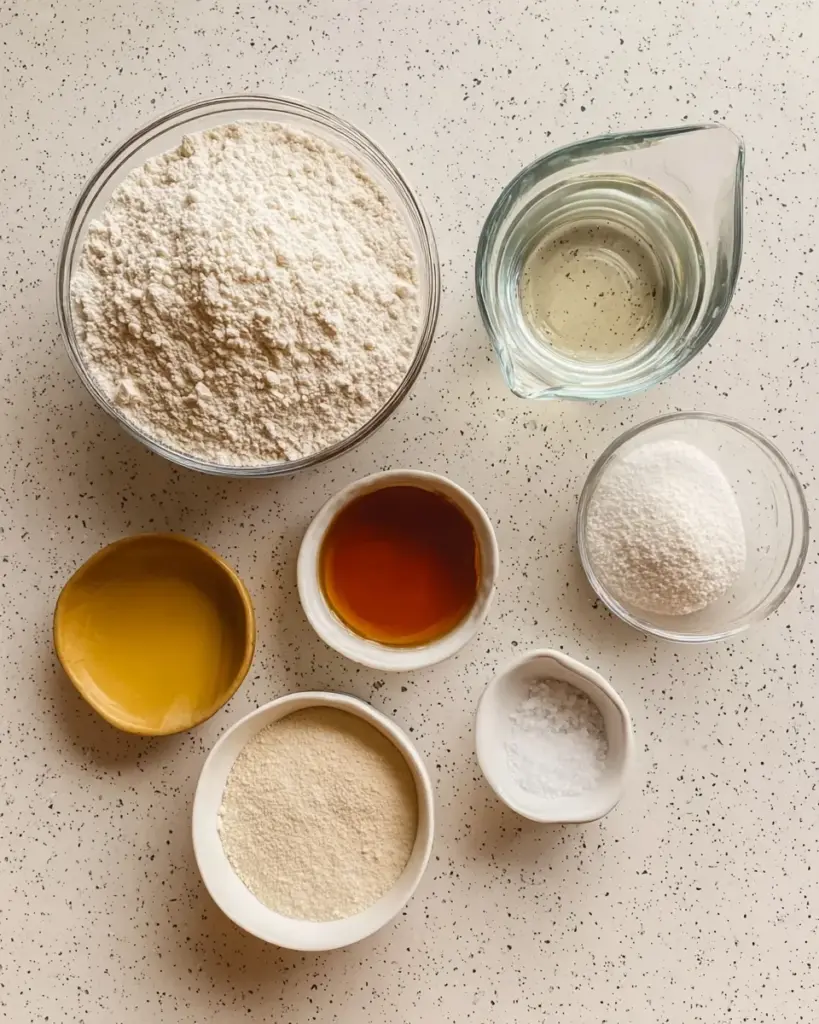
Let’s gather the essentials for this delightful bread! Each ingredient plays a crucial role in creating that soft texture and unique flavor. Below, I’ve shared what you’ll need, along with some handy tips for substitutions and sourcing.
- Sourdough Starter: An active starter is vital. It provides the natural yeast to help the dough rise beautifully. Make sure it’s bubbly and fed for the best results.
- Warm Filtered Water: This hydrates the dough while activating the yeast. Lukewarm water is important, as it encourages fermentation without harming the starter.
- Avocado Oil: A lovely fat that adds moisture and tenderness to the bread. You can substitute it with olive oil or melted butter if you prefer.
- Honey: This natural sweetener adds flavor and helps with browning. If you’re looking for a different taste, try maple syrup or agave nectar!
- Unbleached Bread Flour: The foundation of our loaf; this flour contributes to the bread’s structure and chewiness. If you’re gluten-free, consider using a gluten-free flour blend.
- Salt: Essential for flavor, salt strengthens the dough. Always use fine sea salt or table salt for even incorporation.
You’ll find the exact quantities for each ingredient at the bottom of the article, all ready for printing!
How to Make Soft Sourdough Sandwich Bread Recipe
Let’s dive into the delightful process of making this *Soft Sourdough Sandwich Bread*! Follow these steps, and you’ll create a lovely loaf ready for all your sandwich needs.
Combine Ingredients
Start by grabbing a large mixing bowl. In it, combine your active sourdough starter, warm filtered water, avocado oil, and honey. Stir until the mixture becomes smooth and milky. The warm water is key; it wakes up the sourdough starter, helping it work its magic. Remember, if your starter isn’t bubbly, your bread might fall flat!
Add Flour and Salt
Now, sprinkle the unbleached bread flour and salt over your wet mixture. Stir it all together until you see a shaggy, rough ball forming. Don’t worry; this dough will look a bit messy at first. It’s merely the beginning! Grab a spatula or your hands and ensure everything is well combined. You want a sticky and soft texture—no dry flour should remain.
Stretch & Fold
For the next step, it’s time for some light exercise! Every 30 minutes for about two hours, perform a stretch and fold on the dough. To do this, dampen your hands and grab one side of the dough, stretch it upward, and fold it over itself. Rotate the bowl and repeat until you’ve stretched and folded all sides. This technique develops the gluten, which gives the bread its fantastic structure and helps it rise beautifully.
Bulk Fermentation
After your stretch and fold sessions, cover the bowl with a cloth or plastic wrap and let it sit at room temperature. During this bulk fermentation phase, which lasts between 4 to 8 hours, the dough will double in size. Keep an eye on it! The longer you let it ferment, the more flavor develops. The dough should feel light and airy when ready.
Shape the Dough
Once your dough has risen, turn it out onto a lightly floured surface. Pat it down gently to release some air, then shape it into a loaf. Fold the sides towards the center and roll it up tightly. Placing it seam-side down in a greased loaf pan gives it stability and a lovely appearance. A well-shaped loaf not only looks great but also bakes evenly!
Second Rise
Cover your loaf pan again and let the dough rise for an additional two hours. This second rise is crucial for achieving that airy, soft texture you crave in a sandwich bread. The dough should puff up nicely, almost reaching the top of the pan. Don’t rush this step; patience truly pays off!
Bake
Preheat your oven to 400°F (200°C) before it’s time to bake. Score the top of your loaf with a sharp knife, allowing it to expand without splitting unevenly. Bake it covered for 30 minutes to create a beautiful crust, then remove the cover and lower the temperature to 375°F. Bake for another 15 minutes until golden.
Check Doneness
Use a digital thermometer to check if your bread is done. The internal temperature should reach 205°F. Investing in a thermometer takes away the guesswork! If it’s not there yet, let it bake a little longer—trust me; it’s worth it.
Cool
Once baked, take the bread out of the oven and remove it from the pan. Let it cool completely on a wire rack before slicing. This cooling stage is vital; cutting too soon will result in gummy bread. Give it time to set, and then enjoy the fragrant rewards of your hard work!

Tips for Success
- Make sure your sourdough starter is well-fed and bubbly for the best rise.
- Warm your water to about 110°F for optimal yeast activation.
- Use a kitchen scale for accurate measurements—it’s a game changer!
- Be patient during the fermentation and rising times; good things take time!
- Experiment with different flours for added flavor and texture.
Equipment Needed
- Mixing Bowl: A large bowl is essential for combining ingredients. A stainless steel bowl works beautifully.
- Loaf Pan: A standard 9×5-inch loaf pan is ideal. You can also use a cast-iron skillet for a rustic look.
- Spatula: A silicone spatula helps in mixing ingredients without much mess.
- Digital Thermometer: Ensures perfectly baked bread by checking internal temperature efficiently.
- Wire Rack: For cooling your bread, a wire rack promotes air circulation.
Variations of Soft Sourdough Sandwich Bread Recipe
- Herbed Sourdough: Add dried herbs like rosemary or thyme to the dough for a fragrant twist.
- Cheesy Delight: Incorporate shredded cheese, such as cheddar or mozzarella, into the dough for a savory flavor.
- Nuts and Seeds: Toss in sunflower seeds, flaxseeds, or chopped walnuts for added texture and nutrition.
- Whole Wheat Blend: For a nutty flavor, substitute half of the bread flour with whole wheat flour.
- Sweet Citrus: Add orange or lemon zest for a refreshing scent and subtle sweetness.
- Gluten-Free Option: Use a gluten-free flour blend with xanthan gum to make this bread suitable for gluten-sensitive diets.
Serving Suggestions for Soft Sourdough Sandwich Bread Recipe
- Classic Sandwiches: Layer your favorite deli meats, cheeses, and fresh veggies for a hearty lunch.
- Toast with Toppings: Enjoy slices toasted with avocado, a sprinkle of salt, or your favorite jam.
- Soup and Salad Pairing: Serve alongside a warm bowl of soup or a vibrant salad for a complete meal.
- Brunch Delight: Use it to make decadent French toast topped with fresh berries.
- Presentation Tip: Slice the bread evenly, showcasing its lovely interior, and serve on a wooden board for a rustic touch.
FAQs about Soft Sourdough Sandwich Bread Recipe
Can I use store-bought sourdough starter for this recipe?
Absolutely! Store-bought sourdough starters can be very reliable. Just make sure it’s active and bubbly before using it to ensure your bread rises well.
What if my dough doesn’t rise?
If your dough doesn’t rise, it might be due to an inactive starter or not enough warmth. Before starting, ensure your starter is well-fed and bubbly. A warm spot in the kitchen during fermentation can also help.
How do I store leftovers?
To keep your *Soft Sourdough Sandwich Bread* fresh, store it in a bread bag or wrapped in a cloth at room temperature for up to three days. For longer storage, slice and freeze it, then toast as needed!
Can I reduce the honey or use a sugar substitute?
Yes, you can reduce the honey to your desired sweetness. Just remember that sweetness helps with browning, so if you use a substitute, its impact on the flavor might slightly differ!
Why is cooling important after baking?
Cooling your bread completely on a wire rack is crucial because it prevents moisture buildup. Cutting too soon can lead to a gummy texture instead of the light and airy bread you want.
Final Thoughts
There’s a unique joy in baking your own *Soft Sourdough Sandwich Bread*, isn’t there? It’s more than just a recipe; it’s an experience filled with love and creativity. Every slice tells a story—from the first mix of the ingredients to the delightful aroma wafting through your home. This bread not only elevates your meals but also brings a comforting familiarity to your kitchen. Whether you’re crafting sandwiches or indulging in crispy toast, the satisfaction of homemade bread is truly unmatched. So, roll up your sleeves and embrace this baking adventure; your taste buds will thank you!
Enjoyed this recipe?
Discover more delicious recipes, save your favorites, and plan your meals with the Cooking Layer app.
Free to download • Fast and easy to use

Soft Sourdough Sandwich Bread Recipe
- Prep Time: 1 hour
- Cook Time: 45 minutes
- Total Time: 5 hours
- Yield: 1 loaf 1x
- Category: Bread
- Method: Baking
- Cuisine: American
- Diet: Vegetarian
Description
A recipe for soft sourdough sandwich bread that is perfect for making toast.
Ingredients
- 150g active sourdough starter
- 325g warm filtered water
- 20g avocado oil
- 25g honey
- 500g unbleached bread flour
- 10g salt
Instructions
- Combine Ingredients: In a large mixing bowl, add your sourdough starter, warm water, avocado oil, and honey. Stir until the mixture looks milky and everything is evenly distributed.
- Add Flour and Salt: Sprinkle the flour and salt over the liquid mixture. Mix until the dough comes together into a rough, shaggy ball. Cover and let it rest for one hour.
- Stretch & Fold: Every 30 minutes for the next two hours, perform a stretch and fold to strengthen the gluten.
- Bulk Fermentation: Cover the dough and let it ferment at room temperature for 4 to 8 hours until it doubles in size.
- Shape the Dough: Turn the dough out onto a lightly floured surface and shape it into a loaf. Place it seam-side down in a greased loaf pan.
- Second Rise: Cover the pan and let the dough rise for about two hours until puffed up.
- Bake: Preheat your oven to 400°F (200°C). Score the top of the dough and bake covered for 30 minutes, then uncovered at 375°F for an additional 15 minutes.
- Check Doneness: Use a digital thermometer to ensure the internal temperature reaches 205°F.
- Cool: Remove the bread from the pan and let it cool completely on a wire rack before slicing.
Notes
- Ensure that the sourdough starter is well-fed and bubbly for best results.
- Using lukewarm water helps activate the starter without killing it.
- Overnight fermentation is an option if the environment is cool.
- Properly cooling the bread prevents a gummy texture.
Nutrition
- Serving Size: 1 slice
- Calories: 150
- Sugar: 1g
- Sodium: 180mg
- Fat: 5g
- Saturated Fat: 0.5g
- Unsaturated Fat: 4.5g
- Trans Fat: 0g
- Carbohydrates: 24g
- Fiber: 1g
- Protein: 4g
- Cholesterol: 0mg


