
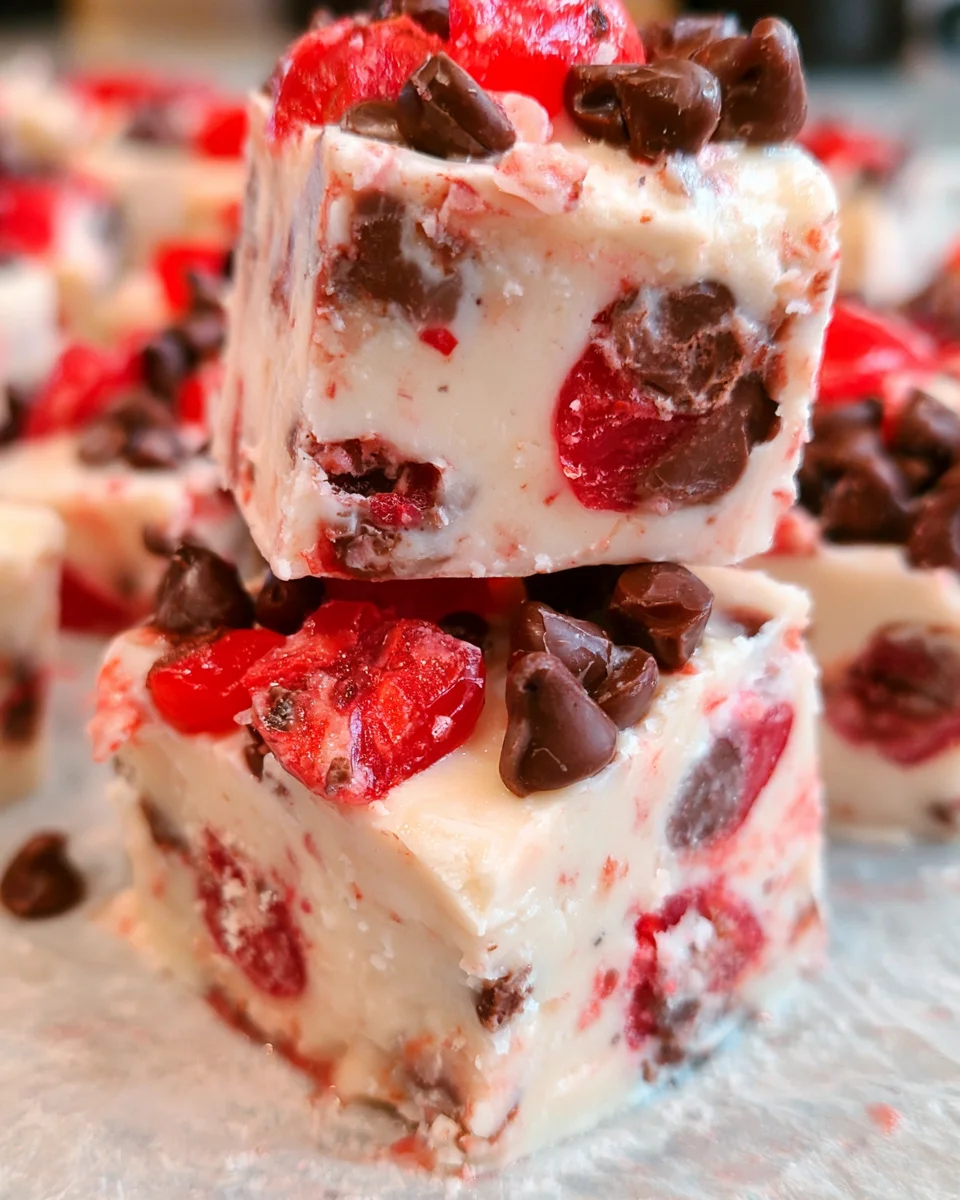
Introduction to Cherry Garcia Fudge
Welcome to the delightful world of Cherry Garcia Fudge! As a passionate home cook, I am always on the lookout for sweet treats that bring a smile to my loved ones’ faces. This fudge recipe captures the irresistible flavors of cherry and chocolate, much like the beloved Cherry Garcia ice cream we all adore.
Whether you’re searching for a quick solution to satisfy your sweet tooth or a dish to impress your friends and family, this Cherry Garcia Fudge hits the mark. It’s rich, creamy, and oh-so-easy to make – perfect for busy days when time is of the essence!
Why You’ll Love This Cherry Garcia Fudge
This Cherry Garcia Fudge is a lifesaver for busy moms like me. It’s quick to whip up, requiring only 15 minutes of prep and minimal baking time. The creamy texture coupled with sweet cherries and rich chocolate makes it simply irresistible. Plus, it’s a no-bake recipe, freeing up your oven for other meals. A dessert this delicious will definitely impress your loved ones without the hassle!
Ingredients for Cherry Garcia Fudge
Before we dive into the delightful process of creating Cherry Garcia Fudge, let’s gather our star ingredients. Each one plays a vital role in crafting this delicious treat, each bringing its unique flavor and texture to the table.
- White chocolate chips: These are the fudge’s base, offering a creamy sweetness that melts beautifully when combined with the other ingredients.
- Sweetened condensed milk: This luscious ingredient provides the fudge with its rich texture and sweetness, making it irresistibly smooth.
- Butter: Adding butter enhances the creaminess of the fudge and ensures a silky finish. Don’t skip this step!
- Chopped maraschino cherries: The star of our show! These cherries infuse the fudge with a burst of juicy flavor, reminiscent of classic Cherry Garcia ice cream.
- Mini chocolate chips: These little bites of chocolate add an extra layer of richness and a delightful surprise in each piece of fudge.
For an exciting twist, consider adding cherry extract for a more intense flavor. You could also experiment with nuts like walnuts or almonds for an added crunch.
All quantities for these ingredients can be found at the bottom of the article, ready for printing when you’re ready to make this delicious Cherry Garcia Fudge!
How to Make Cherry Garcia Fudge
Creating Cherry Garcia Fudge is a rewarding experience that results in a deliciously rich dessert. Follow these simple, step-by-step instructions to make a sweet treat that everyone will love!
Prepare Your Baking Pan
Start by lining a baking pan with parchment paper. This ensures easy removal of the fudge once it’s set. Plus, it makes cleanup a breeze! I often use a 9×13 inch pan for a nice thickness, but you can choose any size. Just make sure the parchment paper hangs over the edges slightly – it will help you lift the fudge out like a pro!
Melt the Base Ingredients
In a medium saucepan, combine the white chocolate chips, sweetened condensed milk, and butter over medium-low heat. Stir continuously to prevent burning, watching as the mixture melts into a smooth, creamy consistency. Be patient; it may take around 5-7 minutes. If it seems to thicken too soon or starts to bubble, lower the heat. You want a velvety base for your Cherry Garcia Fudge!
Fold In the Cherry and Chocolate
Once your base is smooth, take it off the heat and gently fold in the chopped maraschino cherries and mini chocolate chips. Use a spatula to carefully mix them in without overworking the fudge. The goal is to keep the texture light and airy. An important tip: make sure not to crush the cherries too much, as we want those lovely chunks contributing to the fudge’s flavor!
Pour and Set
Now it’s time to pour the fudge mixture into your prepared pan, ensuring an even distribution. Sprinkle the remaining cherry pieces and chocolate chips on top, which adds a beautiful finishing touch. Use the spatula to spread everything evenly if needed. Remember, if the fudge is too hot, let it cool a bit so the chocolate chips don’t melt during the layering process!
Chill Your Fudge
For the fudge to set perfectly, pop it in the refrigerator or freezer. If you’re short on time, the freezer only takes about 2 hours. If you prefer a slower chill, leave it in the refrigerator for about 4-6 hours. This step is crucial, as it ensures your fudge has the right firmness and delightful texture!
Cut Into Squares
Once set, carefully lift the fudge out of the pan using the parchment paper. Place it on a cutting board and use a sharp knife to cut it into 1-2 inch squares. I find running the knife under hot water before cutting helps make clean edges. Presentation matters, and neat squares make for easy serving and sharing!
Tips for Success
- Use high-quality white chocolate chips for a richer flavor.
- Make sure your saucepan is at medium-low heat to avoid burning the chocolate.
- Allow your fudge to cool slightly before adding the chocolate chips to keep them from melting.
- Don’t rush the chilling process; it helps achieve that perfect creamy texture.
- Store leftovers in an airtight container to keep them fresh for longer.
Equipment Needed
- Medium saucepan: A double boiler works well if you prefer gentler heating.
- Spatula: A silicone spatula is ideal for mixing and folding ingredients smoothly.
- Baking pan: A 9×13 inch pan is perfect, but any rectangular dish will do!
- Parchment paper: Wax paper can work too, but parchment is better for easy release.
- Sharp knife: A chef’s knife or a pizza cutter helps achieve nice clean squares.
Variations of Cherry Garcia Fudge
- Nutty Addition: Add chopped walnuts or pecans for a delightful crunch alongside the smooth fudge.
- Dairy-Free Option: Substitute white chocolate chips with dairy-free chocolate chips and use coconut milk for a creamy base.
- More Chocolate: Use a mix of semi-sweet chocolate chips with the white chocolate for a richer flavor profile.
- Cherry Extract: Incorporate a splash of cherry extract to intensify the cherry flavor even further.
- Vegan Twist: Utilize vegan butter and plant-based sweetened condensed milk to make this fudge totally vegan-friendly.
- Colorful Sprinkles: Top your fudge with colorful sprinkles for an extra fun touch, especially for kids!
Serving Suggestions
- Pair with a scoop of vanilla ice cream for a decadent dessert experience.
- Serve alongside fresh fruit, like strawberries or raspberries, to add a pop of color.
- Offer a cup of rich coffee or sweet tea to complement the fudge’s sweetness.
- Present on a decorative platter, garnished with mint leaves for a lovely touch.
- Wrap individual pieces in parchment paper tied with twine for a charming gift idea!
FAQs about Cherry Garcia Fudge
As you embark on your Cherry Garcia Fudge adventure, you might have some questions. Let’s tackle a few frequently asked questions to make your fudge-making experience even smoother!
Can I use dark chocolate chips instead of white chocolate?
Absolutely! Dark chocolate chips will impart a richer flavor profile to your Cherry Garcia Fudge, making it a delightful twist.
How should I store leftover fudge?
I recommend keeping your fudge in an airtight container at room temperature for up to a week. For longer freshness, you can refrigerate it!
Can I freeze Cherry Garcia Fudge?
Yes, you can! Just wrap the individual pieces in plastic wrap and then place them in a freezer-safe container. Properly stored, it can last for up to three months.
What can I substitute for sweetened condensed milk?
If you’re looking for a dairy-free option, try using coconut cream or a homemade vegan condensed milk. Both will work nicely in achieving that creamy texture!
How do I make the fudge more visually appealing?
Consider adding additional toppings like crushed nuts, extra cherry halves, or colorful sprinkles on top of your fudge before it sets. This will enhance both the taste and visual appeal of your homemade treat!
Final Thoughts
Indulging in Cherry Garcia Fudge is more than just treating yourself; it’s about creating cherished moments with those you love. Whether you’re hosting a gathering or enjoying a quiet evening, this easy and delightful dessert brings smiles and sweet memories. The vibrant bursts of cherry combined with the rich chocolate create a symphony of flavors that dance on the palate. Every bite is a reminder of those carefree ice cream days. So, roll up your sleeves, gather your ingredients, and transform your kitchen into a haven of sweetness. Enjoy making this delightful fudge as much as you will enjoy eating it!
Print
Cherry Garcia Fudge: Indulge in a Sweet Treat Today!
- Prep Time: 20 minutes
- Cook Time: 10 minutes
- Total Time: 2-6 hours (including cooling time)
- Yield: 24 pieces 1x
- Category: Dessert
- Method: Stovetop
- Cuisine: American
- Diet: Vegetarian
Description
Cherry Garcia Fudge is a delightful combination of white chocolate, sweetened condensed milk, maraschino cherries, and mini chocolate chips, making it a perfect sweet treat for any occasion.
Ingredients
- 3 cups white chocolate chips
- 14 oz sweetened condensed milk (one typical can)
- 4 Tablespoons butter
- 2.5 cups chopped maraschino cherries
- 2.5 cups mini chocolate chips
Instructions
- Line a baking pan with parchment paper.
- Add the white chocolate chips, milk, and butter to a medium saucepan over medium low heat. Stir until melted and smooth.
- Remove pan from heat and fold in 2 cups of chopped maraschino cherries and 2 cups of mini chocolate chips.
- Pour the fudge into your prepared pan and sprinkle the remaining cherry pieces and chocolate chips on top. If the fudge is very hot, you may want to allow it to cool slightly so the chocolate chips don’t melt.
- Place pan in fridge until the fudge has completely set. (2 hours in freezer or 4-6 hours in fridge).
- Cut into 1-2″ squares. Makes about 24 pieces.
Notes
- For best results, use high-quality white chocolate chips.
- Make sure the fudge is completely cooled before cutting.
Nutrition
- Serving Size: 1 piece
- Calories: 180
- Sugar: 12g
- Sodium: 50mg
- Fat: 8g
- Saturated Fat: 5g
- Unsaturated Fat: 2g
- Trans Fat: 0g
- Carbohydrates: 26g
- Fiber: 1g
- Protein: 2g
- Cholesterol: 10mg