
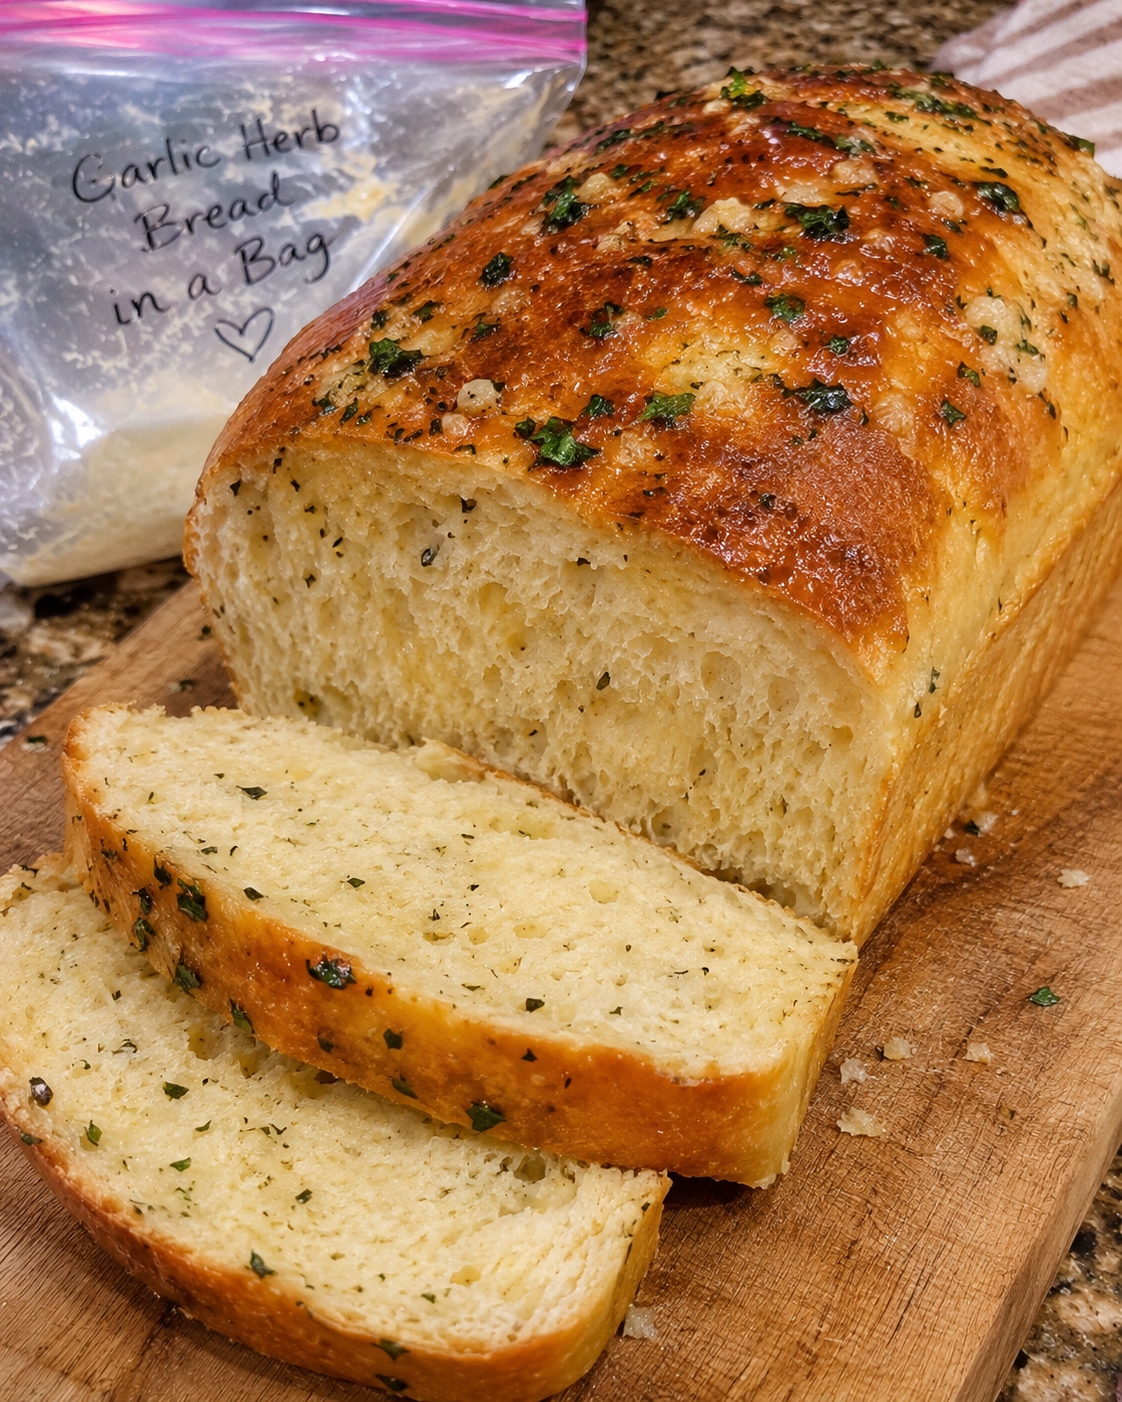
Introduction to Garlic Herb Bread in a Bag
Garlic Herb Bread in a Bag is the perfect solution for anyone looking to create a delicious homemade bread without the usual mess and hassle. This easy recipe allows you to prepare flavorful garlic herb bread using a simple zip-top bag, making the kneading and rising processes remarkably straightforward. The aromatic blend of garlic, Italian herbs, and the rich texture of the bread creates a delightful accompaniment to any meal or a comforting snack on its own. Whether you’re an experienced baker or a novice in the kitchen, this recipe is designed to guide you to success in crafting a warm, savory loaf that everyone will love.
Why You’ll Love This Recipe
This Garlic Herb Bread in a Bag recipe stands out for its simplicity and mess-free approach. By utilizing a zip-top bag for mixing and kneading, you keep your countertops clean and minimize cleanup time. The combination of garlic, herbs, and a touch of butter produces a loaf that is not only fragrant but also utterly irresistible. This recipe’s flexibility allows you to switch up the herbs or incorporate various add-ins, tailoring it to your personal taste preferences. With a straightforward preparation process and gratifying results, this delightful bread is sure to become a regular feature in your kitchen, perfect for gatherings, family dinners, or a cozy night in.
Ingredients for Garlic Herb Bread in a Bag
To create Garlic Herb Bread in a Bag, you will need a selection of pantry staples. The main ingredient, all-purpose flour, provides structure and texture to the bread. You’ll require 3 cups for perfect dough consistency, with a bit extra for kneading. The warm water at 105–110°F activates the yeast, which is crucial for the dough’s rise. Active dry yeast is key for creating a light, fluffy loaf, while sugar helps to feed the yeast during fermentation. Olive oil adds moisture, enhances flavor, and supports a golden crust.
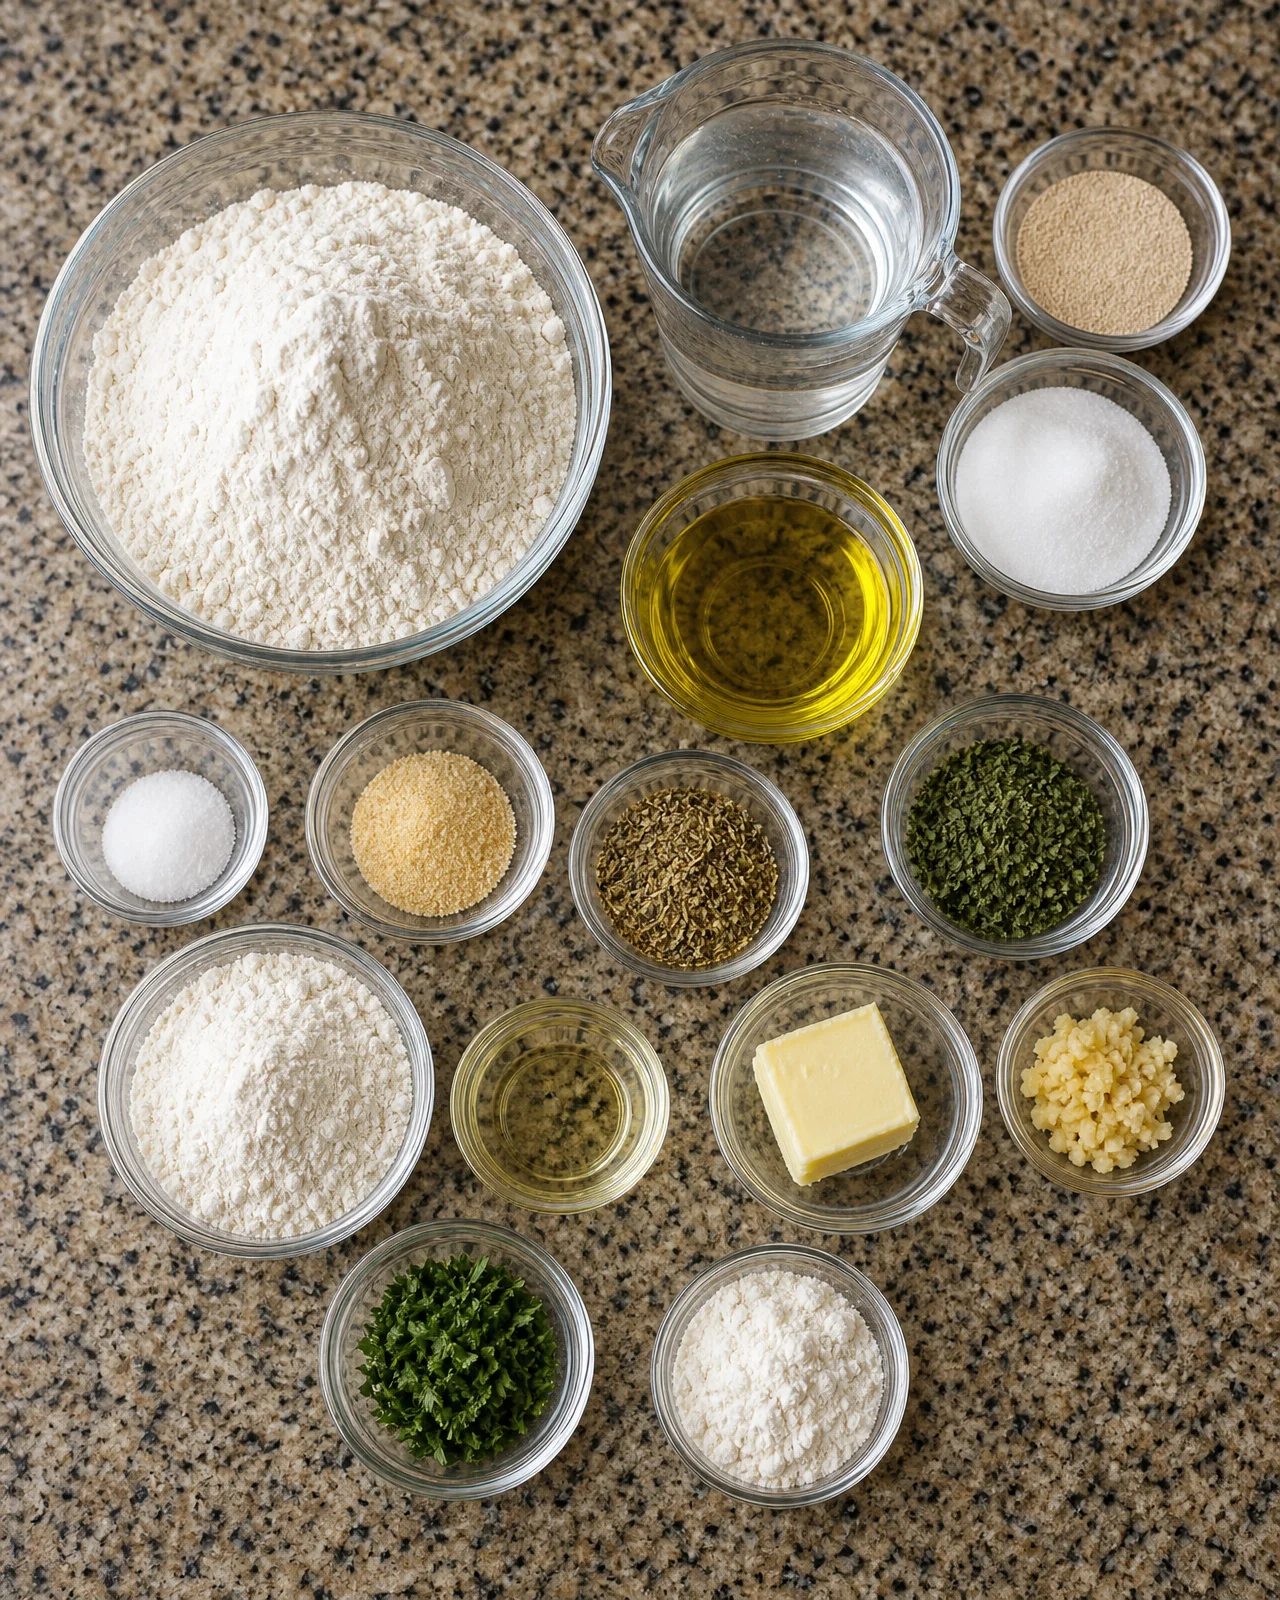
Salt is essential for flavor balance, while garlic powder, dried Italian seasoning, and parsley contribute aromatic notes. For the topping, unsalted butter, fresh garlic, and parsley add a finishing touch that elevates the bread. If needed, you can substitute the all-purpose flour with whole-wheat flour or gluten-free flour blends, though the texture may vary. Additionally, feel free to swap the Italian seasoning with your favorite herbs, such as rosemary or thyme, for a personal twist.
How to Make Garlic Herb Bread in a Bag
Step 1: Mixing the Dough
Begin by mixing the first ingredients for your bread. In a sturdy gallon-size zip-top bag, combine 1 cup of flour, the granulated sugar, active dry yeast, and warm water. Seal the bag, removing excess air, and gently squeeze the contents to mix well. Allow the mixture to rest at room temperature for about 10 minutes. You’ll see bubbles forming as the yeast activates, indicating that the mixture is ready for the next step. This initial phase promotes the yeast’s growth, ensuring your bread will rise beautifully.
Step 2: Forming the Dough
Next, add another cup of flour along with the olive oil, salt, garlic powder, Italian seasoning, and dried parsley to the same bag. Seal it again and mix vigorously until all ingredients are well combined. You may feel the dough becoming thicker and starting to form a shaggy mass. Once this occurs, add the remaining flour and mix until the dough is cohesive.
Get ready to knead! Transfer the dough onto a lightly floured surface and begin kneading for approximately 6–8 minutes. The dough should become smooth and elastic, with a slightly tacky feel. This kneading process helps develop the gluten structure that contributes to a hearty texture. After kneading, place the dough in a greased bowl, cover it with a clean kitchen towel, and let it rise in a warm area for 45–60 minutes, or until it has doubled in size.
Step 3: Shaping and Baking
Once the dough has risen, gently punch it down to release any air bubbles. Shape it into a log and place it seam-side down in a greased 8½ × 4½-inch loaf pan. Cover the loaf with a towel and let it rise again for 30–45 minutes, until it crowns above the rim of the pan. Preheat your oven to 350°F (175°C) while the bread rises for the second time.
When ready, bake the loaf in the preheated oven for 30–35 minutes. You’re looking for a golden brown crust, and the internal temperature should reach between 190–195°F (88–91°C) for the perfect finish. Once baked, melt unsalted butter in a small saucepan over low heat, add minced garlic, and cook gently for 1–2 minutes. Remove from heat, then stir in fresh parsley.
Tips for Success
To achieve the best results with your Garlic Herb Bread in a Bag, closely monitor the temperature of the water you use—too hot can kill the yeast, preventing the dough from rising, while too cold may hinder the activation process. Select a warm, draft-free area for the dough to rise; placing it near a preheating oven or in a cozy corner of your kitchen often works well.
If your dough appears sticky during kneading, don’t hesitate to add a little extra flour, but exercise caution not to overdo it, as an excess of flour can lead to a dense loaf. For an additional flavor boost, consider incorporating cheese or more garlic into the dough before allowing it to rise for the first time. Lastly, be sure to brush the bread with garlic butter while it’s still warm, enhancing the flavor infusion. If you encounter any issues with the dough’s rising process, extending the proofing time slightly can often remedy the situation.
Equipment Needed
For this recipe, you will need a sturdy gallon-size zip-top bag, a mixing bowl, measuring cups and spoons, a clean kitchen towel, an 8½ × 4½-inch loaf pan, and a small saucepan. If you don’t have a loaf pan, consider using a small cast-iron skillet or shaping the dough into rolls. A kitchen thermometer is also handy to check the internal temperature for doneness.
Variations
This Garlic Herb Bread in a Bag recipe offers versatility for personal preferences. For a richer flavor, incorporate grated Parmesan or mozzarella cheese into the dough, which will melt beautifully and add a creamy texture. To enhance the herb factor, swap out the dried Italian seasoning for fresh herbs like basil, thyme, or rosemary, imparting a brighter, fresher taste. If you enjoy a touch of heat, consider adding a pinch of red pepper flakes.
To further customize your bread, try including chopped sun-dried tomatoes or olives for an additional flavor dimension. Adjust the amount of garlic to match your personal taste; using roasted garlic can provide a milder and sweeter flavor profile. If you’re looking to enhance the sweetness of the bread, consider adding a tablespoon of honey or opt for brown sugar in place of some of the granulated sugar for a deeper, caramel-like sweetness.
Serving Suggestions
Garlic Herb Bread in a Bag pairs beautifully with a variety of dishes. You can serve it alongside a fresh garden salad, creamy soups, or pasta for a perfect sidekick. The aromatic flavors also make it an excellent base for sandwiches or bruschetta, adding a savory touch to your favorite fillings. For a delightful appetizer, slice the bread and present it warm with olive oil and balsamic vinegar for dipping. To elevate your serving experience, consider arranging slices on a rustic wooden board or in a charming breadbasket, garnishing with fresh parsley to add a pop of color and visual appeal.
FAQs about Garlic Herb Bread in a Bag
Q1: Can I make this bread ahead of time?
Yes, you can prepare the dough in advance and store it in the refrigerator after the first rise. Just make sure to let it come to room temperature before shaping and rising again before baking.
Q2: How should I store leftover bread?
Wrap the cooled bread in plastic wrap or aluminum foil, and store it at room temperature for up to three days. You can also freeze it for longer storage—wrap it tightly and place it in a freezer-safe bag for up to three months.
Q3: Can I use bread flour instead of all-purpose flour?
Absolutely! Bread flour will yield a chewier texture and may improve the overall rise due to its higher protein content.
Q4: What should I do if the dough doesn’t rise?
Make sure the yeast is fresh and the water temperature was correct. If the environment is too cold, find a warmer place for rising or allow more time.
Q5: Can I add herbs directly to the dough?
Yes, feel free to add fresh or dried herbs directly to the dough for extra flavor. Adjust the quantities based on your preferences; fresh herbs may need a bit more than dried.
Final Thoughts
Garlic Herb Bread in a Bag is an easy yet satisfying way to create homemade bread that bursts with flavor. With a straightforward process, minimal cleanup, and the opportunity to customize your loaf, this recipe is a perfect go-to for any occasion. Remember to brush the bread with the garlic butter while it’s warm to truly let those flavors meld.
Whether you’re serving it at a family dinner or enjoying it with your favorite dip, this bread is sure to impress. Allow it to cool properly before slicing for the ideal texture! Embrace this simple recipe and personalize it further by experimenting with different herbs and flavors. Your kitchen will soon be filled with the irresistible aroma of freshly baked garlic herb bread, making every moment spent preparing this dish enjoyable and rewarding.
Print
Garlic Herb Bread in a Bag
- Prep Time: 10 minutes
- Cook Time: 35 minutes
- Total Time: 1 hour 45 minutes
- Yield: 1 loaf 1x
- Category: Bread
- Method: Baking
- Cuisine: Italian
- Diet: Vegetarian
Description
A simple and delicious recipe for homemade garlic herb bread that you can prepare in a bag, making the process easier and mess-free.
Ingredients
- 3 cups (360 g) all-purpose flour, divided
- 1 cup (240 ml) warm water, 105–110°F (40–43°C)
- 2¼ teaspoons (7 g) active dry yeast
- 2 tablespoons (25 g) granulated sugar
- 2 tablespoons (30 ml) olive oil
- 1 teaspoon (6 g) fine salt
- 1½ teaspoons garlic powder
- 1 teaspoon dried Italian seasoning
- 1 teaspoon dried parsley
- Additional flour for kneading
- Oil for greasing
- 2 tablespoons (28 g) unsalted butter (for topping)
- 1 medium garlic clove, very finely minced (for topping)
- 1 tablespoon finely chopped fresh parsley (for topping)
Instructions
- Combine 1 cup flour, sugar, yeast, and warm water in a sturdy gallon-size zip-top bag. Seal and squeeze gently. Rest for 10 minutes.
- Add another cup flour, olive oil, salt, garlic powder, Italian seasoning, and dried parsley. Seal and mix.
- Add the remaining flour and mix until a shaggy dough forms.
- Knead on a lightly floured surface for 6–8 minutes.
- Place in a greased bowl, cover, and rise for 45–60 minutes, until doubled.
- Shape into a log and place seam-side down in a greased 8½ × 4½-inch loaf pan.
- Cover and rise for 30–45 minutes, until crowned above the rim.
- Bake at 350°F (175°C) for 30–35 minutes, until golden and the center reaches 190–195°F (88–91°C).
- Melt butter over low heat. Add garlic and cook gently for 1–2 minutes. Remove from heat and add parsley.
- Brush the warm loaf with garlic butter.
- Rest in the pan for 10 minutes, then transfer to a rack. Cool before slicing.
Notes
- Ensure the water is at the right temperature to activate the yeast.
- Let the dough rise in a warm place for best results.
- Brush the bread with garlic butter while it’s still warm for better absorption of flavors.
Nutrition
- Serving Size: 1 slice
- Calories: 150
- Sugar: 1 g
- Sodium: 150 mg
- Fat: 5 g
- Saturated Fat: 2 g
- Unsaturated Fat: 3 g
- Trans Fat: 0 g
- Carbohydrates: 23 g
- Fiber: 1 g
- Protein: 4 g
- Cholesterol: 10 mg