
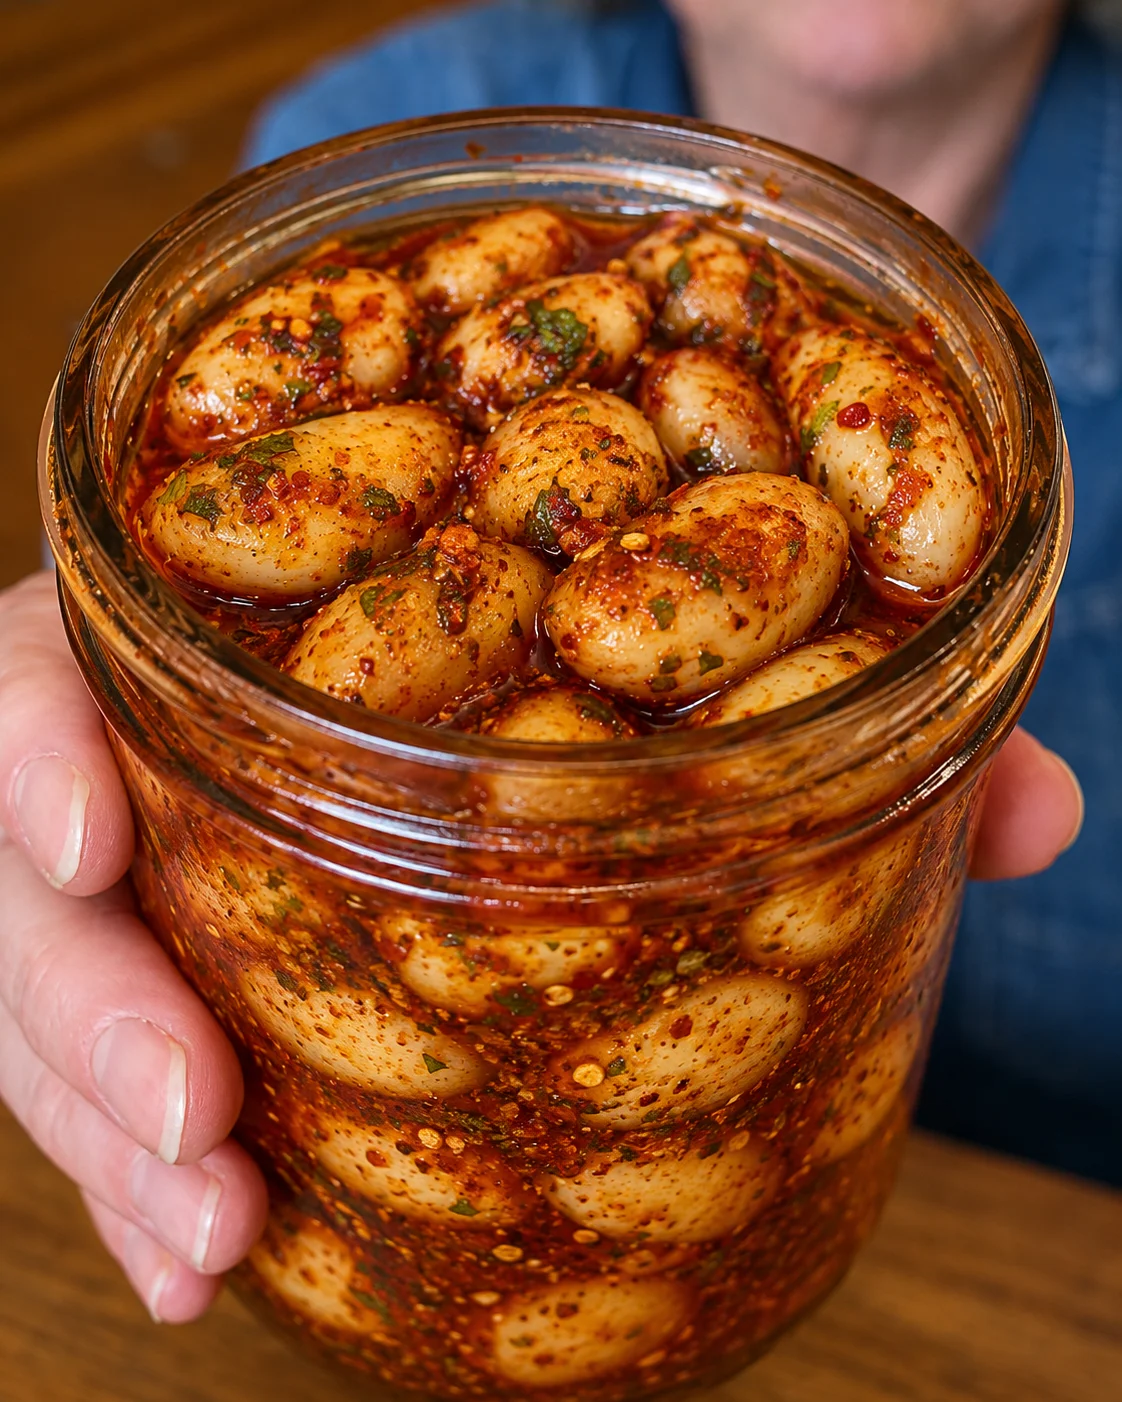
If you’re a garlic lover, this Homemade Spicy Pickled Garlic recipe is one you’ll want to make again and again. Crisp garlic cloves are preserved in a tangy vinegar brine infused with red pepper flakes, mustard seeds, and whole black peppercorns, creating a bold, flavorful condiment that’s surprisingly addictive. The garlic gradually becomes milder as it pickles while absorbing the spicy, tangy flavors of the brine.
Unlike raw garlic, which has a sharp, intense bite, pickled garlic develops a smoother, slightly sweet flavor after a few days in the refrigerator. The cloves remain firm and crunchy while losing much of their harshness, making them perfect for snacking, charcuterie boards, salads, sandwiches, pasta dishes, and countless other recipes.
Save this recipe and cook smarter
Keep your favorite Cooking Layer recipes in one place, plan your weekly meals, and quickly find dinner ideas whenever you need them.
Free to download • Fast and easy to use
One of the best things about this recipe is how incredibly simple it is. With just a handful of pantry ingredients and a single glass jar, you can prepare a homemade refrigerator pickle that keeps for weeks. No special equipment or complicated canning process is required because this recipe is intended for refrigerated storage.
The hardest part is honestly peeling the garlic! Once that’s finished, the remaining steps take only a few minutes. After several days of marinating, you’ll have a jar filled with flavorful garlic cloves that can instantly elevate everyday meals.
Whether you’re preparing appetizers, adding flavor to roasted vegetables, or simply looking for a unique homemade gift for fellow garlic lovers, this Homemade Spicy Pickled Garlic is a recipe worth keeping on hand.
Ingredients You’ll Need
This simple recipe uses only a few ingredients, but each one contributes to the final flavor.
Main Ingredients
- 2 cups fresh garlic cloves (about 2–3 heads), peeled
- 1 cup distilled white vinegar
- 1 cup water
- 1 tablespoon pickling salt or kosher salt
- 1 tablespoon granulated sugar (optional)
Flavorings
- 1 teaspoon red pepper flakes
- 1 teaspoon mustard seeds
- 1 teaspoon whole black peppercorns
Using fresh garlic produces the best texture and flavor. Avoid garlic that feels soft or has started sprouting.
How to Make Homemade Spicy Pickled Garlic
Start by separating the garlic heads into individual cloves. Peel each clove completely, removing all of the papery skin. Although this is the most time-consuming part of the recipe, taking your time ensures the finished garlic has the best appearance and texture.
Once all of the garlic has been peeled, prepare the pickling brine. In a small stainless steel or other non-reactive saucepan, combine the distilled white vinegar, water, pickling salt, and optional sugar. Heat the mixture over medium-high heat until it reaches a gentle boil, stirring occasionally until the salt and sugar have completely dissolved.
While the brine heats, pack the peeled garlic cloves tightly into a clean glass jar. Sprinkle the red pepper flakes, mustard seeds, and whole black peppercorns throughout the jar so they’re evenly distributed among the garlic.
Carefully pour the hot pickling brine over the garlic cloves until they’re completely covered, leaving about ½ inch of headspace at the top of the jar.
Gently tap the jar on the countertop several times to release any trapped air bubbles.
Seal the jar with a clean lid and allow it to cool completely at room temperature.
Once cooled, transfer the jar to the refrigerator.
Although the garlic can be tasted after a day or two, waiting 3 to 4 days allows the cloves to absorb much more of the spicy, tangy flavor while becoming noticeably milder than raw garlic.
Why Pickled Garlic Is So Popular
Many people who find raw garlic too strong are surprised by how mellow pickled garlic becomes.
The vinegar softens garlic’s sharp bite while preserving its rich, savory flavor. The addition of mustard seeds and black peppercorns adds subtle warmth, while red pepper flakes provide just enough heat to keep every bite interesting.
Another reason homemade pickled garlic has become so popular is its versatility. A few cloves can instantly brighten salads, grain bowls, pasta dishes, pizzas, sandwiches, burgers, roasted vegetables, and cheese boards.
Unlike fresh garlic, pickled cloves are ready to eat straight from the jar without any chopping or cooking.
Helpful Tips
Choose firm, fresh garlic heads without green sprouts for the best texture.
Use pickling salt or kosher salt instead of iodized table salt, which may cloud the brine.
A clean glass jar with a tight-fitting lid helps keep the garlic fresh during storage.
Make sure every garlic clove stays completely submerged beneath the brine throughout refrigeration.
If you’d like a milder flavor, reduce the amount of red pepper flakes. For extra heat, simply add a little more.
Easy Variations
One of the best things about homemade pickled garlic is how easy it is to customize. A few simple changes can create completely different flavor profiles while keeping the same basic pickling method.
Extra Spicy Pickled Garlic
If you enjoy bold heat, increase the amount of crushed red pepper flakes or add one or two thinly sliced fresh jalapeños to the jar. A small dried chili pepper can also add extra spice while infusing the brine with deeper flavor over time.
Herb Pickled Garlic
Fresh herbs create a bright, aromatic variation that’s perfect for charcuterie boards and Mediterranean-inspired dishes. Add a few sprigs of fresh dill, thyme, rosemary, or oregano to the jar before pouring in the hot brine.
Sweet and Spicy Version
For a slightly sweeter flavor, increase the sugar to two tablespoons or replace part of the sugar with honey. The sweetness helps balance the vinegar while complementing the natural flavor of the garlic.
Lemon Garlic Pickles
Add a few thin slices of fresh lemon or a strip of lemon zest to the jar. The citrus brightens the overall flavor and pairs especially well with seafood, grilled chicken, and salads.
Smoky Garlic
A small pinch of smoked paprika or a few whole dried chili peppers adds a subtle smoky flavor without overpowering the garlic itself
Storage
Because this recipe is designed as a refrigerator pickle, the jar should always remain refrigerated.
Store the garlic in a clean glass jar with a tight-fitting lid, making sure every clove stays completely submerged beneath the brine.
For the best quality, enjoy the garlic within one month. The flavor will continue to develop during the first couple of weeks, becoming smoother and more balanced over time.
Always use a clean fork or utensil when removing garlic from the jar. This helps reduce the chance of introducing bacteria and keeps the brine fresh.
If the garlic develops an unusual odor, mold, or signs of spoilage, discard the entire batch.
Serving Suggestions
One of the reasons pickled garlic is so popular is its incredible versatility. These flavorful cloves can be enjoyed in countless ways throughout the week.
Serve them alongside cured meats, artisan cheeses, olives, and crackers on a charcuterie board for an easy appetizer.
Slice a few cloves into fresh green salads, pasta salads, or potato salads to add a bright, tangy flavor.
Chop them into homemade vinaigrettes, mayonnaise-based sauces, or creamy dips for an extra layer of flavor.
They also make a delicious topping for burgers, grilled chicken sandwiches, hot dogs, tacos, pizzas, and wraps.
For pasta lovers, finely chop a few cloves and stir them into warm butter or olive oil before tossing with cooked pasta.
Pickled garlic pairs especially well with roasted vegetables, grilled steak, pork chops, roasted chicken, and seafood.
Many garlic lovers even enjoy eating the cloves straight from the jar as a flavorful snack.
Frequently Asked Questions
Does pickled garlic taste as strong as raw garlic?
No. As the garlic sits in the vinegar brine, its sharp bite becomes much milder while still keeping its rich garlic flavor. Most people find pickled garlic much easier to eat than raw garlic.
How long should I wait before eating it?
Although the garlic is technically ready after a couple of days, waiting 3 to 4 days provides noticeably better flavor. Many people prefer waiting a full week for the cloves to become even milder.
Can I reuse the pickling brine?
It’s generally best to prepare a fresh batch of brine for every new batch of garlic. Reusing old brine may reduce quality and consistency.
Can I use apple cider vinegar?
Yes. Apple cider vinegar produces a slightly milder, fruitier flavor than distilled white vinegar. Either option works well for refrigerator pickles.
Why did my garlic change color?
Fresh garlic may occasionally develop a blue or green tint during pickling because of a natural chemical reaction between sulfur compounds and acidity. This color change is harmless and does not mean the garlic has spoiled.
Can I preserve this recipe for pantry storage?
No. This version is intended only for refrigerator storage. Because safe shelf-stable canning requires carefully tested processing methods and acidity levels, this recipe should always be kept refrigerated.
Final Thoughts
This Homemade Spicy Pickled Garlic recipe is an easy way to transform simple garlic cloves into a bold, flavorful condiment you’ll reach for again and again. As the garlic slowly marinates in the tangy vinegar brine, it becomes milder, slightly sweet, and infused with the warm flavors of mustard seeds, black peppercorns, and red pepper flakes.
Whether you’re adding a few cloves to salads, sandwiches, pasta dishes, charcuterie boards, or roasted vegetables, this homemade refrigerator pickle brings a delicious burst of flavor to almost any meal. It also makes a thoughtful homemade gift for anyone who loves garlic or enjoys experimenting with homemade pickles.
With only a handful of inexpensive ingredients and very little hands-on work, you’ll have a versatile jar of pickled garlic ready to enjoy for weeks. Once you make your first batch, it’s easy to see why this simple recipe has become a favorite in so many kitchens.
Print
Homemade Spicy Pickled Garlic
Ingredients
- 2 cups fresh garlic cloves (from about 2–3 heads), peeled
- 1 cup distilled white vinegar
- 1 cup water
- 1 tablespoon pickling salt or kosher salt
- 1 tablespoon granulated sugar (optional)
- 1 teaspoon crushed red pepper flakes
- 1 teaspoon mustard seeds
- 1 teaspoon whole black peppercorns
Optional Add-Ins
- 2 bay leaves
- 2–3 sprigs fresh dill
- ½ teaspoon coriander seeds
- ½ teaspoon celery seeds
- 2 dried red chilies
- 1 teaspoon Italian seasoning
Instructions
- Prepare the Garlic: Peel all the garlic cloves and discard any damaged or bruised pieces.
- Pack the Jar: Place the peeled garlic cloves into a clean glass jar. Sprinkle the crushed red pepper flakes, mustard seeds, black peppercorns, and any optional spices evenly throughout the jar.
- Prepare the Brine: In a small stainless-steel saucepan, combine the white vinegar, water, pickling salt, and sugar (if using). Bring the mixture to a gentle boil over medium-high heat, stirring until the salt and sugar are completely dissolved.
- Fill the Jar: Carefully pour the hot brine over the garlic, leaving about ½ inch of headspace at the top of the jar. Gently tap the jar on the counter to release any trapped air bubbles.
- Cool: Allow the jar to cool completely to room temperature.
- Refrigerate: Seal the jar tightly and refrigerate for at least 3–4 days before enjoying. For a deeper, more mellow flavor, allow the garlic to pickle for 1–2 weeks.
- Serve: Enjoy the pickled garlic as a snack, on charcuterie boards, in salads, pasta dishes, sandwiches, antipasto platters, or chopped into dressings and marinades.
Notes
- Fresh, firm garlic cloves produce the best flavor and texture.
- The garlic will gradually mellow as it pickles while still retaining a pleasant spicy kick.
- Always keep the garlic completely submerged in the brine during storage.
- Store refrigerated for up to 1 month.
- This is a refrigerator pickle recipe and is not intended for shelf-stable canning without following approved home canning procedures.
Enjoyed this recipe?
Discover more delicious recipes, save your favorites, and plan your meals with the Cooking Layer app.
Free to download • Fast and easy to use