Layered Ice Cream Cake: Silky and Crisp
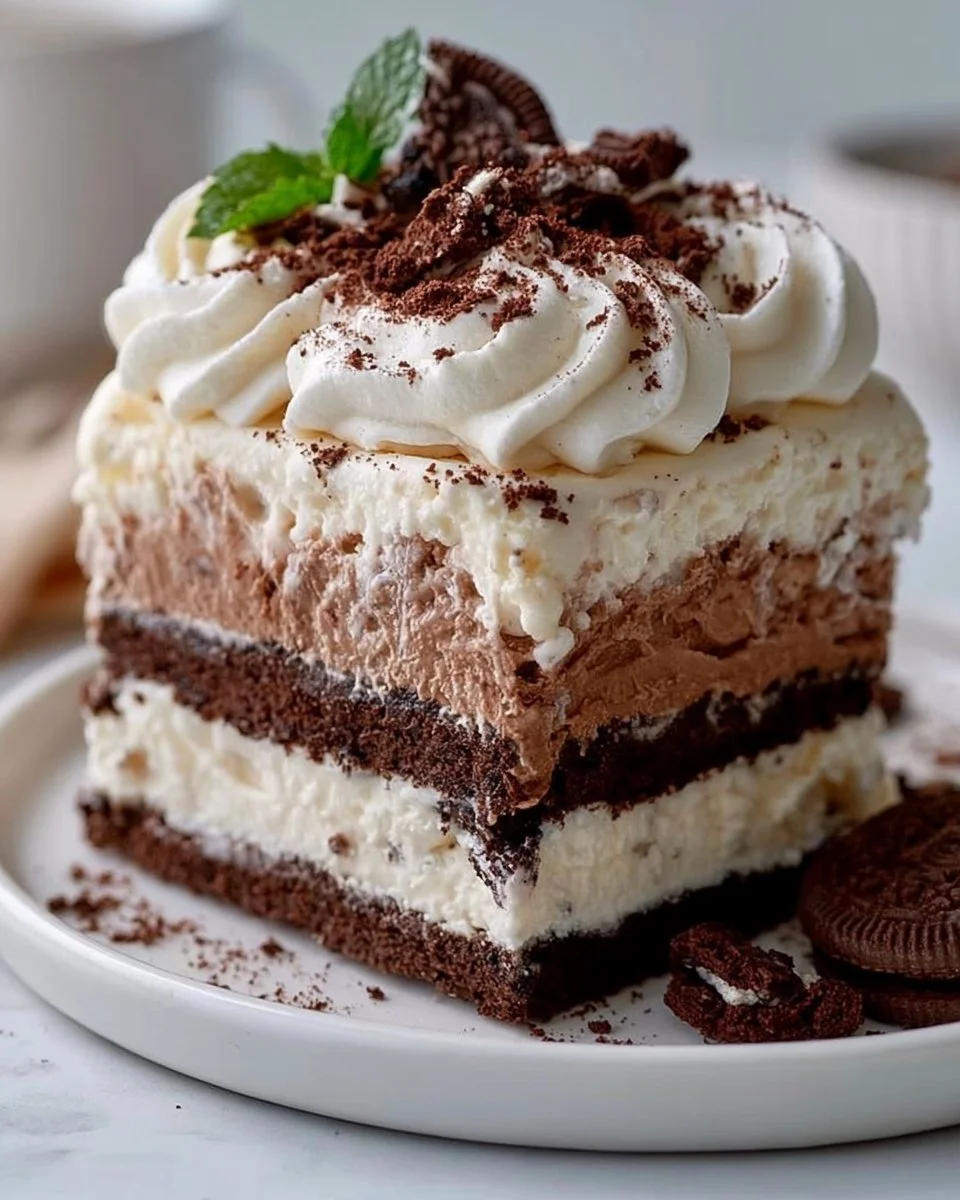
There’s a kind of magic that happens when the seasons shift, coaxing warm weather and sunshine back into our lives. It invites us to explore flavors that dance on our taste buds while enveloping our senses in sweet nostalgia. Imagine a festive gathering where laughter fills the air, friends are mingling, and all eyes are glued to a show-stopping dessert: a Layered Ice Cream Cake, glistening with creamy goodness and draped in luscious whipped cream. The moment that first slice is revealed is nothing short of euphoric. Each layer beckons, promising a bite that melds silky smoothness with crunchy textural surprises.
As you savor the first mouthful, the cool, rich vanilla ice cream meets the distinct flavor of chocolate, interspersed with whispers of crushed Oreo cookies and chocolate sandwich cookies. The harmony of textures captivates—each forkful offers an intriguing contrast of creamy and crisp, inviting you to indulge just one more time. It’s a sweet sensation that not only evokes childhood memories of lazy summer afternoons but also elevates any occasion, be it a birthday celebration, a family barbecue, or simply a moment of self-indulgence after a long week.
Why You’ll Love This Layered Ice Cream Cake
There are endless reasons to fall head over heels for this layered masterpiece. First and foremost, it’s a feast for both the eyes and the palate. Each layer visually contrasts—dark chocolate meets bright vanilla, punctuated by the deep black of Oreo crumbs. Then, of course, there’s the flavor. This cake strikes a perfect balance between sweet and slightly salty, thanks to the rich undertones of the chocolate and the sweet crunch of the cookies.
This dessert isn’t just an indulgence; it’s an experience. The moment you pull your cake from the freezer, slice into its icy depths, and serve it up with a dollop of whipped cream, the eyes around the table light up. Ideal for summer gatherings or cozy winter nights, this dessert is a guaranteed delight that brings people together. Sharing it becomes part of the joy, as everyone clamors for that perfect piece, a bite that promises a little bit of everything.
Preparation Phase & Tools to Use
Creating this Layered Ice Cream Cake isn’t just about the ingredients; it’s also about having the right tools to make the process seamless and enjoyable. Here’s a rundown of essential items to have on hand:
- 9×13-inch Baking Pan: This size serves as the perfect canvas for your layers. The deep sides allow for ample ice cream and whipped cream.
- Parchment Paper: Line the pan with this nifty kitchen tool for easy removal later. The paper acts as a sling, minimizing mess and maximizing presentation.
- Offset Spatula: This versatile utensil is fantastic for spreading ice cream evenly and achieving clean edges.
- Mixing Bowls: You will need a few bowls for mixing your ingredients and preparing your layers.
- Electric Mixer: Whipping the cream into stiff peaks becomes a breeze with an electric mixer, saving you time and effort.
Preparation Tips: Ensure your ice creams soften slightly at room temperature before you start building layers. This will make spreading smoother and easier. Working with soft ice cream allows you to achieve that perfect creamy texture without tearing through the layers. Keep your whipped cream cold to achieve the best results when whipping.
Ingredients for Layered Ice Cream Cake
Let’s take a closer look at the star players in this delectable cake:
- 2 cups (225g) Oreo cookies, crushed into fine crumbs: These provide a crunchy, chocolatey base and add that classic cookie flavor.
- 5 tbsp (70g) unsalted butter, melted: The butter acts as a binding agent, making sure your crust holds together perfectly.
- 1.5 quarts (1.4L) vanilla ice cream, slightly softened: Creamy and sweet, vanilla ice cream contrasts beautifully with chocolate.
- 1.5 quarts (1.4L) chocolate ice cream, slightly softened: Indulgent and rich, this layer adds luxurious depth and intensity.
- 1 cup (150g) chocolate sandwich cookies, roughly chopped: These chunks enhance the texture, bringing extra crunch and flavor.
- 2 cups (480ml) heavy whipping cream, cold: The foundation for your fluffy topping, this cream whips beautifully to create a cloud-like layer.
- 1/2 cup (60g) powdered sugar: This sweetener balances the cream’s richness, adding just the right amount of sweetness.
- 1 tsp (5ml) vanilla extract: A drop of vanilla deepens the overall flavor profile, enhancing each bite.
Feel free to swap the ice creams for your favorite flavors or try different cookie types, sparking creativity in each delicious layer.
How to Make Layered Ice Cream Cake
Line your pan: Begin by lining a 9×13-inch baking pan with parchment paper. Allow the paper to hang over the sides, creating a sling that makes removal a breeze later on.
Create the crust: In a large bowl, combine the crushed Oreo cookies with melted butter. Stir until the mixture resembles moist sand. Press this mixture firmly into the bottom of the lined baking pan, ensuring the surface is compact. For the best texture, flash-freeze your crust for 10 minutes.
Layer in the vanilla ice cream: Once the crust has set, spread the softened vanilla ice cream evenly over the crust using an offset spatula. Make sure to smooth the top and press it gently against the edges to create nice layers.
Add the chocolate cookie crunch: Sprinkle the roughly chopped chocolate sandwich cookies over the vanilla layer. Gently press them into the ice cream, allowing them to nestle in for a flavorful surprise in every slice.
Top with chocolate ice cream: Scoop or spread the softened chocolate ice cream over the chocolate crunch layer, smoothing the surface until level. Now it’s time for a well-deserved freeze! Set your cake in the freezer for at least 4 hours to allow the layers to firm up beautifully.
Whip the cream: In a large mixing bowl, whip the cold heavy cream, powdered sugar, and vanilla extract until you achieve stiff peaks. This dreamily light topping will crown your cake.
Finish and freeze again: Once your ice cream layers are firm, spread the whipped cream over the chocolate ice cream layer, creating a thick and fluffy blanket. If desired, add optional toppings like sprinkles, chocolate shavings, or an extra sprinkle of cookie crumbs. Return the cake to the freezer for another 2 hours to set.
Chef’s Notes & Helpful Tips
- Make-Ahead Magic: This ice cream cake is an excellent make-ahead dessert. Construct it the day before your gathering, allowing the flavors to meld while it sits overnight in the freezer.
- Modification Alternatives: Want to elevate your cake? Consider adding layers of fresh fruit, such as strawberries or raspberries, between the ice cream layers. You can also swirl in sauces like hot fudge or caramel.
- Customization Ideas: Experiment with different cookie bases! How about a chocolate cookie crust or a graham cracker base for a twist? You can even mix different ice cream flavors to suit your preferences.
Common Mistakes to Avoid
Creating a stunning Layered Ice Cream Cake is doable, but avoiding these common pitfalls can make a considerable difference in your outcome:
- Using hard ice cream: Always allow your ice cream to soften a little before spreading—it should be scoopable without tearing the layers apart.
- Not pressing the crust firmly enough: Ensure your crust is tightly packed to prevent crumbling when you slice into it.
- Over-whipping the cream: Stiff peaks are ideal, but over-whipping can lead to a grainy texture. Stop once it just holds its shape beautifully.
- Skipping the freeze time: Patience pays off! Allow enough time for each layer to freeze thoroughly. This way, they maintain their integrity and create a gorgeous cake.
What to Serve With Layered Ice Cream Cake
This ice cream cake stands on its own, but it becomes even more delightful when paired with complementary flavors and textures. Here are some ideas:
- Fresh Berries: The tartness of strawberries, raspberries, or blueberries refreshes the palate and beautifully contrasts the richness of the cake.
- Chocolate Sauce: A drizzle of hot fudge or chocolate ganache enhances the indulgent experience and elevates presentation.
- Caramel Drizzle: Sweet caramel can add a touch of luxury that perfectly complements the cake’s ingredients.
- Whipped Cream: Extra dollops of whipped cream on the side create volume and lightness.
- Coffee: Serve with a cup of freshly brewed coffee or espresso for a delicious afternoon pick-me-up.
- Nutty Toppings: Chopped nuts like pecans or almonds add a lovely crunch and a nutty flavor that pairs well with the chocolate and cream.
- Ice Cream Floats: For those who can’t get enough ice cream, consider serving a cherry soda float alongside for a nostalgic pairing.
- Fruit Sorbet: A bright fruit sorbet provides a refreshing contrast to the creaminess of the layered cake.
Storage & Reheating Instructions
This Layered Ice Cream Cake shines in storage!
- Storing Leftovers: Wrap leftover cake in plastic wrap or foil, or keep it in an airtight container to prevent freezer burn. It lasts for about 1-2 weeks, but trust us, it never lasts that long!
- Freezing: This dessert holds up wonderfully in the freezer—just make sure it’s well-wrapped.
- Thawing: When you’re ready to enjoy, let it sit at room temperature for about 10-15 minutes to soften slightly, making slicing easier.
Estimated Nutrition Information
Approximate values per serving (1/12 of the cake):
- Calories: 350
- Total Fat: 24g
- Saturated Fat: 14g
- Cholesterol: 70mg
- Sodium: 180mg
- Total Carbohydrates: 32g
- Sugars: 25g
- Protein: 5g
(Nutrition values may vary based on ingredient brands and quantities used. For precise measurements and dietary considerations, consult your nutritionist or dietitian.)
FAQs
Can I use homemade ice cream for this recipe?
Absolutely! Homemade ice cream not only allows you to control the ingredients but also adds a personal touch. Just make sure it’s slightly softened before layering.
Can I make this cake dairy-free?
Yes! Use dairy-free ice creams and whipped toppings available in stores, or even coconut cream for your whipped topping as a delightful substitute.
What if I don’t have Oreo cookies?
Don’t fret! You can use other chocolate sandwich cookies or even graham crackers for a different flavor profile. Just ensure they have a similar texture.
How do I know when the cake is set properly?
The cake should be firm to the touch when ready to serve. Gently press down on the top layer to check; if it holds its shape, it’s perfect!
Can kids help with this recipe?
Absolutely! This recipe is family-friendly. Kids can help crush the cookies, layer the ice cream, and add toppings—making it a fun kitchen activity.
Conclusion
The creation of this Layered Ice Cream Cake is more than just a baking session; it’s an invitation to immerse yourself in a playful culinary adventure. Each layer tells a story, and each bite captures the essence of joy and togetherness. It’s an indulgent dessert that transcends time, blending memories of carefree summers with the present moments spent with loved ones. So, gather your ingredients, embrace the magic that lies in food, and dive into a creation that’ll have everyone craving more. Trust us; once you make this cake, it will become a cherished tradition, one that keeps sweet smiles on faces for years to come!
Print
Layered Ice Cream Cake
- Prep Time: 30 minutes
- Cook Time: 0 minutes
- Total Time: 360 minutes
- Yield: 12 servings 1x
- Category: Dessert
- Method: Freezing
- Cuisine: American
- Diet: Vegetarian
Description
A delightful layered cake featuring creamy vanilla and chocolate ice cream with a crunchy Oreo crust and topped with fluffy whipped cream.
Ingredients
- 2 cups (225g) Oreo cookies, crushed into fine crumbs
- 5 tbsp (70g) unsalted butter, melted
- 1.5 quarts (1.4L) vanilla ice cream, slightly softened
- 1.5 quarts (1.4L) chocolate ice cream, slightly softened
- 1 cup (150g) chocolate sandwich cookies, roughly chopped
- 2 cups (480ml) heavy whipping cream, cold
- 1/2 cup (60g) powdered sugar
- 1 tsp (5ml) vanilla extract
Instructions
- Line your pan: Begin by lining a 9×13-inch baking pan with parchment paper.
- Create the crust: In a large bowl, combine the crushed Oreo cookies with melted butter. Press this mixture firmly into the bottom of the lined baking pan.
- Layer in the vanilla ice cream: Spread the softened vanilla ice cream evenly over the crust, smoothing the top.
- Add the chocolate cookie crunch: Sprinkle the roughly chopped chocolate sandwich cookies over the vanilla layer.
- Top with chocolate ice cream: Spread the softened chocolate ice cream over the cookie crunch layer, smoothing the surface. Freeze for at least 4 hours.
- Whip the cream: In a large mixing bowl, whip the cold heavy cream, powdered sugar, and vanilla extract until stiff peaks form.
- Finish and freeze again: Spread the whipped cream over the chocolate layer and freeze for another 2 hours to set.
Notes
Make-ahead for best results; freeze overnight for the best flavor blending. Customize with fruit or sauces if desired.
Nutrition
- Serving Size: 1 slice
- Calories: 350
- Sugar: 25g
- Sodium: 180mg
- Fat: 24g
- Saturated Fat: 14g
- Unsaturated Fat: 6g
- Trans Fat: 0g
- Carbohydrates: 32g
- Fiber: 1g
- Protein: 5g
- Cholesterol: 70mg