Introduction to Pull Apart Stuffing Ring
Gather around, fellow home cooks! The pull apart stuffing ring is here to elevate your holiday gatherings. This delightful dish combines rich flavors and a cozy vibe, making it perfect for impressing family and friends without sacrificing your precious time. As a passionate cook, I find joy in bringing something spectacular to the table that doesn’t require hours in the kitchen. Whether it’s for Thanksgiving or a festive get-together, this pull apart stuffing ring is a wonderful solution for busy days. Who doesn’t love a golden, herb-infused masterpiece that practically begs for sharing?
Why You’ll Love This Pull Apart Stuffing Ring
This pull apart stuffing ring is a culinary dream come true for busy moms and professionals alike. It’s easy to make, with minimal prep time needed. The rich buttery biscuit dough embraces a medley of fresh herbs and sautéed veggies, creating an explosion of flavor in every bite. Plus, it looks stunning on any table, making you feel like a gourmet chef without the stress. What’s not to love?
Ingredients for Pull Apart Stuffing Ring
Creating a stunning pull apart stuffing ring starts with the right ingredients. Here’s what you’ll need:
- Unsalted butter: It adds a rich, creamy flavor to the stuffing that’s simply irresistible.
- Onion: Diced small, it brings sweetness and depth to the dish, enhancing the overall taste profile.
- Celery: This crunchy vegetable contributes a refreshing bite and balances the richness of the butter.
- Fresh sage, thyme, and rosemary: These fragrant herbs are the stars of the show, infusing the stuffing with earthy aromas that scream comfort.
- Salt and pepper: Essential for seasoning, these two staples ensure each bite is packed with flavor.
- Garlic: A must-have for any savory dish, it lends an aromatic warmth that amplifies the taste.
- Egg: This binding agent holds the stuffing together, giving it a cohesive texture.
- Flat leaf parsley: Divided for layering, it adds a pop of color and subtle freshness to the stuffing.
- Biscuit dough: The heart of this recipe. Using refrigerated biscuit dough simplifies the process, making it quick and easy!
- Optional garnishes: Consider using extra sage, thyme, or rosemary sprigs for a decorative touch that elevates your presentation.
You’ll find exact measurements at the bottom of the article, ready for printing when you’re ready to dive into this culinary adventure!
How to Make Pull Apart Stuffing Ring
Step 1: Preheat and Prepare the Pan
First things first! Preheat your oven to 325°F. Then, grab a 9-inch Bundt pan or a fluted tube pan. Give it a good spray of cooking spray to ensure your gorgeous stuffing ring slides out easily later. Trust me; this step is crucial!
Step 2: Sauté the Base Ingredients
In a large sauté pan, melt the butter over medium-high heat. Add the diced onion and celery along with sage, thyme, salt, and pepper. Stir frequently for about 4 to 5 minutes until they soften beautifully. This sautéing creates a flavorful base for your stuffing!
Step 3: Combine with Garlic
Now it’s time to amp up the flavor! Stir in the minced garlic and cook for just 1 minute until it’s fragrant. That sweet garlic aroma is the perfect hint of what’s to come in your pull apart stuffing ring!
Step 4: Prepare the Egg Mixture
Transfer the buttery mixture to a large mixing bowl and let it cool for about five minutes. Then, add the beaten egg and whisk it all together. This cooling step is vital to avoid scrambling the egg, keeping that mix silky and smooth!
Step 5: Add Biscuit Dough
Next, toss in the quartered biscuit dough pieces. Stir gently until each piece is evenly coated with the buttery mixture. This is key! Even coating ensures every bite bursts with that savory goodness, making your pull apart stuffing ring truly delightful!
Step 6: Layer in the Bundt Pan
Start by adding half of your stuffing mixture into the prepared Bundt pan. Sprinkle half of the beautiful parsley over this layer. Repeat the process with the remaining mixture and parsley. Layering helps distribute those vibrant flavors throughout the dish!
Step 7: Cover and Bake
Cover your Bundt pan with nonstick foil. This prevents the top from browning too quickly. Bake in the preheated oven for 30 minutes. Afterward, carefully peel back the foil and continue baking for another 15 to 20 minutes until it reaches 160°F internally.
Step 8: Inverting and Serving
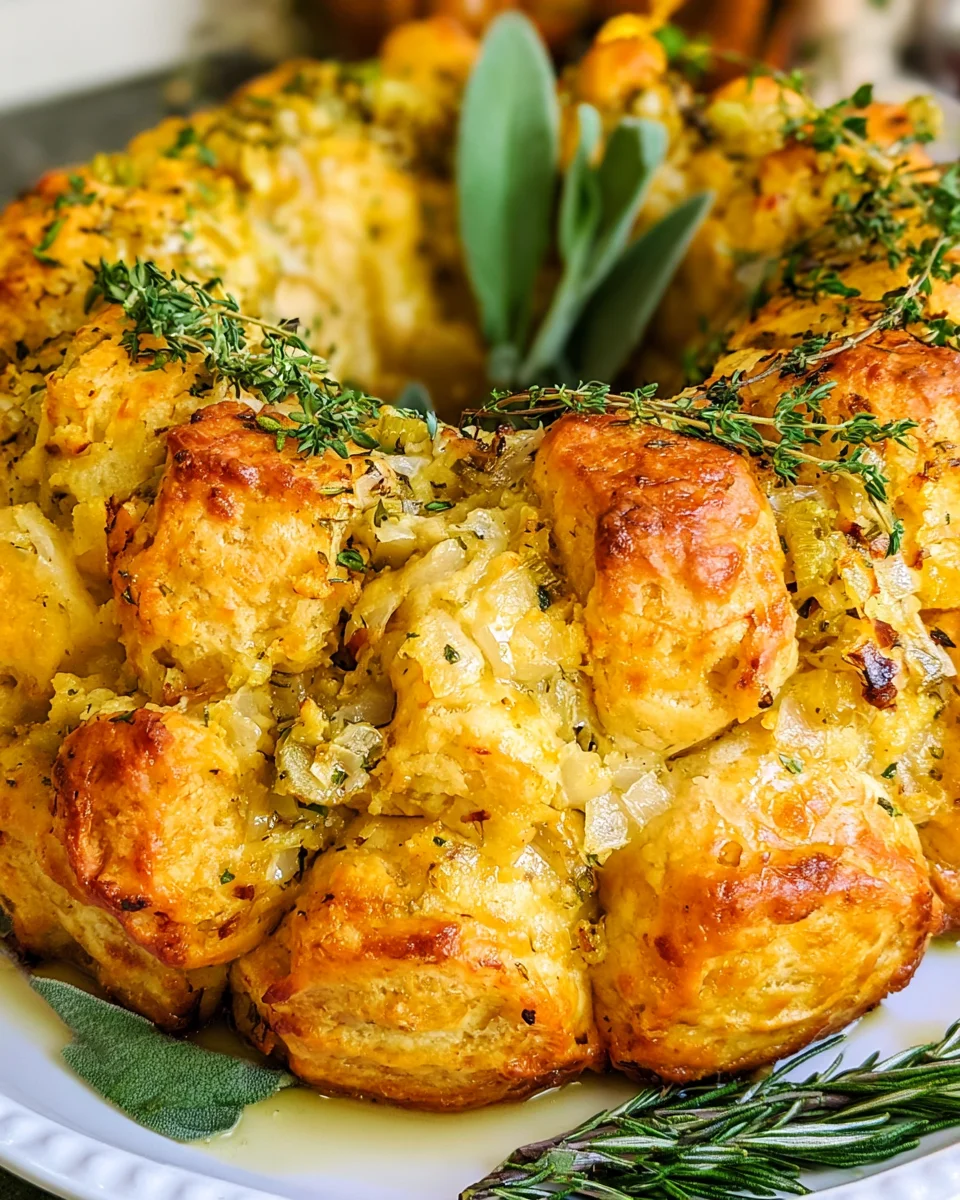
Once baked, remove your Bundt pan and let it cool on a wire rack for about 5 minutes. Carefully run a butter knife around the edges to loosen it. Invert the pan over a serving platter, then flip it again to showcase that gorgeous stuffing ring. You can also garnish with fresh herbs for an elegant touch!
Tips for Success
- Always cool the sautéed mixture before adding the egg to prevent scrambling.
- Mix the biscuit dough gently to maintain its fluffy texture.
- For a pop of flavor, try adding chopped nuts or dried fruit to the stuffing.
- Test doneness using a thermometer for perfect results each time.
- Experiment with different herbs or spices to personalize your stuffing ring.
Equipment Needed
- Bundt pan or fluted tube pan: Essential for shaping the stuffing ring. A regular cake pan can be a substitute, but your presentation won’t be as striking.
- Large sauté pan: Needed for cooking the base ingredients. Any large skillet will work just fine!
- Mixing bowl: You’ll use this for combining the ingredients; a large bowl is best.
- Whisk: Handy for mixing the egg into the cooled mixture. A fork can also get the job done!
- Butter knife: Used for loosening the stuffing ring from the pan edges.
Variations for Pull Apart Stuffing Ring
- Gluten-Free: Substitute refrigerated gluten-free biscuit dough for a delicious gluten-free version that everyone can enjoy.
- Vegetable Medley: Add diced carrots, bell peppers, or mushrooms to the sautéed mixture for extra flavor and nutrition.
- Cheesy Delight: Mix in some shredded cheese like cheddar or mozzarella for a gooey, melty stuffing ring that will have everyone coming back for seconds!
- Spicy Kick: Incorporate red pepper flakes or diced jalapeños for a spicy twist that adds a zing to each mouthful.
- Herb Variations: Experiment with different fresh herbs, like dill or tarragon, to create a unique flavor profile that suits your taste!
Serving Suggestions for Pull Apart Stuffing Ring
- Pair with roasted vegetables: Colorful veggies like carrots, Brussels sprouts, and sweet potatoes make a great side.
- Serve with gravy: Drizzle homemade or store-bought gravy for an extra layer of comfort.
- Accompany with a crisp salad: A light, refreshing salad balances the richness of the stuffing.
- Complement with festive drinks: Consider serving sparkling cider or a light white wine to enhance the holiday spirit.
FAQs about Pull Apart Stuffing Ring
Can I make the Pull Apart Stuffing Ring ahead of time?
Absolutely! You can prepare the stuffing mixture a day in advance. Just store it in the fridge. Then, when you’re ready, pop it in the oven to bake. This makes it a fantastic option for busy holiday mornings!
Can I freeze the Pull Apart Stuffing Ring?
Yes, you can freeze it! Wrap the completely cooled stuffing ring tightly in plastic wrap, then in aluminum foil. It will keep its quality for up to four months. Just remember to thaw it overnight in the fridge before reheating!
What can I serve with the Pull Apart Stuffing Ring?
This stuffing ring pairs beautifully with roasted meats like turkey or chicken. It also shines beside a colorful salad or roasted vegetables. You can even serve it with gravy for that extra comforting touch!
Is this Pull Apart Stuffing Ring vegetarian-friendly?
Yes, it is! This recipe uses vegetable-based ingredients and avoids meat products, making it a delightful vegetarian option for your holiday spread. Just ensure your biscuit dough is also vegetarian.
Can I use homemade biscuit dough instead of refrigerated dough?
Definitely! If you’re feeling adventurous, you can make your own biscuit dough. Just be sure the consistency allows for easy handling, as this will impact the final texture of your pull apart stuffing ring!
Final Thoughts
Bringing a pull apart stuffing ring to your holiday table radiates warmth and love. It’s more than just a dish; it’s a symbol of togetherness and cherished memories. As you savor each fluffy, herb-enriched piece, the satisfying crunch contrasts with a buttery softness, creating a delightful experience. This recipe is my go-to for busy days when I want something impressive yet easy. It has the magical ability to inspire conversation and smiles around the table. So, roll up your sleeves, gather your loved ones, and let this delightful stuffing ring become part of your holiday traditions!
Print
Pull Apart Stuffing Ring: A Unique Holiday Delight!
- Prep Time: 20 minutes
- Cook Time: 50 minutes
- Total Time: 1 hour 10 minutes
- Yield: 8 servings 1x
- Category: Side Dish
- Method: Baking
- Cuisine: American
- Diet: Vegetarian
Description
A delightful Pull Apart Stuffing Ring perfect for holiday gatherings, made with rich biscuit dough, fresh herbs, and sautéed vegetables.
Ingredients
- ½ cup unsalted butter, 1 stick
- 1 small to medium white or yellow onion, diced small
- 2 cups celery stalks, diced small
- 4 large sage leaves, finely minced
- 2 teaspoons fresh thyme, finely minced
- 2 teaspoons fresh rosemary, finely minced
- ½ teaspoon salt, or to taste
- ½ teaspoon freshly ground black pepper, or to taste
- 3 to 4 cloves garlic, finely minced
- 1 large egg
- ½ cup flat leaf parsley, finely minced; divided
- two 8-count cans refrigerated biscuit dough, each can is about 16 ounces, quarter each biscuit
- Extra sage, thyme sprigs, or rosemary, optional for garnishing
Instructions
- Preheat oven to 325°F and spray a 9-inch (approximately 10 cup) Bundt pan or fluted tube pan very well with cooking spray; set aside.
- In a large sauté pan, add the butter, onion, celery, sage, thyme, rosemary, salt, and pepper, sauté over medium-high heat for about 4 to 5 minutes; stirring frequently.
- Add the garlic and cook for 1 minute or until fragrant; stirring constantly.
- Transfer this mixture to a large mixing bowl and set aside for about five minutes to cool.
- Add the egg to the cooled mixture and whisk to combine.
- Add the quartered biscuit dough pieces and toss and stir to coat evenly.
- Transfer about half of the buttery biscuit mixture into your prepared Bundt pan and evenly sprinkle with about half of the parsley.
- Repeat the process and add the remaining buttery biscuit mixture and sprinkle with the remaining parsley.
- Cover the Bundt pan with nonstick foil and bake for 30 minutes.
- After 30 minutes, remove the pan from the oven, peel back the foil and discard it. Bake for an additional 15 to 20 minutes, checking the internal temperature to ensure it reaches 160°F.
- Remove the Bundt pan from the oven and set aside on a wire rack to cool for 5 minutes.
- Gently run a butter knife around the edges and invert the Bundt pan over a plate or cutting board.
- Place your serving platter over the exposed area of the Bundt pan and invert again for better presentation.
- Optionally, garnish the stuffing ring with fresh herbs before serving.
- Serve warm and fresh, or store airtight in the fridge for up to 5 days, or freeze for up to 4 months.
Notes
- Cooling the filling before adding the egg is crucial to avoid scrambling.
- The stuffing can be garnished with fresh herbs for enhanced presentation.
- If baking times vary based on oven type, check for doneness using a thermometer.
Nutrition
- Serving Size: 1 piece
- Calories: 250
- Sugar: 1g
- Sodium: 450mg
- Fat: 15g
- Saturated Fat: 8g
- Unsaturated Fat: 4g
- Trans Fat: 0g
- Carbohydrates: 24g
- Fiber: 1g
- Protein: 5g
- Cholesterol: 40mg