
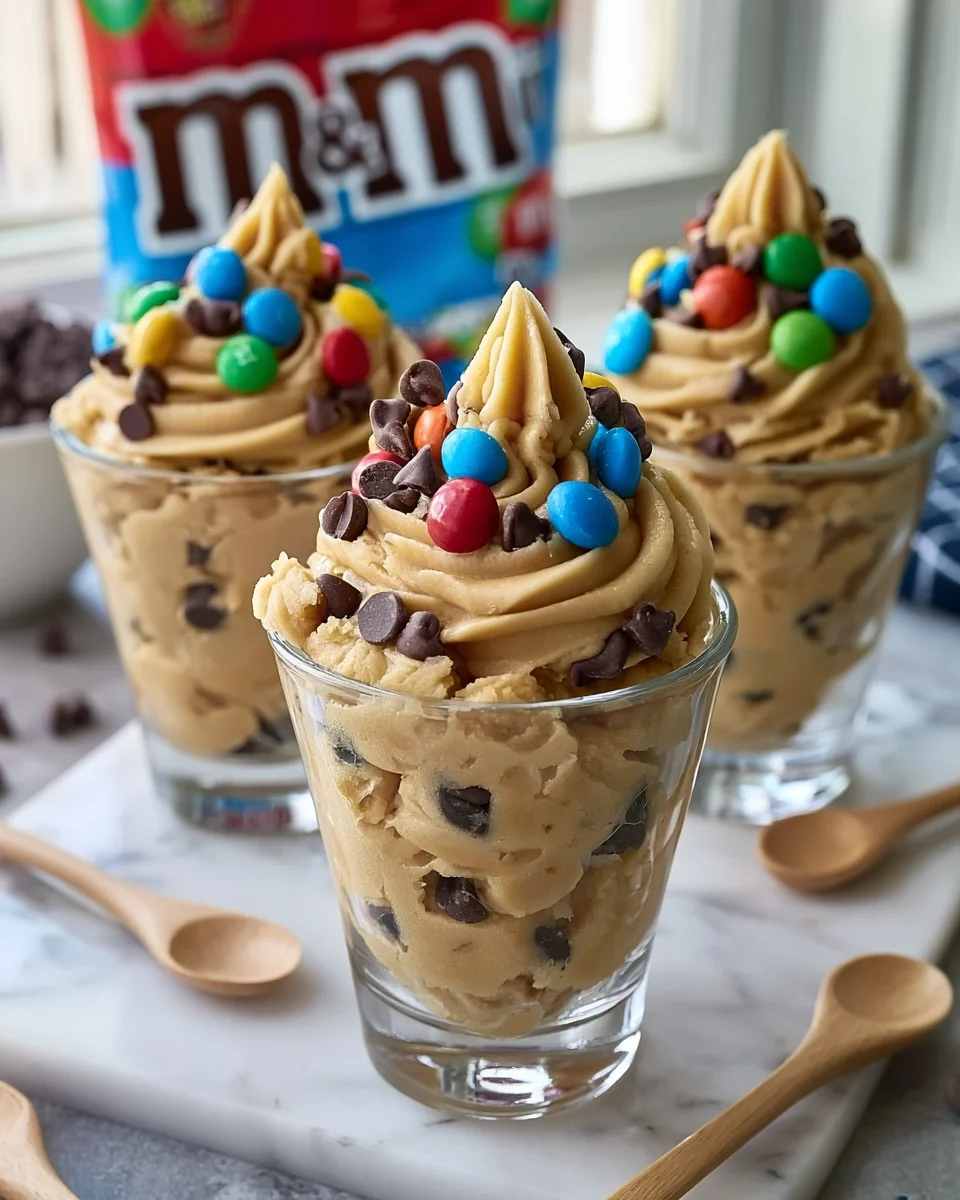
Why No-Bake Cookie Dough Cups Are So Popular
There’s something almost irresistible about cookie dough—that soft, slightly sweet, buttery mixture loaded with chocolate chips that people often sneak before cookies even make it into the oven. Now imagine turning that into a fully safe-to-eat, no-bake dessert, topped with a rich layer of chocolate and packed into perfect little cups. That’s exactly what No-Bake Chocolate Chip Cookie Dough M&M Cups bring to the table.
What makes these treats so popular isn’t just the flavor—it’s the experience. You get the nostalgic taste of cookie dough combined with the satisfying snap of a chocolate shell. It’s the kind of dessert that feels fun, indulgent, and a little playful, which is probably why it shows up everywhere from casual family nights to party dessert tables.
Save this recipe and cook smarter
Keep your favorite Cooking Layer recipes in one place, plan your weekly meals, and quickly find dinner ideas whenever you need them.
Free to download • Fast and easy to use
Another big reason these are trending is convenience. No oven, no complicated techniques, and minimal cleanup. In a world where quick recipes are dominating search trends, no-bake desserts like this have seen a surge in popularity. According to food trend insights, no-bake desserts have increased in online searches by over 30% in recent years, especially among home bakers looking for easy yet impressive options.
The Appeal of Edible Cookie Dough
Traditional cookie dough isn’t meant to be eaten raw due to ingredients like untreated flour. But this recipe solves that problem by using heat-treated flour, making it completely safe while keeping that classic flavor intact.
The texture is what really sells it. It’s soft, slightly crumbly, and melts in your mouth without being overly sticky. Add in mini chocolate chips and colorful M&Ms, and you’ve got a mix of textures that keeps every bite interesting.
A Perfect No-Bake Dessert for Any Occasion
Whether you’re making something quick for a gathering or just craving a sweet treat at home, these cookie dough cups fit the bill. They’re portioned individually, easy to transport, and don’t require last-minute preparation.
They’re also incredibly customizable, which makes them a go-to recipe for different occasions. You can switch up the candies, adjust the chocolate topping, or even change the base flavor entirely.
Ingredients Breakdown and Their Purpose
Understanding what each ingredient does helps you get the texture and flavor just right. This isn’t just about mixing things together—it’s about creating balance.
Cookie Dough Base Ingredients Explained
The base starts with unsalted butter and brown sugar, which create that classic cookie dough flavor. Brown sugar adds moisture and a slight caramel note, making the dough richer and softer than if you used white sugar alone.
The heat-treated flour gives structure, while the milk brings everything together into a smooth, pliable dough. Vanilla extract enhances the overall flavor, and a pinch of salt balances the sweetness.
Mini chocolate chips and M&Ms aren’t just for flavor—they add texture and visual appeal. The small size of mini chips ensures even distribution, so you get chocolate in every bite.
Chocolate Topping Essentials
The topping is simple but important. Semi-sweet chocolate chips provide a rich, slightly bittersweet contrast to the sweet dough. Adding coconut oil helps the chocolate melt smoothly and creates a glossy finish once set.
It also makes the chocolate layer slightly softer when chilled, so it doesn’t crack too hard when you bite into it.
The Importance of Heat-Treating Flour
Why Raw Flour Needs to Be Treated
A lot of people don’t realize that raw flour can contain harmful bacteria. That’s why heat-treating is a crucial step in any edible cookie dough recipe.
Heating the flour to 165°F (74°C) ensures it’s safe to eat while maintaining its functionality in the dough.
Oven vs Microwave Method
You can heat-treat flour in the oven or microwave. The oven method is more even, while the microwave is faster. Either way, the key is letting the flour cool completely before mixing it into the dough.
Step-by-Step Recipe Guide
Creaming Butter and Sugar
Start by beating butter and brown sugar until smooth and creamy. This step creates the base texture and ensures the sugar is fully incorporated.
Mixing the Dough to the Perfect Consistency
Add vanilla, then gradually mix in flour and salt. Pour in milk and adjust as needed until the dough is soft but not sticky.
Folding in Chocolate Chips and M&Ms
Gently fold in the mix-ins. Overmixing can make the dough dense, so keep it light.
Melting and Adding the Chocolate Layer
Melt chocolate with coconut oil in short bursts, stirring between each. Spread evenly over the dough cups.
Chilling and Setting the Cups
Refrigerate until fully set. This step allows the chocolate to harden and the dough to firm up for easy handling.
Pro Tips for Perfect Cookie Dough Cups
Making No-Bake Chocolate Chip Cookie Dough M&M Cups is straightforward, but a few small adjustments can take them from “pretty good” to “absolutely addictive.” The difference usually comes down to texture, temperature, and technique—those subtle details that aren’t obvious at first but make a big impact.
Achieving the Right Dough Texture
The cookie dough should feel soft, slightly fluffy, and easy to press—not crumbly and not sticky. Getting that balance right depends on how you handle the liquid and flour. When you add the milk, do it gradually and pay attention to how the dough responds. If it holds together when pressed but doesn’t stick to your fingers, you’re in the sweet spot.
One common trick is to let the dough sit for a minute or two after mixing. This allows the flour to fully hydrate, which can naturally improve the texture without adding extra liquid. If you rush and adjust too quickly, you might end up overcorrecting.
Also, don’t underestimate the importance of properly creaming the butter and sugar. This step isn’t just about mixing—it’s about creating a smooth base. If the mixture still looks grainy, keep mixing a bit longer. That smoothness carries through the entire recipe.
Getting a Smooth Chocolate Finish
That glossy chocolate top layer is what makes these cups look bakery-worthy. The key here is gentle melting. Chocolate doesn’t like high heat—it can seize quickly and turn thick or grainy.
Microwaving in short bursts at reduced power is the safest method. Stir thoroughly between each interval, even if it doesn’t look fully melted yet. The residual heat will continue to melt the chocolate, giving you a smoother finish.
When spreading the chocolate over the dough, work quickly but gently. Use the back of a spoon to guide it to the edges without pressing too hard into the dough layer. This helps maintain clean, defined layers when the cups are set.
Common Mistakes and How to Avoid Them
Even simple recipes can go slightly off track, especially when dealing with texture-sensitive ingredients like chocolate and dough. Knowing what to watch out for makes all the difference.
Grainy Dough or Dry Texture
If your dough feels grainy, it usually means the butter and sugar weren’t fully creamed or the flour wasn’t incorporated evenly. Take a little extra time at the beginning—it saves you from texture issues later.
Dry dough is often the result of adding too much flour or not enough liquid. The fix is easy: add milk one teaspoon at a time until the dough softens. But go slowly—you don’t want to swing too far in the other direction.
Chocolate Seizing or Uneven Layers
Chocolate seizing happens when it overheats or comes into contact with even a small amount of water. Always use dry bowls and melt the chocolate gently.
Uneven layers often come from rushing the spreading process. Taking a few extra seconds to smooth the chocolate evenly makes a noticeable difference in the final look.
Variations and Creative Twists
Once you’ve mastered the classic version, there’s a lot of room to get creative. This recipe is incredibly flexible, and small changes can completely transform the flavor.
Peanut Butter or Nutty Versions
Adding peanut butter to the dough creates a richer, slightly salty variation that pairs beautifully with chocolate. You can also mix in chopped nuts like walnuts or pecans for extra crunch.
If you want a layered effect, try adding a thin peanut butter layer between the dough and chocolate topping. It creates a Reese’s-inspired twist that’s hard to resist.
Healthier or Dairy-Free Options
For a lighter version, you can substitute butter with plant-based alternatives and use dairy-free chocolate chips. Almond or oat milk works well in place of whole milk.
You can also reduce the sugar slightly or use dark chocolate for a less sweet, more intense flavor profile. While it’s still a dessert, these tweaks can make it feel a bit more balanced.
Serving Ideas and Presentation Tips
These cookie dough cups are already fun to eat, but presentation can make them even more appealing—especially if you’re serving them to guests.
Making Them Party-Ready
Arrange the cups on a platter and sprinkle a few extra M&Ms or chocolate chips on top for a colorful finish. You can even drizzle a bit of melted white chocolate over the tops for contrast.
For parties, consider using decorative cupcake liners to match the theme. It’s a small detail, but it makes the dessert feel more polished and intentional.
Serving them slightly chilled gives you that firm chocolate snap, while letting them sit at room temperature for a few minutes softens the texture for a more melt-in-your-mouth experience. Either way, they’re hard to resist.
Storage and Shelf Life
One of the best things about this recipe is how well it stores. You can make a batch ahead of time and enjoy it over several days.
Refrigeration and Freezing Tips
Store the cookie dough cups in an airtight container in the refrigerator for up to 5–6 days. The texture stays consistent, and the flavors hold up well.
If you want to keep them longer, freezing is a great option. Place them in a freezer-safe container and store for up to a month. When ready to eat, let them thaw in the fridge or at room temperature for a few minutes.
Avoid stacking them directly on top of each other unless separated by parchment paper, as this helps maintain their shape and prevents sticking.
Conclusion
No-Bake Chocolate Chip Cookie Dough M&M Cups are the kind of dessert that checks all the boxes—easy to make, fun to eat, and endlessly customizable. They bring together the nostalgic flavor of cookie dough with the richness of chocolate in a way that feels both familiar and exciting.
What makes them truly special is how approachable they are. You don’t need advanced skills or special equipment—just a few ingredients, a little patience, and an eye for texture. And once you’ve made them once, you’ll find yourself coming back to the recipe again and again, experimenting with new variations each time.
They’re simple, satisfying, and just a little bit indulgent—the kind of treat that never really goes out of style.
FAQs
1. Can I skip heat-treating the flour?
No, it’s important for safety. Always heat-treat flour before using it in no-bake recipes.
2. Can I use regular chocolate chips instead of mini?
Yes, but mini chips distribute more evenly throughout the dough.
3. Why is my dough too sticky?
This usually means too much liquid—add a bit more flour, one tablespoon at a time.
4. Can I make these without M&Ms?
Absolutely, you can replace them with nuts, sprinkles, or more chocolate chips.
5. Do these need to stay refrigerated?
Yes, they’re best stored in the fridge to maintain texture and freshness.
Print
No-Bake Chocolate Chip Cookie Dough M&M Cups
Description
There’s something almost irresistible about cookie dough—that soft, slightly sweet, buttery mixture loaded with chocolate chips that people often sneak before cookies even make it into the oven. Now imagine turning that into a fully safe-to-eat, no-bake dessert, topped with a rich layer of chocolate and packed into perfect little cups. That’s exactly what No-Bake Chocolate Chip Cookie Dough M&M Cups bring to the table.
Ingredients
For the cookie dough base
½ cup (1 stick) unsalted butter
½ cup brown sugar, packed firmly
1 teaspoon pure vanilla extract
1 cup all-purpose flour
¼ teaspoon fine salt
¼ cup whole milk, room temperature
½ cup mini semi-sweet chocolate chips
½ cup M&M candies
For the chocolate topping
1 cup semi-sweet chocolate chips
1 tablespoon coconut oil
Instructions
Heat-treat the flour
Spread the 1 cup of flour evenly on a baking sheet. Bake at 350°F for 5 minutes, or microwave in a microwave-safe bowl for 30-second intervals, stirring between each, until the flour reaches 165°F on an instant-read thermometer. Allow the flour to cool completely before using.
Cream the butter and sugar
In a medium bowl, beat the softened butter and packed brown sugar together with a spatula or electric mixer on medium speed until smooth, creamy, and lighter in color, about 2 minutes. Scrape down the sides of the bowl once.
Add vanilla and dry ingredients
Stir in the vanilla extract until combined. Gradually add the cooled, heat-treated flour and the salt, mixing on low speed or stirring with a spatula until no dry streaks remain.
Add the milk
Pour in the room-temperature milk and stir until a soft, pliable dough forms. The dough should hold together when pressed but not be sticky. If too dry, add 1 additional teaspoon of milk. If too wet, add 1 tablespoon of flour.
Fold in the add-ins
Gently fold the mini chocolate chips and M&M candies into the dough using a spatula, making about 8–10 strokes until evenly distributed.
Prepare the muffin tin
Line a standard 12-cup muffin tin with paper liners. For easier removal later, lightly spray the inside of each liner with nonstick cooking spray.
Portion the cookie dough
Divide the dough evenly among the 12 lined cups, using approximately 2 tablespoons of dough per cup. Press the dough down lightly with the back of a spoon or your fingertips to create a flat, even surface.
Melt the chocolate topping
In a microwave-safe bowl, combine the semi-sweet chocolate chips and coconut oil. Microwave in 30-second bursts at 50% power, stirring thoroughly after each burst, until smooth and fully melted. This typically takes 60–90 seconds total. Do not overheat, as chocolate can seize.
Add the chocolate layer
Spoon approximately 1 tablespoon of melted chocolate over each cookie dough cup. Use the back of the spoon to spread the chocolate evenly to the edges, covering the entire surface.
Chill to set
Place the muffin tin in the refrigerator, uncovered, for at least 2 hours. For best results, chill for 3–4 hours or overnight, allowing the chocolate to harden completely and the dough to firm up.
Remove and serve
Once fully set, peel away the paper liners or serve the cups directly in the liners. Enjoy chilled straight from the refrigerator. For a slightly softer texture, let the cups sit at room temperature for 5 minutes before serving.
Enjoyed this recipe?
Discover more delicious recipes, save your favorites, and plan your meals with the Cooking Layer app.
Free to download • Fast and easy to use


