
What Makes Orange Creamsicle Mousse Cake So Special
There’s something instantly nostalgic about the flavor of an orange creamsicle. It’s that perfect mix of bright citrus and smooth vanilla that somehow feels both refreshing and comforting at the same time. Now imagine transforming that classic flavor into a layered mousse cake—light, airy, creamy, and finished with a glossy citrus glaze and a crunchy almond base. That’s exactly what this dessert delivers, and honestly, it’s hard not to fall in love with it after the first bite.
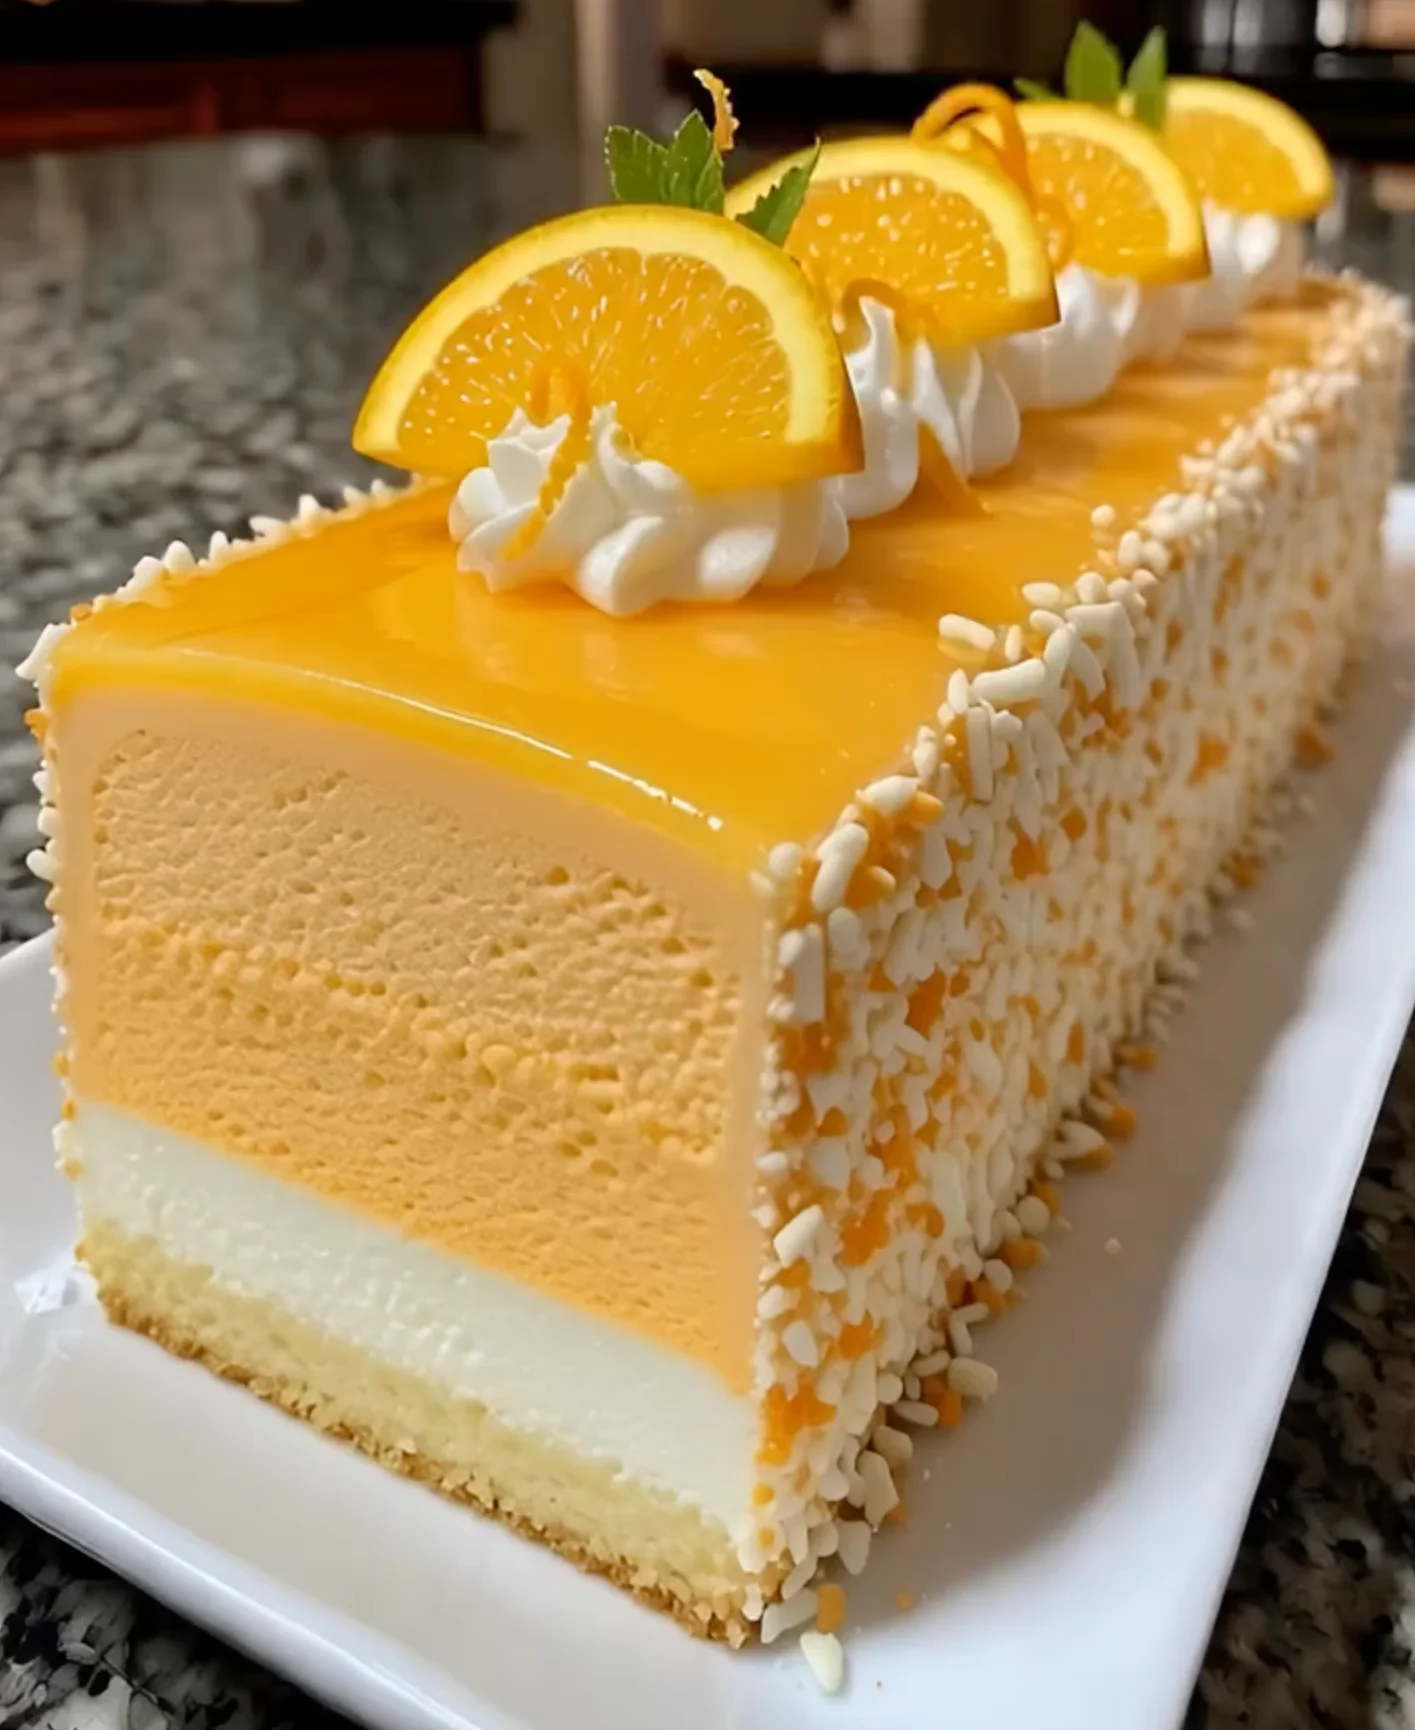
What sets this cake apart from traditional baked desserts is its texture. Instead of something dense or heavy, you get layers that feel almost cloud-like. The mousse is soft and airy, the vanilla layer is creamy and rich, and the crust adds just enough crunch to keep things interesting. It’s the kind of dessert that feels indulgent without weighing you down.
Save this recipe and cook smarter
Keep your favorite Cooking Layer recipes in one place, plan your weekly meals, and quickly find dinner ideas whenever you need them.
Free to download • Fast and easy to use
Another reason this recipe stands out is that it’s no-bake, which makes it incredibly approachable. You don’t have to worry about oven temperatures, cracks, or overbaking. Instead, it’s all about assembling layers and letting the refrigerator do the work. That makes it perfect for warmer months or when you just want something a little easier but still impressive.
The Nostalgic Creamsicle Flavor Experience
The flavor profile here is what really pulls everything together. The orange mousse brings that fresh, citrusy brightness, while the vanilla cream layer softens it with a smooth, mellow sweetness. It’s a contrast that feels familiar, almost like something you’ve tasted before—but elevated.
The addition of orange zest intensifies the citrus flavor, giving it a more natural and slightly complex taste compared to artificial flavorings. It’s subtle, but it makes a noticeable difference.
A Perfect Balance of Creamy, Citrus, and Crunch
Texture plays just as big a role as flavor. Without contrast, desserts can feel one-dimensional. This cake avoids that completely by layering different elements:
- Crunchy almond crust
- Silky vanilla cream
- Light, airy orange mousse
- Smooth citrus glaze
Each layer brings something different, and together they create a dessert that feels dynamic rather than repetitive.
Ingredients Breakdown and Flavor Composition
Understanding each component helps you see why this recipe works so well. Every ingredient has a purpose, and when combined correctly, they create a balanced and cohesive dessert.
Almond Crunch Crust Explained
The base is more than just a foundation—it’s the anchor of the entire cake. The combination of graham cracker crumbs and finely chopped almonds creates a texture that’s both crumbly and slightly nutty. The almonds add depth, preventing the crust from tasting too plain or overly sweet.
Melted butter binds everything together, while a touch of sugar enhances the flavor without overpowering it. Chilling the crust is essential—it helps it firm up so it can support the soft layers above.
Light and Airy Orange Mousse Layer
The mousse is the highlight of the cake. Made with fresh orange juice, zest, sugar, and whipped cream, it delivers that signature creamsicle flavor in a light, airy form.
Gelatin plays a crucial role here. It stabilizes the mousse, allowing it to hold its shape once set. Without it, the mousse would be too soft to slice cleanly.
Smooth Vanilla Cream Layer
This layer adds richness and balance. The cream cheese provides structure and a slight tang, while powdered sugar and vanilla create a smooth, sweet profile.
Folding in whipped cream lightens the texture, making it less dense than traditional cheesecake. The result is a layer that feels creamy but not heavy.
Bright Citrus Glaze Finish
The glaze is like the finishing touch that ties everything together. Made with orange juice, sugar, cornstarch, and a hint of lemon juice, it adds a glossy, slightly tangy layer on top.
It’s not just decorative—it enhances the citrus flavor and adds a subtle contrast to the creamy layers below.
Essential Tools for Mousse Cake Success
You don’t need a complicated setup, but a few tools make the process smoother.
Must-Have Equipment
A springform pan is essential for clean removal and neat layers. Mixing bowls, a whisk or electric mixer, and a spatula are also necessary for preparing each component.
Optional Tools for a Professional Finish
An offset spatula helps create smooth, even layers, while a piping bag can be used for decorative touches if you want a more polished presentation.
Step-by-Step Orange Creamsicle Mousse Cake Recipe
Preparing the Almond Crunch Base
Mix graham cracker crumbs, almonds, sugar, and melted butter until combined. Press firmly into the pan and chill until set. This creates a stable base for the layers.
Making the Orange Mousse
Bloom the gelatin, then dissolve it into warmed orange juice, zest, and sugar. Let it cool slightly before folding in whipped cream and vanilla. This step requires a gentle touch to maintain airiness.
Creating the Vanilla Cream Layer
Beat cream cheese until smooth, then mix in sugar and vanilla. Fold in whipped cream to create a light, fluffy texture that complements the mousse.
Assembling and Setting the Cake
Spread the vanilla layer over the chilled crust, then pour the orange mousse on top. Smooth the surface and refrigerate until set.
Finishing with Citrus Glaze and Almond Crunch
Prepare the glaze, let it cool, then pour it over the set mousse. Finish with chopped almonds for added texture and chill again before serving.
Pro Tips for Perfect Texture and Structure
Creating a mousse cake that looks clean, slices beautifully, and melts in your mouth isn’t just about following the recipe—it’s about understanding the small techniques that make a big difference. With a dessert like Orange Creamsicle Mousse Cake, texture is everything. You’re aiming for layers that are stable yet soft, structured yet airy. That balance can feel tricky at first, but once you get it, it becomes second nature.
Working with Gelatin the Right Way
Gelatin can feel intimidating if you’ve never used it before, but it’s actually pretty straightforward once you understand how it behaves. The most important step is blooming—this simply means letting the gelatin absorb cold water before heating. Skipping this step or rushing it can lead to clumps, which will affect the smoothness of your mousse.
After blooming, the gelatin needs to be dissolved into a warm liquid—in this case, your orange juice mixture. The key word here is warm, not hot. If the liquid is too hot, it can weaken the gelatin’s setting power. If it’s too cool, the gelatin won’t dissolve properly. You’re aiming for that middle ground where everything blends smoothly.
Timing also matters. Once the gelatin mixture is ready, let it cool slightly before folding in whipped cream. If it’s too warm, it can deflate the whipped cream, leaving you with a dense mousse instead of a light, airy one. Think of it like combining two delicate elements—you want them to meet gently, not clash.
Achieving Light, Stable Layers
The secret to those beautiful, defined layers is patience and gentle handling. Each layer should be spread evenly and allowed to set slightly before adding the next. This prevents them from blending together and keeps that clean, professional look when sliced.
Folding is another key technique. When incorporating whipped cream, use a spatula and fold gently rather than stirring. This helps maintain the air you’ve whipped into the cream, which is what gives the mousse its light texture.
Chilling time is just as important as preparation. It might be tempting to rush things, but giving the cake enough time to fully set—especially between layers—ensures it holds its shape. A properly chilled mousse cake slices cleanly and feels firm yet creamy.
Common Mistakes and How to Avoid Them
Even though this is a no-bake dessert, there are still a few common pitfalls that can affect the final result. The good news? Most of them are easy to prevent once you know what to watch for.
Runny Mousse or Layers Not Setting
If your mousse doesn’t set properly, gelatin is usually the culprit. Either it wasn’t bloomed correctly, not fully dissolved, or the proportions were off. Another possibility is adding it to the whipped cream while still too warm, which can break down the structure.
To avoid this, always measure carefully and give each step the time it needs. If the mousse seems too soft before chilling, don’t panic—it often firms up as it sets in the fridge.
Overmixing and Losing Airiness
One of the easiest mistakes to make is overmixing, especially when folding whipped cream into the mousse or cream cheese mixture. Overmixing knocks out the air, resulting in a dense, heavy texture instead of the light, fluffy consistency you want.
The fix is simple: slow down. Use gentle folding motions and stop as soon as everything is combined. It’s better to have a few streaks that you finish folding lightly than to overwork the mixture.
Variations and Creative Twists
Once you’ve mastered the base recipe, there’s plenty of room to get creative. This cake is incredibly adaptable, and small tweaks can give it a completely different personality.
No-Gelatin Alternative Options
If you prefer not to use gelatin, you can substitute it with whipped topping or stabilized whipped cream. Another option is using agar-agar, a plant-based alternative, though it requires slightly different handling and measurements.
Keep in mind that the texture may change slightly—it might be softer and less structured—but still delicious.
Flavor Variations and Add-Ins
Want to switch things up? Try mixing in different citrus flavors like mandarin, blood orange, or even lime for a twist. You can also add layers of fruit compote or a thin sponge cake base instead of the graham crust.
For extra indulgence, consider adding white chocolate to the mousse or a drizzle of chocolate over the glaze. It adds richness and creates a flavor contrast that works surprisingly well with citrus.
Serving and Presentation Ideas
Presentation is where this cake really shines. With its layered structure and glossy top, it already looks impressive—but a few small touches can take it even further.
Garnishing for a Stunning Finish
Top the cake with fresh orange slices, zest curls, or a handful of toasted almonds for added texture and color. Even a light dusting of powdered sugar can give it a polished, elegant look.
For clean slices, use a sharp knife dipped in warm water and wipe it between cuts. This keeps the layers neat and prevents dragging through the mousse.
If you’re serving this at a gathering, consider slicing it ahead of time and arranging the pieces neatly on a platter. It makes serving easier and shows off those beautiful layers.
Storage, Shelf Life, and Make-Ahead Tips
One of the best things about this dessert is how well it fits into a make-ahead plan. In fact, it often tastes better after sitting for a while.
Refrigeration and Freezing Tips
Store the cake in the refrigerator, covered, for up to 3–4 days. The flavors continue to develop, and the texture stays stable as long as it’s kept chilled.
If you need to store it longer, you can freeze it. Wrap it tightly to prevent freezer burn, and thaw it in the refrigerator before serving. The texture may soften slightly, but it will still be enjoyable.
For best results, add the glaze and toppings after thawing to keep everything fresh and visually appealing.
Conclusion
Orange Creamsicle Mousse Cake with Citrus Glaze & Almond Crunch is one of those desserts that feels both playful and sophisticated at the same time. It takes a familiar flavor and transforms it into something layered, textured, and visually stunning—all without turning on the oven.
What makes it truly special is the balance. You’ve got brightness from the citrus, richness from the cream layers, and crunch from the almond base—all working together without overpowering each other. It’s the kind of dessert that feels thoughtfully made, even if the process itself is surprisingly approachable.
Once you’ve made it once, it becomes a go-to recipe for warm-weather gatherings, celebrations, or anytime you want something that stands out without being overly complicated.
FAQs
1. Can I use store-bought orange juice?
Yes, but fresh orange juice gives a brighter, more natural flavor.
2. How do I know when the mousse is fully set?
It should feel firm to the touch and not jiggle excessively when the pan is gently shaken.
3. Can I make this cake a day ahead?
Absolutely—it’s actually better when made in advance and chilled overnight.
4. What can I use instead of almonds in the crust?
You can use pecans, walnuts, or simply more graham crackers if you prefer a nut-free option.
5. Why is my mousse not fluffy?
This usually happens from overmixing or adding gelatin while too warm, which deflates the whipped cream.
Print
Orange Creamsicle Mousse Cake with Citrus Glaze & Almond Crunch
Description
There’s something instantly nostalgic about the flavor of an orange creamsicle. It’s that perfect mix of bright citrus and smooth vanilla that somehow feels both refreshing and comforting at the same time. Now imagine transforming that classic flavor into a layered mousse cake—light, airy, creamy, and finished with a glossy citrus glaze and a crunchy almond base. That’s exactly what this dessert delivers, and honestly, it’s hard not to fall in love with it after the first bite.
Ingredients
🍰 Base (Almond Crunch Crust):
- 1 ½ cups crushed graham crackers
- ½ cup finely chopped almonds
- ⅓ cup melted butter
- 2 tablespoons sugar
🍊 Orange Mousse:
- 1 cup fresh orange juice
- 1 tablespoon orange zest
- ¾ cup granulated sugar
- 1 tablespoon gelatin
- 3 tablespoons cold water
- 1 ½ cups heavy cream (whipped to soft peaks)
- ½ teaspoon vanilla extract
🍦 Vanilla Cream Layer:
- 8 oz cream cheese, softened
- ½ cup powdered sugar
- 1 teaspoon vanilla extract
- 1 cup whipped cream
🍊 Citrus Glaze:
- ½ cup orange juice
- 2 tablespoons sugar
- 1 teaspoon cornstarch
- 1 teaspoon lemon juice
Instructions
1️⃣ Make the Almond Crunch Base
Mix crushed graham crackers, almonds, sugar, and melted butter.
Press firmly into the bottom of a springform pan.
Chill in the fridge for 20–30 minutes.
2️⃣ Prepare the Orange Mousse
Bloom gelatin in cold water for 5 minutes.
Heat orange juice, zest, and sugar until warm (not boiling), then stir in gelatin until dissolved.
Let it cool slightly.
Fold in whipped cream and vanilla gently until light and airy.
3️⃣ Make the Vanilla Cream Layer
Beat cream cheese until smooth.
Add powdered sugar and vanilla, mix until creamy.
Fold in whipped cream for a fluffy texture.
4️⃣ Assemble the Cake
- Spread vanilla cream layer over chilled crust
- Pour orange mousse on top and smooth evenly
Chill for 3–4 hours until set.
5️⃣ Make the Citrus Glaze
In a small saucepan, combine orange juice, sugar, cornstarch, and lemon juice.
Cook until slightly thickened and glossy.
Cool completely, then pour over the set mousse layer.
6️⃣ Final Touch
Sprinkle chopped almonds on top for crunch.
Chill another 1–2 hours before slicing.
✨ Optional Garnish
- Orange slices 🍊
- White chocolate curls
- Extra whipped cream
Enjoyed this recipe?
Discover more delicious recipes, save your favorites, and plan your meals with the Cooking Layer app.
Free to download • Fast and easy to use


