
Introduction to Peach Angel Food Cake
As a busy mom, I understand the hustle of juggling work, school, and everything in between. That’s why I’m excited to share my recipe for Peach Angel Food Cake—a light and delicious dessert that feels like a treat without the guilt. This cake is perfect for those warm summer evenings when you want something sweet yet refreshing. The best part? It comes together in no time, allowing you to impress your loved ones without breaking a sweat. Trust me, everyone will be asking for seconds!
Why You’ll Love This Peach Angel Food Cake
This Peach Angel Food Cake is a game changer for your dessert table! It’s as light as a cloud, making you feel fantastic after indulging in a slice. Plus, it’s quick to whip up—taking just 40 minutes from start to finish. The fresh peach flavor dances in your mouth, adding a burst of summer joy. Whether you’re hosting friends or treating your family, this cake never disappoints!
Ingredients for Peach Angel Food Cake
Gathering the right ingredients is crucial to achieving that heavenly lightness in your Peach Angel Food Cake. Here’s what you’ll need:
- Angel Food Cake Mix: This is the backbone of the recipe. It brings that airy texture we all love. Look for a brand without artificial ingredients for the best flavor.
- Canned Peaches: Use diced peaches not drained. They add moisture and a delightful sweetness that complements the cake beautifully. If you prefer fresh, feel free to use ripe peaches; just dice them up!
For an extra touch, consider adding a dash of cinnamon or vanilla extract to enhance the flavor profile. Don’t forget to keep your pantry stocked with these essentials—they’ll elevate your baking experience.
If you’re interested in more details regarding exact quantities, check out the end of the article where I’ve provided a printable version!
How to Make Peach Angel Food Cake
Making your own Peach Angel Food Cake is not just easy; it’s a fun adventure in the kitchen! Let’s go through the steps together, creating this delightful dessert that is perfect for any occasion.
Step 1: Preheat the Oven
First things first, you’ll need to preheat your oven to 350 degrees F. Preheating is crucial because it helps the cake rise properly, giving it that fluffy texture we all crave. If the oven isn’t hot enough when you pop the cake in, it might not bake evenly. So let the oven do its thing while you prepare the other ingredients!
Step 2: Prepare the Peaches
Next up, let’s get those peaches ready! Empty your can of peaches into a bowl. If they aren’t already diced, grab a knife and slice them into bite-sized pieces. Keeping the juice helps keep the cake moist but be mindful—don’t drain those peaches! The extra moisture makes a huge difference.
Step 3: Combine the Ingredients
Now, it’s time to combine. Gently add the dry angel food cake mix to the bowl with peaches. Using a rubber spatula, fold the mixture together. Be gentle! Overmixing can make the cake dense, taking away that airy angel food texture you want. Think of this as a delicate dance—just enough movement to blend it all nicely!
Step 4: Bake the Cake
Time to bake! Take your peach mixture and pour it into a non-stick 9×13 inch pan, but don’t spray it with non-stick spray. Place it in the preheated oven and bake for 25-30 minutes. You’ll know it’s ready when the top is lightly browned and feels firm when you gently touch it. A toothpick test is always a winner—stick it in the center, and it should come out clean.
Step 5: Cooling and Serving
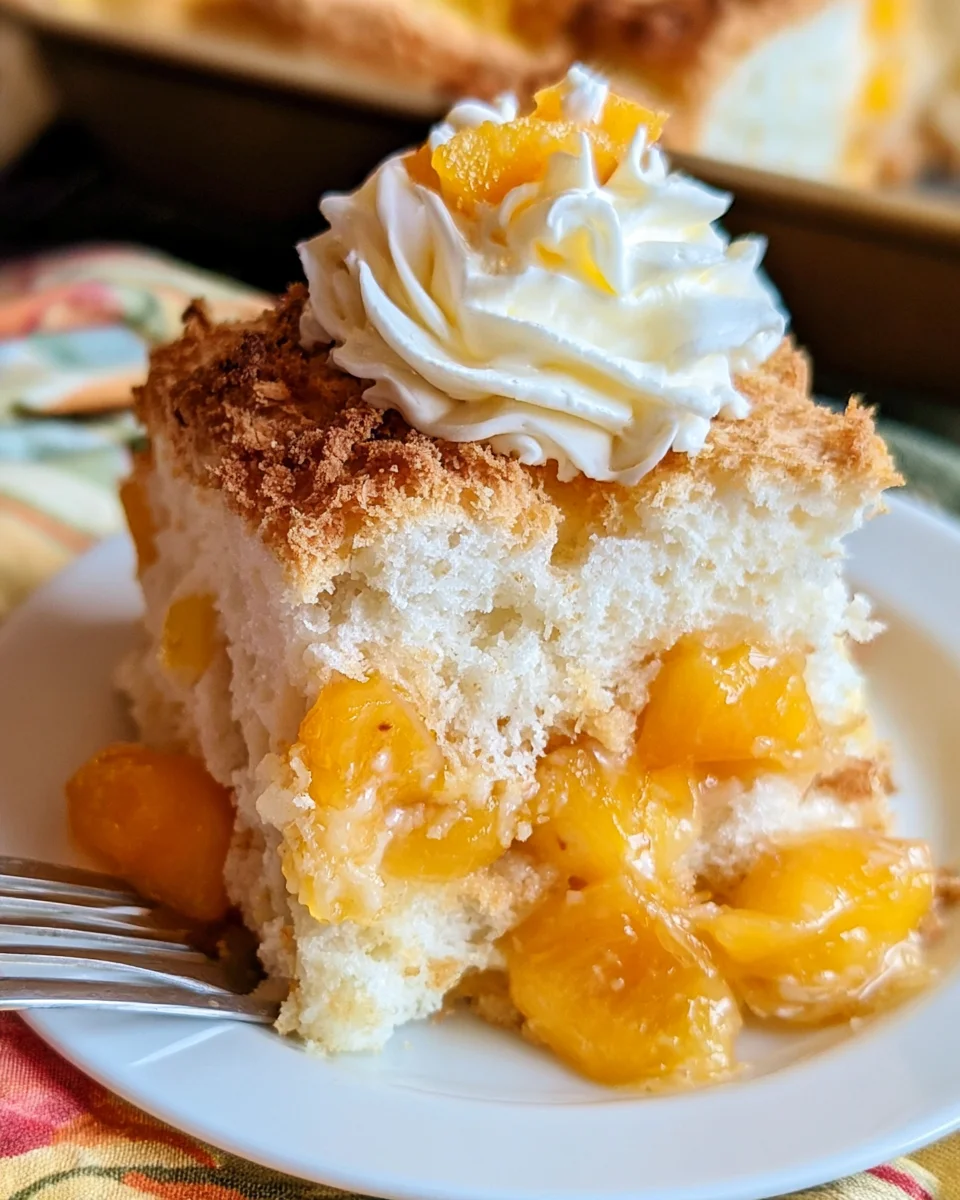
Once baked, remove the cake and let it cool on a rack. This cooling process helps refine the texture. Once cool, slice it into pieces and serve! I love to add a dollop of whipped cream on top or serve it with fresh fruit. It’s like adding just a whisper of indulgence!
Tips for Success
- Remember to gently fold the batter to keep your Peach Angel Food Cake light and airy.
- Check your oven temperature with a thermometer to ensure accuracy; every oven behaves differently.
- Cool the cake completely before slicing for the best texture and flavor.
- Consider using fresh peaches when in season for an added burst of flavor.
- Enjoy your cake chilled; it makes a delightful summer treat!
Equipment Needed
- Mixing Bowl: A medium-sized bowl works well, but you can also use a large measuring cup if that’s all you have.
- Rubber Spatula: Perfect for folding mixtures; a wooden spoon can serve as a substitute.
- 9×13 Inch Pan: Use any non-stick baking dish; just make sure it’s deep enough to hold the cake.
- Cooling Rack: Essential for proper cooling; a plate can work in a pinch.
Variations of Peach Angel Food Cake
- Berry Blast: Add a mix of strawberries or blueberries along with the peaches for a delicious berry fusion. This summer twist brightens up the flavor!
- Gluten-Free Option: Use a gluten-free angel food cake mix to cater to those with gluten sensitivities. You won’t lose any of the fluffiness!
- Cinnamon Swirl: Incorporate a teaspoon of cinnamon into the batter for a warm, cozy flavor that pairs beautifully with peaches.
- Yogurt Surprise: Swap a portion of the juice from the peaches with vanilla yogurt to enhance creaminess and give a tangy twist to the cake.
- Nutty Delight: Sprinkle some chopped pecans or walnuts into the batter for added crunch and richness; that texture contrast is heavenly!
Serving Suggestions for Peach Angel Food Cake
- Pair with a scoop of vanilla ice cream for a delightful contrast of temperatures.
- Serve alongside a fresh fruit salad to add color and nutrition to your dessert plate.
- Drizzle with a light caramel or honey glaze to elevate the sweetness.
- For a fancy touch, garnish slices with mint leaves for a pop of color.
- Accompany with iced tea or lemonade for a refreshing summer beverage.
FAQs about Peach Angel Food Cake
As we dive into the world of Peach Angel Food Cake, you might have some questions brewing in your mind. Whether it’s about substitutions, storage, or flavor adjustments, I’m here to help! Let’s tackle those common queries:
Can I use fresh peaches instead of canned?
Absolutely! Fresh peaches are a wonderful choice when they’re in season. Just make sure to peel and dice them into small bits, and keep their juice for moisture.
How should I store leftovers?
Leftover Peach Angel Food Cake can be stored in an airtight container at room temperature for up to three days. For longer storage, wrap it tightly and freeze for up to three months. Just defrost before serving!
Can I make this cake in advance?
Yes! This cake stays delicious even if made a day ahead. Just cool it completely, store it, and slice just before serving. It’s a lifesaver for busy event days!
How do I avoid a dense texture in my cake?
To maintain that fluffy quality, fold the ingredients gently. Overmixing is the enemy of angel food cakes! Treat it like a delicate dance—slow and easy!
What can I serve with Peach Angel Food Cake?
It’s lovely on its own, but pairing it with fresh fruit, whipped cream, or even a scoop of ice cream can elevate the experience. Consider a mint garnish for style!
Final Thoughts
Creating this Peach Angel Food Cake feels like capturing a slice of summer sunshine. It’s not just about baking; it’s about gathering family around the table and sharing moments of joy. Each bite is light, fruity, and bursting with flavor—a perfect way to celebrate life’s little wins. Plus, it’s a breeze to whip up, making it an ideal choice for any busy day. I hope this recipe becomes a cherished favorite in your household, just as it has in mine. So grab your ingredients, and let’s bake some happiness together!
Print
Peach Angel Food Cake
- Prep Time: 10 minutes
- Cook Time: 30 minutes
- Total Time: 40 minutes
- Yield: 12 servings 1x
- Category: Dessert
- Method: Baking
- Cuisine: American
- Diet: Vegetarian
Description
A light and delicious Peach Angel Food Cake perfect for any occasion.
Ingredients
- 1 box angel food cake mix
- 1 can peaches, diced, not drained
Instructions
- Preheat your oven to 350 degrees F.
- Empty your can of peaches into a bowl. If they aren’t already diced, cut them up into bite size pieces.
- Add your dry angel food cake mix and gently fold together until combined with a rubber spatula.
- Dump your mixture into a 9×13″ pan that has a non-stick surface, but not sprayed with non-stick spray.
- Bake for 25-30 minutes or until it is lightly browned on top and the middle feels firm when gently touched.
- Check with a toothpick; it should come out clean.
- Put on a cooling rack until cool.
- Slice and serve.
Notes
- Make sure not to overmix the batter to keep the cake light and airy.
- Serve with whipped cream or fresh fruit for added flavor.
Nutrition
- Serving Size: 1 slice
- Calories: 120
- Sugar: 10g
- Sodium: 200mg
- Fat: 0g
- Saturated Fat: 0g
- Unsaturated Fat: 0g
- Trans Fat: 0g
- Carbohydrates: 28g
- Fiber: 1g
- Protein: 2g
- Cholesterol: 0mg