Introduction to Reese’s Cake
There’s something magical about a slice of cake that combines rich chocolate with the creamy goodness of peanut butter. That’s exactly what you’ll get with this delightful Reese’s Cake! Whether it’s a festive gathering or just a Tuesday craving, this recipe serves as a perfect solution for busy days. As a busy mom, I know how important it is to whip up something that not only looks impressive but satisfies those sweet cravings. This cake is bound to warm hearts and create smiles at any table. Let’s dive into this delightful adventure together!
Why You’ll Love This Reese’s Cake
Who doesn’t love a dessert that tastes as good as it looks? This Reese’s Cake checks all the boxes for a busy lifestyle. It’s quick to whip up, using simple ingredients you’ll likely have on hand. Plus, the combination of chocolate and peanut butter is pure bliss! It’s a guaranteed crowd-pleaser that brings joy without overwhelming your schedule. You’ll find yourself making this cake again and again!
Save this recipe and cook smarter
Keep your favorite Cooking Layer recipes in one place, plan your weekly meals, and quickly find dinner ideas whenever you need them.
Free to download • Fast and easy to use
Ingredients for Reese’s Cake
Getting the right ingredients is key to making a memorable Reese’s Cake, and thankfully, this recipe is both accessible and forgiving. Here’s what you’ll need:
- Milk Chocolate Cake Mix: This forms the rich, chocolaty base of the cake. You can use any brand you love; you can even try using a gluten-free mix for a dietary twist.
- Whole Milk: This moistens the cake batter, creating a soft texture that melts in your mouth.
- Butter: Softened butter adds richness and flavor. For a lighter version, margarine works, too!
- Eggs: Eggs are the binding agents that help your cake rise and stay together. Using room temperature eggs works best.
Now for the star of the frosting:
- Peanut Butter: The creamy goodness of peanut butter brings that classic Reese’s flavor. Smooth or crunchy works; pick what you prefer!
- Powdered Sugar: This sweetens and thickens the buttercream. Feel free to adjust the amount based on your sweet tooth.
- Heavy Cream: This is your secret weapon for a silky frosting texture. Adjust as needed for consistency.
- Vanilla: A splash of vanilla elevates the flavor profile of the frosting.
- Salt: Just a pinch helps balance the sweetness.
For that glossy finish, here’s what you’ll need for the ganache:
- Semi-Sweet Chocolate Chips: These are essential for the ganache’s rich flavor, so go for quality chocolate!
- Heavy Cream: You’ll heat this to create that dreamy chocolate sauce. Remember, freshness counts!
Lastly, don’t forget your garnishes:
- Hershey Bar: For decorative shavings, this chocolate adds a lovely touch.
- Reese’s Cups: These can be chopped or placed whole for a delightful surprise in every slice.
Exact measurements for all these delicious ingredients are at the bottom of the article, ready for you to print!
How to Make Reese’s Cake
Now comes the fun part—making your Reese’s Cake! Follow these steps carefully, and you’ll have a gorgeous dessert that dazzles everyone. Let’s get started!
Step 1: Preheat & Prepare Pans
First things first! Preheat your oven to 350°F. Don’t skip this step; preheating guarantees even baking. Next, grab your three 9-inch round cake pans and spray them with Pam baking spray. This step is critical to ensure your cakes don’t stick. Trust me, no one likes a cake casualty!
Step 2: Mixing the Batter
In a large mixing bowl, combine your chocolate cake mix, whole milk, softened butter, and eggs. Stir until everything is smooth and fully combined. A well-blended batter is crucial for a light, airy cake, so take your time!
Step 3: Baking the Cakes
Once your batter is ready, evenly divide it between the pans. Bake them for about 25–30 minutes. To test for doneness, insert a toothpick in the center; if it comes out clean, your cakes are ready. If not, give them a few more minutes and check again!
Step 4: Cooling & Preparing the Layers
After baking, let the cakes cool for about 10 minutes in the pans. Then, gently remove them from the pans and transfer them to a wire rack to cool completely. When they’re cool, level the tops with a serrated knife. This ensures that your layers fit perfectly together, preventing a lopsided cake!
Step 5: Making the Peanut Butter Buttercream
In a large bowl, cream together softened butter and peanut butter until fluffy. Gradually add the powdered sugar, mixing well. Then, stir in heavy cream until you reach your desired frosting consistency. If it feels too thick, just add a splash more cream. You want it smooth and creamy but not runny!
Step 6: Making the Chocolate Ganache
For the ganache, heat half a cup of heavy cream in a small saucepan until it’s steaming, but don’t let it boil. Pour it over the chocolate chips in a heat-proof bowl. Let it sit for about one minute, and then whisk until it’s entirely smooth. This luscious ganache will take your cake to another level!
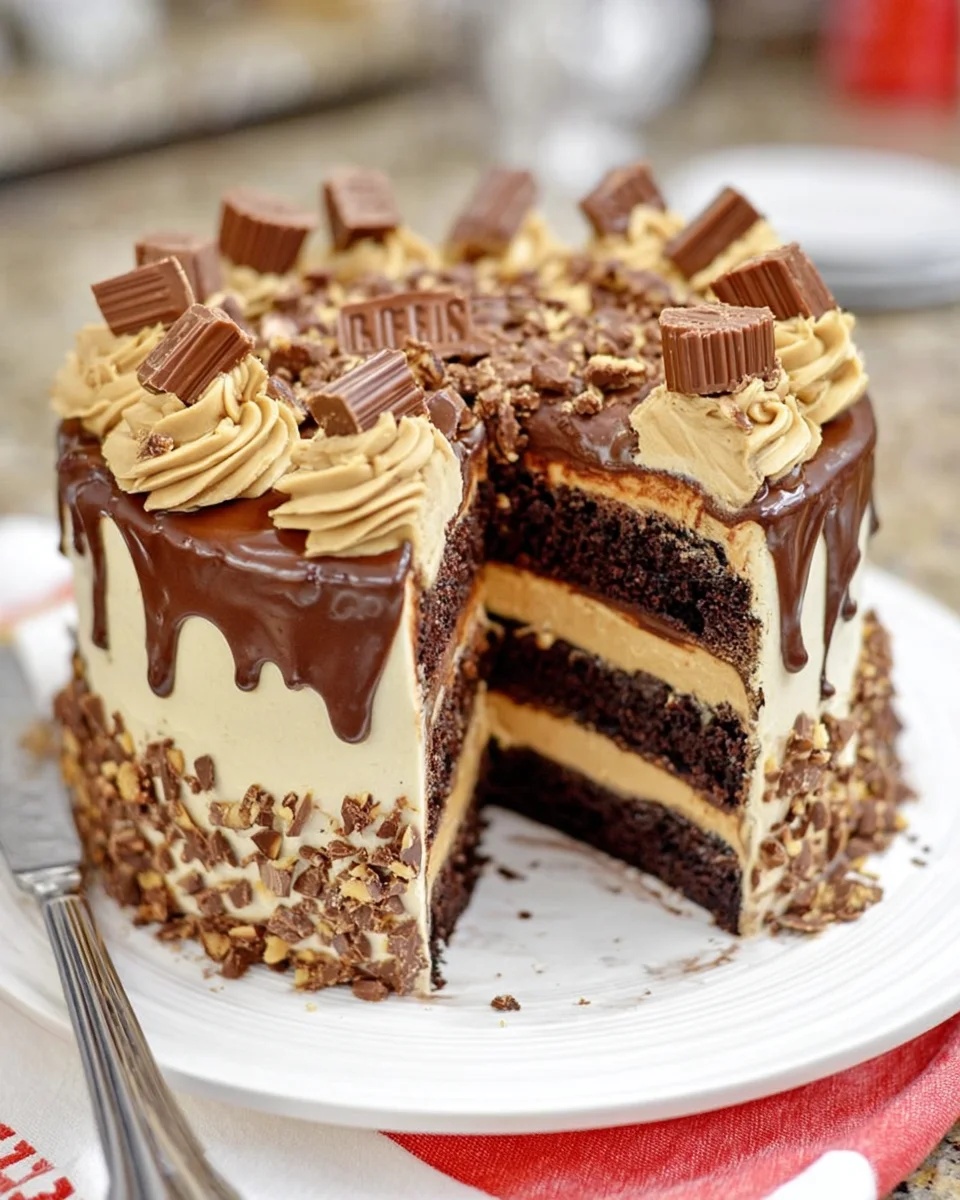
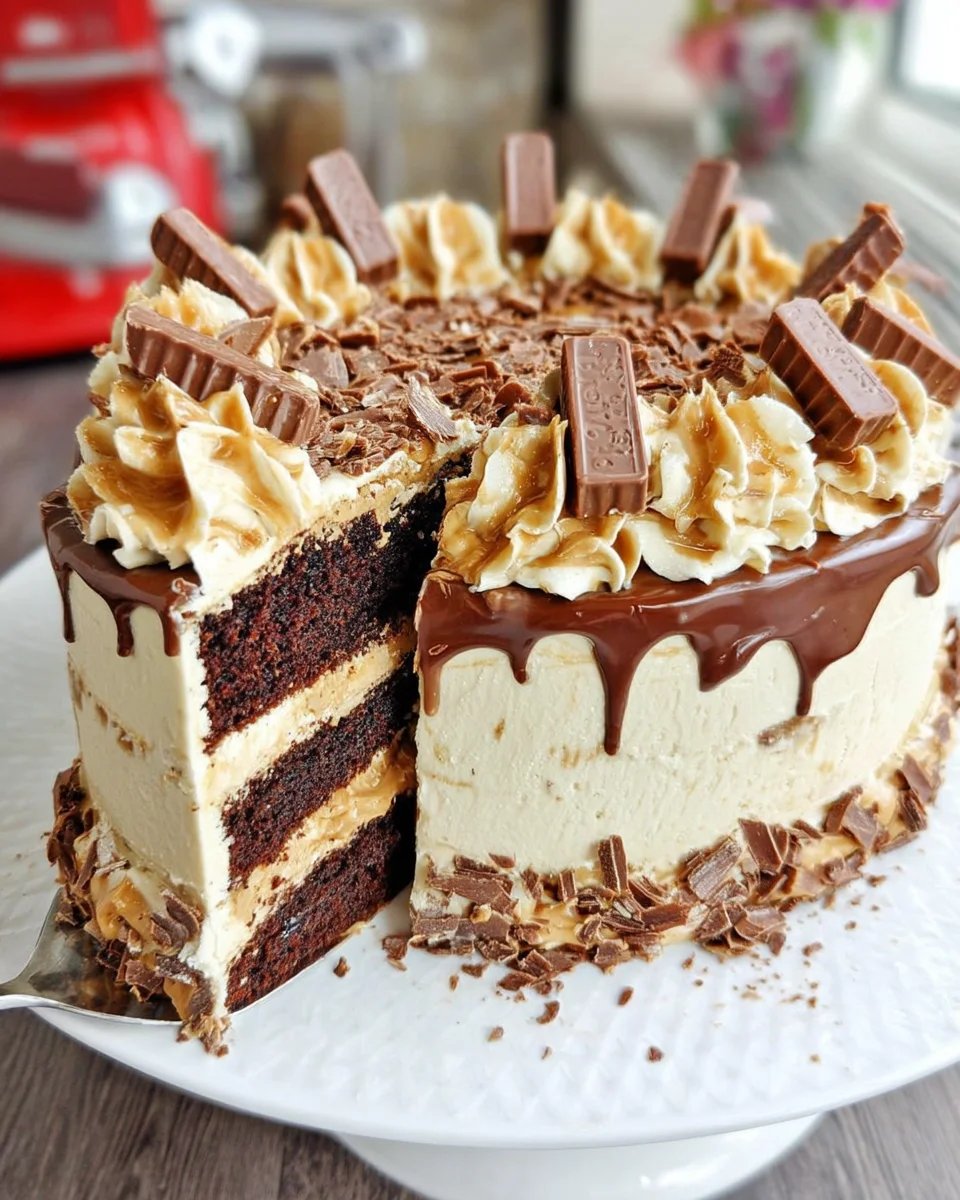
Step 7: Assembling the Cake
Place the first layer on a serving plate. Scoop about one cup of peanut butter buttercream on top and spread it evenly. Repeat the layers with the remaining cakes and finish by frosting the sides and the top. Aim for a smooth finish to impress your guests!
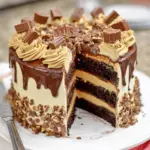
Step 8: Drizzling Ganache & Final Touches
Now, for the artistic part! Using a squeeze bottle, drizzle some ganache around the top edge of the cake, allowing it to drip down the sides. Pour the remaining ganache in the middle and smooth it out. Let the cake sit for about 10 minutes for the ganache to set. To finish, pipe dollops of frosting on top, then sprinkle chocolate shavings and place Reese’s Cups for that stunning final touch!
Tips for Success
- Always ensure your ingredients are at room temperature for better mixing and texture.
- Don’t rush the baking time; each oven is unique. Keep an eye on your cakes.
- When leveling your cakes, use a serrated knife for clean, even cuts.
- If your frosting is too sweet, add a pinch more salt to balance it out.
- Get creative with your garnishes! Crushed Reese’s Cups can add extra flair.
Equipment Needed
- 3 9-inch round cake pans: If you don’t have three, bake in batches.
- Mixing bowls: A large one for the batter and a medium one for the frosting.
- Electric mixer: A handheld one works perfectly, but a stand mixer is great if you have it.
- Measuring cups and spoons: Essential for accuracy in baking.
- Serrated knife: Perfect for leveling cakes and cutting slices.
Variations of Reese’s Cake
- Gluten-Free Option: Substitute the chocolate cake mix for a gluten-free version. This allows everyone to indulge!
- Peanut Butter Alternative: For those with nut allergies, use sun butter or almond butter. They provide a delicious twist!
- Dark Chocolate Ganache: Swap semi-sweet chocolate chips for dark chocolate to add a richer flavor to the ganache.
- Half the Sugar: Reduce the amount of powdered sugar in the frosting. It’ll still be delicious without being overly sweet.
- Layered with Fruit: Add fresh raspberries or sliced bananas between the layers for a refreshing burst of flavor.
- Coconut Flavored Frosting: Mix shredded coconut into the buttercream for a tropical touch that pairs nicely with chocolate.
Serving Suggestions
- Serve slices of Reese’s Cake with a dollop of whipped cream on top for added indulgence.
- Pair it with a scoop of vanilla ice cream to balance the rich flavors.
- A hot cup of coffee or tea complements this dessert beautifully.
- For presentation, arrange cake slices on colorful plates with fresh berries on the side.
FAQs about Reese’s Cake
If you’re curious about this Reese’s Cake, you’re not alone! Many have questions, so let’s tackle some of the most common ones together.
Can I make Reese’s Cake ahead of time?
Absolutely! You can bake the cakes and store them wrapped in plastic wrap for up to 2 days. Just frost them the day you plan to serve for the best texture.
How can I store leftovers?
Store any leftovers in an airtight container in the fridge for up to a week. Allow it to come to room temperature before serving for the best flavor and texture.
Can I freeze this cake?
Yes, you can freeze slices of Reese’s Cake! Wrap each slice in foil and store in a zip-top bag. It can stay frozen for up to 3 months. Just thaw overnight in the fridge before enjoying.
What can I substitute for eggs?
If you’re looking for an egg alternative, try using unsweetened applesauce. One-third cup per egg works great in this recipe, adding moisture without compromising texture!
Can I use other flavors instead of peanut butter?
Of course! If peanut butter isn’t your thing, try using Nutella or a chocolate hazelnut spread for a unique twist. It’s all about making it your own!
Final Thoughts
Indulging in a slice of Reese’s Cake is more than just a treat; it’s an experience filled with joy and memories. From the moment you mix the ingredients to the first bite, this cake is bound to brighten your day. It’s about gathering around the table with loved ones and sharing something truly delicious. Whether you’re celebrating a special occasion or just treating yourself on a busy weeknight, this cake always delivers smiles. I hope you embark on this sweet journey and enjoy every crumb of this decadent delight! You deserve it!
Enjoyed this recipe?
Discover more delicious recipes, save your favorites, and plan your meals with the Cooking Layer app.
Free to download • Fast and easy to use
Reese’s Cake
- Prep Time: 30 minutes
- Cook Time: 30 minutes
- Total Time: 1 hour
- Yield: 12 servings 1x
- Category: Dessert
- Method: Baking
- Cuisine: American
- Diet: Vegetarian
Description
Indulge in this decadent Reese’s Cake, layered with rich chocolate and creamy peanut butter flavors.
Ingredients
- 2 Boxes Milk Chocolate Cake Mix
- 2 ½ Cups Whole Milk
- 2 Cups Butter Softened
- 6 Eggs
- For the Peanut Butter Buttercream:
- 2 Cups Butter Softened
- 3 Cups Powdered Sugar
- 2–4 tablespoons Heavy Cream
- ½ Cup Peanut Butter
- 1 teaspoon Vanilla
- Pinch Salt
- For the Chocolate Ganache:
- 1 Cup Semi Sweet Chocolate Chips
- ½ Cup Heavy Cream
- Garnish:
- 1 Hershey Bar
- Reese’s Cups
Instructions
- Preheat oven to 350 degrees and spray 3 9 inch round cake pans with Pam baking spray. Set aside.
- In a large mixing bowl combine all cake ingredients together until fully combined.
- Divide batter between the 3 baking pans and bake for 25-30 minutes or until a toothpick inserted in the center comes out clean. Cool completely.
- Once cooled, remove cakes from cake pan and cut the top domes off so they are flat.
- In a large bowl, cream butter, powdered sugar, peanut butter, vanilla and salt. Stir in powdered sugar a little at a time. Add heavy cream until you reach your desired consistency.
- In a small saucepan, heat heavy whipping cream until steaming. Place chocolate chips into a heat-proof bowl.
- Once the heavy whipping cream is heated, pour over the chocolate chips. Allow to sit for 1 minute before whisking until smooth.
- Pour ganache into a squeeze bottle.
- Place the first cake layer onto a serving plate. Scoop 1 cup of frosting onto the first layer and spread it out. Repeat steps with remaining cake layers. Frost top and sides too.
- Scoop remaining frosting into a piping bag with a star tip, and set aside.
- Using the squeeze bottle, create a drizzle effect around the top of the cake. Squeeze some ganache over the side to allow the chocolate ganache to drip down.
- Pour remaining ganache onto the center of the top of the cake and smooth evenly to coat the top.
- Allow to sit for 10 minutes to allow ganache to harden.
- Pipe dollops of frosting onto the top cake.
- Take the potato peeler and run it along the edge of the chocolate bar like you’re peeling an apple to create shavings.
- Place the Reese Peanut Butter Cups in between the frosting dollops.
Notes
- Ensure cakes are completely cooled before frosting.
- Adjust the amount of heavy cream in the buttercream for desired consistency.
- Get creative with garnishes; you can add crushed Reese’s Cups for extra texture.
Nutrition
- Serving Size: 1 slice
- Calories: 560
- Sugar: 45g
- Sodium: 220mg
- Fat: 34g
- Saturated Fat: 16g
- Unsaturated Fat: 18g
- Trans Fat: 0g
- Carbohydrates: 60g
- Fiber: 2g
- Protein: 6g
- Cholesterol: 75mg