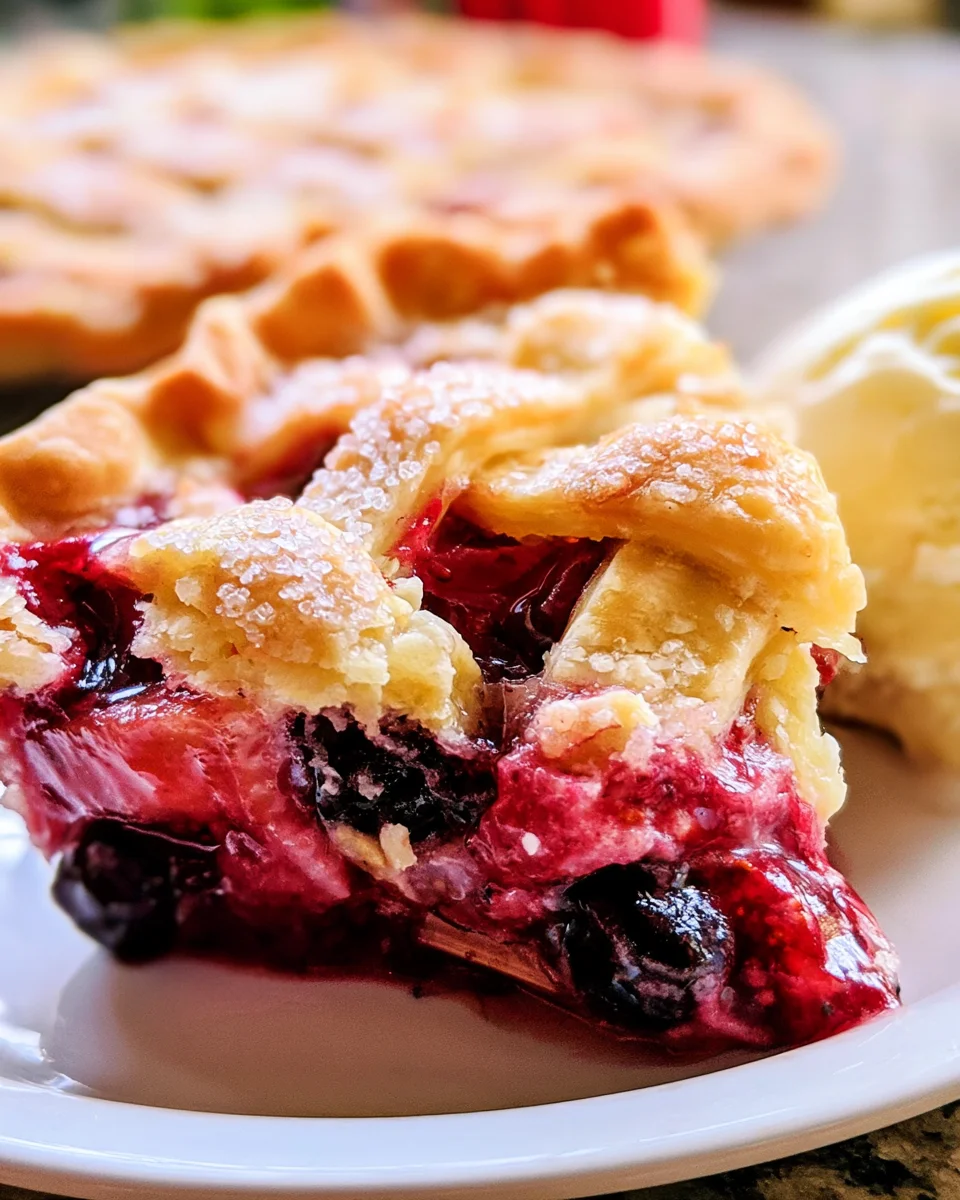
Introduction to Strawberry Rhubarb Pie
Ah, nothing screams comfort quite like a delightful strawberry rhubarb pie! Picture this: a tender, flaky crust holding together a sweet and tart filling that reminds you of summer afternoons spent with loved ones.
As a busy mom, I know how precious those little moments can be. This classic dessert is perfect for quick family dinners or gatherings where you want to impress without breaking a sweat.
With fresh strawberries and vibrant rhubarb, this pie is as comforting as a warm hug. Plus, it’s a fantastic way to celebrate seasonal fruit, making it a must-try recipe that you and your family will adore!
Why You’ll Love This Strawberry Rhubarb Pie
This strawberry rhubarb pie is the epitome of effortless elegance.
With simple ingredients and straightforward steps, you’ll whip up a delicious dessert even on your busiest days.
Its sweet and tangy filling is like a burst of sunshine, leaving everyone asking for seconds.
Plus, it’s a beautiful centerpiece for any table, making it perfect for gatherings or that family Saturday dinner.
Isn’t it wonderful how a slice of pie can brighten up your day?
Ingredients for Strawberry Rhubarb Pie
Gathering quality ingredients is the first step to making your strawberry rhubarb pie a hit. Here’s what you’ll need:
- Refrigerated pie crusts: You’ll need a package containing two crusts. If you’re feeling adventurous, go ahead and make a homemade double-crust version!
- Rhubarb: Fresh rhubarb brings the perfect tang. Cut it into 1 to 1.5-inch pieces to ensure even cooking.
- Sliced strawberries: Their sweetness complements the tartness of rhubarb beautifully. Feel free to substitute with your favorite berries, like raspberries or blackberries.
- Blueberries: These plump little gems add color and flavor to your pie. You can use just strawberries if you prefer fewer ingredients.
- Granulated sugar: This sweet ingredient balances the tartness. You’ll save some for sprinkling on top for that extra touch of sweetness!
- Large egg: A beaten egg helps to bind your filling and gives a lovely glaze to the crust.
- Quick-cooking tapioca: This helps thicken your filling without making it gummy. If you don’t have it, cornstarch or flour will do.
- All-purpose flour: You’ll need this for dusting and to help absorb excess moisture from the fruits.
For exact measurements and additional tips, check out the bottom of the article where the complete ingredient list is available for printing!
How to Make Strawberry Rhubarb Pie
Step 1: Preheat Your Oven
Before diving into the mixing bowl, let’s get that oven ready! Preheating is important as it ensures your pie bakes evenly. Set it to 375°F, and while it heats up, place a baking sheet or pizza stone in there to catch any potential drips. It’s a small step that saves a big mess later!
Step 2: Prepare the Pie Crust
Now, let’s soften the refrigerated pie crusts. Leave them out on the counter for about 15 minutes. This makes rolling a breeze! Lightly dust your countertop with flour to prevent sticking and roll out your first crust to fit a greased 9-inch glass pie plate. Gently drape it into the plate, letting it hang over the edges. This step is crucial for holding all that delicious filling!
Step 3: Mix the Fruit Filling
In a large mixing bowl, combine your diced rhubarb, sliced strawberries, and blueberries for an irresistible flavor combo. Add the sugar, beaten egg, tapioca, and flour. Gently stir it all together to coat the fruit. Let this mixture sit for about 15 to 30 minutes. This resting time allows the flavors to meld beautifully, resulting in a more delicious pie!
Step 4: Create the Lattice Design
Flour your counter again and roll out your second crust, aiming for a 12-inch diameter. Once rolled out, slice it into 1-inch wide strips. You can get creative here! For a lovely lattice design, slice four strips in half to create thinner strips. Now, arrange these strips in a crisscross pattern over the fruit filling. Don’t forget to seal and flute the edges of the pie for that homemade touch!
Step 5: Bake the Pie
Time to let that pie shine! Carefully cover it with foil to prevent over-browning, then place it on your preheated baking sheet. Bake for 40 minutes. After that, remove the foil and create a barrier of foil around the crust’s edges to protect them from burning. Bake again for 25 to 30 more minutes until the filling is bubbling and the crust is golden brown. The aroma will be heavenly!
Step 6: Cool and Serve
Once out of the oven, allow the pie to cool on a wire rack for about 2 hours before slicing. This cooling period helps the filling set so you can have perfectly shaped slices. I love serving my pie with a scoop of vanilla ice cream or a dollop of whipped cream – it’s a must-try combination!
Tips for Success
- Keep an eye on your pie! Baking times can vary, so check for doneness rather than relying solely on the clock.
- If you want a glossy crust, brush the lattice with an extra beaten egg before baking.
- Chill your pie before baking to help maintain the shape of the crust.
- Don’t hesitate to mix and match fruits based on what’s in season or what you have on hand!
Equipment Needed
- 9-inch glass pie plate: A must for your pie! Alternatively, use a metal pie pan.
- Rolling pin: Essential for rolling out crusts. If you don’t have one, a wine bottle works in a pinch!
- Mixing bowls: You’ll need a couple for combining ingredients.
- Baking sheet: Helps catch drips while baking. A pizza stone can also do the job!
- Wire rack: Perfect for cooling your pie. You can use a cutting board as a substitute.
Variations of Strawberry Rhubarb Pie
- Berry Medley Pie: Swap out the blueberries for a mix of raspberries and blackberries for an extra berry punch.
- Gluten-Free Crust: Use a gluten-free pie crust mix instead to make this dessert suitable for gluten-sensitive folks.
- Crumb Topping: Instead of lattice, top your pie with a sweet oat crumble for a delightful texture contrast.
- Spiced Variation: Add a pinch of cinnamon or nutmeg to the filling for a warm, cozy flavor twist.
- Vegan Option: Replace the egg with flaxseed meal mixed with water and use a plant-based buttery substitute for the crust.
Serving Suggestions for Strawberry Rhubarb Pie
- Serve warm with a scoop of vanilla ice cream for an irresistible combination.
- Top with freshly whipped cream for a light, airy touch.
- Accompany with a glass of chilled lemonade or sweet tea.
- Plate slices with a sprinkle of powdered sugar for that café-style presentation.
FAQs about Strawberry Rhubarb Pie
Can I use frozen rhubarb for this pie? Absolutely! Just let the frozen rhubarb thaw and drain any excess liquid before mixing it with the other filling ingredients.
How can I tell when my pie is done baking? Look for bubbling filling and a golden-brown crust. If it’s not quite there, give it an extra few minutes in the oven.
Can I make this pie ahead of time? Yes! You can make it a day or two in advance. Just store it covered in the fridge, and reheat slightly before serving for that fresh-baked taste.
What’s the best way to store leftover pie? Keep the leftover slices wrapped well or in an airtight container in the fridge for up to five days. It’s still delicious chilled!
Can I substitute other fruits? Definitely! Feel free to experiment by using other fruits like peaches, cherries, or apples, but remember to adjust the sugar to taste.
Final Thoughts
Baking this strawberry rhubarb pie is more than just a cooking task; it’s an experience filled with joy and nostalgia. As you mix the vibrant ingredients, the sweet and tart aromas envelop your kitchen, creating an atmosphere reminiscent of summer gatherings.
Each slice you share becomes a moment, a conversation starter, or a sweet memory in the making. Whether enjoyed warm from the oven or cold from the fridge, this pie has the power to brighten even the busiest of days.
I hope this recipe becomes a cherished tradition in your home, creating delicious memories for years to come!
Print
Strawberry Rhubarb Pie
- Prep Time: 30 minutes
- Cook Time: 1 hour
- Total Time: 1 hour 30 minutes
- Yield: 8 slices 1x
- Category: Dessert
- Method: Baking
- Cuisine: American
- Diet: Vegetarian
Description
A delicious and classic dessert featuring the sweet and tart combination of strawberries and rhubarb, encased in a flaky pie crust.
Ingredients
- 1 package refrigerated pie crusts, should contain 2 crusts; alternatively make a double-crust homemade pie crust recipe
- 3 cups rhubarb, diced into 1 to 1.5-inch pieces
- 1 cup sliced strawberries
- 1 cup blueberries
- 1 cup granulated sugar, plus about 2 tablespoons for sprinkling
- 1 large egg, beaten
- 1 tablespoon quick-cooking or minute tapioca
- 1 tablespoon all-purpose flour, plus more for dusting counter
Instructions
- Preheat oven to 375°F and place a baking sheet or pizza stone inside the oven to heat up.
- Allow the refrigerated pie crusts to soften for about 15 minutes on a clean counter, then flour your countertop to prevent sticking. Roll out one pie crust and drape it into a greased 9-inch glass pie plate; set aside.
- In a large bowl, add the rhubarb, strawberries, blueberries, 1 cup of sugar, egg, minute tapioca, and flour. Gently stir together and allow to stand for 15 to 30 minutes.
- Meanwhile, sprinkle your counter with flour, flatten the second crust with a rolling pin, and roll it out to a diameter of 12 inches.
- Slice the crust into 1-inch wide strips, making 12 strips. Vertically slice 4 of those strips in half to create 8 thinner strips (1/2-inch wide); leave these strips in pairs.
- Arrange the strips in a lattice design over the filling. Seal and flute edges of the pie plate using your fingers.
- Evenly sprinkle the top with about 2 tablespoons of sugar.
- Cover the entire pie plate with foil, place on the preheated baking sheet and bake for 40 minutes.
- Remove the pie plate from the oven, remove the foil, and create a barrier of foil around the crust’s perimeter. Bake for an additional 25 to 30 minutes or until the filling is bubbling and the crust is lightly golden brown.
- Allow the pie to cool on a wire rack for about 2 hours at room temp before slicing and serving.
- Serve with ice cream, whipped cream, or plain. Store leftover pie well-covered in the fridge for up to 5 days.
Notes
- Watch your pie rather than the clock, as baking time might vary based on oven operations and fruit used.
- To accelerate cooling after baking, you can place the pie in the fridge.
Nutrition
- Serving Size: 1 slice
- Calories: 250
- Sugar: 18g
- Sodium: 150mg
- Fat: 10g
- Saturated Fat: 5g
- Unsaturated Fat: 4g
- Trans Fat: 0g
- Carbohydrates: 38g
- Fiber: 2g
- Protein: 2g
- Cholesterol: 30mg