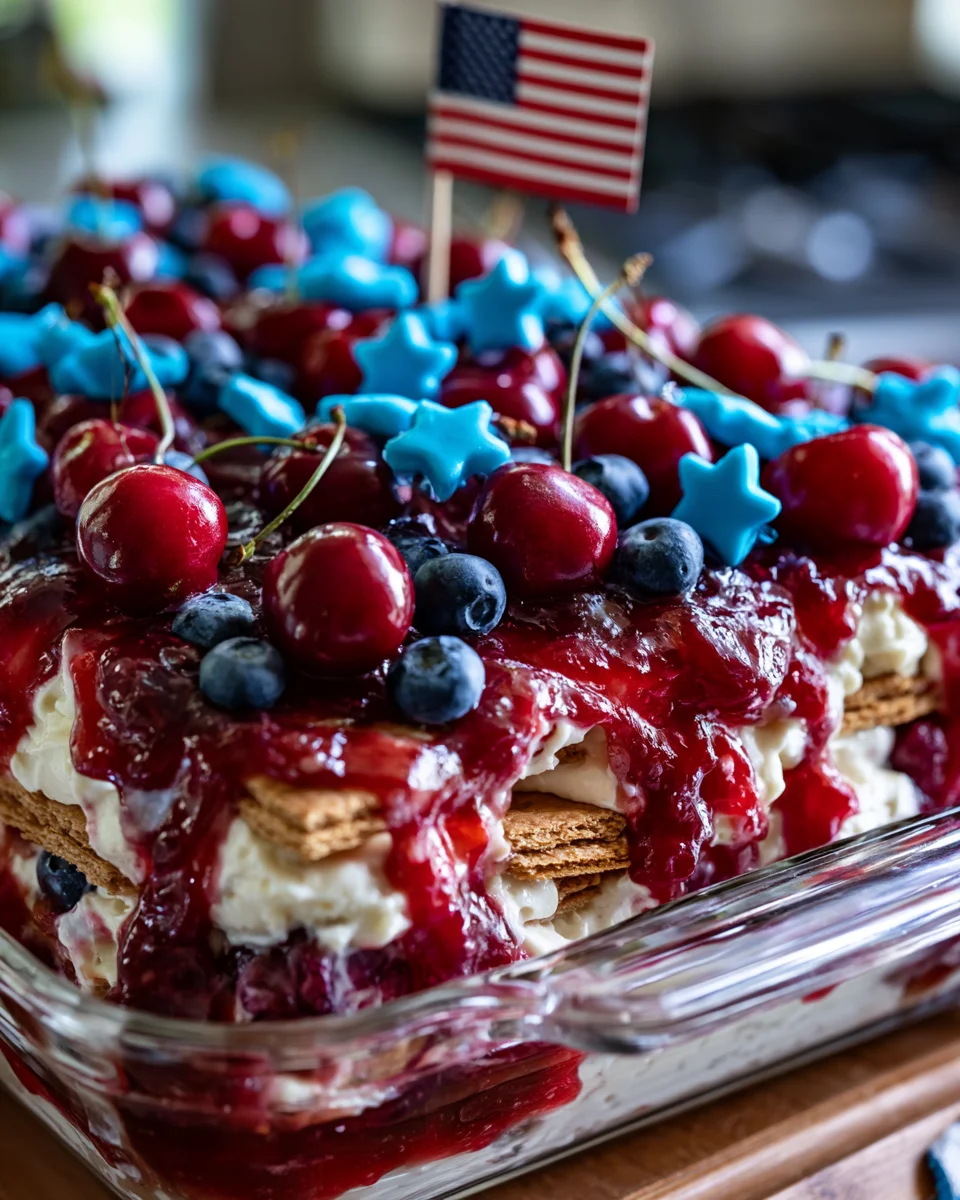
When summer celebrations call for an easy, refreshing dessert, this No-Bake 4th of July Cherry Cheesecake Icebox Cake is the perfect choice. Creamy cheesecake filling, sweet cherry pie topping, layers of soft graham crackers, and festive red, white, and blue decorations come together to create a dessert that’s as beautiful as it is delicious.
Unlike traditional cheesecakes that require baking and hours of careful cooling, this icebox cake comes together in just a few simple steps. After a night in the refrigerator, the graham crackers soften into tender, cake-like layers while the fluffy cheesecake filling becomes rich and sliceable. The result is a dessert that tastes like a cross between classic cheesecake and layered cake without ever turning on the oven.
This recipe is ideal for hot summer days when you want something cool and refreshing without heating up the kitchen. Whether you’re hosting a Fourth of July barbecue, attending a neighborhood potluck, planning a family picnic, or celebrating with friends, this patriotic dessert is guaranteed to become the centerpiece of your dessert table.
The bright red cherry topping paired with white cheesecake filling and blue decorations creates a festive look that’s perfect for Independence Day. Fresh cherries, blueberries, whipped cream, and star-shaped sprinkles add the finishing touches, making every slice look bakery-worthy.
Another reason to love this recipe is how easy it is to prepare ahead of time. In fact, it tastes even better after chilling overnight, making it one of the least stressful holiday desserts you can make. Simply assemble it the day before your celebration, refrigerate overnight, decorate before serving, and enjoy compliments from everyone who tries it.
If you’re looking for a crowd-pleasing dessert that’s creamy, fruity, light, and incredibly simple to prepare, this No-Bake 4th of July Cherry Cheesecake Icebox Cake belongs on your summer menu.
Why You’ll Love This No-Bake 4th of July Cherry Cheesecake Icebox Cake
There are countless patriotic desserts to choose from, but this recipe stands out for many reasons.
No Oven Required
One of the biggest advantages is that there’s absolutely no baking involved. During the summer months, keeping the oven off helps keep your kitchen cool while still allowing you to serve an impressive homemade dessert.
Perfect Make-Ahead Dessert
Since the cake needs several hours to chill, it’s actually better when prepared the night before. That means less work on the day of your party and more time to enjoy your guests.
Rich and Creamy Cheesecake Filling
The combination of cream cheese, instant cheesecake pudding, whipped cream, and vanilla creates a silky, fluffy filling that’s rich without feeling too heavy. Every bite melts in your mouth while complementing the sweet cherry topping.
Beautiful Patriotic Presentation
The bright red cherries, white whipped cream, and fresh blueberries naturally create a festive red, white, and blue color palette. Add blue candy stars or patriotic sprinkles, and you have a dessert that fits perfectly into any Independence Day celebration.
Great for Feeding a Crowd
A single 9×13-inch pan easily serves 12 to 15 people, making it ideal for cookouts, potlucks, church gatherings, family reunions, and neighborhood parties.
Beginner-Friendly Recipe
Even if you’ve never made an icebox cake before, this recipe is almost impossible to mess up. There are no complicated baking techniques, no water baths, and no worries about cracking cheesecake.
Simply layer, chill, decorate, and serve.
Ingredients You’ll Need
One of the reasons this recipe is so popular is that every ingredient is easy to find at most grocery stores.
Cream Cheese
Full-fat cream cheese creates the rich, smooth base of the cheesecake filling. Be sure to let it soften at room temperature before mixing to prevent lumps.
Powdered Sugar
Powdered sugar sweetens the filling while helping it stay smooth and creamy. It blends easily into the cream cheese without creating a grainy texture.
Vanilla Extract
Pure vanilla extract adds warmth and enhances the overall cheesecake flavor.
Almond Extract (Optional)
A small amount of almond extract gives the filling a subtle bakery-style flavor that pairs beautifully with cherries. If you prefer a classic cheesecake taste, simply leave it out.
Instant Cheesecake Pudding Mix
This ingredient helps stabilize the filling while adding extra cheesecake flavor. If you can’t find cheesecake pudding mix, instant vanilla pudding works just as well.
Whole Milk
Cold whole milk activates the pudding mix and helps create a thick, creamy consistency.
Heavy Whipping Cream
Fresh whipped cream makes the cheesecake filling incredibly light and airy. It also adds richness that balances the tangy cream cheese perfectly.
Honey Graham Crackers
The graham crackers form the layers of the cake. As they chill, they absorb moisture from the filling and soften into a tender texture that’s similar to cake.
Cherry Pie Filling
The glossy cherry topping adds bright color, fruity sweetness, and beautiful presentation. Its vibrant red color makes it perfect for patriotic celebrations.
Decorations
To complete the festive look, you’ll need:
- Fresh whole cherries
- Fresh blueberries
- Blue candy stars or blue star sprinkles
- Homemade whipped cream
- Optional American flag picks
These simple decorations transform an easy icebox cake into a stunning holiday dessert that’s guaranteed to impress.
How to Make No-Bake 4th of July Cherry Cheesecake Icebox Cake
This dessert comes together in a few simple steps, making it one of the easiest holiday treats you can prepare. The secret is allowing enough chilling time so the layers can set properly and the graham crackers soften into a cake-like texture.
Step 1: Prepare the Cheesecake Filling
Start by placing the softened cream cheese into a large mixing bowl.
Using a hand mixer or stand mixer, beat the cream cheese on medium speed for about 2 to 3 minutes until it becomes completely smooth and creamy. There should be no lumps remaining.
Add the powdered sugar, vanilla extract, and almond extract, if using.
Continue beating until the mixture becomes light, fluffy, and well combined.
Taking the time to fully blend the cream cheese at this stage creates a silky filling with the best texture.
Step 2: Mix the Pudding
In a separate bowl, whisk together the instant cheesecake pudding mix and the cold whole milk.
Whisk for about 2 minutes until the mixture begins to thicken.
Pour the pudding mixture into the cream cheese mixture.
Beat everything together until smooth and fully incorporated.
The pudding helps stabilize the filling while adding extra cheesecake flavor and making the dessert easier to slice after chilling.
Step 3: Whip the Heavy Cream
In a chilled mixing bowl, combine:
- 2 cups heavy whipping cream
- ¼ cup powdered sugar
Beat on high speed until stiff peaks form.
The whipped cream should be thick enough to hold its shape but still smooth and creamy.
Using cold cream and a chilled bowl helps it whip faster and creates a lighter texture.
Step 4: Fold Everything Together
Using a rubber spatula, gently fold the whipped cream into the cream cheese mixture.
Work slowly, using broad folding motions rather than stirring.
This keeps as much air as possible in the filling, giving the cheesecake layers a light and fluffy texture.
Continue folding until no white streaks remain.
Avoid overmixing, as this can deflate the whipped cream.
Assembling the Icebox Cake
Now it’s time to build the layers.
First Layer
Spread a thin layer of the cheesecake filling over the bottom of a 9×13-inch glass baking dish.
This helps anchor the graham crackers in place.
Arrange a single layer of honey graham crackers over the filling.
Break a few crackers into smaller pieces as needed to completely cover the bottom.
Add the Filling
Spread about one-third of the cheesecake filling evenly over the graham crackers.
Use an offset spatula or the back of a spoon to smooth the surface.
Try to reach all the corners of the dish for even layers.
Add the Cherry Topping
Spoon about one-third of the cherry pie filling over the cheesecake layer.
Spread it gently so the cherries are evenly distributed.
Don’t worry if a little cheesecake shows through in places.
Repeat the Layers
Repeat the layering process two more times:
- Graham crackers
- Cheesecake filling
- Cherry pie filling
For the final layer, use the remaining cherry pie filling.
Allow some of the glossy cherries to naturally flow toward the edges for an elegant, homemade look.
The finished dessert should have beautiful, even layers with vibrant red cherries covering the top.
Chill the Cake
Cover the baking dish tightly with plastic wrap or aluminum foil.
Refrigerate for at least 8 hours, although overnight is strongly recommended.
During this time, two important things happen:
- The cheesecake filling firms up.
- The graham crackers absorb moisture and soften into tender cake-like layers.
Resist the temptation to cut into the cake too early.
The longer chill time produces cleaner slices and a much better texture.
Decorating Before Serving
Right before serving, prepare the whipped cream topping.
In a chilled bowl, beat together:
- 1 cup heavy whipping cream
- 2 tablespoons powdered sugar
Beat until stiff peaks form.
Transfer the whipped cream to a piping bag fitted with a large star tip.
Pipe decorative swirls around the edge of the cake.
Finish by decorating with:
- Fresh whole cherries
- Fresh blueberries
- Blue candy stars
- Patriotic sprinkles
- Small American flag picks if desired
The decorations give the dessert a festive red, white, and blue appearance that’s perfect for Independence Day celebrations.
Expert Tips for the Best Icebox Cake
A few simple tips can make this dessert even better.
Soften the Cream Cheese
Cold cream cheese is difficult to blend and can leave lumps in the filling.
Let it sit at room temperature for about 30 to 45 minutes before mixing.
Use Full-Fat Ingredients
Full-fat cream cheese and heavy whipping cream provide the richest flavor and creamiest texture.
Reduced-fat ingredients may produce a softer filling.
Chill the Mixing Bowl
A cold bowl helps heavy cream whip more quickly and hold stiff peaks longer.
Place the bowl and beaters in the freezer for 10 to 15 minutes before whipping.
Fold Gently
When combining the whipped cream with the cheesecake mixture, use slow folding motions instead of stirring.
This keeps the filling light and airy.
Give It Time
The overnight chill is worth the wait.
Not only does it improve the texture, but it also allows the flavors to blend together beautifully.
Common Mistakes to Avoid
Using Warm Cream Cheese
If the cream cheese isn’t softened enough, the filling may contain small lumps that are difficult to remove.
Skipping the Chill Time
Cutting the cake too soon can cause the layers to slide apart.
An overnight chill creates the cleanest slices.
Overmixing the Filling
Once the whipped cream has been folded into the cheesecake mixture, stop mixing as soon as everything is combined.
Overmixing can deflate the filling and make it less fluffy.
Too Much Cherry Filling in One Layer
Spread the cherry topping evenly across each layer.
Adding too much in one spot can make slicing more difficult and create uneven layers.
Forgetting to Clean the Knife
For bakery-style slices, wipe the knife clean between each cut.
This keeps the beautiful cheesecake and cherry layers looking neat and professional.
Fun Variations to Try
One of the best things about this No-Bake 4th of July Cherry Cheesecake Icebox Cake is how easy it is to customize. Once you master the basic recipe, you can create endless variations using different fruits, cookies, and flavors while keeping the same creamy texture everyone loves.
Mixed Berry Icebox Cake
Replace one can of cherry pie filling with blueberry or strawberry pie filling for a colorful mixed berry version. Fresh raspberries layered between the cheesecake filling also add a bright, slightly tart flavor.
Strawberry Cheesecake Version
Swap the cherry pie filling for strawberry pie filling and decorate with fresh strawberries and blueberries. This creates another patriotic dessert that’s perfect for summer holidays.
Chocolate Lovers’ Version
Layer chocolate graham crackers instead of honey graham crackers and drizzle melted white chocolate over the finished dessert. The chocolate pairs wonderfully with the creamy cheesecake filling.
Lemon Cheesecake Icebox Cake
Mix one tablespoon of fresh lemon zest into the cheesecake filling and use lemon sandwich cookies instead of graham crackers. Top with fresh blueberries for a refreshing summer dessert.
Oreo Cheesecake Icebox Cake
Replace the graham crackers with Golden Oreos or classic Oreos for an extra indulgent twist. This version is especially popular with kids.
Make-Ahead Tips
This dessert is one of the best recipes for entertaining because almost everything can be prepared in advance.
One Day Before
Assemble the entire cake, cover it tightly, and refrigerate overnight. Waiting until the next day actually improves both the flavor and texture.
Prepare the Decorations Later
For the freshest appearance, wait until just before serving to add:
- Fresh whipped cream
- Fresh cherries
- Blueberries
- Candy stars
- Patriotic sprinkles
- American flag picks
This keeps the fruit looking vibrant and prevents the whipped cream from losing volume.
Homemade Whipped Cream
If you’d like to save time, you can whip the cream a few hours before serving.
Store it in the refrigerator in a covered bowl, then give it a quick whisk before piping onto the cake.
Storage Instructions
Because this dessert contains dairy, proper storage is important.
Refrigerator
Cover the baking dish tightly with plastic wrap or store slices in an airtight container.
The cake stays fresh for up to 4 days in the refrigerator.
The graham crackers continue to soften slightly over time, making the texture even more cake-like.
Can You Freeze It?
Yes, but freezing slightly changes the texture.
Freeze individual slices in airtight containers for up to 2 months.
Thaw overnight in the refrigerator before serving.
Keep in mind that fresh fruit decorations should always be added after thawing.
Serving Suggestions
This patriotic dessert pairs beautifully with many classic summer favorites.
Serve it after:
- Grilled burgers
- BBQ chicken
- Hot dogs
- Pulled pork sandwiches
- Grilled ribs
- Pasta salad
- Potato salad
- Corn on the cob
- Fresh fruit salad
- Watermelon slices
For drinks, consider serving:
- Fresh lemonade
- Sweet iced tea
- Sparkling berry punch
- Cherry limeade
- Iced coffee for adults
Its cool, creamy texture makes it especially refreshing after a hot day outdoors.
Perfect Occasions
Although it’s designed for Independence Day, this cheesecake icebox cake is wonderful throughout the entire summer.
It’s perfect for:
- Fourth of July celebrations
- Memorial Day cookouts
- Labor Day parties
- Backyard BBQs
- Family reunions
- Graduation parties
- Church potlucks
- Neighborhood block parties
- Baby showers
- Birthday celebrations
- Summer picnics
- Pool parties
Since it serves a crowd, it’s an excellent choice whenever you need an easy dessert that everyone can enjoy.
Frequently Asked Questions
Can I use low-fat cream cheese?
You can, but full-fat cream cheese gives the richest flavor and the firmest cheesecake filling.
Can I substitute Cool Whip?
Yes. Replace the homemade whipped cream in the filling with an equal amount of thawed whipped topping if you’re looking for an even quicker recipe.
Can I use homemade cherry pie filling?
Absolutely.
Homemade cherry pie filling works beautifully and often provides an even fresher flavor. Just make sure it has cooled completely before layering it into the dessert.
Can I make this recipe gluten-free?
Yes.
Simply use gluten-free graham crackers and confirm that your pudding mix and pie filling are gluten-free.
How long does the cake need to chill?
A minimum of 8 hours is recommended, but overnight chilling delivers the best flavor, texture, and cleanest slices.
Why are my graham crackers still crunchy?
The dessert probably hasn’t chilled long enough.
Given enough time, the moisture from the cheesecake filling softens the crackers into tender, cake-like layers.
Can I decorate it the night before?
It’s best to wait until shortly before serving to add the whipped cream and fresh fruit. This keeps everything looking bright, fresh, and picture-perfect.
Final Thoughts
This No-Bake 4th of July Cherry Cheesecake Icebox Cake is everything you could want in a summer dessert. It’s creamy, light, fruity, and incredibly easy to prepare, making it a stress-free option for busy holidays and family gatherings.
The layers of fluffy cheesecake filling, soft graham crackers, and sweet cherry topping create a dessert that’s rich without feeling heavy. Best of all, it tastes even better after an overnight chill, so you can prepare it ahead of time and focus on enjoying your celebration.
Whether you’re hosting a backyard barbecue, bringing dessert to a potluck, or creating a festive Independence Day spread, this icebox cake is sure to impress. Its bright red cherries, fluffy white whipped cream, and pops of blue from fresh berries and candy stars make every slice as beautiful as it is delicious.
Once you make this recipe, it’s likely to become a family favorite that everyone looks forward to year after year. Keep it in your collection of summer desserts, and you’ll always have an easy, crowd-pleasing treat ready for every patriotic celebration.

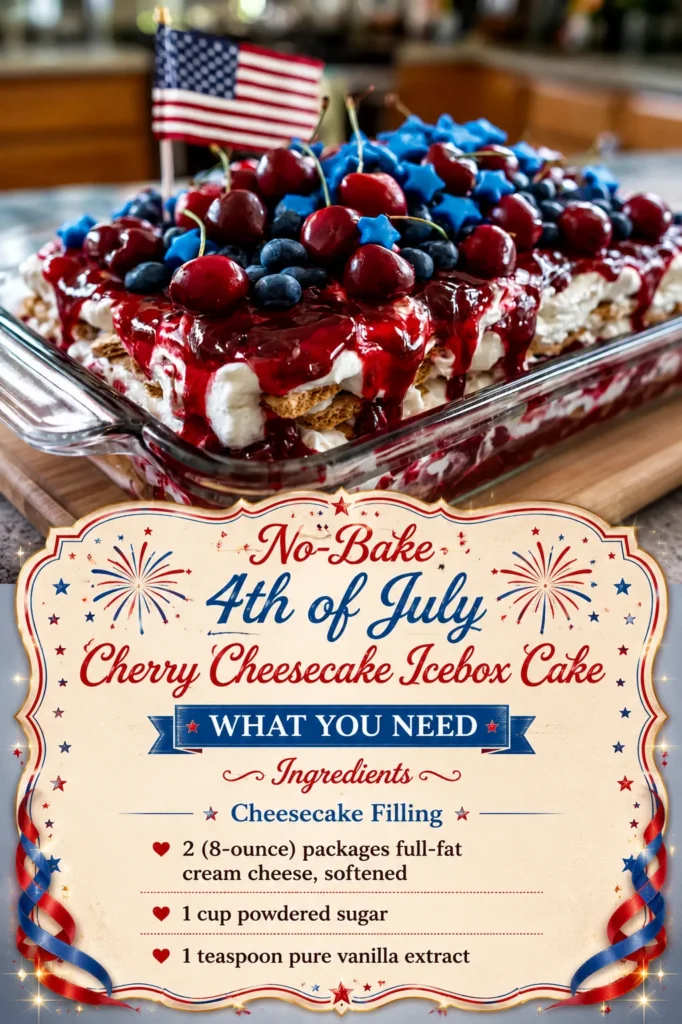
No-Bake 4th of July Cherry Cheesecake Icebox Cake
Ingredients
Cheesecake Filling
- 2 (8-ounce) packages full-fat cream cheese, softened
- 1 cup powdered sugar
- 1 teaspoon pure vanilla extract
- 1 teaspoon almond extract (optional)
- 1 (3.4-ounce) package instant cheesecake pudding mix (or instant vanilla pudding mix)
- ½ cup cold whole milk
- 2 cups heavy whipping cream
- ¼ cup powdered sugar
Layers
- 1 (14.4-ounce) box honey graham crackers
Cherry Topping
- 2 (21-ounce) cans cherry pie filling
Decoration
- 1 cup heavy whipping cream
- 2 tablespoons powdered sugar
- Fresh whole cherries
- Fresh blueberries
- Blue candy stars or blue star sprinkles
- Small American flag pick (optional)
Instructions
Step 1: Prepare the Cheesecake Base
In a large mixing bowl, beat the softened cream cheese with an electric mixer until completely smooth and creamy, about 2–3 minutes.
Add the powdered sugar, vanilla extract, and almond extract (if using). Beat again until the mixture is light, fluffy, and free of lumps.
Step 2: Make the Pudding Mixture
In a separate bowl, whisk together the instant cheesecake pudding mix and cold whole milk for about 2 minutes, or until it begins to thicken.
Pour the pudding mixture into the cream cheese mixture and beat until fully combined and silky smooth.
Step 3: Fold in the Whipped Cream
In a chilled mixing bowl, whip the 2 cups of heavy whipping cream with the ¼ cup powdered sugar until stiff peaks form.
Using a rubber spatula, gently fold the whipped cream into the cheesecake mixture until fully incorporated. Fold carefully to keep the filling light, airy, and fluffy.
Step 4: Assemble the Icebox Cake
Spread a thin layer of the cheesecake filling across the bottom of a 9×13-inch glass baking dish.
Arrange a single layer of graham crackers over the filling, breaking the crackers as needed to fit.
Spread one-third of the cheesecake filling evenly over the graham crackers.
Top with one-third of the cherry pie filling.
Repeat the layers two more times in this order:
- Graham crackers
- Cheesecake filling
- Cherry pie filling
Finish with a generous final layer of cherry pie filling, allowing some of the glossy cherries to naturally cascade toward the edges for a beautiful presentation.
Step 5: Chill
Cover the baking dish tightly with plastic wrap or aluminum foil.
Refrigerate for at least 8 hours, preferably overnight.
This allows the graham crackers to soften into tender cake-like layers while the cheesecake filling sets perfectly.
Step 6: Decorate
Just before serving, whip the remaining 1 cup heavy whipping cream with the 2 tablespoons powdered sugar until stiff peaks form.
Transfer the whipped cream to a piping bag fitted with a large star tip.
Pipe decorative swirls around the edges of the cake.
Finish by decorating with:
- Fresh whole cherries
- Fresh blueberries
- Blue candy stars or blue star sprinkles
- A small American flag pick (optional)
Step 7: Serve
Slice with a sharp knife, wiping the blade clean between each cut for neat, beautiful layers.
Serve chilled and enjoy!
Notes
Chill overnight for the best texture and clean slices.
Full-fat cream cheese creates the richest, creamiest filling.
Instant cheesecake pudding gives the filling extra stability, but vanilla pudding works well too.
Keep refrigerated until ready to serve.
Store leftovers covered in the refrigerator for up to 4 days.
This dessert is not freezer-friendly, as the texture of the whipped filling may change after thawing.